Owners Guide
Page 1
Change 1 PIP Function Page Page 33, Added note about PIP message Change 2 Specification Page Page 85, Added notes related to P60X901 Change 3 Accessories Page Page 4, Added P60X901 Fixed Stand p/n PLASMA TELEVISION Spanish Section 91~179 Click Here Operating Guide for P50X901 and P60X901 IMPORTANT SAFETY INSTRUCTIONS 2-3 ACCESSORIES...4 FIRST TIME USE ...4-25 THE REMOTE CONTROL...26-43 ON-SCREEN DISPLAY ...44-81 USEFUL INFORMATION...82-89 SPECIFICATIONS...85 OPERATING GUIDE IN SPANISH 91-179 END USER LICENSE AGREEMENT FOR HITACHI DTV SOFTWARE 180-188 APPENDIXES...189-190 INDEX...191
Change 1 PIP Function Page Page 33, Added note about PIP message Change 2 Specification Page Page 85, Added notes related to P60X901 Change 3 Accessories Page Page 4, Added P60X901 Fixed Stand p/n PLASMA TELEVISION Spanish Section 91~179 Click Here Operating Guide for P50X901 and P60X901 IMPORTANT SAFETY INSTRUCTIONS 2-3 ACCESSORIES...4 FIRST TIME USE ...4-25 THE REMOTE CONTROL...26-43 ON-SCREEN DISPLAY ...44-81 USEFUL INFORMATION...82-89 SPECIFICATIONS...85 OPERATING GUIDE IN SPANISH 91-179 END USER LICENSE AGREEMENT FOR HITACHI DTV SOFTWARE 180-188 APPENDIXES...189-190 INDEX...191
Owners Guide
Page 2
...moisture, does not operate RISK OF ELECTRIC SHOCK DO NOT OPEN normally, or has been dropped. 15.Televisions are YOUR HITACHI PLASMA TELEVISION provided for long periods of electric shock to grounding electrodes and requirements for wall, shelf or ceiling mounting as power...CATV system installer's attention to the receiver be located in the literature accompanying the appliance. A polarized plug has two system of HITACHI plasma televisions. A grounding entry as to provide some protection against voltage surges and The exclamation point within the product's enclosure that produce...
...moisture, does not operate RISK OF ELECTRIC SHOCK DO NOT OPEN normally, or has been dropped. 15.Televisions are YOUR HITACHI PLASMA TELEVISION provided for long periods of electric shock to grounding electrodes and requirements for wall, shelf or ceiling mounting as power...CATV system installer's attention to the receiver be located in the literature accompanying the appliance. A polarized plug has two system of HITACHI plasma televisions. A grounding entry as to provide some protection against voltage surges and The exclamation point within the product's enclosure that produce...
Owners Guide
Page 3
Never connect the plasma television to 50 Hz, direct current, or anything other sources, may require the use the plasma television's (polarized) plug with applicable environmental laws. Public viewing of copyrighted material Public viewing of programs broadcast by TV stations and cable ... authorization from other than 2.5 minutes, protection function will restore after moving ) patterns can be permanently imprinted onto your HITACHI Factory Warranty. Certain advanced and interactive digital cable services such as the disconnect device and shall remain readily operable. Note...
Never connect the plasma television to 50 Hz, direct current, or anything other sources, may require the use the plasma television's (polarized) plug with applicable environmental laws. Public viewing of copyrighted material Public viewing of programs broadcast by TV stations and cable ... authorization from other than 2.5 minutes, protection function will restore after moving ) patterns can be permanently imprinted onto your HITACHI Factory Warranty. Certain advanced and interactive digital cable services such as the disconnect device and shall remain readily operable. Note...
Owners Guide
Page 4
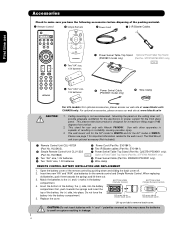
...web site at: www.hitachi.us/tv CANADA only: For optional accessories, please access our web site at: www.hitachi.ca/tv CAUTION: 1. The Wall... BOTTOM VIEW (Simple Remote Control) 4. CAUTION: Do not insert batteries with Hitachi P50X901. Insert the bottom of the battery, the (-) side, into the battery...Two IR Blaster cables (Part No. SELECT VOL + MUTE CH - This plasma television product is WM07S and for use Accessories Check to make sure you have ... from vertical. 2. The wall mount unit for the 50" model is designed for important information related to the (+) and ...
...web site at: www.hitachi.us/tv CANADA only: For optional accessories, please access our web site at: www.hitachi.ca/tv CAUTION: 1. The Wall... BOTTOM VIEW (Simple Remote Control) 4. CAUTION: Do not insert batteries with Hitachi P50X901. Insert the bottom of the battery, the (-) side, into the battery...Two IR Blaster cables (Part No. SELECT VOL + MUTE CH - This plasma television product is WM07S and for use Accessories Check to make sure you have ... from vertical. 2. The wall mount unit for the 50" model is designed for important information related to the (+) and ...
Owners Guide
Page 5
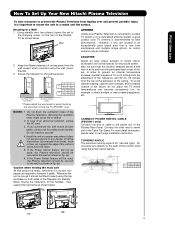
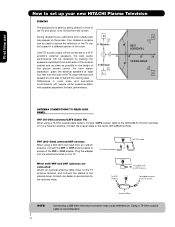
..., etc. 30 cm (12 inches) 10 cm (4 inches) 10 cm (4 inches) CONNECT POWER SWIVEL CABLE (P50X901 only) Connect one end of cable to the swivel slot of the Plasma Rear Panel. Secure the television to next page installation instruction. Do not install by yourself. 4. In order to ...fasten the set failure, do not place the TV where temperatures can become excessively hot, for professional installer. D 27.5 cm 39 cm 60" 50" 5 First time use How To Set Up Your New Hitachi Plasma Television To take measures to prevent the Plasma Television from tipping over and prevent possible injury ...
..., etc. 30 cm (12 inches) 10 cm (4 inches) 10 cm (4 inches) CONNECT POWER SWIVEL CABLE (P50X901 only) Connect one end of cable to the swivel slot of the Plasma Rear Panel. Secure the television to next page installation instruction. Do not install by yourself. 4. In order to ...fasten the set failure, do not place the TV where temperatures can become excessively hot, for professional installer. D 27.5 cm 39 cm 60" 50" 5 First time use How To Set Up Your New Hitachi Plasma Television To take measures to prevent the Plasma Television from tipping over and prevent possible injury ...
Owners Guide
Page 6
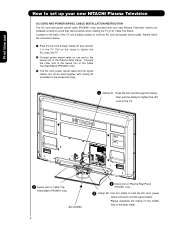
...cord to the TV. · Connect power swivel cable on one end to hold the AC cord and power swivel cable. First time use How to set up your new HITACHI Plasma Television AC CORD AND POWER SWIVEL CABLE INSTALLATION INSTRUCTION The AC cord and power swivel cable (P50X901 only) provided ...with your new Plasma Television need to be held together with Clamp #2 (included on the accesories bag...
...cord to the TV. · Connect power swivel cable on one end to hold the AC cord and power swivel cable. First time use How to set up your new HITACHI Plasma Television AC CORD AND POWER SWIVEL CABLE INSTALLATION INSTRUCTION The AC cord and power swivel cable (P50X901 only) provided ...with your new Plasma Television need to be held together with Clamp #2 (included on the accesories bag...
Owners Guide
Page 7
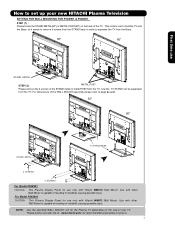
... on the back of the WALL MOUNT assembly please refer to page 86 & 87. 50" 60" STAND METAL TV STAND BASE 4 SCREWS 4 SCREWS For Model P50X901 CAUTION- For Model P60X901 CAUTION- Use with Hitachi WM07L Wall Mount. This Plasma Display Panel for use STAND METAL STEP (2): METAL POST Please remove the 4 screws of resulting in...
... on the back of the WALL MOUNT assembly please refer to page 86 & 87. 50" 60" STAND METAL TV STAND BASE 4 SCREWS 4 SCREWS For Model P50X901 CAUTION- For Model P60X901 CAUTION- Use with Hitachi WM07L Wall Mount. This Plasma Display Panel for use STAND METAL STEP (2): METAL POST Please remove the 4 screws of resulting in...
Owners Guide
Page 8
... both VHF and UHF antennas are connected Attach an optional antenna cable mixer to the TV antenna terminal, and connect the cables to the same AIR/CABLE terminal. Consult your new HITACHI Plasma Television VIEWING The best picture is recommended. Differences in room sizes and acoustical environments will...antenna When using a 75-Ohm coaxial cable system, connect CATV coaxial cable to the AIR/CABLE (75-Ohm) terminal. R 4" Minimum If the TV's audio output will be obtained by sitting directly in a different section of the room. AIR / CABLE To CATV cable or To outdoor antenna AIR ...
... both VHF and UHF antennas are connected Attach an optional antenna cable mixer to the TV antenna terminal, and connect the cables to the same AIR/CABLE terminal. Consult your new HITACHI Plasma Television VIEWING The best picture is recommended. Differences in room sizes and acoustical environments will...antenna When using a 75-Ohm coaxial cable system, connect CATV coaxial cable to the AIR/CABLE (75-Ohm) terminal. R 4" Minimum If the TV's audio output will be obtained by sitting directly in a different section of the room. AIR / CABLE To CATV cable or To outdoor antenna AIR ...
Owners Guide
Page 9
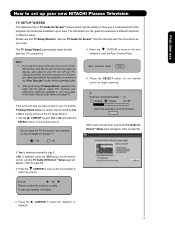
... adding the channels available in your area refer to the Auto Channel Scan feature on . 4. Do you turn on the remote control and the TV Guide ON ScreenTM Setup page will appear (refer to page 54). Air Scanning Channel Number : 12 Analog Digital 12-123 Scan time may take... find all of this Operating Guide. 2. Yes No Auto Channel Scan : Start 5. Please use How to set up your new HITACHI Plasma Television TV SETUP WIZARD This television has a TV Guide On ScreenTM feature which has the ability to show you have turned on your area. If this page will not appear...
... adding the channels available in your area refer to the Auto Channel Scan feature on . 4. Do you turn on the remote control and the TV Guide ON ScreenTM Setup page will appear (refer to page 54). Air Scanning Channel Number : 12 Analog Digital 12-123 Scan time may take... find all of this Operating Guide. 2. Yes No Auto Channel Scan : Start 5. Please use How to set up your new HITACHI Plasma Television TV SETUP WIZARD This television has a TV Guide On ScreenTM feature which has the ability to show you have turned on your area. If this page will not appear...
Owners Guide
Page 10
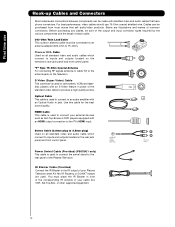
... input connector types required by the various components and the length of the Plasma Television. Use this cable for the best sound quality. AUDIO OUT 3.8mm STEREO MINI-PLUG 2 RCA TYPE PLUGS Power Swivel Cable (Provided) (P50X901 only) This cable is used to connect to inputs and outputs located on...made with shielded video and audio cables that sell audio/video products. "F" Type 75-Ohm Coaxial Antenna For connecting RF signals (antenna or cable TV) to the TV's HDMI input. Stereo Cable (3.8mm plug to 3.5mm plug) Used on the rear jack panel and front control panel. You must be ...
... input connector types required by the various components and the length of the Plasma Television. Use this cable for the best sound quality. AUDIO OUT 3.8mm STEREO MINI-PLUG 2 RCA TYPE PLUGS Power Swivel Cable (Provided) (P50X901 only) This cable is used to connect to inputs and outputs located on...made with shielded video and audio cables that sell audio/video products. "F" Type 75-Ohm Coaxial Antenna For connecting RF signals (antenna or cable TV) to the TV's HDMI input. Stereo Cable (3.8mm plug to 3.5mm plug) Used on the rear jack panel and front control panel. You must be ...
Owners Guide
Page 11
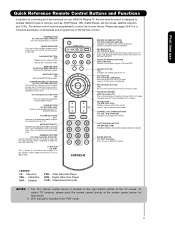
... of the Remote Control. MUTE BUTTON (TV) Reduces the audio level to 50% if pressed once, and to restore audio level. FAVORITE CHANNEL (FAV CH) button (TV) Press to enter/access Favorite Channel (FAV CH) mode. (Favorite channel is used for a complete description of all of your HITACHI Plasma TV, the new remote control is in...
... of the Remote Control. MUTE BUTTON (TV) Reduces the audio level to 50% if pressed once, and to restore audio level. FAVORITE CHANNEL (FAV CH) button (TV) Press to enter/access Favorite Channel (FAV CH) mode. (Favorite channel is used for a complete description of all of your HITACHI Plasma TV, the new remote control is in...
Owners Guide
Page 12
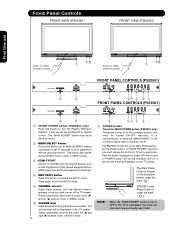
...INPUT PUSH EJECT ቩ ቤ ቭ FRONT PANEL CONTROLS (P60X901) PHOTO INPUT PUSH EJECT ቩ ቤ ቢ FRONT POWER button (P50X901 only) Press this button to access the INPUT menu. This button also serves as the SELECT button when in MENU mode. ቤ HDMI-FRONT Use ... this button is set or wall outlet. When the "MAIN POWER" button is pressed for a period until the picture appears on the TV screen. Press again to turn the Plasma Television ON/OFF. These buttons also serve as the cursor down (̄) and up (̆) buttons when in MENU mode. ቧ ...
...INPUT PUSH EJECT ቩ ቤ ቭ FRONT PANEL CONTROLS (P60X901) PHOTO INPUT PUSH EJECT ቩ ቤ ቢ FRONT POWER button (P50X901 only) Press this button to access the INPUT menu. This button also serves as the SELECT button when in MENU mode. ቤ HDMI-FRONT Use ... this button is set or wall outlet. When the "MAIN POWER" button is pressed for a period until the picture appears on the TV screen. Press again to turn the Plasma Television ON/OFF. These buttons also serve as the cursor down (̄) and up (̆) buttons when in MENU mode. ቧ ...

Owners Guide
Page 13
... Lamp Power Status Operating Off * OFF. picture is ON ; Lights Blue On TV POWER is shown. Your HITACHI Plasma TV will illuminate. Remote Control cannot turn the TV ON, press the main power switch located on the lower right side of the TV. Lights Red OFF. (Stand-by) When the main power switch on the lower...-by mode (lights red) when not in use. 2. Check the Power Light to Off. When the main power switch is set to make sure the TV is for P50X901 model ; A red stand-by indicator lamp located on the...
... Lamp Power Status Operating Off * OFF. picture is ON ; Lights Blue On TV POWER is shown. Your HITACHI Plasma TV will illuminate. Remote Control cannot turn the TV ON, press the main power switch located on the lower right side of the TV. Lights Red OFF. (Stand-by) When the main power switch on the lower...-by mode (lights red) when not in use. 2. Check the Power Light to Off. When the main power switch is set to make sure the TV is for P50X901 model ; A red stand-by indicator lamp located on the...

Owners Guide
Page 14
.... In this case, connect the components B-Y output to the TV's PB input and the components R-Y output to the TV's PR input. 4. It may be labeled Y, B-Y, and ...ቦ S-VIDEO Input 1 Input 1 provide S-VIDEO (Super Video) jacks for connecting equipment with your Plasma Television's remote control. (For reference see page 46). 5. NOTE: 1. To ensure no copyright infringement,...quality when using the Y-PBPR inputs (see pages 24-25). ቫ Power Swivel Connector (P50X901 only) Connect from Dolby Laboratories. HDMI enables the secure distribution of S-VIDEO type. ቧ ...
.... In this case, connect the components B-Y output to the TV's PB input and the components R-Y output to the TV's PR input. 4. It may be labeled Y, B-Y, and ...ቦ S-VIDEO Input 1 Input 1 provide S-VIDEO (Super Video) jacks for connecting equipment with your Plasma Television's remote control. (For reference see page 46). 5. NOTE: 1. To ensure no copyright infringement,...quality when using the Y-PBPR inputs (see pages 24-25). ቫ Power Swivel Connector (P50X901 only) Connect from Dolby Laboratories. HDMI enables the secure distribution of S-VIDEO type. ቧ ...

Owners Guide
Page 17
... device cables will be made from coaxial shielded wire. However, you do not, the played back picture may need to modify them to accommodate your Plasma TV is dependent on the model and features of each component for the location of your choice (see page 29). OUTPUT Video L R Video Game COMPOSITE.... 17 Connecting External Video Sources The FRONT panel jacks are offered as shown in the following examples: FRONT INPUT PANEL PHOTO INPUT PUSH EJECT P50X901 model FRONT panel picture shown here Note : For Monoaural devices, please connect Audio signal cable into L/Mono input jack .
... device cables will be made from coaxial shielded wire. However, you do not, the played back picture may need to modify them to accommodate your Plasma TV is dependent on the model and features of each component for the location of your choice (see page 29). OUTPUT Video L R Video Game COMPOSITE.... 17 Connecting External Video Sources The FRONT panel jacks are offered as shown in the following examples: FRONT INPUT PANEL PHOTO INPUT PUSH EJECT P50X901 model FRONT panel picture shown here Note : For Monoaural devices, please connect Audio signal cable into L/Mono input jack .
Owners Guide
Page 23
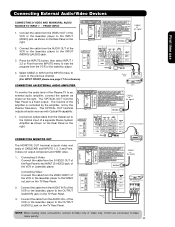
...Connecting Video: Connect the cable from the Rear Panel is controlled by the amplifier, not by the Plasma Television. Connect the cable from the Optical out to the OUTPUT (AUDIO/R) jack on the TV Rear Panel. 2. Connect the cable from the S-VIDEO OUT of the Rear Panel to the ...INPUTS 1, 2, 3 and Front. It does not output component and HDMI video. 1. Connecting S-Video: Connect the cable from the AUDIO IN L of the Plasma TV to the previous channel. (For INPUT FRONT please see page 17 for reference). Connect the cable from the INPUTS menu to return to an external...
...Connecting Video: Connect the cable from the Rear Panel is controlled by the amplifier, not by the Plasma Television. Connect the cable from the Optical out to the OUTPUT (AUDIO/R) jack on the TV Rear Panel. 2. Connect the cable from the S-VIDEO OUT of the Rear Panel to the ...INPUTS 1, 2, 3 and Front. It does not output component and HDMI video. 1. Connecting S-Video: Connect the cable from the AUDIO IN L of the Plasma TV to the previous channel. (For INPUT FRONT please see page 17 for reference). Connect the cable from the INPUTS menu to return to an external...

Owners Guide
Page 24
...Rear Panel has two IR OUT terminals which can use Connecting External Video Sources Your HITACHI Plasma Television is setup, it allows your IR Blaster cable to control your equipment using your Hitachi Plasma Television and external Audio/Video equipment (VCR and DVD Player). First time use your ... channel scroll to select. 7. Please see the following example of the Audio/Video components for each of an AV Net setup between your HITACHI Plasma TV Remote Control. Use the CURSOR PAD ̄ or channel scroll down to control your external Audio/Video equipment (VCR, Set Top Box,...
...Rear Panel has two IR OUT terminals which can use Connecting External Video Sources Your HITACHI Plasma Television is setup, it allows your IR Blaster cable to control your equipment using your Hitachi Plasma Television and external Audio/Video equipment (VCR and DVD Player). First time use your ... channel scroll to select. 7. Please see the following example of the Audio/Video components for each of an AV Net setup between your HITACHI Plasma TV Remote Control. Use the CURSOR PAD ̄ or channel scroll down to control your external Audio/Video equipment (VCR, Set Top Box,...
Owners Guide
Page 25
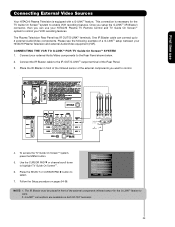
... ̈ button to highlight TV Guide On ScreenTM. 6. V L R INPUT V L R OUTPUT Infrared Sensor VCR IR Blaster 4. Follow the Setup procedure on both IR OUT terminals. 25 One IR Blaster cable can use Connecting External Video Sources Your HITACHI Plasma Television is necessary for the ...G-LINKTM feature to work. 2. The Plasma Television Rear Panel has IR OUT/G-LINKTM terminals. First time use your HITACHI Plasma TV Remote Control and TV Guide On ScreenTM system to control your VCR...
... ̈ button to highlight TV Guide On ScreenTM. 6. V L R INPUT V L R OUTPUT Infrared Sensor VCR IR Blaster 4. Follow the Setup procedure on both IR OUT terminals. 25 One IR Blaster cable can use Connecting External Video Sources Your HITACHI Plasma Television is necessary for the ...G-LINKTM feature to work. 2. The Plasma Television Rear Panel has IR OUT/G-LINKTM terminals. First time use your HITACHI Plasma TV Remote Control and TV Guide On ScreenTM system to control your VCR...
Owners Guide
Page 26
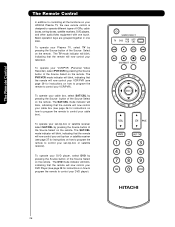
...Control The Remote Control In addition to controlling all the functions on your HITACHI Plasma TV, the new remote control is designed to operate different types of VCRs, ...of the Source Select on the remote. To operate your set -top-box or satellite receiver). The TV mode indicator will blink, indicating that the remote will now control your VCR/PVR). The SAT/CBL...-boxes, satellite receivers, DVD players, and other audio/video equipment with one area. To operate your Plasma TV, select TV by pressing the Source button of the Source Select on the remote. To operate your DVD player)....
...Control The Remote Control In addition to controlling all the functions on your HITACHI Plasma TV, the new remote control is designed to operate different types of VCRs, ...of the Source Select on the remote. To operate your set -top-box or satellite receiver). The TV mode indicator will blink, indicating that the remote will now control your VCR/PVR). The SAT/CBL...-boxes, satellite receivers, DVD players, and other audio/video equipment with one area. To operate your Plasma TV, select TV by pressing the Source button of the Source Select on the remote. To operate your DVD player)....

Owners Guide
Page 29
...button to check the channel being used. Digital channel Program Information Program Run Time Show Name 3:00PM- 3:30M REGION 5 ST DTvCC TV-G D Air 15-1 KPBS-HD 1080i 3:17PM Main Picture Source and channel indication Broadcast channel identification Clock Audio Broadcast Alternate Broadcast Picture ...again for a more detailed description) Auto Closed Caption setting When an S-VIDEO Input is connected to access the Channel Guide of the Plasma TV (see page 54-56). Program Information, Program Run Time and Program Description can be set . Use the CURSOR and SELECT buttons...
...button to check the channel being used. Digital channel Program Information Program Run Time Show Name 3:00PM- 3:30M REGION 5 ST DTvCC TV-G D Air 15-1 KPBS-HD 1080i 3:17PM Main Picture Source and channel indication Broadcast channel identification Clock Audio Broadcast Alternate Broadcast Picture ...again for a more detailed description) Auto Closed Caption setting When an S-VIDEO Input is connected to access the Channel Guide of the Plasma TV (see page 54-56). Program Information, Program Run Time and Program Description can be set . Use the CURSOR and SELECT buttons...


