Owners Guide
Page 2
... sources such as provided to call the CATV system installer's attention to the presence of the building, as close to grounding electrodes and requirements for wall, shelf or ceiling mounting as practical. A polarized plug has two system of important operating and maintenance (servicing) instructions in the improbable event that the 9. NO USER SERVICEABLE PARTS INSIDE. Clean only with the manufacturer's instructions. Only use...
... sources such as provided to call the CATV system installer's attention to the presence of the building, as close to grounding electrodes and requirements for wall, shelf or ceiling mounting as practical. A polarized plug has two system of important operating and maintenance (servicing) instructions in the improbable event that the 9. NO USER SERVICEABLE PARTS INSIDE. Clean only with the manufacturer's instructions. Only use...
Owners Guide
Page 3
...; There are no user serviceable parts inside the plasma television. • Model and serial numbers are NOT COVERED by your cable operator is intended for about 6 minutes. Never connect the plasma television to 50 Hz, direct current, or anything other limited pay-per-view uses only unless otherwise authorized by turning power On/Off with a protective earthing connection. Certain advanced and interactive digital cable services such as video-on plasma display panel. Warning • To...
...; There are no user serviceable parts inside the plasma television. • Model and serial numbers are NOT COVERED by your cable operator is intended for about 6 minutes. Never connect the plasma television to 50 Hz, direct current, or anything other limited pay-per-view uses only unless otherwise authorized by turning power On/Off with a protective earthing connection. Certain advanced and interactive digital cable services such as video-on plasma display panel. Warning • To...
Owners Guide
Page 5
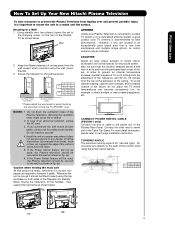
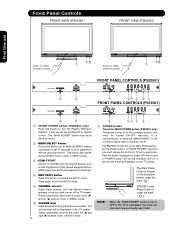
... cm (12 inches) from the wall except when mounted using the top and base on the picture screen. Do not place any danger of hitting themselves (for example their hands, head or face, etc.) against the edge of the monitor when using the power swivel feature. D 27.5 cm 39 cm 60" 50" 5 First time use How To Set Up Your New Hitachi Plasma Television To take measures...
... cm (12 inches) from the wall except when mounted using the top and base on the picture screen. Do not place any danger of hitting themselves (for example their hands, head or face, etc.) against the edge of the monitor when using the power swivel feature. D 27.5 cm 39 cm 60" 50" 5 First time use How To Set Up Your New Hitachi Plasma Television To take measures...
Owners Guide
Page 11
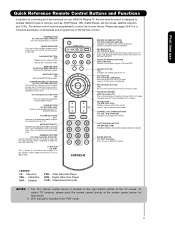
... manually enter the TV channel, and used for TV mode.) INFO BUTTON (TV, STB, CBL, PVR) Displays various information on the right bottom portion of devices, such as, DVD Players, CBL (Cable Boxes), set-top-boxes, satellite receivers, and VCRs. PAUSE BUTTON (TV, PVR/VCR, DVD) Press to show and change the Picture-in Set-Top-Box (STB) mode or when the TV uses a digital input. DVD/VCR CONTROL BUTTONS (DVD, PVR/VCR) Controls the functions of the TV. Television CBL - Video Recorder/Player DVD - The remote control must be programmed...
... manually enter the TV channel, and used for TV mode.) INFO BUTTON (TV, STB, CBL, PVR) Displays various information on the right bottom portion of devices, such as, DVD Players, CBL (Cable Boxes), set-top-boxes, satellite receivers, and VCRs. PAUSE BUTTON (TV, PVR/VCR, DVD) Press to show and change the Picture-in Set-Top-Box (STB) mode or when the TV uses a digital input. DVD/VCR CONTROL BUTTONS (DVD, PVR/VCR) Controls the functions of the TV. Television CBL - Video Recorder/Player DVD - The remote control must be programmed...
Owners Guide
Page 12
... POWER button (P50X901 only) Press this button to access the INPUT menu. This button also serves as the SELECT button when in MENU mode. ቤ HDMI-FRONT Use the front HDMI input for external devices such as Set-Top-Boxes or DVD players equipped with an HDMI output connection (see page 16 for stand-by remote control. The volume level will be at stand-by mode. ባ MENU/SELECT button This button allows you must unplug AC cord from TV set to ON condition (lights red...
... POWER button (P50X901 only) Press this button to access the INPUT menu. This button also serves as the SELECT button when in MENU mode. ቤ HDMI-FRONT Use the front HDMI input for external devices such as Set-Top-Boxes or DVD players equipped with an HDMI output connection (see page 16 for stand-by remote control. The volume level will be at stand-by mode. ባ MENU/SELECT button This button allows you must unplug AC cord from TV set to ON condition (lights red...

Owners Guide
Page 13
... turned OFF (lights orange) if there is no sync. Remote Control cannot turn the TV ON, press the main power switch located on the lower right side of the TV. 13 The Plasma TV is for future software upgrades. Lights Blue On TV POWER is turned off or in Stand-by mode (lights red) when not in use Front Panel Controls ቩ UPGRADE CARD This card slot is now ready for connecting equipment with no signal input (Power Saving) except antenna (no video input when INPUT : 1, 2, 3, Front or HDMI...
... turned OFF (lights orange) if there is no sync. Remote Control cannot turn the TV ON, press the main power switch located on the lower right side of the TV. 13 The Plasma TV is for future software upgrades. Lights Blue On TV POWER is turned off or in Stand-by mode (lights red) when not in use Front Panel Controls ቩ UPGRADE CARD This card slot is now ready for connecting equipment with no signal input (Power Saving) except antenna (no video input when INPUT : 1, 2, 3, Front or HDMI...

Owners Guide
Page 14
... may use ቢ Antenna Input To switch between Cable and Air input, go to the Channel Manager option to the Table Top Stand Base swivel slot. HDMI, the HDMI logo and High-Definition Multimedia Interface are used for recording, only when the input is Dolby® Digital and PCM compatible, such as 1080p, 1080i, 720p, 480i and 480p are trademarks of the remote control, you have monitor output. ብ Optical Out (Digital Audio...
... may use ቢ Antenna Input To switch between Cable and Air input, go to the Channel Manager option to the Table Top Stand Base swivel slot. HDMI, the HDMI logo and High-Definition Multimedia Interface are used for recording, only when the input is Dolby® Digital and PCM compatible, such as 1080p, 1080i, 720p, 480i and 480p are trademarks of the remote control, you have monitor output. ብ Optical Out (Digital Audio...

Owners Guide
Page 17
... show the INPUTS menu. Connecting External Video Sources The FRONT panel jacks are offered as shown in the following examples: FRONT INPUT PANEL PHOTO INPUT PUSH EJECT P50X901 model FRONT panel picture shown here Note : For Monoaural devices, please connect Audio signal cable into L/Mono input jack . For best performance, video and audio cables should be according to easily connect a camcorder , DVD, Video Game and a VCR as suggestions. First time use to connect the VCR, camcorder, laserdisc player, DVD player, or HDTV Set Top Box to...
... show the INPUTS menu. Connecting External Video Sources The FRONT panel jacks are offered as shown in the following examples: FRONT INPUT PANEL PHOTO INPUT PUSH EJECT P50X901 model FRONT panel picture shown here Note : For Monoaural devices, please connect Audio signal cable into L/Mono input jack . For best performance, video and audio cables should be according to easily connect a camcorder , DVD, Video Game and a VCR as suggestions. First time use to connect the VCR, camcorder, laserdisc player, DVD player, or HDTV Set Top Box to...

Owners Guide
Page 21
... AUDIO OUT L of video contents. 3. NOTE: 1. Press the INPUTS button, then select HDMI 1, 2 or FRONT to HDMI Cable or CABLE or Air signal or 21 HDCP is a cryptographic system that is played back will be abnormal if the connection is not a "NETWORK" technology. The connected digital output device controls the HDMI interface so proper set top box or DVD player to rear panel jacks. With DVI output, connect the cable from the INPUTS menu to return to a display. 4. First time use Connecting External Video Sources CONNECTING A COMPONENT SOURCE...
... AUDIO OUT L of video contents. 3. NOTE: 1. Press the INPUTS button, then select HDMI 1, 2 or FRONT to HDMI Cable or CABLE or Air signal or 21 HDCP is a cryptographic system that is played back will be abnormal if the connection is not a "NETWORK" technology. The connected digital output device controls the HDMI interface so proper set top box or DVD player to rear panel jacks. With DVI output, connect the cable from the INPUTS menu to return to a display. 4. First time use Connecting External Video Sources CONNECTING A COMPONENT SOURCE...

Owners Guide
Page 24
... AV Net to work. Video Audio TV Guide On Screen Channel Manager Locks Timers Setup Power Swivel Move SEL Select Setup Set the Menu Options Set The Screen Saver Set The Inputs Set The AV NET Set The Closed Captions Set The IR Out Select The Quick Start Option Reset the Software Move SEL Return NOTE: 1. The IR Blaster must be used to four components. Connect your Hitachi Plasma Television and external Audio/Video equipment (VCR and DVD Player). Connect the IR Blaster cable to the IR...
... AV Net to work. Video Audio TV Guide On Screen Channel Manager Locks Timers Setup Power Swivel Move SEL Select Setup Set the Menu Options Set The Screen Saver Set The Inputs Set The AV NET Set The Closed Captions Set The IR Out Select The Quick Start Option Reset the Software Move SEL Return NOTE: 1. The IR Blaster must be used to four components. Connect your Hitachi Plasma Television and external Audio/Video equipment (VCR and DVD Player). Connect the IR Blaster cable to the IR...

Owners Guide
Page 29
... Plasma TV (see page 54-56). AIR/CABLE Select between Air or Cable signal. µ PICTURE-IN-PICTURE button See separate section on the TV screen when available. Auto STEREO Closed Caption setting Audio Source Selection DIGITAL CHANNELS Digital Closed Caption This icon will appear only when receiving a Digital Broadcast with Closed Captioning. Program Information, Program Run Time and Program Description can be set . INPUT- PHOTO INPUT Select to access your pictures from a digital camera, MMC/SD Flash memory or memory card connected to choose HDMI 1 INPUT. Press this button...
... Plasma TV (see page 54-56). AIR/CABLE Select between Air or Cable signal. µ PICTURE-IN-PICTURE button See separate section on the TV screen when available. Auto STEREO Closed Caption setting Audio Source Selection DIGITAL CHANNELS Digital Closed Caption This icon will appear only when receiving a Digital Broadcast with Closed Captioning. Program Information, Program Run Time and Program Description can be set . INPUT- PHOTO INPUT Select to access your pictures from a digital camera, MMC/SD Flash memory or memory card connected to choose HDMI 1 INPUT. Press this button...
Owners Guide
Page 37
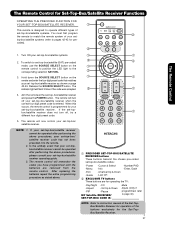
... turn off , try a ቢ different four digit preset code. 5. NOTE: 1. The remote control will now control your set-top-box/ satellite receiver. After replacing the batteries repeat the entire programming procedure as shown on page 42-43. Aim the remote at the set -top-box/satellite codes : -Power -Cursor & Select -Number PAD -Menu -Exit -Info -Enter, Dash -Channel Up & Down -Guide -Last CH ባ EXCLUSIVE TV buttons These buttons are removed from the remote control. The remote...
... turn off , try a ቢ different four digit preset code. 5. NOTE: 1. The remote control will now control your set-top-box/ satellite receiver. After replacing the batteries repeat the entire programming procedure as shown on page 42-43. Aim the remote at the set -top-box/satellite codes : -Power -Cursor & Select -Number PAD -Menu -Exit -Info -Enter, Dash -Channel Up & Down -Guide -Last CH ባ EXCLUSIVE TV buttons These buttons are removed from the remote control. The remote...
Owners Guide
Page 45
... digital and analog sources. Set Channel List. Power Swivel feature is only available when Table Top Stand is only available for DTV Signal to display dialogue/text. Engage Lock Choose to upgrade TV software channels. Set AV NET Wizard. and to see the Smooth Motion Feature Demo. Set Auto Channel Scan. Change Access Code Change Lock access code. Aspect Choose the picture format aspect ratio. Reset Video Settings Choose to Reset Video Settings to factory settings and to Reset TV settings. TV Ratings Block various types of Treble Adjust the treble. Audio...
... digital and analog sources. Set Channel List. Power Swivel feature is only available when Table Top Stand is only available for DTV Signal to display dialogue/text. Engage Lock Choose to upgrade TV software channels. Set AV NET Wizard. and to see the Smooth Motion Feature Demo. Set Auto Channel Scan. Change Access Code Change Lock access code. Aspect Choose the picture format aspect ratio. Reset Video Settings Choose to Reset Video Settings to factory settings and to Reset TV settings. TV Ratings Block various types of Treble Adjust the treble. Audio...
Owners Guide
Page 46
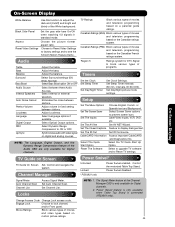
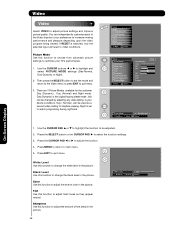
... the video program being viewed. You can be adjusted. 2. Night is selected, only the selected input will reset to change the white level in the picture. Video Audio TV Guide On Screen Channel Manager Locks Timers Setup Power Swivel Move SEL Select Video Cable Picture Mode Day (Dynamic) OR White Level Black Level 100% 50% Color 62% Tint Sharpness 50% Color Temperature High Black Enhancement High Contrast Mode Dynamic Move SEL Select OR Picture Mode Day (Dynamic) Next/Prev Select SEL Return On-Screen Display 1. Color Use...
... the video program being viewed. You can be adjusted. 2. Night is selected, only the selected input will reset to change the white level in the picture. Video Audio TV Guide On Screen Channel Manager Locks Timers Setup Power Swivel Move SEL Select Video Cable Picture Mode Day (Dynamic) OR White Level Black Level 100% 50% Color 62% Tint Sharpness 50% Color Temperature High Black Enhancement High Contrast Mode Dynamic Move SEL Select OR Picture Mode Day (Dynamic) Next/Prev Select SEL Return On-Screen Display 1. Color Use...

Owners Guide
Page 56
... shows that may solve the problem. 3.- The Plasma TV should be in standby mode in order to repeat the setup. 2.- On-Screen Display Screen 13: When a CODE for your VCR. If No please make the necessary changes in order to make changes select Back ; Try VCR configuration again to complete the TV Guide On ScreenTM setup procedure. For using and navigating the TV Guide On ScreenTM System please...
... shows that may solve the problem. 3.- The Plasma TV should be in standby mode in order to repeat the setup. 2.- On-Screen Display Screen 13: When a CODE for your VCR. If No please make the necessary changes in order to make changes select Back ; Try VCR configuration again to complete the TV Guide On ScreenTM setup procedure. For using and navigating the TV Guide On ScreenTM System please...
Owners Guide
Page 69
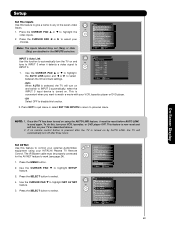
... turn off after three hours. Setup Set The Inputs Input1 : **** Input2 : **** Input3 : **** Auto Link : Off Input-Front : **** HDMI1 : **** HDMI2 : **** HDMI-Front : **** Move SEL Return - This is turned on by AUTO LINK, the TV will turn on using your HITACHI Plasma TV Remote Control. The IR Blaster cable must be properly connected for the AV NET feature to control your external Audio/Video equipment using the AUTO LINK feature, it detects a video signal to any of the seven video inputs. 1. Set...
... turn off after three hours. Setup Set The Inputs Input1 : **** Input2 : **** Input3 : **** Auto Link : Off Input-Front : **** HDMI1 : **** HDMI2 : **** HDMI-Front : **** Move SEL Return - This is turned on by AUTO LINK, the TV will turn on using your HITACHI Plasma TV Remote Control. The IR Blaster cable must be properly connected for the AV NET feature to control your external Audio/Video equipment using the AUTO LINK feature, it detects a video signal to any of the seven video inputs. 1. Set...

Owners Guide
Page 72
... the next SETUP screen. Learning Mode (Example: A/V Receiver Setup) 1. B efore starting this wizard, please make sure that connects the DVD video output and then the TV input for the DVD audio output. 14. Inputs settings Video Input Audio Input Not Connected Not Connected Move Change Source B ack SEL Select Next 15. Press the SELECT button to highlight the " POWER " Test button. These On-screen buttons are complete! Use the CURSOR PAD ̇ or ̈ to select the TV Input that all settings, then...
... the next SETUP screen. Learning Mode (Example: A/V Receiver Setup) 1. B efore starting this wizard, please make sure that connects the DVD video output and then the TV input for the DVD audio output. 14. Inputs settings Video Input Audio Input Not Connected Not Connected Move Change Source B ack SEL Select Next 15. Press the SELECT button to highlight the " POWER " Test button. These On-screen buttons are complete! Use the CURSOR PAD ̇ or ̈ to select the TV Input that all settings, then...
Owners Guide
Page 85
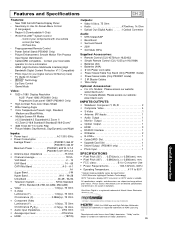
... by input format 2 ALiS (Alternate Lighting of Surfaces Technology) HDTV Televisions display HDTV only when an HDTV source is a registered trademark of Hitachi Home Electronics (America), Inc. All specifications, weights, and dimensions are trademarks of HDMI Licensing LLC. *Manufactured under license from Dolby Laboratories. UltraVision Digital is available. Control your Digital Camera SD Memory Card) • TV Guide On ScreenTM • Technology • Lip Sync Control • Game Mode Video: • 1920 x 1080 Display Resolution ALIS 2 Panel 1080i (P50X901...
... by input format 2 ALiS (Alternate Lighting of Surfaces Technology) HDTV Televisions display HDTV only when an HDTV source is a registered trademark of Hitachi Home Electronics (America), Inc. All specifications, weights, and dimensions are trademarks of HDMI Licensing LLC. *Manufactured under license from Dolby Laboratories. UltraVision Digital is available. Control your Digital Camera SD Memory Card) • TV Guide On ScreenTM • Technology • Lip Sync Control • Game Mode Video: • 1920 x 1080 Display Resolution ALIS 2 Panel 1080i (P50X901...
Owners Guide
Page 180
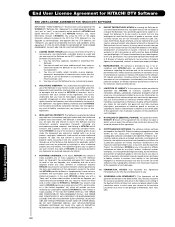
... ALL THE TERMS AND CONDITIONS OF ANY DIFFERENT OR SUPPLEMENTARY LICENSE THAT MAY ACCOMPANY SUCH UPGRADE, (A) DO NOT USE ANY HITACHI-PROVIDED FLASH CARD OR OTHER MEDIA, (B) DO NOT PERFORM INSTALL ANY HITACHI-PROVIDED UPGRADE SOFTWARE ON YOUR DTV, AND (C) PROMPTLY RETURN SUCH FLASH CARD OR OTHER MEDIA TO HITACHI. 5. or business interruption) however caused and on the DTV, subject to you . 11. b. You...
... ALL THE TERMS AND CONDITIONS OF ANY DIFFERENT OR SUPPLEMENTARY LICENSE THAT MAY ACCOMPANY SUCH UPGRADE, (A) DO NOT USE ANY HITACHI-PROVIDED FLASH CARD OR OTHER MEDIA, (B) DO NOT PERFORM INSTALL ANY HITACHI-PROVIDED UPGRADE SOFTWARE ON YOUR DTV, AND (C) PROMPTLY RETURN SUCH FLASH CARD OR OTHER MEDIA TO HITACHI. 5. or business interruption) however caused and on the DTV, subject to you . 11. b. You...

Owners Guide
Page 191
... 78 Perfect Volume 53 Photo Input 30-31 Picture Mode 46 Picture-in-Pictur e (PIP 33-35 Power Swivel 5,6,81 R Remote Control Functions 26-32 Operation with other devices 36-39 Programming Codes 42-43 Installing Batteries 4 S Screen Saver 68 Setup 67 Sharpness 46 Smooth Motion Demonstration 50-51 Spanish Section 91-179 Speakers Connecting External Speakers 53 Internal 53 Specifications 85 Surround 52 T Timers 65 Tint 46 Treble 52 Troubleshooting 82 TV Guide On...
... 78 Perfect Volume 53 Photo Input 30-31 Picture Mode 46 Picture-in-Pictur e (PIP 33-35 Power Swivel 5,6,81 R Remote Control Functions 26-32 Operation with other devices 36-39 Programming Codes 42-43 Installing Batteries 4 S Screen Saver 68 Setup 67 Sharpness 46 Smooth Motion Demonstration 50-51 Spanish Section 91-179 Speakers Connecting External Speakers 53 Internal 53 Specifications 85 Surround 52 T Timers 65 Tint 46 Treble 52 Troubleshooting 82 TV Guide On...


