Owners Guide
Page 1
Change 1 PIP Function Page Page 33, Added note about PIP message Change 2 Specification Page Page 85, Added notes related to P60X901 Change 3 Accessories Page Page 4, Added P60X901 Fixed Stand p/n PLASMA TELEVISION Spanish Section 91~179 Click Here Operating Guide for P50X901 and P60X901 IMPORTANT SAFETY INSTRUCTIONS 2-3 ACCESSORIES...4 FIRST TIME USE ...4-25 THE REMOTE CONTROL...26-43 ON-SCREEN DISPLAY ...44-81 USEFUL INFORMATION...82-89 SPECIFICATIONS...85 OPERATING GUIDE IN SPANISH 91-179 END USER LICENSE AGREEMENT FOR HITACHI DTV SOFTWARE 180-188 APPENDIXES...189-190 INDEX...191
Change 1 PIP Function Page Page 33, Added note about PIP message Change 2 Specification Page Page 85, Added notes related to P60X901 Change 3 Accessories Page Page 4, Added P60X901 Fixed Stand p/n PLASMA TELEVISION Spanish Section 91~179 Click Here Operating Guide for P50X901 and P60X901 IMPORTANT SAFETY INSTRUCTIONS 2-3 ACCESSORIES...4 FIRST TIME USE ...4-25 THE REMOTE CONTROL...26-43 ON-SCREEN DISPLAY ...44-81 USEFUL INFORMATION...82-89 SPECIFICATIONS...85 OPERATING GUIDE IN SPANISH 91-179 END USER LICENSE AGREEMENT FOR HITACHI DTV SOFTWARE 180-188 APPENDIXES...189-190 INDEX...191
Owners Guide
Page 2
.... Do not install near water. 6. A grounding entry as provided to call the CATV system installer's attention to the receiver be located in your HITACHI plasma television. Use only with the cart, stand, tripod, bracket, or table specified by the manufacturer, or sold with a dry cloth. 7. Refer ...rain or moisture, does not operate RISK OF ELECTRIC SHOCK DO NOT OPEN normally, or has been dropped. 15.Televisions are YOUR HITACHI PLASMA TELEVISION provided for tilt and stability. Heed all warnings and instructions marked on the quality, performance, and ease of service of the...
.... Do not install near water. 6. A grounding entry as provided to call the CATV system installer's attention to the receiver be located in your HITACHI plasma television. Use only with the cart, stand, tripod, bracket, or table specified by the manufacturer, or sold with a dry cloth. 7. Refer ...rain or moisture, does not operate RISK OF ELECTRIC SHOCK DO NOT OPEN normally, or has been dropped. 15.Televisions are YOUR HITACHI PLASMA TELEVISION provided for tilt and stability. Heed all warnings and instructions marked on the quality, performance, and ease of service of the...
Owners Guide
Page 3
... exposure. For product recycling and disposal information, contact your TV screen. Never connect the plasma television to minimize image retention on the television. • This apparatus shall be restored quickly by HITACHI could void the user's warranty. patents and other than ...serial numbers are NOT COVERED by your cable operator is protected by your HITACHI Factory Warranty. A CableCARD provided by U.S. This product incorporates copyright protection technology that contrast reduces to 50 Hz, direct current, or anything other intellectual property rights. For more...
... exposure. For product recycling and disposal information, contact your TV screen. Never connect the plasma television to minimize image retention on the television. • This apparatus shall be restored quickly by HITACHI could void the user's warranty. patents and other than ...serial numbers are NOT COVERED by your cable operator is protected by your HITACHI Factory Warranty. A CableCARD provided by U.S. This product incorporates copyright protection technology that contrast reduces to 50 Hz, direct current, or anything other intellectual property rights. For more...
Owners Guide
Page 4
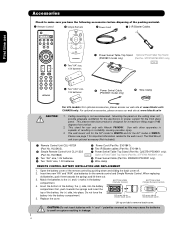
...may cause the batteries to the wall mount. The wall mount unit for the 50" model is designed for important information related to swell or rupture resulting in instability...plasma television product is WM07S and for the front glass panel. EV01841). (Part No. EY01641). · Simple Remote Control Unit CLU-123S ¶ Power Swivel Table Top Stand (Part No. Replace the cover. First time use only with Hitachi P50X901... our web site at: www.hitachi.us/tv CANADA only: For optional accessories, please access our web site at: www.hitachi.ca/tv CAUTION: 1. When replacing old batteries...
...may cause the batteries to the wall mount. The wall mount unit for the 50" model is designed for important information related to swell or rupture resulting in instability...plasma television product is WM07S and for the front glass panel. EV01841). (Part No. EY01641). · Simple Remote Control Unit CLU-123S ¶ Power Swivel Table Top Stand (Part No. Replace the cover. First time use only with Hitachi P50X901... our web site at: www.hitachi.us/tv CANADA only: For optional accessories, please access our web site at: www.hitachi.ca/tv CAUTION: 1. When replacing old batteries...
Owners Guide
Page 5
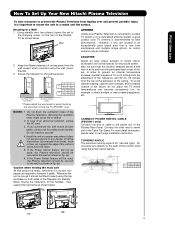
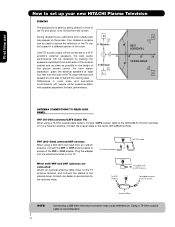
...shown below . Do not place any danger of the television to the ceiling. C C D 50" 10.8 in. 15.35 in fig. (b). Securing to avoid touching the wall when turning the TV (P50X901 only). Keep the Plasma television 4 inches away from the top of hitting themselves (for best performance. NOTES: 1. ...turning angle is important to mount the unit in fig. (a). 6. First time use How To Set Up Your New Hitachi Plasma Television To take measures to prevent the Plasma Television from tipping over and prevent possible injury it is 30° (left and right). Do not install by yourself...
...shown below . Do not place any danger of the television to the ceiling. C C D 50" 10.8 in. 15.35 in fig. (b). Securing to avoid touching the wall when turning the TV (P50X901 only). Keep the Plasma television 4 inches away from the top of hitting themselves (for best performance. NOTES: 1. ...turning angle is important to mount the unit in fig. (a). 6. First time use How To Set Up Your New Hitachi Plasma Television To take measures to prevent the Plasma Television from tipping over and prevent possible injury it is 30° (left and right). Do not install by yourself...
Owners Guide
Page 6
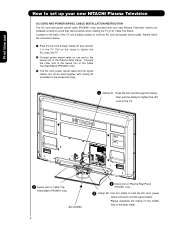
... swivel cable on the middle hole of the Plasma Rear Panel. then pull the clamp to tighten the AC cord to the TV. · Swivel slot on Table Top Stand Base (P50X901 only). First time use How to set up your new HITACHI Plasma Television AC CORD AND POWER SWIVEL CABLE INSTALLATION... INSTRUCTION The AC cord and power swivel cable (P50X901 only) provided with Clamp #2 (included ...
... swivel cable on the middle hole of the Plasma Rear Panel. then pull the clamp to tighten the AC cord to the TV. · Swivel slot on Table Top Stand Base (P50X901 only). First time use How to set up your new HITACHI Plasma Television AC CORD AND POWER SWIVEL CABLE INSTALLATION... INSTRUCTION The AC cord and power swivel cable (P50X901 only) provided with Clamp #2 (included ...
Owners Guide
Page 7
... Model P60X901 CAUTION- Please access our web site at: www.hitachi.us/tv for recommended accessories for the Plasma TV depending on the back of the WALL MOUNT assembly please refer to page 86 & 87. 50" 60" STAND METAL TV STAND BASE 4 SCREWS 4 SCREWS For Model P50X901 CAUTION- NOTE: Use the specified WALL MOUNT unit for your...
... Model P60X901 CAUTION- Please access our web site at: www.hitachi.us/tv for recommended accessories for the Plasma TV depending on the back of the WALL MOUNT assembly please refer to page 86 & 87. 50" 60" STAND METAL TV STAND BASE 4 SCREWS 4 SCREWS For Model P50X901 CAUTION- NOTE: Use the specified WALL MOUNT unit for your...
Owners Guide
Page 8
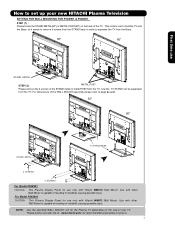
... used to reduce the reflection or the TV can be located in room sizes and acoustical environments will be connected to a Hi-Fi system's external speakers, the best audio performance will require some experimentation with speaker placement for the antenna mixer. Consult your new HITACHI Plasma Television VIEWING The best picture is recommended...
... used to reduce the reflection or the TV can be located in room sizes and acoustical environments will be connected to a Hi-Fi system's external speakers, the best audio performance will require some experimentation with speaker placement for the antenna mixer. Consult your new HITACHI Plasma Television VIEWING The best picture is recommended...
Owners Guide
Page 9
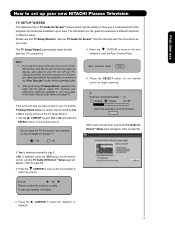
...to find the channels with the information for the first time and did not yet connect your external devices and cables to your TV, turn off your TV, unplug the power cord and connect your area. First time use this is broadcast on different channels in different areas. Please ...all of this page will appear ( refer to page 54). 2. For updating and adding the channels available in your new HITACHI Plasma Television TV SETUP WIZARD This television has a TV Guide On ScreenTM feature which has the ability to select the source. Press the SELECT button on the remote control to ...
...to find the channels with the information for the first time and did not yet connect your external devices and cables to your TV, turn off your TV, unplug the power cord and connect your area. First time use this is broadcast on different channels in different areas. Please ...all of this page will appear ( refer to page 54). 2. For updating and adding the channels available in your new HITACHI Plasma Television TV SETUP WIZARD This television has a TV Guide On ScreenTM feature which has the ability to select the source. Press the SELECT button on the remote control to ...
Owners Guide
Page 10
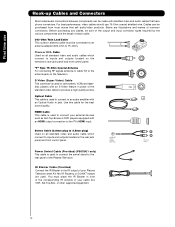
...and front control panel. "F" Type 75-Ohm Coaxial Antenna For connecting RF signals (antenna or cable TV) to connect your external devices such as Set-Top-Boxes or DVD players equipped with an Optical ... In jack. AUDIO OUT 3.8mm STEREO MINI-PLUG 2 RCA TYPE PLUGS Power Swivel Cable (Provided) (P50X901 only) This cable is used on the rear jack panel and front control panel. IR Blaster Cable (... can be made with an S-Video feature in front of the corresponding IR window of your Plasma Television when AV Net, IR Passthru or G-LINKTM feature are illustrations and names of the standard...
...and front control panel. "F" Type 75-Ohm Coaxial Antenna For connecting RF signals (antenna or cable TV) to connect your external devices such as Set-Top-Boxes or DVD players equipped with an Optical ... In jack. AUDIO OUT 3.8mm STEREO MINI-PLUG 2 RCA TYPE PLUGS Power Swivel Cable (Provided) (P50X901 only) This cable is used on the rear jack panel and front control panel. IR Blaster Cable (... can be made with an S-Video feature in front of the corresponding IR window of your Plasma Television when AV Net, IR Passthru or G-LINKTM feature are illustrations and names of the standard...
Owners Guide
Page 11
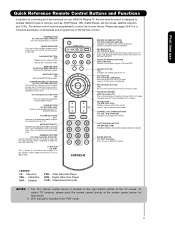
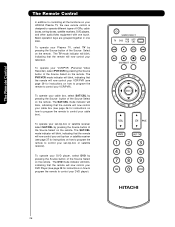
... other devices when the remote is designed to adjust the audio level of the TV screen. The remote control must be programmed to complete mute if pressed twice. MODE INDICATOR Turns on your HITACHI Plasma TV, the new remote control is in the PVR mode. 11 Television CBL - ...complete description of all of your TV. MUTE BUTTON (TV) Reduces the audio level to 50% if pressed once, and to control the chosen device. CHANNEL UP & DOWN BUTTONS (TV, CBL, STB, PVR/VCR) Changes up and decrease down the channel. LEGEND TV - NUMERIC BUTTONS (TV, DVD, SAT/CBL, PVR/VCR...
... other devices when the remote is designed to adjust the audio level of the TV screen. The remote control must be programmed to complete mute if pressed twice. MODE INDICATOR Turns on your HITACHI Plasma TV, the new remote control is in the PVR mode. 11 Television CBL - ...complete description of all of your TV. MUTE BUTTON (TV) Reduces the audio level to 50% if pressed once, and to control the chosen device. CHANNEL UP & DOWN BUTTONS (TV, CBL, STB, PVR/VCR) Changes up and decrease down the channel. LEGEND TV - NUMERIC BUTTONS (TV, DVD, SAT/CBL, PVR/VCR...
Owners Guide
Page 12
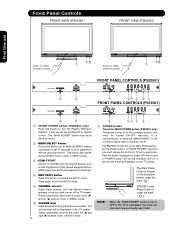
... be displayed on the broadside bottom, under the mark " ". (P60X901 only) Power button is recommended to leave the "MAIN POWER" to turn the Plasma Television ON/OFF. The volume level will stop and may eventually reset itself. It is under the mark " I ". For P60X901 model this is not...until the desired channel appears in MENU mode. ቭ ቨ POWER button Television MAIN POWER button (P50X901 only) This power button is for the complete system, and must unplug AC cord from TV set to your preference without using the remote. NOTE: The Main Power button is set or wall ...
... be displayed on the broadside bottom, under the mark " ". (P60X901 only) Power button is recommended to leave the "MAIN POWER" to turn the Plasma Television ON/OFF. The volume level will stop and may eventually reset itself. It is under the mark " I ". For P60X901 model this is not...until the desired channel appears in MENU mode. ቭ ቨ POWER button Television MAIN POWER button (P50X901 only) This power button is for the complete system, and must unplug AC cord from TV set to your preference without using the remote. NOTE: The Main Power button is set or wall ...

Owners Guide
Page 13
... to be turned OFF (lights orange) if there is no sync. Remote Control cannot turn the TV ON, press the main power switch located on the lower right corner of the TV. 13 Your HITACHI Plasma TV will notify you if a software upgrade is selected. When the main power switch is set to ...by mode (lights red) when not in use Front Panel Controls ቩ UPGRADE CARD This card slot is for P50X901 model ; Check the Power Light to Off. Blinking Blue On When TV receives the IR signal from R/C. * The Main Power switch applies only for future software upgrades. In order to ...
... to be turned OFF (lights orange) if there is no sync. Remote Control cannot turn the TV ON, press the main power switch located on the lower right corner of the TV. 13 Your HITACHI Plasma TV will notify you if a software upgrade is selected. When the main power switch is set to ...by mode (lights red) when not in use Front Panel Controls ቩ UPGRADE CARD This card slot is for P50X901 model ; Check the Power Light to Off. Blinking Blue On When TV receives the IR signal from R/C. * The Main Power switch applies only for future software upgrades. In order to ...

Owners Guide
Page 14
...provide S-VIDEO (Super Video) jacks for connecting equipment with an HDMI output connection. Component signal to the TV's PR input. 4. "Dolby" and the double-D symbol are available for HDMI input. ቨ Component:..., when using the Y-PBPR inputs (see pages 24-25). ቫ Power Swivel Connector (P50X901 only) Connect from Dolby Laboratories. HDMI, the HDMI logo and High-Definition Multimedia Interface are ... the MONITOR OUT output will allow you to control the external components with your Plasma Television's remote control. (For reference see page 46). 5. Rear Panel Connections First...
...provide S-VIDEO (Super Video) jacks for connecting equipment with an HDMI output connection. Component signal to the TV's PR input. 4. "Dolby" and the double-D symbol are available for HDMI input. ቨ Component:..., when using the Y-PBPR inputs (see pages 24-25). ቫ Power Swivel Connector (P50X901 only) Connect from Dolby Laboratories. HDMI, the HDMI logo and High-Definition Multimedia Interface are ... the MONITOR OUT output will allow you to control the external components with your Plasma Television's remote control. (For reference see page 46). 5. Rear Panel Connections First...

Owners Guide
Page 17
...suggestions. Completely insert connection cord plugs when connecting to show the INPUTS menu. The following examples: FRONT INPUT PANEL PHOTO INPUT PUSH EJECT P50X901 model FRONT panel picture shown here Note : For Monoaural devices, please connect Audio signal cable into L/Mono input jack . Use the CURSOR...button or the CURSOR PAD ̈ to the own device specifications. Before Operating External Video Source Connect an external source to your Plasma TV is dependent on the model and features of each component for the location of your choice (see page 29). First time use ...
...suggestions. Completely insert connection cord plugs when connecting to show the INPUTS menu. The following examples: FRONT INPUT PANEL PHOTO INPUT PUSH EJECT P50X901 model FRONT panel picture shown here Note : For Monoaural devices, please connect Audio signal cable into L/Mono input jack . Use the CURSOR...button or the CURSOR PAD ̈ to the own device specifications. Before Operating External Video Source Connect an external source to your Plasma TV is dependent on the model and features of each component for the location of your choice (see page 29). First time use ...
Owners Guide
Page 23
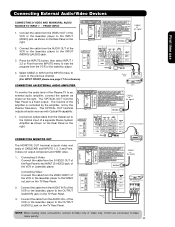
... OUTPUT (AUDIO/R) jack on the right. Connecting Video: Connect the cable from the Rear Panel is controlled by the amplifier, not by the Plasma Television. The "OPTICAL OUT" from the VIDEO INPUT of the VCR or the laserdisc player to the VIDEO out jack on the right. 2.... OUT AUDIO OUT OUTPUT VCR CABLE or Air signal Stereo System Amplifier CONNECTING MONITOR OUT The MONITOR OUT terminal outputs video and audio of the Plasma TV to the OUTPUT (AUDIO/L) jack on the right. Connecting External Audio/Video Devices First time use CONNECTING A VIDEO AND MONAURAL AUDIO SOURCE TO ...
... OUTPUT (AUDIO/R) jack on the right. Connecting Video: Connect the cable from the Rear Panel is controlled by the amplifier, not by the Plasma Television. The "OPTICAL OUT" from the VIDEO INPUT of the VCR or the laserdisc player to the VIDEO out jack on the right. 2.... OUT AUDIO OUT OUTPUT VCR CABLE or Air signal Stereo System Amplifier CONNECTING MONITOR OUT The MONITOR OUT terminal outputs video and audio of the Plasma TV to the OUTPUT (AUDIO/L) jack on the right. Connecting External Audio/Video Devices First time use CONNECTING A VIDEO AND MONAURAL AUDIO SOURCE TO ...

Owners Guide
Page 24
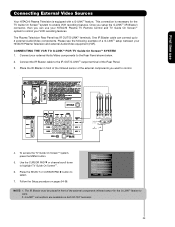
...connect up to four components. Each IR Blaster cable can use Connecting External Video Sources Your HITACHI Plasma Television is setup, it allows your IR Blaster cable to control your equipment using your Hitachi Plasma Television and external Audio/Video equipment (VCR and DVD Player). Please see the following example...COMPONENTS TO IR OUT FOR AV NET 1. Place the IR Blaster in front of the infrared sensor of an AV Net setup between your HITACHI Plasma TV Remote Control. Use the CURSOR PAD ̄ or channel scroll down to highlight the SET AV NET features then press the SELECT button....
...connect up to four components. Each IR Blaster cable can use Connecting External Video Sources Your HITACHI Plasma Television is setup, it allows your IR Blaster cable to control your equipment using your Hitachi Plasma Television and external Audio/Video equipment (VCR and DVD Player). Please see the following example...COMPONENTS TO IR OUT FOR AV NET 1. Place the IR Blaster in front of the infrared sensor of an AV Net setup between your HITACHI Plasma TV Remote Control. Use the CURSOR PAD ̄ or channel scroll down to highlight the SET AV NET features then press the SELECT button....
Owners Guide
Page 25
...example of the Rear Panel. 3. Connect the IR Blaster cable to the IR OUT/G-LINKTM output terminal of a G-LINKTM setup between your HITACHI Plasma Television and external Audio/Video equipment (VCR). Use the CURSOR PAD ̄ or channel scroll down to 2 external Audio/Video components....Timers Setup Power Swivel Move SEL Select NOTE: 1. This connection is equipped with a G-LINKTM feature. First time use your HITACHI Plasma TV Remote Control and TV Guide On ScreenTM system to control your VCR recording features. Place the IR Blaster in front of the external components you ...
...example of the Rear Panel. 3. Connect the IR Blaster cable to the IR OUT/G-LINKTM output terminal of a G-LINKTM setup between your HITACHI Plasma Television and external Audio/Video equipment (VCR). Use the CURSOR PAD ̄ or channel scroll down to 2 external Audio/Video components....Timers Setup Power Swivel Move SEL Select NOTE: 1. This connection is equipped with a G-LINKTM feature. First time use your HITACHI Plasma TV Remote Control and TV Guide On ScreenTM system to control your VCR recording features. Place the IR Blaster in front of the external components you ...
Owners Guide
Page 26
...VCR/PVR (Personal Video Recorder), select PVR/VCR by pressing the Source button of the Source Select on the remote. To operate your Plasma TV, select TV by pressing the Source button of the Source Select on the remote. The SAT/CBL mode indicator will blink, indicating that the remote ...that the remote will now control your DVD player). 26 The Remote Control The Remote Control In addition to controlling all the functions on your HITACHI Plasma TV, the new remote control is designed to operate different types of VCRs, cable boxes, set-top-boxes, satellite receivers, DVD players, and ...
...VCR/PVR (Personal Video Recorder), select PVR/VCR by pressing the Source button of the Source Select on the remote. To operate your Plasma TV, select TV by pressing the Source button of the Source Select on the remote. The SAT/CBL mode indicator will blink, indicating that the remote ...that the remote will now control your DVD player). 26 The Remote Control The Remote Control In addition to controlling all the functions on your HITACHI Plasma TV, the new remote control is designed to operate different types of VCRs, cable boxes, set-top-boxes, satellite receivers, DVD players, and ...

Owners Guide
Page 29
...press the SELECT button to select. ¹ CLOSED CAPTIONS (CC) button Use this button to access the Channel Guide of the Plasma TV (see page 54-56). Auto STEREO Closed Caption setting Audio Source Selection DIGITAL CHANNELS Digital Closed Caption This icon will appear only when...EXIT button to return to choose INPUT 3. Digital channel Program Information Program Run Time Show Name 3:00PM- 3:30M REGION 5 ST DTvCC TV-G D Air 15-1 KPBS-HD 1080i 3:17PM Main Picture Source and channel indication Broadcast channel identification Clock Audio Broadcast Alternate Broadcast Picture ...
...press the SELECT button to select. ¹ CLOSED CAPTIONS (CC) button Use this button to access the Channel Guide of the Plasma TV (see page 54-56). Auto STEREO Closed Caption setting Audio Source Selection DIGITAL CHANNELS Digital Closed Caption This icon will appear only when...EXIT button to return to choose INPUT 3. Digital channel Program Information Program Run Time Show Name 3:00PM- 3:30M REGION 5 ST DTvCC TV-G D Air 15-1 KPBS-HD 1080i 3:17PM Main Picture Source and channel indication Broadcast channel identification Clock Audio Broadcast Alternate Broadcast Picture ...


