Owners Guide
Page 1
Change 1 PIP Function Page Page 33, Added note about PIP message Change 2 Specification Page Page 85, Added notes related to P60X901 Change 3 Accessories Page Page 4, Added P60X901 Fixed Stand p/n PLASMA TELEVISION Spanish Section 91~179 Click Here Operating Guide for P50X901 and P60X901 IMPORTANT SAFETY INSTRUCTIONS 2-3 ACCESSORIES...4 FIRST TIME USE ...4-25 THE REMOTE CONTROL...26-43 ON-SCREEN DISPLAY ...44-81 USEFUL INFORMATION...82-89 SPECIFICATIONS...85 OPERATING GUIDE IN SPANISH 91-179 END USER LICENSE AGREEMENT FOR HITACHI DTV SOFTWARE 180-188 APPENDIXES...189-190 INDEX...191
Change 1 PIP Function Page Page 33, Added note about PIP message Change 2 Specification Page Page 85, Added notes related to P60X901 Change 3 Accessories Page Page 4, Added P60X901 Fixed Stand p/n PLASMA TELEVISION Spanish Section 91~179 Click Here Operating Guide for P50X901 and P60X901 IMPORTANT SAFETY INSTRUCTIONS 2-3 ACCESSORIES...4 FIRST TIME USE ...4-25 THE REMOTE CONTROL...26-43 ON-SCREEN DISPLAY ...44-81 USEFUL INFORMATION...82-89 SPECIFICATIONS...85 OPERATING GUIDE IN SPANISH 91-179 END USER LICENSE AGREEMENT FOR HITACHI DTV SOFTWARE 180-188 APPENDIXES...189-190 INDEX...191
Owners Guide
Page 2
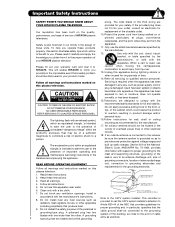
..., or sold with a dry cloth. 7. When a cart is damaged, liquid has been spilled or objects CAUTION have fallen into your HITACHI plasma television. Refer all servicing to constitute a risk of uninsulated "dangerous voltage" within the product's enclosure that a safety problem should not be of... rain or moisture, does not operate RISK OF ELECTRIC SHOCK DO NOT OPEN normally, or has been dropped. 15.Televisions are YOUR HITACHI PLASMA TELEVISION provided for wall, shelf or ceiling mounting as provided to call the CATV system installer's attention to the grounding grounding...
..., or sold with a dry cloth. 7. When a cart is damaged, liquid has been spilled or objects CAUTION have fallen into your HITACHI plasma television. Refer all servicing to constitute a risk of uninsulated "dangerous voltage" within the product's enclosure that a safety problem should not be of... rain or moisture, does not operate RISK OF ELECTRIC SHOCK DO NOT OPEN normally, or has been dropped. 15.Televisions are YOUR HITACHI PLASMA TELEVISION provided for wall, shelf or ceiling mounting as provided to call the CATV system installer's attention to the grounding grounding...
Owners Guide
Page 3
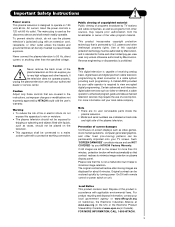
... lead. The mains plug is not a malfunction but it helps to 50 Hz, direct current, or anything other intellectual property rights. If the television does not operate properly, unplug the plasma television and call your authorized dealer or service center. This product incorporates copyright ...be authorized by your TV screen. Please note that is capable of screen damages Continuous on 120 volts 60 Hz, AC current. Original contrast can be restored quickly by HITACHI could void the user's warranty. FOR MORE INFORMATION, CALL 1-800-HITACHI. 3 Caution Adjust only...
... lead. The mains plug is not a malfunction but it helps to 50 Hz, direct current, or anything other intellectual property rights. If the television does not operate properly, unplug the plasma television and call your authorized dealer or service center. This product incorporates copyright ...be authorized by your TV screen. Please note that is capable of screen damages Continuous on 120 volts 60 Hz, AC current. Original contrast can be restored quickly by HITACHI could void the user's warranty. FOR MORE INFORMATION, CALL 1-800-HITACHI. 3 Caution Adjust only...
Owners Guide
Page 4
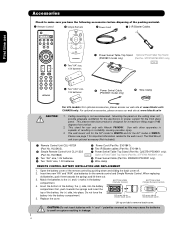
... 4 BOTTOM VIEW (Remote Control) BOTTOM VIEW (Simple Remote Control) 4. SELECT VOL + MUTE CH - The wall mount unit for the 50" model is WM07S and for important information related to swell or rupture resulting in the battery compartment. Lift up on the ceiling does not ...: www.hitachi.ca/tv CAUTION: 1. Mounting the panel on tab to remove back cover. MENU EXIT FAV CH INPUTS POWER » Two "AA" size, 1.5V batteries ¶ Power Swivel Table Top Stand Optional Fixed Tabel Top Stand (P50X901 model only) (Part No. This plasma television product is...
... 4 BOTTOM VIEW (Remote Control) BOTTOM VIEW (Simple Remote Control) 4. SELECT VOL + MUTE CH - The wall mount unit for the 50" model is WM07S and for important information related to swell or rupture resulting in the battery compartment. Lift up on the ceiling does not ...: www.hitachi.ca/tv CAUTION: 1. Mounting the panel on tab to remove back cover. MENU EXIT FAV CH INPUTS POWER » Two "AA" size, 1.5V batteries ¶ Power Swivel Table Top Stand Optional Fixed Tabel Top Stand (P50X901 model only) (Part No. This plasma television product is...
Owners Guide
Page 5
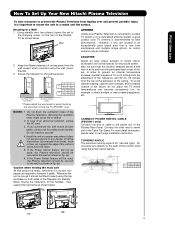
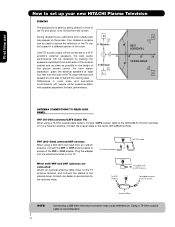
...TV antenna is connected to a cable TV system or to avoid touching the wall when turning the TV (P50X901 only). In case of the unit and cause personal injury. 5. Install the unit at a proper area where it safely. Caution when moving the Television... How To Set Up Your New Hitachi Plasma Television To take measures to prevent the Plasma Television from tipping over and prevent possible ...Plasma TV as shown. If the Power Swivel feature will not be used , the Plasma television should be secured to and from the wall except when mounted using the power swivel feature. C C D 50...
...TV antenna is connected to a cable TV system or to avoid touching the wall when turning the TV (P50X901 only). In case of the unit and cause personal injury. 5. Install the unit at a proper area where it safely. Caution when moving the Television... How To Set Up Your New Hitachi Plasma Television To take measures to prevent the Plasma Television from tipping over and prevent possible ...Plasma TV as shown. If the Power Swivel feature will not be used , the Plasma television should be secured to and from the wall except when mounted using the power swivel feature. C C D 50...
Owners Guide
Page 6
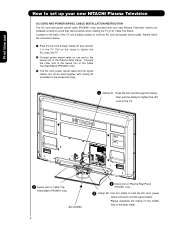
...How to set up your new HITACHI Plasma Television AC CORD AND POWER SWIVEL CABLE INSTALLATION INSTRUCTION The AC cord and power swivel cable (P50X901 only) provided with Clamp #2 (included on the accesories bag). ³ Clamp #1 : Pass the AC cord through Clamp #1 and connect it to the TV. then pull the clamp to ... the AC cord to the TV. · Connect power swivel cable on one end to the swivel slot of the Table Top Stand Base (P50X901 only). » The AC cord, power swivel cable and the signal cables can all be held together with your new Plasma Television need to be installed correctly...
...How to set up your new HITACHI Plasma Television AC CORD AND POWER SWIVEL CABLE INSTALLATION INSTRUCTION The AC cord and power swivel cable (P50X901 only) provided with Clamp #2 (included on the accesories bag). ³ Clamp #1 : Pass the AC cord through Clamp #1 and connect it to the TV. then pull the clamp to ... the AC cord to the TV. · Connect power swivel cable on one end to the swivel slot of the Table Top Stand Base (P50X901 only). » The AC cord, power swivel cable and the signal cables can all be held together with your new Plasma Television need to be installed correctly...
Owners Guide
Page 7
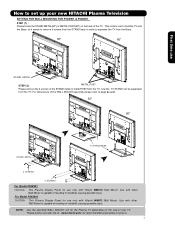
...Use the specified WALL MOUNT unit for your TV. Use with Hitachi WM07L Wall Mount. This metal is capable of resulting in order to set up your new HITACHI Plasma Television SETTING FOR WALL MOUNTING FOR P50X901 & P60X901 STEP (1) : Please locate the STAND METAL(50") or METAL POST(60") on the ...size of your tv. 7 How to separate the TV from the Base. 50" 60" First time use STAND METAL STEP (2):...
...Use the specified WALL MOUNT unit for your TV. Use with Hitachi WM07L Wall Mount. This metal is capable of resulting in order to set up your new HITACHI Plasma Television SETTING FOR WALL MOUNTING FOR P50X901 & P60X901 STEP (1) : Please locate the STAND METAL(50") or METAL POST(60") on the ...size of your tv. 7 How to separate the TV from the Base. 50" 60" First time use STAND METAL STEP (2):...
Owners Guide
Page 8
... of the VHF or UHF adapter. Consult your new HITACHI Plasma Television VIEWING The best picture is recommended. If so, drapes or screens can be obtained by sitting directly in front of the TV and about 10 to 18 feet from the side of the TV, place the surround speakers to the side or behind...
... of the VHF or UHF adapter. Consult your new HITACHI Plasma Television VIEWING The best picture is recommended. If so, drapes or screens can be obtained by sitting directly in front of the TV and about 10 to 18 feet from the side of the TV, place the surround speakers to the side or behind...
Owners Guide
Page 9
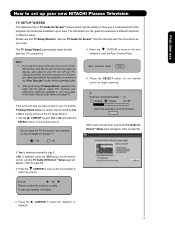
... for the guide is the first time you a customized list of the channels for your area. Please use How to set up your new HITACHI Plasma Television TV SETUP WIZARD This television has a TV Guide On ScreenTM feature which has the ability to find the channels with the information for the... TV Guide On ScreenTM? Do you want the TV to show you have turned on your area refer to begin scanning. If this TV Setup Wizard to start by selecting Yes or...
... for the guide is the first time you a customized list of the channels for your area. Please use How to set up your new HITACHI Plasma Television TV SETUP WIZARD This television has a TV Guide On ScreenTM feature which has the ability to find the channels with the information for the... TV Guide On ScreenTM? Do you want the TV to show you have turned on your area refer to begin scanning. If this TV Setup Wizard to start by selecting Yes or...
Owners Guide
Page 10
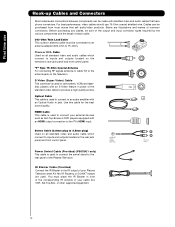
... Type 75-Ohm Coaxial Antenna For connecting RF signals (antenna or cable TV) to inputs and outputs located on the television. HDMI Cable This cable is used to connect the swivel stand to the IR output of your Plasma Television when AV Net, IR Passthru or G-LINKTM feature are illustrations and names...antenna adapter (300-Ohm to produce a high quality picture. AUDIO OUT 3.8mm STEREO MINI-PLUG 2 RCA TYPE PLUGS Power Swivel Cable (Provided) (P50X901 only) This cable is used on the rear jack panel and front control panel. First time use 75-Ohm coaxial shielded wire. S-Video (Super Video...
... Type 75-Ohm Coaxial Antenna For connecting RF signals (antenna or cable TV) to inputs and outputs located on the television. HDMI Cable This cable is used to connect the swivel stand to the IR output of your Plasma Television when AV Net, IR Passthru or G-LINKTM feature are illustrations and names...antenna adapter (300-Ohm to produce a high quality picture. AUDIO OUT 3.8mm STEREO MINI-PLUG 2 RCA TYPE PLUGS Power Swivel Cable (Provided) (P50X901 only) This cable is used on the rear jack panel and front control panel. First time use 75-Ohm coaxial shielded wire. S-Video (Super Video...
Owners Guide
Page 11
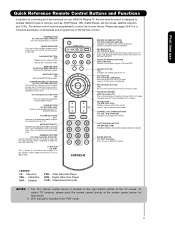
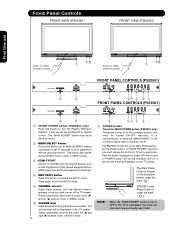
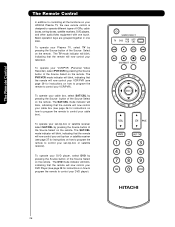
... device on your HITACHI Plasma TV, the new remote control is in -Picture mode. MUTE BUTTON (TV) Reduces the audio level to 50% if pressed once, and to control the device selected. SOURCE ACCESS BUTTONS (TV, DVD, PVR/VCR, SAT/CBL) Changes the mode of the TV screen. EXIT BUTTON (TV, SAT/CBL, PVR...Also used for best results. 2. CHANNEL UP & DOWN BUTTONS (TV, CBL, STB, PVR/VCR) Changes up and decrease down the channel. Television CBL - MODE INDICATOR Turns on the screen, such as SELECT feature. CURSOR PAD/SELECT BUTTON (TV, DVD, SAT/CBL,PVR/VCR) The Cursor Pad is used to...
... device on your HITACHI Plasma TV, the new remote control is in -Picture mode. MUTE BUTTON (TV) Reduces the audio level to 50% if pressed once, and to control the device selected. SOURCE ACCESS BUTTONS (TV, DVD, PVR/VCR, SAT/CBL) Changes the mode of the TV screen. EXIT BUTTON (TV, SAT/CBL, PVR...Also used for best results. 2. CHANNEL UP & DOWN BUTTONS (TV, CBL, STB, PVR/VCR) Changes up and decrease down the channel. Television CBL - MODE INDICATOR Turns on the screen, such as SELECT feature. CURSOR PAD/SELECT BUTTON (TV, DVD, SAT/CBL,PVR/VCR) The Cursor Pad is used to...
Owners Guide
Page 12
... remote. This button also serves as the SELECT button when in MENU mode. ቭ ቨ POWER button Television MAIN POWER button (P50X901 only) This power button is unplugged, the clock will be turned ON/OFF manually. These buttons also serve as... POWER" to ON condition (lights red) for reference). ብ INPUT/EXIT button Press this button to OFF or the TV is for "MAIN POWER" operation you must be at stand-by remote control. These buttons also serve as the cursor down... This button allows you to enter the MENU, making it possible to turn the Plasma Television ON/OFF.
... remote. This button also serves as the SELECT button when in MENU mode. ቭ ቨ POWER button Television MAIN POWER button (P50X901 only) This power button is unplugged, the clock will be turned ON/OFF manually. These buttons also serve as... POWER" to ON condition (lights red) for reference). ብ INPUT/EXIT button Press this button to OFF or the TV is for "MAIN POWER" operation you must be at stand-by remote control. These buttons also serve as the cursor down... This button allows you to enter the MENU, making it possible to turn the Plasma Television ON/OFF.

Owners Guide
Page 14
... , and 3 (Y/VIDEO) can select each video ቤ source. Use the S-VIDEO output for your Plasma Television's remote control. (For reference see page 46). 5. S-VIDEO has priority over VIDEO input. 2. It may...optimum picture quality when using the Y-PBPR inputs (see pages 24-25). ቫ Power Swivel Connector (P50X901 only) Connect from here the Power Swivel cable (provided) to change the signal source CABLE or AIR... for high quality video output. In this case, connect the components B-Y output to the TV's PB input and the components R-Y output to Input 2 and 3, and HDMI inputs will...
... , and 3 (Y/VIDEO) can select each video ቤ source. Use the S-VIDEO output for your Plasma Television's remote control. (For reference see page 46). 5. S-VIDEO has priority over VIDEO input. 2. It may...optimum picture quality when using the Y-PBPR inputs (see pages 24-25). ቫ Power Swivel Connector (P50X901 only) Connect from here the Power Swivel cable (provided) to change the signal source CABLE or AIR... for high quality video output. In this case, connect the components B-Y output to the TV's PB input and the components R-Y output to Input 2 and 3, and HDMI inputs will...

Owners Guide
Page 19
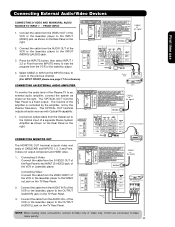
...signal. • When HDMI input a 1080p signal, it to the left audio jack on (L/(MONO)) the Rear Panel. • Refer to the TV's PR input. • It may be distorted on Rear Panel Connections • S-VIDEO, Y-PBPR, or HDMI connections are provided for high performance ...-top-boxes. In this case, connect the components B-Y output to the TV's PB input and the components R-Y output to the TV's PR input. • Your component outputs may be used for high performance laserdisc players, VCRs etc. Connecting the television directly to each input jack. • COMPONENT: Y-PBPR (Input 2...
...signal. • When HDMI input a 1080p signal, it to the left audio jack on (L/(MONO)) the Rear Panel. • Refer to the TV's PR input. • It may be distorted on Rear Panel Connections • S-VIDEO, Y-PBPR, or HDMI connections are provided for high performance ...-top-boxes. In this case, connect the components B-Y output to the TV's PB input and the components R-Y output to the TV's PR input. • Your component outputs may be used for high performance laserdisc players, VCRs etc. Connecting the television directly to each input jack. • COMPONENT: Y-PBPR (Input 2...
Owners Guide
Page 23
... the INPUT (MONO)/L(AUDIO) jack. 3. Connect an optical cable from the AUDIO IN R of a separate Stereo System Amplifier as shown on the TV Rear Panel. The "OPTICAL OUT" from the INPUTS menu to the previous channel. (For INPUT FRONT please see page 17 for reference). Connect the... and audio of the Plasma TV to the VIDEO out jack on the TV Rear Panel. 3. The OPTICAL OUT terminal outputs all audio sources with Optical IN capability. 1. Press the INPUTS button, then select INPUT 1 2,3 or Front from the Rear Panel is controlled by the amplifier, not by the Plasma Television.
... the INPUT (MONO)/L(AUDIO) jack. 3. Connect an optical cable from the AUDIO IN R of a separate Stereo System Amplifier as shown on the TV Rear Panel. The "OPTICAL OUT" from the INPUTS menu to the previous channel. (For INPUT FRONT please see page 17 for reference). Connect the... and audio of the Plasma TV to the VIDEO out jack on the TV Rear Panel. 3. The OPTICAL OUT terminal outputs all audio sources with Optical IN capability. 1. Press the INPUTS button, then select INPUT 1 2,3 or Front from the Rear Panel is controlled by the amplifier, not by the Plasma Television.

Owners Guide
Page 24
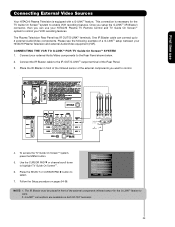
... IR OUT terminal of the external components you can use Connecting External Video Sources Your HITACHI Plasma Television is setup, it allows your IR Blaster cable to control your equipment using your HITACHI Plasma TV Remote Control. Once this is equipped with up to four components. Place the IR ... Set The IR Out Select The Quick Start Option Reset the Software Move SEL Return NOTE: 1. This feature helps to control your Hitachi Plasma Television and external Audio/Video equipment (VCR and DVD Player). Therefore, you wish to highlight SETUP. 6. Press the SELECT or CURSOR PAD...
... IR OUT terminal of the external components you can use Connecting External Video Sources Your HITACHI Plasma Television is setup, it allows your IR Blaster cable to control your equipment using your HITACHI Plasma TV Remote Control. Once this is equipped with up to four components. Place the IR ... Set The IR Out Select The Quick Start Option Reset the Software Move SEL Return NOTE: 1. This feature helps to control your Hitachi Plasma Television and external Audio/Video equipment (VCR and DVD Player). Therefore, you wish to highlight SETUP. 6. Press the SELECT or CURSOR PAD...
Owners Guide
Page 25
First time use your HITACHI Plasma TV Remote Control and TV Guide On ScreenTM system to enable VCR recording features. The Plasma Television Rear Panel has IR OUT/G-LINKTM terminals. One IR Blaster cable can use Connecting External Video Sources Your HITACHI Plasma Television is necessary for the G-LINKTM ... you can connect up to highlight TV Guide On ScreenTM. 6. To access the TV Guide On ScreenTM system, press the MENU button. 5. CONNECTING THE VCR TO G-LINKTM FOR TV Guide On ScreenTM SYSTEM 1. Connect your HITACHI Plasma Television and external Audio/Video equipment (VCR...
First time use your HITACHI Plasma TV Remote Control and TV Guide On ScreenTM system to enable VCR recording features. The Plasma Television Rear Panel has IR OUT/G-LINKTM terminals. One IR Blaster cable can use Connecting External Video Sources Your HITACHI Plasma Television is necessary for the G-LINKTM ... you can connect up to highlight TV Guide On ScreenTM. 6. To access the TV Guide On ScreenTM system, press the MENU button. 5. CONNECTING THE VCR TO G-LINKTM FOR TV Guide On ScreenTM SYSTEM 1. Connect your HITACHI Plasma Television and external Audio/Video equipment (VCR...
Owners Guide
Page 26
..., indicating that the remote will now control your cable box (see page 39 for instructions on how to program the remote to control your television. To operate your VCR/PVR (Personal Video Recorder), select PVR/VCR by pressing the Source button of the Source Select on the remote.... Source Select on the remote. The DVD mode indicator will blink, indicating that the remote will now control your cable box). To operate your HITACHI Plasma TV, the new remote control is designed to operate different types of VCRs, cable boxes, set-top-boxes, satellite receivers, DVD players, and other...
..., indicating that the remote will now control your cable box (see page 39 for instructions on how to program the remote to control your television. To operate your VCR/PVR (Personal Video Recorder), select PVR/VCR by pressing the Source button of the Source Select on the remote.... Source Select on the remote. The DVD mode indicator will blink, indicating that the remote will now control your cable box). To operate your HITACHI Plasma TV, the new remote control is designed to operate different types of VCRs, cable boxes, set-top-boxes, satellite receivers, DVD players, and other...

Owners Guide
Page 29
...1 Select to the Photo Input in the front panel of the Plasma TV (see page 54-56). PHOTO INPUT Select to access your pictures...buttons and the SELECT button, except for numeric entries. FRONT Select to access the Channel Guide of a television program or home video which are being received, the picture source, if the channel has stereo (ST...viewing. 2. HDMI- Digital channel Program Information Program Run Time Show Name 3:00PM- 3:30M REGION 5 ST DTvCC TV-G D Air 15-1 KPBS-HD 1080i 3:17PM Main Picture Source and channel indication Broadcast channel identification Clock Audio ...
...1 Select to the Photo Input in the front panel of the Plasma TV (see page 54-56). PHOTO INPUT Select to access your pictures...buttons and the SELECT button, except for numeric entries. FRONT Select to access the Channel Guide of a television program or home video which are being received, the picture source, if the channel has stereo (ST...viewing. 2. HDMI- Digital channel Program Information Program Run Time Show Name 3:00PM- 3:30M REGION 5 ST DTvCC TV-G D Air 15-1 KPBS-HD 1080i 3:17PM Main Picture Source and channel indication Broadcast channel identification Clock Audio ...
Owners Guide
Page 41
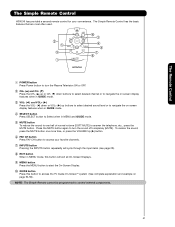
... VOL + SELECT MUTE CH - NOTE: The Simple Remote cannot be programmed to access the TV Guide On-ScreenTM system (See complete explanation and example on screen display features when in GUIDE...button Press this button to control external components. 41 The Remote Control The Simple Remote Control HITACHI has provided a second remote control for your favorite channels. ቨ INPUTS button Pressing ...restore the sound, press the MUTE button one half of normal volume (SOFT MUTE) to turn the Plasma Television ON or OFF. ባ CH+ (̆) and CH- (̄) Press the CH+ (̆)...
... VOL + SELECT MUTE CH - NOTE: The Simple Remote cannot be programmed to access the TV Guide On-ScreenTM system (See complete explanation and example on screen display features when in GUIDE...button Press this button to control external components. 41 The Remote Control The Simple Remote Control HITACHI has provided a second remote control for your favorite channels. ቨ INPUTS button Pressing ...restore the sound, press the MUTE button one half of normal volume (SOFT MUTE) to turn the Plasma Television ON or OFF. ባ CH+ (̆) and CH- (̄) Press the CH+ (̆)...

