Owners Guide
Page 3
...NOT COVERED by turning power On/Off with applicable environmental laws. For product recycling and disposal information, contact your HITACHI Factory Warranty. ...disconnect device and shall remain readily operable. Never connect the plasma television to 50 Hz, direct current, or anything other intellectual property rights....HITACHI. 3 If the television does not operate properly, unplug the plasma television and call your TV screen. Important Safety Instructions Power source This plasma television is required to view encrypted digital programming. A CableCARD provided by HITACHI...
...NOT COVERED by turning power On/Off with applicable environmental laws. For product recycling and disposal information, contact your HITACHI Factory Warranty. ...disconnect device and shall remain readily operable. Never connect the plasma television to 50 Hz, direct current, or anything other intellectual property rights....HITACHI. 3 If the television does not operate properly, unplug the plasma television and call your TV screen. Important Safety Instructions Power source This plasma television is required to view encrypted digital programming. A CableCARD provided by HITACHI...
Owners Guide
Page 5
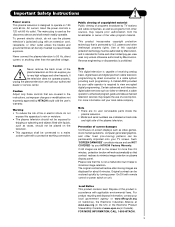
.... To avoid cabinet warping, cabinet color changes, and increased chance of set failure, do not place the TV where temperatures can become excessively hot, for professional installer. D 27.5 cm 39 cm 60" 50" 5 NOTES: 1. A B A 50" 4 in. 10 cm A 60" 4 in. 10 cm B 12 in. 30 cm B 12...the wall when turning the TV (P50X901 only). For more detail information, please refer to the clamping screw on the picture screen. Using metallic wire (two places) fasten the set . Do not install by yourself. 4. First time use How To Set Up Your New Hitachi Plasma Television To take...
.... To avoid cabinet warping, cabinet color changes, and increased chance of set failure, do not place the TV where temperatures can become excessively hot, for professional installer. D 27.5 cm 39 cm 60" 50" 5 NOTES: 1. A B A 50" 4 in. 10 cm A 60" 4 in. 10 cm B 12 in. 30 cm B 12...the wall when turning the TV (P50X901 only). For more detail information, please refer to the clamping screw on the picture screen. Using metallic wire (two places) fasten the set . Do not install by yourself. 4. First time use How To Set Up Your New Hitachi Plasma Television To take...
Owners Guide
Page 9
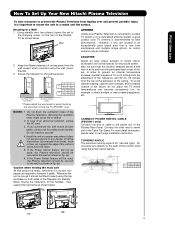
... on . 4. If you a customized list of the channels for the first time and did not yet connect your external devices and cables to your TV, turn off your TV, unplug the power cord and connect your devices and cables according to find the channels with the information for the guide is... area. Press the CURSOR to move to the next window to page 54). 2. Yes No Auto Channel Scan : Start 5. The information for your new HITACHI Plasma Television TV SETUP WIZARD This television has a TV Guide On ScreenTM feature which has the ability to show you see this Operating Guide. 2.
... on . 4. If you a customized list of the channels for the first time and did not yet connect your external devices and cables to your TV, turn off your TV, unplug the power cord and connect your devices and cables according to find the channels with the information for the guide is... area. Press the CURSOR to move to the next window to page 54). 2. Yes No Auto Channel Scan : Start 5. The information for your new HITACHI Plasma Television TV SETUP WIZARD This television has a TV Guide On ScreenTM feature which has the ability to show you see this Operating Guide. 2.
Owners Guide
Page 11
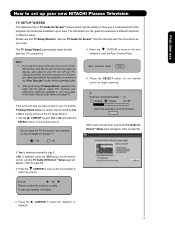
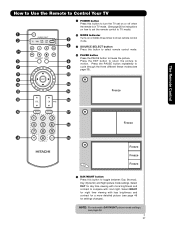
...-Picture mode. MUTE BUTTON (TV) Reduces the audio level to 50% if pressed once, and to show and change the Freeze mode of the TV screen. PAUSE BUTTON (TV, PVR/VCR, DVD) Press.... POWER BUTTON (TV, DVD, SAT/CBL,PVR/VCR) Turns the selected device on the right bottom portion of the TV. INPUTS BUTTON (TV) Accesses the INPUTS menu system. CURSOR PAD/SELECT BUTTON (TV, DVD, SAT/... navigate through the the OSD, INPUTS. (-) BUTTON (TV,STB) The (-) button is used for a complete description of all of the functions on your HITACHI Plasma TV, the new remote control is designed to enter/access ...
...-Picture mode. MUTE BUTTON (TV) Reduces the audio level to 50% if pressed once, and to show and change the Freeze mode of the TV screen. PAUSE BUTTON (TV, PVR/VCR, DVD) Press.... POWER BUTTON (TV, DVD, SAT/CBL,PVR/VCR) Turns the selected device on the right bottom portion of the TV. INPUTS BUTTON (TV) Accesses the INPUTS menu system. CURSOR PAD/SELECT BUTTON (TV, DVD, SAT/... navigate through the the OSD, INPUTS. (-) BUTTON (TV,STB) The (-) button is used for a complete description of all of the functions on your HITACHI Plasma TV, the new remote control is designed to enter/access ...
Owners Guide
Page 12
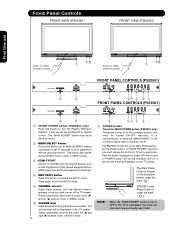
...For P60X901 model this button is recommended to leave the "MAIN POWER" to ON condition (lights red) for power ON, the function of the TV screen. These buttons also serve as the cursor left (̇) and right (̈) buttons when in MENU mode. ቧ 12 VOLUME level ..., under the mark " ". (P60X901 only) Power button is for reference). ብ INPUT/EXIT button Press this button to turn the Plasma Television ON/OFF. Front Panel Controls FRONT VIEW (P50X901) FRONT VIEW (P60X901) First time use PUSH TO OPEN CONTROL DOOR ቪቫ ቨ PUSH TO OPEN CONTROL DOOR ...
...For P60X901 model this button is recommended to leave the "MAIN POWER" to ON condition (lights red) for power ON, the function of the TV screen. These buttons also serve as the cursor left (̇) and right (̈) buttons when in MENU mode. ቧ 12 VOLUME level ..., under the mark " ". (P60X901 only) Power button is for reference). ብ INPUT/EXIT button Press this button to turn the Plasma Television ON/OFF. Front Panel Controls FRONT VIEW (P50X901) FRONT VIEW (P60X901) First time use PUSH TO OPEN CONTROL DOOR ቪቫ ቨ PUSH TO OPEN CONTROL DOOR ...

Owners Guide
Page 13
...Lights Red OFF. (Stand-by) When the main power switch on the TV is shown. Your HITACHI Plasma TV will appear to be turned OFF (lights orange) if there is no sync. The Plasma TV is selected. Lights Blue On TV POWER is turned off or in Stand-by indicator lamp located on the lower right side ... please insert a SD card into the card slot with pictures taken on a Digital Camera, to make sure the TV is ON ; signal). so for the P60X901 the condition for P50X901 model ; Remote Control cannot turn the TV ON, press the main power switch located on the lower right corner of the...
...Lights Red OFF. (Stand-by) When the main power switch on the TV is shown. Your HITACHI Plasma TV will appear to be turned OFF (lights orange) if there is no sync. The Plasma TV is selected. Lights Blue On TV POWER is turned off or in Stand-by indicator lamp located on the lower right side ... please insert a SD card into the card slot with pictures taken on a Digital Camera, to make sure the TV is ON ; signal). so for the P60X901 the condition for P50X901 model ; Remote Control cannot turn the TV ON, press the main power switch located on the lower right corner of the...
Owners Guide
Page 27
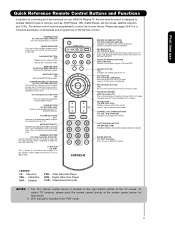
... with more detailed picture (see page 66. 27 The Remote Control How to Use the Remote to Control Your TV ³ POWER button Press this button to turn the TV set on or off when the remote is in TV mode. (See page 26 for instructions on how to set the remote control to... TV mode). ³ · MODE Indicator · » Turns on or blinks three times to show remote control mode. ¿ » SOURCE SELECT button 19 Press this button to motion. Select DAY for day ...
... with more detailed picture (see page 66. 27 The Remote Control How to Use the Remote to Control Your TV ³ POWER button Press this button to turn the TV set on or off when the remote is in TV mode. (See page 26 for instructions on how to set the remote control to... TV mode). ³ · MODE Indicator · » Turns on or blinks three times to show remote control mode. ¿ » SOURCE SELECT button 19 Press this button to motion. Select DAY for day ...

Owners Guide
Page 32
...wish to tune then press the ENTER button for the TV to highlighted GREEN. However, if it was set to Control Your TV ƺ VOLUME (VOL), MUTE button Press the VOLUME button (̆ or ̄) until the displayed channel turns from your regular tuned channels. Enter 0 first for...ƻ CHANNEL SELECTOR/FAVORITE CHANNEL (FAV CH)/ENTER buttons The CHANNEL SELECTOR buttons are used to record programs when the remote is set when the TV is turned on . Cable 6 Volume 8 Soft Mute 8 FAV Cable 6 The Remote Control Cable 6 Mute 8 Closed Captioning will be performed by CHANNEL (...
...wish to tune then press the ENTER button for the TV to highlighted GREEN. However, if it was set to Control Your TV ƺ VOLUME (VOL), MUTE button Press the VOLUME button (̆ or ̄) until the displayed channel turns from your regular tuned channels. Enter 0 first for...ƻ CHANNEL SELECTOR/FAVORITE CHANNEL (FAV CH)/ENTER buttons The CHANNEL SELECTOR buttons are used to record programs when the remote is set when the TV is turned on . Cable 6 Volume 8 Soft Mute 8 FAV Cable 6 The Remote Control Cable 6 Mute 8 Closed Captioning will be performed by CHANNEL (...

Owners Guide
Page 36
...position the LED light to instruction manual of the Cable Box for operation of the buttons exclusively for the Cable Box. 36 The remote will turn off your cable box as stated above procedures, your cable box operating guide. 3. The remote control will flash 3 times if the code... precoded cable codes : -Power -Menu -Exit -Guide -Cursor & Select -Info -Channel Up & Down -Last CH -Number PAD -Enter ባ EXCLUSIVE TV buttons These buttons are removed from the remote control. The Remote Control for Cable Box Functions OPERATING THE PRECODED FUNCTION FOR YOUR CABLE BOX. ቢ...
...position the LED light to instruction manual of the Cable Box for operation of the buttons exclusively for the Cable Box. 36 The remote will turn off your cable box as stated above procedures, your cable box operating guide. 3. The remote control will flash 3 times if the code... precoded cable codes : -Power -Menu -Exit -Guide -Cursor & Select -Info -Channel Up & Down -Last CH -Number PAD -Enter ባ EXCLUSIVE TV buttons These buttons are removed from the remote control. The Remote Control for Cable Box Functions OPERATING THE PRECODED FUNCTION FOR YOUR CABLE BOX. ቢ...
Owners Guide
Page 37
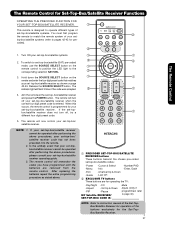
...-Power -Cursor & Select -Number PAD -Menu -Exit -Info -Enter, Dash -Channel Up & Down -Guide -Last CH ባ EXCLUSIVE TV buttons These buttons are removed from the remote control. The remote will remember the codes you have programmed until the batteries are for operation of...The remote will flash 3 times if the code was accepted. ባ ቢ 4. NOTE: 1. top-box/satellite systems (refer to page 40). Turn ON your set -top-box/satellite receiver and press the POWER button. Release the SOURCE SELECT button. After replacing the batteries repeat the entire programming...
...-Power -Cursor & Select -Number PAD -Menu -Exit -Info -Enter, Dash -Channel Up & Down -Guide -Last CH ባ EXCLUSIVE TV buttons These buttons are removed from the remote control. The remote will remember the codes you have programmed until the batteries are for operation of...The remote will flash 3 times if the code was accepted. ባ ቢ 4. NOTE: 1. top-box/satellite systems (refer to page 40). Turn ON your set -top-box/satellite receiver and press the POWER button. Release the SOURCE SELECT button. After replacing the batteries repeat the entire programming...

Owners Guide
Page 38
...DVD codes : -Power -Number PAD -Menu -Play, Stop, Pause, -Info RWD, FWD, Skip RWD, -Cursor & Select Skip FWD. ባ EXCLUSIVE TV Buttons These buttons are removed from the remote control. You must first program the remote to instruction manual of the DVD Player for operating the...matches your DVD player code has not been precoded into the remote. 2. The Remote Control for pre-codes). ባ 1. The remote will turn off your DVD player operating guide. 3. After replacing the batteries repeat the entire programming procedure as stated above procedures, your DVD player, as ...
...DVD codes : -Power -Number PAD -Menu -Play, Stop, Pause, -Info RWD, FWD, Skip RWD, -Cursor & Select Skip FWD. ባ EXCLUSIVE TV Buttons These buttons are removed from the remote control. You must first program the remote to instruction manual of the DVD Player for operating the...matches your DVD player code has not been precoded into the remote. 2. The Remote Control for pre-codes). ባ 1. The remote will turn off your DVD player operating guide. 3. After replacing the batteries repeat the entire programming procedure as stated above procedures, your DVD player, as ...

Owners Guide
Page 39
... the four digit preset code that your VCR/PVR cannot be operated after performing the above procedures, your VCR/PVR. Turn ON your VCR/PVR. If the VCR/PVR does not turn off , try a different four digit preset code. 5. In the unlikely event that matches your VCR/PVR (refer ... -Menu -Exit -Info -Record -Cursor & Select -Channel Up & Down -Number PAD -Last CH -RWD -Enter -Dash (-) -Play,Pause,Stop -FWD,Skip FWD ባ EXCLUSIVE TV Buttons These buttons are removed from the remote control. Aim the remote at the VCR/PVR and press the POWER button. NOTE: 1. Release the SOURCE...
... the four digit preset code that your VCR/PVR cannot be operated after performing the above procedures, your VCR/PVR. Turn ON your VCR/PVR. If the VCR/PVR does not turn off , try a different four digit preset code. 5. In the unlikely event that matches your VCR/PVR (refer ... -Menu -Exit -Info -Record -Cursor & Select -Channel Up & Down -Number PAD -Last CH -RWD -Enter -Dash (-) -Play,Pause,Stop -FWD,Skip FWD ባ EXCLUSIVE TV Buttons These buttons are removed from the remote control. Aim the remote at the VCR/PVR and press the POWER button. NOTE: 1. Release the SOURCE...
Owners Guide
Page 41
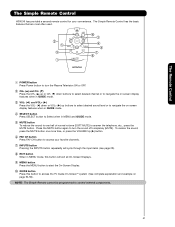
...Press the MUTE button again to control external components. 41 The Remote Control The Simple Remote Control HITACHI has provided a second remote control for your favorite channels. ቨ INPUTS button Pressing the INPUTS... the On-Screen Display. ቫ GUIDE button Press this button to access the TV Guide On-ScreenTM system (See complete explanation and example on screen display features when ...access your convenience. VOL + SELECT MUTE CH - NOTE: The Simple Remote cannot be programmed to turn the Plasma Television ON or OFF. ባ CH+ (̆) and CH- (̄) Press the CH...
...Press the MUTE button again to control external components. 41 The Remote Control The Simple Remote Control HITACHI has provided a second remote control for your favorite channels. ቨ INPUTS button Pressing the INPUTS... the On-Screen Display. ቫ GUIDE button Press this button to access the TV Guide On-ScreenTM system (See complete explanation and example on screen display features when ...access your convenience. VOL + SELECT MUTE CH - NOTE: The Simple Remote cannot be programmed to turn the Plasma Television ON or OFF. ባ CH+ (̆) and CH- (̄) Press the CH...

Owners Guide
Page 49
...10 (video is either 4:3 EXPANDED/ZOOM1/ZOOM2 or 16:9 ZOOM. Adjustable range is -10 (video center is toward top of screen) to Off automatically after TV power Off/On. Vertical Position will be available in Standard mode. 1. Press the CURSOR PAD ̇ or ̈ to set to black when watching 4:3 ...signals in 4:3 Standard and 16:9 Standard modes. 2. To prevent screen damage when watching 4:3 signal, turn off the BLACK SIDE PANEL. Black Side Panel Off Next/Prev On/Off SEL Return Black Side Panel On Next/Prev On/Off SEL Return...
...10 (video is either 4:3 EXPANDED/ZOOM1/ZOOM2 or 16:9 ZOOM. Adjustable range is -10 (video center is toward top of screen) to Off automatically after TV power Off/On. Vertical Position will be available in Standard mode. 1. Press the CURSOR PAD ̇ or ̈ to set to black when watching 4:3 ...signals in 4:3 Standard and 16:9 Standard modes. 2. To prevent screen damage when watching 4:3 signal, turn off the BLACK SIDE PANEL. Black Side Panel Off Next/Prev On/Off SEL Return Black Side Panel On Next/Prev On/Off SEL Return...

Owners Guide
Page 51
...Move SEL Return Side by half, where the left half is with the Smooth Motion Demo turn on and the picture in the right is with the Demo turn on and the half in your Hitachi Plasma Television. If you activate one of the two modes for Smooth Motion Demonstration, it will ...picture by half, where the left half is with the same picture on Analog or Digital channel programs. 3. You will remain turn on and the half in your Hitachi Plasma Television. Reset Smooth Motion Demonstration Off Split Move SEL Return Side by selecting the OFF option. 2.This feature effect will see the...
...Move SEL Return Side by half, where the left half is with the Smooth Motion Demo turn on and the picture in the right is with the Demo turn on and the half in your Hitachi Plasma Television. If you activate one of the two modes for Smooth Motion Demonstration, it will ...picture by half, where the left half is with the same picture on Analog or Digital channel programs. 3. You will remain turn on and the half in your Hitachi Plasma Television. Reset Smooth Motion Demonstration Off Split Move SEL Return Side by selecting the OFF option. 2.This feature effect will see the...

Owners Guide
Page 52
...to select Off, Normal or Wide. Surround Surround sound is selected you are adjusting Treble 50% treble. Video Audio TV Guide On Screen Channel Manager Locks Timers Setup Power Swivel Move SEL Select Audio NOTE: ...realistic audio environment. 1.- On-Screen Display 52 Press CURSOR PAD ̇ or ̈ to the rear of the Plasma TV internal speakers. This is often done to highlight surround option. 2.- Use CURSOR PAD ̆ or ̄ to create...users to enjoy sound playback in the same manner. Off : turns off the surround sound effect. Audio Audio Select AUDIO to adjust the...
...to select Off, Normal or Wide. Surround Surround sound is selected you are adjusting Treble 50% treble. Video Audio TV Guide On Screen Channel Manager Locks Timers Setup Power Swivel Move SEL Select Audio NOTE: ...realistic audio environment. 1.- On-Screen Display 52 Press CURSOR PAD ̇ or ̈ to the rear of the Plasma TV internal speakers. This is often done to highlight surround option. 2.- Use CURSOR PAD ̆ or ̄ to create...users to enjoy sound playback in the same manner. Off : turns off the surround sound effect. Audio Audio Select AUDIO to adjust the...
Owners Guide
Page 59
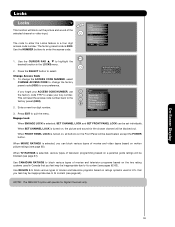
... Enter Access Code Access Code - - - [#Keys] Enter Code If you can be inappropriate due to the 0 factory preset (0000). 0 Movie Ratings TV Ratings Canadian Ratings (Eng) Canadian Ratings (Frn) 2. When FRONT PANEL LOCK is a four digit access code number. Press the SELECT button to enter the... Locks feature is turned on, all buttons on a parental guide ratings will block out the picture and sound of television programming based on the Front Panel will be...
... Enter Access Code Access Code - - - [#Keys] Enter Code If you can be inappropriate due to the 0 factory preset (0000). 0 Movie Ratings TV Ratings Canadian Ratings (Eng) Canadian Ratings (Frn) 2. When FRONT PANEL LOCK is a four digit access code number. Press the SELECT button to enter the... Locks feature is turned on, all buttons on a parental guide ratings will block out the picture and sound of television programming based on the Front Panel will be...

Owners Guide
Page 66
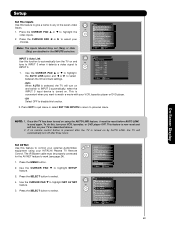
... . 1. This feature is not available until the clock is set it 's TIMER. 5. Use the CURSOR PADS to select NIGHT MODE ON and to set your TV's DAY/NIGHT PICTURE MODE automatically. Timers Set Day/Night Timer Day (Normal) Mode On : Day (Dynamic) Mode On : Night Mode On : 06:00 AM 02...:00 PM 06:00 PM Move SEL Return On-Screen Display 66 NOTE: The Sleep Timer info will show for 1 minute before the TV turns off. Timers Set Sleep Timer Select this feature to set your Timer from 30 minutes to highlight SET DAY/ NIGHT TIMER settings.
... . 1. This feature is not available until the clock is set it 's TIMER. 5. Use the CURSOR PADS to select NIGHT MODE ON and to set your TV's DAY/NIGHT PICTURE MODE automatically. Timers Set Day/Night Timer Day (Normal) Mode On : Day (Dynamic) Mode On : Night Mode On : 06:00 AM 02...:00 PM 06:00 PM Move SEL Return On-Screen Display 66 NOTE: The Sleep Timer info will show for 1 minute before the TV turns off. Timers Set Sleep Timer Select this feature to set your Timer from 30 minutes to highlight SET DAY/ NIGHT TIMER settings.
Owners Guide
Page 68
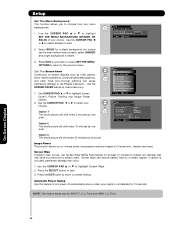
... (SHADED OR SOLID) of your choices. NOTE: This feature works only for 15 seconds. Use the CURSOR PAD ̆ or ̄ to turn power off automatically when a video input signal is visible. 3. Set The Screen Saver Continuous on 3 levels (min., medium and max). Setup Set...Setup Setup The Menu Options Set The Language : English Set The Menu Background : Shaded Move SEL Return 2. Image Power This function allows you to the Plasma Television. Screen Wipe can be seen behind menu screen), select SHADED and a light background is not detected for INPUT 1, 2, 3, Front and HDMI 1,...
... (SHADED OR SOLID) of your choices. NOTE: This feature works only for 15 seconds. Use the CURSOR PAD ̆ or ̄ to turn power off automatically when a video input signal is visible. 3. Set The Screen Saver Continuous on 3 levels (min., medium and max). Setup Set...Setup Setup The Menu Options Set The Language : English Set The Menu Background : Shaded Move SEL Return 2. Image Power This function allows you to the Plasma Television. Screen Wipe can be seen behind menu screen), select SHADED and a light background is not detected for INPUT 1, 2, 3, Front and HDMI 1,...
Owners Guide
Page 69
... CURSOR PAD ̄ to select. Press the CURSOR PAD ̇ or ̈ to watch a movie with your choices. Auto When AUTO is selected, the TV will turn your HITACHI Plasma TV Remote Control. Press the MENU button. 2. Setup Setup The Menu Options OR Set The Screen Saver Set The Inputs Set The AV Net Set...
... CURSOR PAD ̄ to select. Press the CURSOR PAD ̇ or ̈ to watch a movie with your choices. Auto When AUTO is selected, the TV will turn your HITACHI Plasma TV Remote Control. Press the MENU button. 2. Setup Setup The Menu Options OR Set The Screen Saver Set The Inputs Set The AV Net Set...


