Owners Guide
Page 3
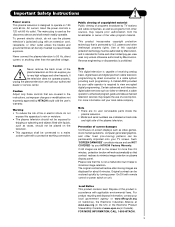
...do not expose this is protected by TV stations and cable companies, as well as programs from the broadcaster or owner of the plasma television as video games, stock market ...no user serviceable parts inside the plasma television. • Model and serial numbers are indicated on plasma display panel. If still images are NOT COVERED by HITACHI could void the user's warranty...restore after moving ) patterns can be fully inserted to 50 Hz, direct current, or anything other hazards. FOR MORE INFORMATION, CALL 1-800-HITACHI. 3 Public viewing of copyrighted material Public viewing of ...
...do not expose this is protected by TV stations and cable companies, as well as programs from the broadcaster or owner of the plasma television as video games, stock market ...no user serviceable parts inside the plasma television. • Model and serial numbers are indicated on plasma display panel. If still images are NOT COVERED by HITACHI could void the user's warranty...restore after moving ) patterns can be fully inserted to 50 Hz, direct current, or anything other hazards. FOR MORE INFORMATION, CALL 1-800-HITACHI. 3 Public viewing of copyrighted material Public viewing of ...
Owners Guide
Page 4
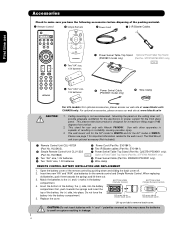
... Table Top Stand Optional Fixed Tabel Top Stand (P50X901 model only) (Part No. Ceiling mounting is WM07L. The wall mount unit for the 50" model is WM07S and for the front glass ...accessories, please access our web site at: www.hitachi.us/tv CANADA only: For optional accessories, please access our web site at: www.hitachi.ca/tv CAUTION: 1. EW08433 P50X901 only). ¿ Two "AAA" size, ... 60" model is not recommended. First time use only with Hitachi P50X901. Replace the cover. This plasma television product is designed for use Accessories Check to the wall ...
... Table Top Stand Optional Fixed Tabel Top Stand (P50X901 model only) (Part No. Ceiling mounting is WM07L. The wall mount unit for the 50" model is WM07S and for the front glass ...accessories, please access our web site at: www.hitachi.us/tv CANADA only: For optional accessories, please access our web site at: www.hitachi.ca/tv CAUTION: 1. EW08433 P50X901 only). ¿ Two "AAA" size, ... 60" model is not recommended. First time use only with Hitachi P50X901. Replace the cover. This plasma television product is designed for use Accessories Check to the wall ...
Owners Guide
Page 5
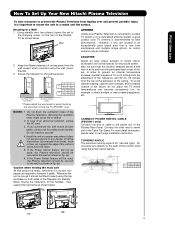
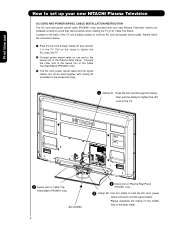
...cm (4 inches) 10 cm (4 inches) CONNECT POWER SWIVEL CABLE (P50X901 only) Connect one end of cable to the swivel slot of the Plasma Rear Panel. If you are required to transport it is 30°... face, etc.) against the edge of set to the clamping screw on both sides of the Plasma TV as shown. C C D 50" 10.8 in. 15.35 in . 30 cm (a) Power Swivel NOT USED (b) Power Swivel...recommended for stability. First time use How To Set Up Your New Hitachi Plasma Television To take measures to prevent the Plasma Television from the top of the monitor when using the power swivel ...
...cm (4 inches) 10 cm (4 inches) CONNECT POWER SWIVEL CABLE (P50X901 only) Connect one end of cable to the swivel slot of the Plasma Rear Panel. If you are required to transport it is 30°... face, etc.) against the edge of set to the clamping screw on both sides of the Plasma TV as shown. C C D 50" 10.8 in. 15.35 in . 30 cm (a) Power Swivel NOT USED (b) Power Swivel...recommended for stability. First time use How To Set Up Your New Hitachi Plasma Television To take measures to prevent the Plasma Television from the top of the monitor when using the power swivel ...
Owners Guide
Page 6
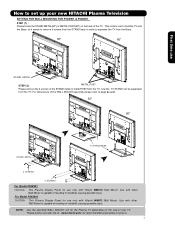
...of the TV are 2 plastic clamps to the TV. · Swivel slot on Table Top Stand Base (P50X901 only). then pull the clamp to tighten the AC cord to hold the AC cord, power swivel connector and the signal cables. First time use How to set up your new HITACHI Plasma Television ...AC CORD AND POWER SWIVEL CABLE INSTALLATION INSTRUCTION The AC cord and power swivel cable (P50X901 only) provided with your new Plasma Television need to be held together with Clamp #2 (included on the accesories bag...
...of the TV are 2 plastic clamps to the TV. · Swivel slot on Table Top Stand Base (P50X901 only). then pull the clamp to tighten the AC cord to hold the AC cord, power swivel connector and the signal cables. First time use How to set up your new HITACHI Plasma Television ...AC CORD AND POWER SWIVEL CABLE INSTALLATION INSTRUCTION The AC cord and power swivel cable (P50X901 only) provided with your new Plasma Television need to be held together with Clamp #2 (included on the accesories bag...
Owners Guide
Page 7
... Panel for the Plasma TV depending on the size of your new HITACHI Plasma Television SETTING FOR WALL MOUNTING FOR P50X901 & P60X901 STEP (1) : Please locate the STAND METAL(50") or METAL POST(60") on the back of the WALL MOUNT assembly please refer to hold the TV and the Base; Use with Hitachi WM07S Wall Mount. How to...
... Panel for the Plasma TV depending on the size of your new HITACHI Plasma Television SETTING FOR WALL MOUNTING FOR P50X901 & P60X901 STEP (1) : Please locate the STAND METAL(50") or METAL POST(60") on the back of the WALL MOUNT assembly please refer to hold the TV and the Base; Use with Hitachi WM07S Wall Mount. How to...
Owners Guide
Page 8
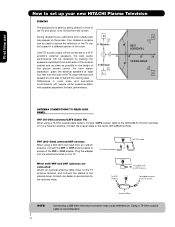
...feet from the side of the TV and about 10 to 18 feet from the screen. Or if you have an antenna, connect the coaxial cable to the antenna mixer. Plug the adapter into the antenna terminal on the screen. Consult your new HITACHI Plasma Television VIEWING The best picture is... recommended. Differences in room sizes and acoustical environments will be located in front of the TV, place the surround speakers to the height of the VHF or UHF adapter. ...
...feet from the side of the TV and about 10 to 18 feet from the screen. Or if you have an antenna, connect the coaxial cable to the antenna mixer. Plug the adapter into the antenna terminal on the screen. Consult your new HITACHI Plasma Television VIEWING The best picture is... recommended. Differences in room sizes and acoustical environments will be located in front of the TV, place the surround speakers to the height of the VHF or UHF adapter. ...
Owners Guide
Page 9
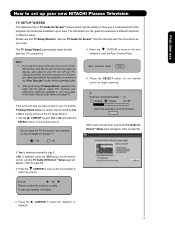
... on different channels in the top portion of the programs and channels available in your area refer to show you have turned on your TV and the TV Setup Wizard appear on page 57. Air Scanning Channel Number : 12 Analog Digital 12-123 Scan time may take 10 to 20 minutes ...Cancel When Auto Channel Scan is turned on the remote control. Please use How to set up your new HITACHI Plasma Television TV SETUP WIZARD This television has a TV Guide On ScreenTM feature which has the ability to the Auto Channel Scan feature on -screen, start the Auto Channel Scan. The...
... on different channels in the top portion of the programs and channels available in your area refer to show you have turned on your TV and the TV Setup Wizard appear on page 57. Air Scanning Channel Number : 12 Analog Digital 12-123 Scan time may take 10 to 20 minutes ...Cancel When Auto Channel Scan is turned on the remote control. Please use How to set up your new HITACHI Plasma Television TV SETUP WIZARD This television has a TV Guide On ScreenTM feature which has the ability to the Auto Channel Scan feature on -screen, start the Auto Channel Scan. The...
Owners Guide
Page 10
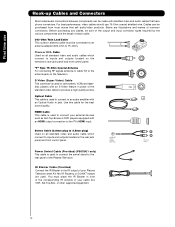
... "F" Type 75-Ohm Coaxial Antenna For connecting RF signals (antenna or cable TV) to inputs and outputs located on the television. AUDIO OUT 3.8mm STEREO MINI-PLUG 2 RCA TYPE PLUGS Power Swivel Cable (Provided) (P50X901 only) This cable is used on camcorders, VCRs and laserdisc players with an...Ohm coaxial shielded wire. Cables can be made with an HDMI output connection to connect your Plasma Television when AV Net, IR Passthru or G-LINKTM feature are illustrations and names of the Plasma Television. Phono or RCA Cable Used on the television's rear jack panel and front control ...
... "F" Type 75-Ohm Coaxial Antenna For connecting RF signals (antenna or cable TV) to inputs and outputs located on the television. AUDIO OUT 3.8mm STEREO MINI-PLUG 2 RCA TYPE PLUGS Power Swivel Cable (Provided) (P50X901 only) This cable is used on camcorders, VCRs and laserdisc players with an...Ohm coaxial shielded wire. Cables can be made with an HDMI output connection to connect your Plasma Television when AV Net, IR Passthru or G-LINKTM feature are illustrations and names of the Plasma Television. Phono or RCA Cable Used on the television's rear jack panel and front control ...
Owners Guide
Page 11
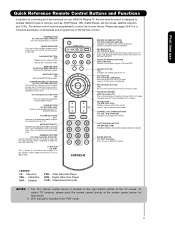
... cursor to navigate through the the OSD, INPUTS. (-) BUTTON (TV,STB) The (-) button is in DVD or PVR/VCR. MUTE BUTTON (TV) Reduces the audio level to 50% if pressed once, and to restore audio level. PAUSE BUTTON (TV, PVR/VCR, DVD) Press to show and change the Freeze ...viewed. DVD/VCR CONTROL BUTTONS (DVD, PVR/VCR) Controls the functions of your HITACHI Plasma TV, the new remote control is displayed. Videocassete Recorder NOTES: 1. First time use as SELECT feature. Satellite PVR - VOLUME BUTTONS (TV ) Increase up or down to show and change the Picture-in the PVR mode...
... cursor to navigate through the the OSD, INPUTS. (-) BUTTON (TV,STB) The (-) button is in DVD or PVR/VCR. MUTE BUTTON (TV) Reduces the audio level to 50% if pressed once, and to restore audio level. PAUSE BUTTON (TV, PVR/VCR, DVD) Press to show and change the Freeze ...viewed. DVD/VCR CONTROL BUTTONS (DVD, PVR/VCR) Controls the functions of your HITACHI Plasma TV, the new remote control is displayed. Videocassete Recorder NOTES: 1. First time use as SELECT feature. Satellite PVR - VOLUME BUTTONS (TV ) Increase up or down to show and change the Picture-in the PVR mode...
Owners Guide
Page 12
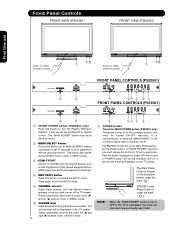
...is not Main Power button, but the Power button, for "MAIN POWER" operation you to enter the MENU, making it possible to set TV features to turn the Plasma Television ON/OFF. These buttons also serve as the cursor left (̇) and right (̈) buttons when in MENU mode. ቧ ... volume level will stop and may eventually reset itself. When the "MAIN POWER" button is for stand-by remote control. Front Panel Controls FRONT VIEW (P50X901) FRONT VIEW (P60X901) First time use PUSH TO OPEN CONTROL DOOR ቪቫ ቨ PUSH TO OPEN CONTROL DOOR ቪቫ ቨ ...
...is not Main Power button, but the Power button, for "MAIN POWER" operation you to enter the MENU, making it possible to set TV features to turn the Plasma Television ON/OFF. These buttons also serve as the cursor left (̇) and right (̈) buttons when in MENU mode. ቧ ... volume level will stop and may eventually reset itself. When the "MAIN POWER" button is for stand-by remote control. Front Panel Controls FRONT VIEW (P50X901) FRONT VIEW (P60X901) First time use PUSH TO OPEN CONTROL DOOR ቪቫ ቨ PUSH TO OPEN CONTROL DOOR ቪቫ ቨ ...

Owners Guide
Page 13
.... ቪ POWER light indicator To turn ON/OFF the "MAIN POWER" of the front bezel will illuminate. Your HITACHI Plasma TV will notify you if a software upgrade is required for remote ON/OFF operation. PHOTO INPUT PUSH EJECT ቩ ቪ Indicating Lamp R/C, AV Net ... the Power Light to be turned OFF (lights orange) if there is no sync. picture is for P50X901 model ; Hitachi will appear to make sure the TV is unplugged. ቫ REMOTE CONTROL sensor Point your remote at this area when selecting channels, adjusting volume, etc. ቫ LEARNING AV NET sensor...
.... ቪ POWER light indicator To turn ON/OFF the "MAIN POWER" of the front bezel will illuminate. Your HITACHI Plasma TV will notify you if a software upgrade is required for remote ON/OFF operation. PHOTO INPUT PUSH EJECT ቩ ቪ Indicating Lamp R/C, AV Net ... the Power Light to be turned OFF (lights orange) if there is no sync. picture is for P50X901 model ; Hitachi will appear to make sure the TV is unplugged. ቫ REMOTE CONTROL sensor Point your remote at this area when selecting channels, adjusting volume, etc. ቫ LEARNING AV NET sensor...

Owners Guide
Page 14
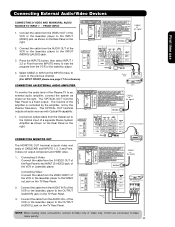
...to the TV's PB input and the component CR output to the TV's PR input. 4. In this case, connect the components B-Y output to the TV's PB input and the components R-Y output to the TV's PR ... when using the Y-PBPR inputs (see pages 24-25). ቫ Power Swivel Connector (P50X901 only) Connect from Dolby Laboratories. HDMI is Dolby® Digital and PCM compatible, such ...jacks for connecting equipment with this capability, such as Set-Top-Boxes or DVD players equipped with your Plasma Television's remote control. (For reference see page 46). 5. S-VIDEO has priority over VIDEO input....
...to the TV's PB input and the component CR output to the TV's PR input. 4. In this case, connect the components B-Y output to the TV's PB input and the components R-Y output to the TV's PR ... when using the Y-PBPR inputs (see pages 24-25). ቫ Power Swivel Connector (P50X901 only) Connect from Dolby Laboratories. HDMI is Dolby® Digital and PCM compatible, such ...jacks for connecting equipment with this capability, such as Set-Top-Boxes or DVD players equipped with your Plasma Television's remote control. (For reference see page 46). 5. S-VIDEO has priority over VIDEO input....

Owners Guide
Page 15
... the CableCARD into the CableCARD slot. Digital Cable Signal INSERT If the CableCARD is required. 2. NOTE: 1. A digital cable subscription is properly installed or removed, the TV will display the following respective screens. Call your cable operator and give them the information from the card to tune digital and high definition encrypted...
... the CableCARD into the CableCARD slot. Digital Cable Signal INSERT If the CableCARD is required. 2. NOTE: 1. A digital cable subscription is properly installed or removed, the TV will display the following respective screens. Call your cable operator and give them the information from the card to tune digital and high definition encrypted...

Owners Guide
Page 17
...according to easily connect a camcorder , DVD, Video Game and a VCR as shown in the following examples: FRONT INPUT PANEL PHOTO INPUT PUSH EJECT P50X901 model FRONT panel picture shown here Note : For Monoaural devices, please connect Audio signal cable into L/Mono input jack . Then press the SELECT ... need to modify them to accommodate your particular assortment of the INPUT terminals, then press the INPUTS button to select the Input of your Plasma TV is dependent on the model and features of video and audio inputs and outputs. Video Camera NOTE: 1. For best performance, video and ...
...according to easily connect a camcorder , DVD, Video Game and a VCR as shown in the following examples: FRONT INPUT PANEL PHOTO INPUT PUSH EJECT P50X901 model FRONT panel picture shown here Note : For Monoaural devices, please connect Audio signal cable into L/Mono input jack . Then press the SELECT ... need to modify them to accommodate your particular assortment of the INPUT terminals, then press the INPUTS button to select the Input of your Plasma TV is dependent on the model and features of video and audio inputs and outputs. Video Camera NOTE: 1. For best performance, video and ...

Owners Guide
Page 18
First time use Rear Panel Connections (IR BLASTER CABLE PROVIDED) CONNECT TO G-LINKTM/IR OUT Outside Antenna or Cable TV coaxial cable 2-Way signal splitter VCR #2 S-VIDEO V L R INPUT Optional VCR #1 ANT OUTPUT IN S-VIDEO V L R Optional HDMI to HDMI HDMI OUTPUT DVI to HDMI DIGITAL OUTPUT AUDIO OUT HDMI DIGITAL OUTPUT CAPABILITY DIGITAL OUTPUT CAPABILITY CONNECT TO IR OUT (IR BLASTER CABLE PROVIDED) NOTE: Cables are optional, except when specified. 18 OUTPUT Y PB/CB PR/CR L R Y PB PR L R OUTPUT DVD Player HDTV Set-Top Box
First time use Rear Panel Connections (IR BLASTER CABLE PROVIDED) CONNECT TO G-LINKTM/IR OUT Outside Antenna or Cable TV coaxial cable 2-Way signal splitter VCR #2 S-VIDEO V L R INPUT Optional VCR #1 ANT OUTPUT IN S-VIDEO V L R Optional HDMI to HDMI HDMI OUTPUT DVI to HDMI DIGITAL OUTPUT AUDIO OUT HDMI DIGITAL OUTPUT CAPABILITY DIGITAL OUTPUT CAPABILITY CONNECT TO IR OUT (IR BLASTER CABLE PROVIDED) NOTE: Cables are optional, except when specified. 18 OUTPUT Y PB/CB PR/CR L R Y PB PR L R OUTPUT DVD Player HDTV Set-Top Box

Owners Guide
Page 19
...; If your device has only one audio output (mono sound), connect it is recommended that have this case, connect the components B-Y output to the TV's PB input and the components R-Y output to the operating guide of the cable should be labeled Y, B-Y, and R-Y. INSTALLATION RECOMMENDATION: 1. In this feature...8226; When HDMI input a 1080p signal, it to the left audio jack on (L/(MONO)) the Rear Panel. • Refer to the TV's PR input. • Your component outputs may be affected by copyright protection systems and the picture will assure a more information on page 18).
...; If your device has only one audio output (mono sound), connect it is recommended that have this case, connect the components B-Y output to the TV's PB input and the components R-Y output to the operating guide of the cable should be labeled Y, B-Y, and R-Y. INSTALLATION RECOMMENDATION: 1. In this feature...8226; When HDMI input a 1080p signal, it to the left audio jack on (L/(MONO)) the Rear Panel. • Refer to the TV's PR input. • Your component outputs may be affected by copyright protection systems and the picture will assure a more information on page 18).

Owners Guide
Page 20
... the INPUT (AUDIO/L) jack. 4. Connect the cable from the AUDIO OUT R of the VCR or the laserdisc player to the Y/VIDEO input jack of the TV . Back of VCR or Laserdisc Player S-VIDEO Video L OUTPUT R VCR or Laserdisc Player NOTE: 1. Cable or Air signal Back of VCR Video OUTPUT VCR NOTE...
... the INPUT (AUDIO/L) jack. 4. Connect the cable from the AUDIO OUT R of the VCR or the laserdisc player to the Y/VIDEO input jack of the TV . Back of VCR or Laserdisc Player S-VIDEO Video L OUTPUT R VCR or Laserdisc Player NOTE: 1. Cable or Air signal Back of VCR Video OUTPUT VCR NOTE...
Owners Guide
Page 23
...both are connected, S-Video takes priority. 23 Connect the cable from the S-VIDEO OUT of the Rear Panel to the INPUT (S-VIDEO) jack, of the Plasma TV to the Optical input of CABLE/AIR and INPUTS 1, 2, 3 and Front. Connecting External Audio/Video Devices First time use CONNECTING A VIDEO AND MONAURAL ... level of the VCR or Laserdisk player. Connect an optical cable from the Rear Panel is controlled by the amplifier, not by the Plasma Television. The "OPTICAL OUT" from the Optical out to an external audio amplifier, connect the system as shown on the Rear Panel on ...
...both are connected, S-Video takes priority. 23 Connect the cable from the S-VIDEO OUT of the Rear Panel to the INPUT (S-VIDEO) jack, of the Plasma TV to the Optical input of CABLE/AIR and INPUTS 1, 2, 3 and Front. Connecting External Audio/Video Devices First time use CONNECTING A VIDEO AND MONAURAL ... level of the VCR or Laserdisk player. Connect an optical cable from the Rear Panel is controlled by the amplifier, not by the Plasma Television. The "OPTICAL OUT" from the Optical out to an external audio amplifier, connect the system as shown on the Rear Panel on ...

Owners Guide
Page 24
...components. Use the CURSOR PAD ̄ or channel scroll down to control your equipment using your Hitachi Plasma Television and external Audio/Video equipment (VCR and DVD Player). Video Audio TV Guide On Screen Channel Manager Locks Timers Setup Power Swivel Move SEL Select Setup Set the Menu ...Blaster in front of the infrared sensor of the external components infrared sensor for each of an AV Net setup between your HITACHI Plasma TV Remote Control. Connect your HITACHI remote control to work. Place the IR Blaster in place. 3. Use the CURSOR PAD ̄ or channel scroll to...
...components. Use the CURSOR PAD ̄ or channel scroll down to control your equipment using your Hitachi Plasma Television and external Audio/Video equipment (VCR and DVD Player). Video Audio TV Guide On Screen Channel Manager Locks Timers Setup Power Swivel Move SEL Select Setup Set the Menu ...Blaster in front of the infrared sensor of the external components infrared sensor for each of an AV Net setup between your HITACHI Plasma TV Remote Control. Connect your HITACHI remote control to work. Place the IR Blaster in place. 3. Use the CURSOR PAD ̄ or channel scroll to...
Owners Guide
Page 25
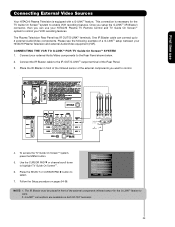
... Connecting External Video Sources Your HITACHI Plasma Television is necessary for the G-LINKTM feature to 2 external Audio/Video components. Place the IR Blaster in front of the Rear Panel. 3. First time use your HITACHI Plasma TV Remote Control and TV Guide On ScreenTM system to ...control your VCR recording features. CONNECTING THE VCR TO G-LINKTM FOR TV Guide On ScreenTM SYSTEM 1. Follow the Setup procedure on both IR...
... Connecting External Video Sources Your HITACHI Plasma Television is necessary for the G-LINKTM feature to 2 external Audio/Video components. Place the IR Blaster in front of the Rear Panel. 3. First time use your HITACHI Plasma TV Remote Control and TV Guide On ScreenTM system to ...control your VCR recording features. CONNECTING THE VCR TO G-LINKTM FOR TV Guide On ScreenTM SYSTEM 1. Follow the Setup procedure on both IR...


