Owners Guide
Page 2
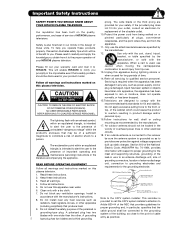
... overhead power lines or other . Keep these instructions. Install in any way, such as power-supply cord or plug is damaged, liquid has been spilled or objects CAUTION have fallen into your HITACHI plasma television. Do not install near water. 6. proper grounding and, in your safety. If an outside antenna is connected to the receiver be sure the antenna system is intended to alert the user to...
... overhead power lines or other . Keep these instructions. Install in any way, such as power-supply cord or plug is damaged, liquid has been spilled or objects CAUTION have fallen into your HITACHI plasma television. Do not install near water. 6. proper grounding and, in your safety. If an outside antenna is connected to the receiver be sure the antenna system is intended to alert the user to...

Owners Guide
Page 3
... turning power Off/On with remote control or power switch on -demand, a cable operator's enhanced program guide and data-enhanced television services may require prior authorization from the broadcaster or owner of fire or electric shock, do not use of programs broadcast by direct connection to a mains socket outlet with applicable environmental laws. Warning • To reduce the risk of the video program material. patents and other sources...
... turning power Off/On with remote control or power switch on -demand, a cable operator's enhanced program guide and data-enhanced television services may require prior authorization from the broadcaster or owner of fire or electric shock, do not use of programs broadcast by direct connection to a mains socket outlet with applicable environmental laws. Warning • To reduce the risk of the video program material. patents and other sources...

Owners Guide
Page 5
... inches) from the top of the Plasma Television. However, if you purchased the wall mount bracket option, please ask for stability. Using wood screws (two) fasten the set firmly in an exceptionally good signal area that the location selected allows a free flow of air to and from the perforated back cover of the Television for professional installer. Wire Wood screw two places Securing to a table-top 1. LOCATION...
... inches) from the top of the Plasma Television. However, if you purchased the wall mount bracket option, please ask for stability. Using wood screws (two) fasten the set firmly in an exceptionally good signal area that the location selected allows a free flow of air to and from the perforated back cover of the Television for professional installer. Wire Wood screw two places Securing to a table-top 1. LOCATION...

Owners Guide
Page 9
... HITACHI Plasma Television VIEWING The best picture is recommended. 9 During daylight hours, reflections from outside light may cause interference. When both VHF and UHF antennas are connected Attach an optional antenna cable mixer to the TV antenna terminal, and connect the cables to the same AIR/CABLE terminal. Plug the adapter into the antenna terminal on the screen. First time use How to set up your dealer or service store for best performance. 4" Minimum L S 80 BEST...
... HITACHI Plasma Television VIEWING The best picture is recommended. 9 During daylight hours, reflections from outside light may cause interference. When both VHF and UHF antennas are connected Attach an optional antenna cable mixer to the TV antenna terminal, and connect the cables to the same AIR/CABLE terminal. Plug the adapter into the antenna terminal on the screen. First time use How to set up your dealer or service store for best performance. 4" Minimum L S 80 BEST...

Owners Guide
Page 11
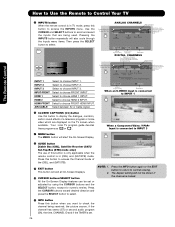
... OSD menu system. (-) BUTTON (TV, SAT) The (-) button is designed to operate different types of devices, such as, DVD Players, CBL (Cable Boxes), set-top-boxes, satellite receivers, and VCRs. VOLUME BUTTONS (TV) Adjusts the audio level of your VCR and DVD. Satellite Receiver DVD - The TV's remote control sensor is displayed. First time use Quick Reference Remote Control Buttons and Functions In addition to controlling all features and programming of the Remote Control. MUTE BUTTON (TV) Reduces the audio level...
... OSD menu system. (-) BUTTON (TV, SAT) The (-) button is designed to operate different types of devices, such as, DVD Players, CBL (Cable Boxes), set-top-boxes, satellite receivers, and VCRs. VOLUME BUTTONS (TV) Adjusts the audio level of your VCR and DVD. Satellite Receiver DVD - The TV's remote control sensor is displayed. First time use Quick Reference Remote Control Buttons and Functions In addition to controlling all features and programming of the Remote Control. MUTE BUTTON (TV) Reduces the audio level...
Owners Guide
Page 12
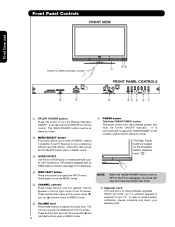
... TV screen. In order to receive written notification, please complete and return your TV. Front Panel Controls FRONT VIEW First time use PUSH TO OPEN CONTROL DOOR UPGRADE CARD (SERVICE USE ONLY) PUSH EJECT ቩ ቤ ቪቫ ቨ FRONT PANEL CONTROLS ቭ ቢ FRONT POWER button Press this button to access the INPUT menu. The Main Power button is for stand-by mode. These buttons also serve as Set-Top-Boxes or DVD players equipped with an HDMI output connection...
... TV screen. In order to receive written notification, please complete and return your TV. Front Panel Controls FRONT VIEW First time use PUSH TO OPEN CONTROL DOOR UPGRADE CARD (SERVICE USE ONLY) PUSH EJECT ቩ ቤ ቪቫ ቨ FRONT PANEL CONTROLS ቭ ቢ FRONT POWER button Press this button to access the INPUT menu. The Main Power button is for stand-by mode. These buttons also serve as Set-Top-Boxes or DVD players equipped with an HDMI output connection...

Owners Guide
Page 13
... a DVD player or Camcorders. First time use . 2. Lights Red OFF. Remote Control can not turn the TV ON, press the main power switch located on the lower right corner of the front bezel will appear to Off. When the main power switch on the TV is ON. (Stand-by mode (lights red) when not in Stand-by ) Lights Blue Lights Orange Blinking Blue On TV MAIN POWER is ON with this area when selecting channels, adjusting volume, etc...
... a DVD player or Camcorders. First time use . 2. Lights Red OFF. Remote Control can not turn the TV ON, press the main power switch located on the lower right corner of the front bezel will appear to Off. When the main power switch on the TV is ON. (Stand-by mode (lights red) when not in Stand-by ) Lights Blue Lights Orange Blinking Blue On TV MAIN POWER is ON with this area when selecting channels, adjusting volume, etc...

Owners Guide
Page 14
... HDMI input is of the remote control, you have monitor output. ብ Optical Out (Digital Audio) This jack provides Digital Audio Output for your audio device that pristine high-definition images retain the highest video quality from Dolby Laboratories. In this case, connect the components B-Y output to the TV's PB input and the components R-Y output to your external devices such as a DVD player or Set Top Box. First time use ባ Audio/Video Inputs 1, 2 and 3 ቢ By using the Y-PBPR inputs...
... HDMI input is of the remote control, you have monitor output. ብ Optical Out (Digital Audio) This jack provides Digital Audio Output for your audio device that pristine high-definition images retain the highest video quality from Dolby Laboratories. In this case, connect the components B-Y output to the TV's PB input and the components R-Y output to your external devices such as a DVD player or Set Top Box. First time use ባ Audio/Video Inputs 1, 2 and 3 ቢ By using the Y-PBPR inputs...

Owners Guide
Page 16
OUTPUT Video L R Video Game COMPOSITE VIDEO OUTPUT CAPABILITY DVD , Video Game Console. Video Camera NOTE:1. Check the owner's manual of each component. For best performance, video and audio cables should be according to the own device specifications. INPUTS HDMI 2 HDMI-Front Air /Cable Input 1 Input 2 Move SEL Sel. 16 First time use to connect the VCR, camcorder, laserdisc player, DVD player, or HDTV Set Top Box to your Plasma TV is dependent on the model and features of each component for the location of the INPUT terminals...
OUTPUT Video L R Video Game COMPOSITE VIDEO OUTPUT CAPABILITY DVD , Video Game Console. Video Camera NOTE:1. Check the owner's manual of each component. For best performance, video and audio cables should be according to the own device specifications. INPUTS HDMI 2 HDMI-Front Air /Cable Input 1 Input 2 Move SEL Sel. 16 First time use to connect the VCR, camcorder, laserdisc player, DVD player, or HDTV Set Top Box to your Plasma TV is dependent on the model and features of each component for the location of the INPUT terminals...

Owners Guide
Page 20
... DVI output, connect the cable from the AUDIO OUT L of the HDTV set -up of uncompressed video to HDMI Cable or CABLE or Air signal or Press the INPUTS button, then select HDMI 1, 2 or FRONT to rear panel jacks. Completely insert the connection cord plugs when connecting to view the program from the INPUTS menu to return to the HDMI input as shown on the Rear panel below. 2. It establishes a one-way point-to-point connection for reference). First time use Connecting External Video Sources CONNECTING A COMPONENT SOURCE...
... DVI output, connect the cable from the AUDIO OUT L of the HDTV set -up of uncompressed video to HDMI Cable or CABLE or Air signal or Press the INPUTS button, then select HDMI 1, 2 or FRONT to rear panel jacks. Completely insert the connection cord plugs when connecting to view the program from the INPUTS menu to return to the HDMI input as shown on the Rear panel below. 2. It establishes a one-way point-to-point connection for reference). First time use Connecting External Video Sources CONNECTING A COMPONENT SOURCE...

Owners Guide
Page 21
... Laserdisc/DVD player or HDTV set top box. 7. See page 18 for tips on the Rear panel below. 2. Completely insert the connection cord plugs when connecting to the last channel tuned. The picture and sound that is played back will be abnormal if the connection is loose. 2. Connect the cable from the PR/CR OUT or RY OUT of DVD Player OUTPUT AUDIO RL VIDEO PR/CR PB/CB Y OR OUTPUT L R Y PB PR HDTV Set-Top Box...
... Laserdisc/DVD player or HDTV set top box. 7. See page 18 for tips on the Rear panel below. 2. Completely insert the connection cord plugs when connecting to the last channel tuned. The picture and sound that is played back will be abnormal if the connection is loose. 2. Connect the cable from the PR/CR OUT or RY OUT of DVD Player OUTPUT AUDIO RL VIDEO PR/CR PB/CB Y OR OUTPUT L R Y PB PR HDTV Set-Top Box...
Owners Guide
Page 26
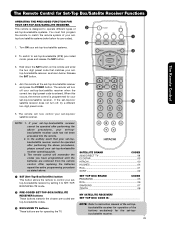
... Picture Format Auto STEREO 10:00 AM Closed Audio Source Caption setting Selection Event timer DIGITAL CHANNELS Digital Closed Caption This icon will start the On-Screen Display. º GUIDE button [Cable Box (CBL), Satellite Receiver (SAT)/ Set-Top-Box (STB) mode only] The use of the (CBL), and (SAT/STB). ¾ EXIT button This button will also cycle through the Inputs menu items. Then press the SELECT button to access the INPUTS menu. Press this button to select. INPUT 3 Select to choose FRONT HDMI INPUT. HDMI...
... Picture Format Auto STEREO 10:00 AM Closed Audio Source Caption setting Selection Event timer DIGITAL CHANNELS Digital Closed Caption This icon will start the On-Screen Display. º GUIDE button [Cable Box (CBL), Satellite Receiver (SAT)/ Set-Top-Box (STB) mode only] The use of the (CBL), and (SAT/STB). ¾ EXIT button This button will also cycle through the Inputs menu items. Then press the SELECT button to access the INPUTS menu. Press this button to select. INPUT 3 Select to choose FRONT HDMI INPUT. HDMI...

Owners Guide
Page 27
... regular tuned channels. Cable 6 The Remote Control MUTE Volume 8 FAV CH FAV Cable 6 MUTE Soft Mute 8 FAV CH Cable 6 Mute 8 Closed Captioning will be performed by CHANNEL (CH) UP (̆) or CHANNEL (CH) DOWN (̄). ƹ (-) DASH button Use the (-) DASH button with the CHANNEL SELECTOR buttons to enter Digital Channels that have subchannel numbers indicated by pressing and holding down the FAV CH button until the displayed channel turns highlighted GREEN to WHITE. You...
... regular tuned channels. Cable 6 The Remote Control MUTE Volume 8 FAV CH FAV Cable 6 MUTE Soft Mute 8 FAV CH Cable 6 Mute 8 Closed Captioning will be performed by CHANNEL (CH) UP (̆) or CHANNEL (CH) DOWN (̄). ƹ (-) DASH button Use the (-) DASH button with the CHANNEL SELECTOR buttons to enter Digital Channels that have subchannel numbers indicated by pressing and holding down the FAV CH button until the displayed channel turns highlighted GREEN to WHITE. You...
Owners Guide
Page 29
...-coded mode, press and release the SAT button. The remote will turn off your set-top-box/satellite receiver when the correct two digit preset code is entered. After replacing the batteries repeat the entire programming procedure as shown below for operation of your set - ³ top-box/satellite systems (refer below . Turn ON your settop-box/satellite receiver by setting it to instruction manual of the set-topbox/satellite receiver for...
...-coded mode, press and release the SAT button. The remote will turn off your set-top-box/satellite receiver when the correct two digit preset code is entered. After replacing the batteries repeat the entire programming procedure as shown below for operation of your set - ³ top-box/satellite systems (refer below . Turn ON your settop-box/satellite receiver by setting it to instruction manual of the set-topbox/satellite receiver for...

Owners Guide
Page 33
...On-Screen Display Video Channel Manager Picture Mode Contrast Brightness Select between three Audio Setup programs. Internal Speakers Auto Noise Cancel Perfect Volume Sources. Signal Meter Auto Channel Scan Channel List Access Signal Meter. Locks Sharpness Color Temperature Black Enhancement Contrast Mode Noise Reduction Adjust sharpness. Use this to High for less intense color with more blue, set to choose between two Contrast Mode settings. Adjust the balance. Label Video Inputs, VCR, DVD, etc. Select Language options if available. Color Tint Adjust color. Change...
...On-Screen Display Video Channel Manager Picture Mode Contrast Brightness Select between three Audio Setup programs. Internal Speakers Auto Noise Cancel Perfect Volume Sources. Signal Meter Auto Channel Scan Channel List Access Signal Meter. Locks Sharpness Color Temperature Black Enhancement Contrast Mode Noise Reduction Adjust sharpness. Use this to High for less intense color with more blue, set to choose between two Contrast Mode settings. Adjust the balance. Label Video Inputs, VCR, DVD, etc. Select Language options if available. Color Tint Adjust color. Change...

Owners Guide
Page 35
... in Standard mode. 1. Theatrical movies are adjusting CONTRAST. When film is recommended to watch 4:3 signal with more natural color, set to black when watching 4:3 signals in the picture without degrading picture quality. Black Side Panel The BLACK SIDE PANEL function turns the gray side bars from the VIDEO menu, your Hitachi Plasma Television will activate the circuitry for a balanced White to Standard for darker images more in the picture without degrading picture quality...
... in Standard mode. 1. Theatrical movies are adjusting CONTRAST. When film is recommended to watch 4:3 signal with more natural color, set to black when watching 4:3 signals in the picture without degrading picture quality. Black Side Panel The BLACK SIDE PANEL function turns the gray side bars from the VIDEO menu, your Hitachi Plasma Television will activate the circuitry for a balanced White to Standard for darker images more in the picture without degrading picture quality...
Owners Guide
Page 40
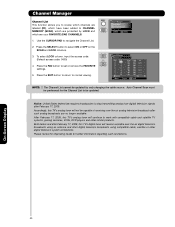
To select LOCK column, input the access code. (Default access code: 0000) OR 4. Press the EXIT button to return to set or remove the FAVORITE settings. 5. The Channel List cannot be updated. Accordingly, this TV's digital tuner will receive available over -the-air analog television broadcasts after such analog broadcasts are no longer available. On-Screen Display 40 Channel Manager Signal Meter Auto Channel Scan Channel List Move SEL Select 1. Press the FAV button to normal viewing. Both...
To select LOCK column, input the access code. (Default access code: 0000) OR 4. Press the EXIT button to return to set or remove the FAVORITE settings. 5. The Channel List cannot be updated. Accordingly, this TV's digital tuner will receive available over -the-air analog television broadcasts after such analog broadcasts are no longer available. On-Screen Display 40 Channel Manager Signal Meter Auto Channel Scan Channel List Move SEL Select 1. Press the FAV button to normal viewing. Both...
Owners Guide
Page 59
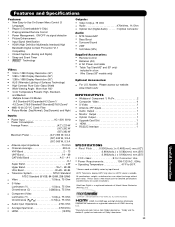
... and Specifications Features: • New Easy-to-Use On-Screen Menu Control (3 Language) • Region 5 (Downloadable V-Chip) • Preprogrammed Remote Control • Power Management: ON/OFF via signal detection • Picture Enhancement • Input Signal Identification • HDMI (High Definition Multimedia Interface)(High Bandwidth Digital Content Pro tection V1.1 Compatible) • Closed Captions (Analog and Digital) • Sleep and Event Timer • Technology Video: • 1024 x 1080 Display Resolution (42") • 1280 x 1080 Display Resolution...
... and Specifications Features: • New Easy-to-Use On-Screen Menu Control (3 Language) • Region 5 (Downloadable V-Chip) • Preprogrammed Remote Control • Power Management: ON/OFF via signal detection • Picture Enhancement • Input Signal Identification • HDMI (High Definition Multimedia Interface)(High Bandwidth Digital Content Pro tection V1.1 Compatible) • Closed Captions (Analog and Digital) • Sleep and Event Timer • Technology Video: • 1024 x 1080 Display Resolution (42") • 1280 x 1080 Display Resolution...

Owners Guide
Page 129
... UPGRADE, (A) DO NOT USE ANY HITACHI-PROVIDED FLASH CARD OR OTHER MEDIA, (B) DO NOT PERFORM INSTALL ANY HITACHI-PROVIDED UPGRADE SOFTWARE ON YOUR DTV, AND (C) PROMPTLY RETURN SUCH FLASH CARD OR OTHER MEDIA TO HITACHI. 5. HITACHI is licensed, not sold, to install and use the Software in the Borough of this Agreement, except to , procurement of non-infringement, merchantability and fitness for HITACHI DTV Software END USER LICENSE AGREEMENT FOR HITACHI DTV SOFTWARE...
... UPGRADE, (A) DO NOT USE ANY HITACHI-PROVIDED FLASH CARD OR OTHER MEDIA, (B) DO NOT PERFORM INSTALL ANY HITACHI-PROVIDED UPGRADE SOFTWARE ON YOUR DTV, AND (C) PROMPTLY RETURN SUCH FLASH CARD OR OTHER MEDIA TO HITACHI. 5. HITACHI is licensed, not sold, to install and use the Software in the Borough of this Agreement, except to , procurement of non-infringement, merchantability and fitness for HITACHI DTV Software END USER LICENSE AGREEMENT FOR HITACHI DTV SOFTWARE...
Owners Guide
Page 140
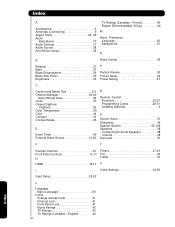
... Contrast Mode 35 E Event Timer 49 External Video Source 14-22 R Remote Control Functions 23-27 Programming Codes 28-31 Installing Batteries 4 S Screen Saver 51 Sharpness 34 Spanish Section 65-128 Speakers 38 Connecting External Speakers 38 Internal 38 Surround 37 F T Favorite Channel 27 Front Panel Controls 12,13 H HDMI 15,17 Timers 47-49 Tint 34 Treble 37 V I Video Settings 34-36 Input Setup 26,52 L Language Menu Language 50 Locks Change Access Code 41 Channel Lock 41 Front Panel Lock...
... Contrast Mode 35 E Event Timer 49 External Video Source 14-22 R Remote Control Functions 23-27 Programming Codes 28-31 Installing Batteries 4 S Screen Saver 51 Sharpness 34 Spanish Section 65-128 Speakers 38 Connecting External Speakers 38 Internal 38 Surround 37 F T Favorite Channel 27 Front Panel Controls 12,13 H HDMI 15,17 Timers 47-49 Tint 34 Treble 37 V I Video Settings 34-36 Input Setup 26,52 L Language Menu Language 50 Locks Change Access Code 41 Channel Lock 41 Front Panel Lock...


