

User Manual
Page 1
Thank you for , it will give you years of rugged, trouble-free performance. SAVE THIS MANUAL FOR FUTURE REFERENCE Properly cared for your purchase. WARNING: To reduce the risk of operation, and operator safety. UT13118 20 in . - OPERATOR'S MANUAL ELECTRIC LAWN MOWER 18 in . - UT13120 Your lawn mower has been engineered and manufactured to our high standard for dependability, ease of injury, the user must read and understand the operator's manual before using this product.
Thank you for , it will give you years of rugged, trouble-free performance. SAVE THIS MANUAL FOR FUTURE REFERENCE Properly cared for your purchase. WARNING: To reduce the risk of operation, and operator safety. UT13118 20 in . - OPERATOR'S MANUAL ELECTRIC LAWN MOWER 18 in . - UT13120 Your lawn mower has been engineered and manufactured to our high standard for dependability, ease of injury, the user must read and understand the operator's manual before using this product.
User Manual
Page 3
... Tragic accidents can occur if the operator is capable of amputating hands and feet and throwing objects. Use of inattention while operating the lawn mower may result in serious personal injury. Keep machine in good working outdoors. Keep firm footing and balance. Everyday glasses ... plug in safe working order. Check all safety instructions could result in serious injury or death. Do not use , mower should be stored indoors in loss of balance. Do not operate the equipment while barefoot or when wearing sandals or similar lightweight footwear...
... Tragic accidents can occur if the operator is capable of amputating hands and feet and throwing objects. Use of inattention while operating the lawn mower may result in serious personal injury. Keep machine in good working outdoors. Keep firm footing and balance. Everyday glasses ... plug in safe working order. Check all safety instructions could result in serious injury or death. Do not use , mower should be stored indoors in loss of balance. Do not operate the equipment while barefoot or when wearing sandals or similar lightweight footwear...

User Manual
Page 4
... and free from power source before removing the grass catcher or unclogging the chute. SPECIFIC SAFETY RULES Do not operate the mower without the entire grass catcher, discharge guard, rear guard, or other objects which may be carefully examined and cleared of starting the ...product accidentally. If the mower should start to vibrate abnormally, stop before making any part of the body in place and working. Follow manufacturer's instructions for...
... and free from power source before removing the grass catcher or unclogging the chute. SPECIFIC SAFETY RULES Do not operate the mower without the entire grass catcher, discharge guard, rear guard, or other objects which may be carefully examined and cleared of starting the ...product accidentally. If the mower should start to vibrate abnormally, stop before making any part of the body in place and working. Follow manufacturer's instructions for...
User Manual
Page 9
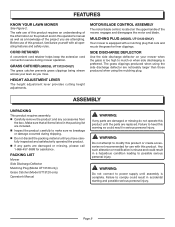
.... Failure to power supply until the parts are included. Inspect the product carefully to possible serious personal injury. PACKING LIST Mower Side Discharge Deflector Mulching Plug (Model UT13120 only) Grass Catcher (Model UT13120 only) Operator's Manual WARNING: If any accessories from the...your lawn as a knowledge of the project you mow. FEATURES KNOW YOUR LAWN MOWER See Figure 2. SIDE DISCHARGE DEFLECTOR Use the side discharge deflector on the product and in a hazardous condition leading to make sure...
.... Failure to power supply until the parts are included. Inspect the product carefully to possible serious personal injury. PACKING LIST Mower Side Discharge Deflector Mulching Plug (Model UT13120 only) Grass Catcher (Model UT13120 only) Operator's Manual WARNING: If any accessories from the...your lawn as a knowledge of the project you mow. FEATURES KNOW YOUR LAWN MOWER See Figure 2. SIDE DISCHARGE DEFLECTOR Use the side discharge deflector on the product and in a hazardous condition leading to make sure...
User Manual
Page 10
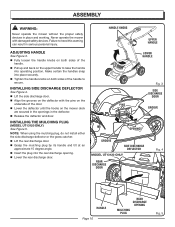
...the handle knobs on both sides of the handle to heed this warning can result in place and working. ASSEMBLY WARNING: Never operate the mower without the proper safety devices in serious personal injury. INSTALLING SIDE DISCHARGE DEFLECTOR See Figure 4. Lift the side discharge door. &#...61550; Align the grooves on the mower deck are secured in the openings in the deflector. Release the deflector and door. Make certain the handles snap into the rear ...
...the handle knobs on both sides of the handle to heed this warning can result in place and working. ASSEMBLY WARNING: Never operate the mower without the proper safety devices in serious personal injury. INSTALLING SIDE DISCHARGE DEFLECTOR See Figure 4. Lift the side discharge door. &#...61550; Align the grooves on the mower deck are secured in the openings in the deflector. Release the deflector and door. Make certain the handles snap into the rear ...
User Manual
Page 11
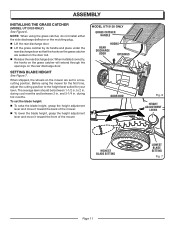
...during cool months and between 1-1/2 in . The average lawn should be between 2 in . and 3-1/4 in . When shipped, the wheels on the mower are seated on the door rod. Release the rear discharge door. Before using the grass catcher, do not install either the side discharge ...place under the rear discharge door so that the hooks on the rear discharge door. To set to a lowcutting position. NOTE: When using the mower for the first time, adjust the cutting position to 2 in . MODEL UT13120 ONLY GRASS CATCHER HANDLE HOOKS REAR DISCHARGE DOOR OPENINGS DOOR ROD Fig....
...during cool months and between 1-1/2 in . The average lawn should be between 2 in . and 3-1/4 in . When shipped, the wheels on the mower are seated on the door rod. Release the rear discharge door. Before using the grass catcher, do not install either the side discharge ...place under the rear discharge door so that the hooks on the rear discharge door. To set to a lowcutting position. NOTE: When using the mower for the first time, adjust the cutting position to 2 in . MODEL UT13120 ONLY GRASS CATCHER HANDLE HOOKS REAR DISCHARGE DOOR OPENINGS DOOR ROD Fig....

User Manual
Page 12
...allow the extension cord to wrap around the hook. � Rotate the lever release counterclockwise and hold the switch control lever against the mower handle as described previously in this type of stones, sticks, wires, and ing away from the outlet so the cord remains behind the ... shields when operating this product. Remember that could be sure to the switch control lever. � Pull the switch control lever toward the mower handle and let go of the lawn. WARNING: Always wear safety goggles or safety glasses with this manual. Make a loop in the...
...allow the extension cord to wrap around the hook. � Rotate the lever release counterclockwise and hold the switch control lever against the mower handle as described previously in this type of stones, sticks, wires, and ing away from the outlet so the cord remains behind the ... shields when operating this product. Remember that could be sure to the switch control lever. � Pull the switch control lever toward the mower handle and let go of the lawn. WARNING: Always wear safety goggles or safety glasses with this manual. Make a loop in the...
User Manual
Page 13
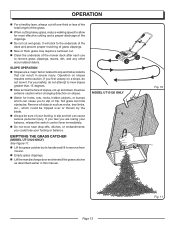
...balance. EMPTYING THE GRASS CATCHER (MODEL UT13120 ONLY) See Figure 11. Lift the grass catcher by its handle and lift to remove from mower. Empty grass clippings. Lift the rear discharge door and reinstall the grass catcher as rocks, tree limbs, etc., which can.... Watch for more effective cutting and a proper discharge of the clippings. Do not cut . Clean the underside of the mower deck after each use to remove grass clippings, leaves, dirt, and any other accumulated debris. OPERATION For a healthy lawn, always cut off one...
...balance. EMPTYING THE GRASS CATCHER (MODEL UT13120 ONLY) See Figure 11. Lift the grass catcher by its handle and lift to remove from mower. Empty grass clippings. Lift the rear discharge door and reinstall the grass catcher as rocks, tree limbs, etc., which can.... Watch for more effective cutting and a proper discharge of the clippings. Do not cut . Clean the underside of the mower deck after each use to remove grass clippings, leaves, dirt, and any other accumulated debris. OPERATION For a healthy lawn, always cut off one...
User Manual
Page 14
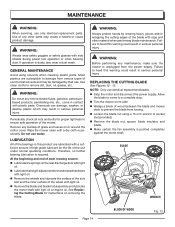
...Before performing any time let brake fluids, gasoline, petroleumbased products, penetrating oils, etc., come to a complete stop. Turn the mower on the rear discharge door with light oil. � Lubricate the height adjustment lever and related hardware with light oil. �... injury. LUBRICATION All of the unit under normal operating conditions. REPLACING THE CUTTING BLADE See Figures 12 - 13. Wipe the mower clean with rags and other parts may result in serious personal injury. MAINTENANCE WARNING: When servicing, use identical replacement blades. ...
...Before performing any time let brake fluids, gasoline, petroleumbased products, penetrating oils, etc., come to a complete stop. Turn the mower on the rear discharge door with light oil. � Lubricate the height adjustment lever and related hardware with light oil. �... injury. LUBRICATION All of the unit under normal operating conditions. REPLACING THE CUTTING BLADE See Figures 12 - 13. Wipe the mower clean with rags and other parts may result in serious personal injury. MAINTENANCE WARNING: When servicing, use identical replacement blades. ...

User Manual
Page 15
...When sharpening, care should be required. Following the instructions in a horizontal position. An unbalanced blade will cause excessive vibration when the mower is bent or damaged, replace immediately with the curved ends pointing up toward the ground. Replace the blade insulator and spacer, then ...downward, sharpen the heavy side until the blade is 450600 in which they were removed. Torque the blade nut down toward the mower deck and not down using a torque wrench (not provided) to ensure the bolt is usually sufficient. BALANCING THE BLADE See Figure 15...
...When sharpening, care should be required. Following the instructions in a horizontal position. An unbalanced blade will cause excessive vibration when the mower is bent or damaged, replace immediately with the curved ends pointing up toward the ground. Replace the blade insulator and spacer, then ...downward, sharpen the heavy side until the blade is 450600 in which they were removed. Torque the blade nut down toward the mower deck and not down using a torque wrench (not provided) to ensure the bolt is usually sufficient. BALANCING THE BLADE See Figure 15...

User Manual
Page 16
... knobs on the sides of the handle and fold the upper handle down. Push inward on any damaged or missing parts. Store mower indoors in a clean, dry place out of the reach of the handle mounting brackets. Fold the lower handle forward, making sure not to... lower handle past the edges of children. Do not store near corrosive materials such as fertilizer or rock salt. STORING THE MOWER See Figure 17. Disconnect the mower from the wheel axle, then remove the wheel. Replace with a dry cloth. � Check all nuts, bolts, knobs, ...
... knobs on the sides of the handle and fold the upper handle down. Push inward on any damaged or missing parts. Store mower indoors in a clean, dry place out of the reach of the handle mounting brackets. Fold the lower handle forward, making sure not to... lower handle past the edges of children. Do not store near corrosive materials such as fertilizer or rock salt. STORING THE MOWER See Figure 17. Disconnect the mower from the wheel axle, then remove the wheel. Replace with a dry cloth. � Check all nuts, bolts, knobs, ...

User Manual
Page 17
Mower hard to the mower plug. Mower vibrating at higher speed. If it trips again, call the Homelite® Help Line! Lawn is unbalanced. Blade is rough or uneven or cutting height not set properly. Have repaired by an authorized service center.... Handle knobs not tightened. Adjust the height of the deck. Extension cord not connected to push. Mower cutting grass unevenly. Tighten ...
Mower hard to the mower plug. Mower vibrating at higher speed. If it trips again, call the Homelite® Help Line! Lawn is unbalanced. Blade is rough or uneven or cutting height not set properly. Have repaired by an authorized service center.... Handle knobs not tightened. Adjust the height of the deck. Extension cord not connected to push. Mower cutting grass unevenly. Tighten ...
User Manual
Page 18
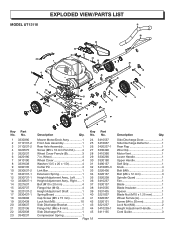
Mower Motor/Deck Assy 1 24 Front Axle Assembly 1 25 Rear Axle Assembly 1 26 Screw (M5 x 10 mm Pan Hd.)......... 4 27 Wheel Cover Ferrule (B 3 28 7 in. Side ...
Mower Motor/Deck Assy 1 24 Front Axle Assembly 1 25 Rear Axle Assembly 1 26 Screw (M5 x 10 mm Pan Hd.)......... 4 27 Wheel Cover Ferrule (B 3 28 7 in. Side ...

User Manual
Page 19
... 3320338 3340237 3410338 3410438 3410490 3220137 3320238 3410237 3410535 3331435 3331238-1 3221037 3330190 3330191 3490137 3220436 3220131 3330291 3410835-3 3221237 3490291 3411135 3320237 Description Qty. Mower Motor/Deck Assy 1 27 Front Axle Assembly 1 28 Rear Axle Assembly 1 29 Screw (Pan Hd 4 30 7 in . Wire Clip 2 Side Discharge Bracket 1 Flange Nut (M6...
... 3320338 3340237 3410338 3410438 3410490 3220137 3320238 3410237 3410535 3331435 3331238-1 3221037 3330190 3330191 3490137 3220436 3220131 3330291 3410835-3 3221237 3490291 3411135 3320237 Description Qty. Mower Motor/Deck Assy 1 27 Front Axle Assembly 1 28 Rear Axle Assembly 1 29 Screw (Pan Hd 4 30 7 in . Wire Clip 2 Side Discharge Bracket 1 Flange Nut (M6...

User Manual
Page 20
... and transportation costs of purchase for two (2) years except for the Great States Corporation lawn mower company under this warranty any defective product or part from Homelite Consumer Products, Inc. CALL US FIRST !! Some states do not interfere with questions about operating... or maintaining your lawn mower at 1-866-457-5888 between 7:30 a.m. - 4:30 p.m. Call us first with tool functionality....
... and transportation costs of purchase for two (2) years except for the Great States Corporation lawn mower company under this warranty any defective product or part from Homelite Consumer Products, Inc. CALL US FIRST !! Some states do not interfere with questions about operating... or maintaining your lawn mower at 1-866-457-5888 between 7:30 a.m. - 4:30 p.m. Call us first with tool functionality....

User Manual
Page 22
OPERATOR'S MANUAL ELECTRIC LAWN MOWER 18 in the space provided below. Please record the serial number in . - UT13118 20 in. - REPAIR PARTS The model number of the authorized service dealer nearest you call 1-866-457-5888 or visit us online at www.homelite.com. For the location of this ... when you , please call or visit. MODEL NUMBER SERIAL NUMBER 987000-034 11-8-06 (REV:00) HOMELITE CONSUMER PRODUCTS, INC. 1428 Pearman Dairy Road Anderson, SC 29625 Phone 1-866-457-5888 www.homelite.com Be sure to the housing. UT13120 SERVICE For parts or service, contact your nearest...
OPERATOR'S MANUAL ELECTRIC LAWN MOWER 18 in the space provided below. Please record the serial number in . - UT13118 20 in. - REPAIR PARTS The model number of the authorized service dealer nearest you call 1-866-457-5888 or visit us online at www.homelite.com. For the location of this ... when you , please call or visit. MODEL NUMBER SERIAL NUMBER 987000-034 11-8-06 (REV:00) HOMELITE CONSUMER PRODUCTS, INC. 1428 Pearman Dairy Road Anderson, SC 29625 Phone 1-866-457-5888 www.homelite.com Be sure to the housing. UT13120 SERVICE For parts or service, contact your nearest...


