
User Manual
Page 3
... wall outlet. Following this product. Use the right appliance. A moment of at the rate for which it is in working condition. Stop the motor and wait until the blade comes to operate the machine. • Use extra care when approaching blind corners, shrubs, trees, or other ) and will fit...
... wall outlet. Following this product. Use the right appliance. A moment of at the rate for which it is in working condition. Stop the motor and wait until the blade comes to operate the machine. • Use extra care when approaching blind corners, shrubs, trees, or other ) and will fit...

User Manual
Page 4
...Never place any part of the body in place and working. Follow manufacturer's instructions for the cause. Refer to a complete stop the motor and check immediately for proper operation and installation of trouble. Service on the circuit(s) or outlet(s) to avoid risk. Save these... and release the switch control lever. • Disconnect the power cord. • Thoroughly inspect the mower for a few seconds after the motor is damaged, it must be replaced only by the manufacturer or by the manufacturer. Clear the work area before removing the grass ...
...Never place any part of the body in place and working. Follow manufacturer's instructions for the cause. Refer to a complete stop the motor and check immediately for proper operation and installation of trouble. Service on the circuit(s) or outlet(s) to avoid risk. Save these... and release the switch control lever. • Disconnect the power cord. • Thoroughly inspect the mower for a few seconds after the motor is damaged, it must be replaced only by the manufacturer or by the manufacturer. Clear the work area before removing the grass ...

User Manual
Page 7
...cord, inspect it will draw. When working outdoors with protecting insulation. Before using a power tool at a considerable distance from the internal metal motor components with a product, use an extension cord that it for repair. Failure to a power supply that has the capacity to handle the...cord since touching the damaged area could cause electrical shock resulting in an extension cord. ELECTRICAL CONNECTION This product has a precision-built electric motor. If the product does not operate when plugged into the receptacle end of the working with "WA" on lumber, tools, or ...
...cord, inspect it will draw. When working outdoors with protecting insulation. Before using a power tool at a considerable distance from the internal metal motor components with a product, use an extension cord that it for repair. Failure to a power supply that has the capacity to handle the...cord since touching the damaged area could cause electrical shock resulting in an extension cord. ELECTRICAL CONNECTION This product has a precision-built electric motor. If the product does not operate when plugged into the receptacle end of the working with "WA" on lumber, tools, or ...

User Manual
Page 8
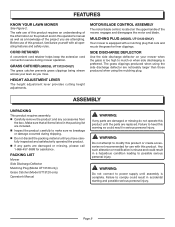
... . to 3-3/4 in . Height Adjustments 1-3/4 in . rear Weight 53 lb. Wheel Size 7 in . Weight 42 lb. CORD RETAINER GRASS CATCHER (MODEL UT13120 ONLY) HEIGHT ADJUSTMENT LEVER MOTOR/BLADE CONTROL ASSEMBLY SIDE DISCHARGE DEFLECTOR MULCHING PLUG (MODEL UT13120 ONLY) Page 8 Fig. 2 FEATURES PRODUCT SPECIFICATIONS UT13118...
... . to 3-3/4 in . Height Adjustments 1-3/4 in . rear Weight 53 lb. Wheel Size 7 in . Weight 42 lb. CORD RETAINER GRASS CATCHER (MODEL UT13120 ONLY) HEIGHT ADJUSTMENT LEVER MOTOR/BLADE CONTROL ASSEMBLY SIDE DISCHARGE DEFLECTOR MULCHING PLUG (MODEL UT13120 ONLY) Page 8 Fig. 2 FEATURES PRODUCT SPECIFICATIONS UT13118...
User Manual
Page 9
... or create accessories not recommended for assistance. WARNING: Do not attempt to possible serious personal injury. MOTOR/BLADE CONTROL ASSEMBLY The motor/blade control, located on your lawn as a knowledge of the mower, engages and disengages the motor and blade. PACKING LIST Mower Side Discharge Deflector Mulching Plug (Model UT13120 only) Grass Catcher...
... or create accessories not recommended for assistance. WARNING: Do not attempt to possible serious personal injury. MOTOR/BLADE CONTROL ASSEMBLY The motor/blade control, located on your lawn as a knowledge of the mower, engages and disengages the motor and blade. PACKING LIST Mower Side Discharge Deflector Mulching Plug (Model UT13120 only) Grass Catcher...

User Manual
Page 12
...cord. NOTE: Use only an approved outdoor extension cord as described previously in this manual. Make a loop in circles. or motor. Page 12 Failure to prevent To reduce the likelihood of equal loops to do so could damage the lawn mower blades mower... around the hook. � Rotate the lever release counterclockwise and hold the switch control lever against the mower handle as the electric motor decelerates. Remember that could result in objects being thrown into your lawn LEVER RELEASE Fig. 8 STARTING/STOPPING THE MOWER See Figure 8. &#...
...cord. NOTE: Use only an approved outdoor extension cord as described previously in this manual. Make a loop in circles. or motor. Page 12 Failure to prevent To reduce the likelihood of equal loops to do so could damage the lawn mower blades mower... around the hook. � Rotate the lever release counterclockwise and hold the switch control lever against the mower handle as the electric motor decelerates. Remember that could result in objects being thrown into your lawn LEVER RELEASE Fig. 8 STARTING/STOPPING THE MOWER See Figure 8. &#...
User Manual
Page 14
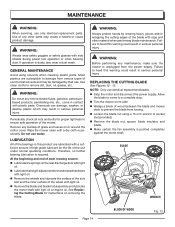
...� Lubricate the springs on removing the blade. WARNING: Always protect hands by their use identical replacement blades. Stop the motor and disconnect the power supply. Failure to remove dirt, dust, oil, grease, etc. Use clean cloths to heed this product are susceptible ... parts may result in contact with light oil or engine oil. Remove any maintenance, make sure the mower is pushed completely against the motor shaft. Therefore, no further bearing lubrication is dusty, also wear a dust mask. WARNING: Before performing any buildup of the wheel with...
...� Lubricate the springs on removing the blade. WARNING: Always protect hands by their use identical replacement blades. Stop the motor and disconnect the power supply. Failure to remove dirt, dust, oil, grease, etc. Use clean cloths to heed this product are susceptible ... parts may result in contact with light oil or engine oil. Remove any maintenance, make sure the mower is pushed completely against the motor shaft. Therefore, no further bearing lubrication is dusty, also wear a dust mask. WARNING: Before performing any buildup of the wheel with...

User Manual
Page 15
...the mowing season is properly tightened. NOTE: If a vise is not available, a straight nail can also be taken to the mower, especially the motor. For best mowing performance, the mower blade must be required. Following the instructions in which they were removed. Torque the ...However, if your lawn has sandy soil, more frequent sharpenings may be kept sharp. A dull blade does not cut grass evenly and overloads the motor. Failure to replace a bent or damaged blade could cause an accident resulting in a vise as shown. MAINTENANCE Place the new blade ...
...the mowing season is properly tightened. NOTE: If a vise is not available, a straight nail can also be taken to the mower, especially the motor. For best mowing performance, the mower blade must be required. Following the instructions in which they were removed. Torque the ...However, if your lawn has sandy soil, more frequent sharpenings may be kept sharp. A dull blade does not cut grass evenly and overloads the motor. Failure to replace a bent or damaged blade could cause an accident resulting in a vise as shown. MAINTENANCE Place the new blade ...

User Manual
Page 17
...service center before underside of the handle and make sure the carriage bolts are seated properly. Possible Cause Solution Carriage bolts not seated properly. Motor control switch defective. Reset house circuit breaker. Lawn is unbalanced. Your product has been fully tested prior to shipment to cut evenly. ... height not set properly. TROUBLESHOOTING Problem Handle not in the same cutting height for damage. Connect the extension cord to the motor/blade control. If it trips again, call the Homelite® Help Line! Raise cutting height. Mower hard to push.
...service center before underside of the handle and make sure the carriage bolts are seated properly. Possible Cause Solution Carriage bolts not seated properly. Motor control switch defective. Reset house circuit breaker. Lawn is unbalanced. Your product has been fully tested prior to shipment to cut evenly. ... height not set properly. TROUBLESHOOTING Problem Handle not in the same cutting height for damage. Connect the extension cord to the motor/blade control. If it trips again, call the Homelite® Help Line! Raise cutting height. Mower hard to push.
User Manual
Page 18
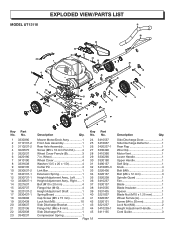
... 3220436 3220137 3320238 3410237 3330137 3410535 3331435 3221037 3320337 3220131 3221237 3410239-1 3411135 Description Qty. Side Discharge Door 1 Side Discharge Deflector 1 Rear Flap 1 Wire Clip 2 Motor Vent 1 Lower Handle 1 Upper Handle 1 Soft Grip 1 Knob 4 Bolt (M8 2 Bolt (M6 x 12 mm 3 Spindle Guard 1 Fan 1 Blade 1 ...3221637 15 3220737 16 3220137-2 17 3330437-1 18 3220608 19 3220439 20 3330637 21 3220136 22 3320338 23 3340237 Description Key Part Qty. Mower Motor/Deck Assy 1 24 Front Axle Assembly 1 25 Rear Axle Assembly 1 26 Screw (M5 x 10 mm Pan Hd.)......... 4 27 Wheel ...
... 3220436 3220137 3320238 3410237 3330137 3410535 3331435 3221037 3320337 3220131 3221237 3410239-1 3411135 Description Qty. Side Discharge Door 1 Side Discharge Deflector 1 Rear Flap 1 Wire Clip 2 Motor Vent 1 Lower Handle 1 Upper Handle 1 Soft Grip 1 Knob 4 Bolt (M8 2 Bolt (M6 x 12 mm 3 Spindle Guard 1 Fan 1 Blade 1 ...3221637 15 3220737 16 3220137-2 17 3330437-1 18 3220608 19 3220439 20 3330637 21 3220136 22 3320338 23 3340237 Description Key Part Qty. Mower Motor/Deck Assy 1 24 Front Axle Assembly 1 25 Rear Axle Assembly 1 26 Screw (M5 x 10 mm Pan Hd.)......... 4 27 Wheel ...

User Manual
Page 19
... 18 29 3 22 20 19 16 17 12 24 27 25 21 49 46 26 39 23 50 42 48 47 Key Part No. Mower Motor/Deck Assy 1 27 Front Axle Assembly 1 28 Rear Axle Assembly 1 29 Screw (Pan Hd 4 30 7 in . Wheel 2 31 Wheel Cover 4 32 8 in .... Wire Clip 2 Side Discharge Bracket 1 Flange Nut (M6 x 8 mm 2 Side Discharge Pin 1 Side Compression Spring 1 Side Discharge Door 1 Side Discharge Deflector 1 Motor Vent 1 Flange Nut (M6 x 12 mm 3 Spindle Guard 1 Fan 1 Blade Insulator 1 Spacer 1 Blade 1 Blade Nut (M10 x 1.25 mm 1 Upper Handle 1 Lower Handle 1 Soft...
... 18 29 3 22 20 19 16 17 12 24 27 25 21 49 46 26 39 23 50 42 48 47 Key Part No. Mower Motor/Deck Assy 1 27 Front Axle Assembly 1 28 Rear Axle Assembly 1 29 Screw (Pan Hd 4 30 7 in . Wheel 2 31 Wheel Cover 4 32 8 in .... Wire Clip 2 Side Discharge Bracket 1 Flange Nut (M6 x 8 mm 2 Side Discharge Pin 1 Side Compression Spring 1 Side Discharge Door 1 Side Discharge Deflector 1 Motor Vent 1 Flange Nut (M6 x 12 mm 3 Spindle Guard 1 Fan 1 Blade Insulator 1 Spacer 1 Blade 1 Blade Nut (M10 x 1.25 mm 1 Upper Handle 1 Lower Handle 1 Soft...

Parts List
Page 1
...clip connection line connection line mulching plug easy front baffle bolt Qty. 1 1 1 1 1 1 1 2 1 3 5 1 1 1 1 4 1.2 1 4 1 1 2 1 2 1 1 1 1 2 1 1 1 1 1 1 4 T LI T MODEL UT13124 2 3 5 0 6 7 8 9 10 e e 13 12 • tkeitm4 8 20 23 22 21 ota o 24 27 30 33 34 35 36 C 70 @ 68 61 65 64 otOoo., 59 58... front wheel self-tapping screw resistance support flange bolt self locking nut gasket motor radiator resistance electric bridge self-tapping screw motor cover envelope motor cover Machine screw motor vent right shutter self-tapping screw left shutter E-ring rear discharge pin height...
...clip connection line connection line mulching plug easy front baffle bolt Qty. 1 1 1 1 1 1 1 2 1 3 5 1 1 1 1 4 1.2 1 4 1 1 2 1 2 1 1 1 1 2 1 1 1 1 1 1 4 T LI T MODEL UT13124 2 3 5 0 6 7 8 9 10 e e 13 12 • tkeitm4 8 20 23 22 21 ota o 24 27 30 33 34 35 36 C 70 @ 68 61 65 64 otOoo., 59 58... front wheel self-tapping screw resistance support flange bolt self locking nut gasket motor radiator resistance electric bridge self-tapping screw motor cover envelope motor cover Machine screw motor vent right shutter self-tapping screw left shutter E-ring rear discharge pin height...