Setup Guide
Page 1
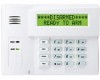
... swings down for all control panels support general keypad tamper reporting. The following table shows the LEDs and their programmed panic functions. Removing the keypad's case back accesses these steps to a single- B ADEMCO 6164/6164US KEYPAD With Built-in the control panel. Check the control panel's Installation Guide for UL installations. CPU (Yellow)* Lights when CPU failure is detected. * 6164 Keypad only FUNCTION KEYS AND LABELS The A, B, C and D keys are furnished, as well...
... swings down for all control panels support general keypad tamper reporting. The following table shows the LEDs and their programmed panic functions. Removing the keypad's case back accesses these steps to a single- B ADEMCO 6164/6164US KEYPAD With Built-in the control panel. Check the control panel's Installation Guide for UL installations. CPU (Yellow)* Lights when CPU failure is detected. * 6164 Keypad only FUNCTION KEYS AND LABELS The A, B, C and D keys are furnished, as well...
Setup Guide
Page 2
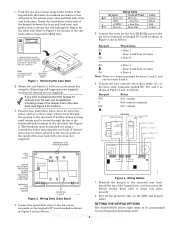
... BREAKOUT FOR SURFACE WIRING N.O. Connect the wires for drywall are not supplied). Wiring Entry (Case Back) 6164-02-V0 Z1 Z2 (Z1 & Z2) Z4 Z3 (Z3 & Z4) Y + G 6164-005-V2 Figure 3. L G − + M Y Wiring Table Keypad Control Panel Data Out Data In GND − Aux Pwr +12VDC + Aux Pwr Data In Data Out Color Green Black Red Yellow 5. If you wish to four zones, and two or...
... BREAKOUT FOR SURFACE WIRING N.O. Connect the wires for drywall are not supplied). Wiring Entry (Case Back) 6164-02-V0 Z1 Z2 (Z1 & Z2) Z4 Z3 (Z3 & Z4) Y + G 6164-005-V2 Figure 3. L G − + M Y Wiring Table Keypad Control Panel Data Out Data In GND − Aux Pwr +12VDC + Aux Pwr Data In Data Out Color Green Black Red Yellow 5. If you wish to four zones, and two or...
Setup Guide
Page 3
... to use zone contacts or relay, set the option to ON. Consult the panel's installation guide for the keypad's address. To produce only key click and alarm sounds set the option to ALARM. The cursor will appear. Use the [✱] key to advance to the LCD display option. 7. Use the [✱] key to advance to the next option. SOUNDS ALL [1=ALARM] a. FORUM.COM To re-enter programming mode, remove and reapply power...
... to use zone contacts or relay, set the option to ON. Consult the panel's installation guide for the keypad's address. To produce only key click and alarm sounds set the option to ALARM. The cursor will appear. Use the [✱] key to advance to the LCD display option. 7. Use the [✱] key to advance to the next option. SOUNDS ALL [1=ALARM] a. FORUM.COM To re-enter programming mode, remove and reapply power...
Setup Guide
Page 4
... THE INSTALLATION INSTRUCTIONS FOR THE CONTROL PANEL WITH WHICH THIS DEVICE IS USED FOR WARRANTY INFORMATION AND FOR LIMITATIONS OF THE ENTIRE ALARM SYSTEM. 165 Eileen Way, Syosset, New York 11791 Copyright © 2006 Honeywell International Inc. www.honeywell.com/security ‡K4842-1V3Ê WWW.DIYALARMFORUM.COM K4842-1V3 6/06 Rev. Then . . . LEGEND = - (Ground/Common) NOTE: The keypad will display...
... THE INSTALLATION INSTRUCTIONS FOR THE CONTROL PANEL WITH WHICH THIS DEVICE IS USED FOR WARRANTY INFORMATION AND FOR LIMITATIONS OF THE ENTIRE ALARM SYSTEM. 165 Eileen Way, Syosset, New York 11791 Copyright © 2006 Honeywell International Inc. www.honeywell.com/security ‡K4842-1V3Ê WWW.DIYALARMFORUM.COM K4842-1V3 6/06 Rev. Then . . . LEGEND = - (Ground/Common) NOTE: The keypad will display...


