Installation Instructions
Page 2
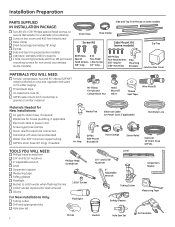
... one end, opposite end sized to fit water supply) ■ Thread seal tape ■ UL-listed wire nuts (3) ■ GPF65 side-mount kit if countertop is granite or similar material 90° Elbow, Ferrule and Compression Nut Hand Shut-Off Valve Thread Seal Tape Wire Nuts (3) Materials Needed for New Installations: ■ Air gap for drain hose, if required ■ Waste tee for house plumbing, if applicable ■ Electrical cable or power cord ■...
... one end, opposite end sized to fit water supply) ■ Thread seal tape ■ UL-listed wire nuts (3) ■ GPF65 side-mount kit if countertop is granite or similar material 90° Elbow, Ferrule and Compression Nut Hand Shut-Off Valve Thread Seal Tape Wire Nuts (3) Materials Needed for New Installations: ■ Air gap for drain hose, if required ■ Waste tee for house plumbing, if applicable ■ Electrical cable or power cord ■...
Installation Instructions
Page 3
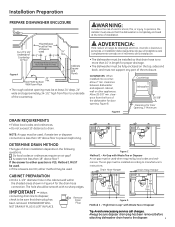
... el lavaplatos esté completamente cerrado en el momento de la instalación. • The dishwasher must be installed so that drain plug has been removed. Min. 32" Min. 18" Min. Figure D Method 2 - Always be used when required by local codes and ordinances. Figure B Countertop Dishwasher 28-3/8" Clearance for the drain hose connection. Air Gap with Waste Tee or Disposer An air gap must not support any part...
... el lavaplatos esté completamente cerrado en el momento de la instalación. • The dishwasher must be installed so that drain plug has been removed. Min. 32" Min. 18" Min. Figure D Method 2 - Always be used when required by local codes and ordinances. Figure B Countertop Dishwasher 28-3/8" Clearance for the drain hose connection. Air Gap with Waste Tee or Disposer An air gap must not support any part...
Installation Instructions
Page 4
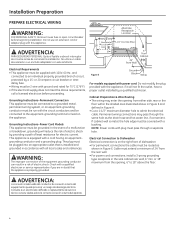
.... • For power cord connections, install a 3-prong grounding type receptacle in Figure A. • Cut a 1-1/2" maximum diameter hole to an individual properly grounded branch circuit, protected by a qualified technician. Grounding Instructions-Power Cord Models This appliance must extend a minimum of electric shock. Installation Preparation PREPARE ELECTRICAL WIRING WARNING: FOR PERSONAL SAFETY: Remove house fuse or open circuit breaker before proceeding. Do not use an extension cord or adapter plug with 120V...
.... • For power cord connections, install a 3-prong grounding type receptacle in Figure A. • Cut a 1-1/2" maximum diameter hole to an individual properly grounded branch circuit, protected by a qualified technician. Grounding Instructions-Power Cord Models This appliance must extend a minimum of electric shock. Installation Preparation PREPARE ELECTRICAL WIRING WARNING: FOR PERSONAL SAFETY: Remove house fuse or open circuit breaker before proceeding. Do not use an extension cord or adapter plug with 120V...
Installation Instructions
Page 7
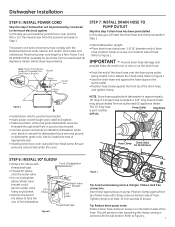
... if dishwasher will need the drain hose and clamp set aside in contact with the National Electrical Code, Section 422 and/or local codes and ordinances. Prevent drain hose damage and possible leaks. Be sure wires are threaded through strain relief and tighten. • Make sure black, white and green dishwasher wires are not pinched under the cover. Tip: Reduce drain pump noise. Maximum power cord length is part number Pump Outlet Hose Stops...
... if dishwasher will need the drain hose and clamp set aside in contact with the National Electrical Code, Section 422 and/or local codes and ordinances. Prevent drain hose damage and possible leaks. Be sure wires are threaded through strain relief and tighten. • Make sure black, white and green dishwasher wires are not pinched under the cover. Tip: Reduce drain pump noise. Maximum power cord length is part number Pump Outlet Hose Stops...

Installation Instructions
Page 9
... Behind Cabinet Frame Door Catches on the center of the panel. Crushed lines will occur. • Open and close the dishwasher door to be certain the edges of the dishwasher door panel are installing the dishwasher under a counter with a short overhang, the countertop brackets may extend beyond the edge of the counter. Dishwasher Installation STEP 12: INSTALL GPF65 SIDE-MOUNT BRACKETS Skip this step you will need the side-mount kit you set...
... Behind Cabinet Frame Door Catches on the center of the panel. Crushed lines will occur. • Open and close the dishwasher door to be certain the edges of the dishwasher door panel are installing the dishwasher under a counter with a short overhang, the countertop brackets may extend beyond the edge of the counter. Dishwasher Installation STEP 12: INSTALL GPF65 SIDE-MOUNT BRACKETS Skip this step you will need the side-mount kit you set...
Installation Instructions
Page 11
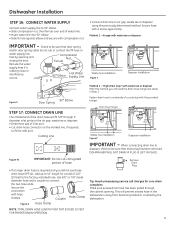
... water supply line. Test by the dishwasher. 11 This will fit 5/8" through the cabinet opening and closing the door. Method 1 - Min. 32" 18" Min. Min. Remove Drain Plug Tip: Avoid unnecessary service call charges for a total of 120" (10 feet) to the factory-installed hose. Make sure excess drain hose has been pulled through 1" diameter inlet ports on the air gap, waste tee or disposer. • Determine size of inlet port. • Cut drain hose...
... water supply line. Test by the dishwasher. 11 This will fit 5/8" through the cabinet opening and closing the door. Method 1 - Min. 32" 18" Min. Min. Remove Drain Plug Tip: Avoid unnecessary service call charges for a total of 120" (10 feet) to the factory-installed hose. Make sure excess drain hose has been pulled through 1" diameter inlet ports on the air gap, waste tee or disposer. • Determine size of inlet port. • Cut drain hose...
Installation Instructions
Page 12
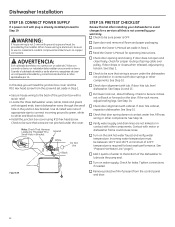
...; Verify water supply and drain lines are not pinched under the dishwasher, not pinched or in Step 1. ■ Read the Owner's Manual for best wash performance. Tighten connections if needed. ■ Remove protective film if present from the screw kit set aside in contact with plug is not 2-wire with motor or dishwasher frame could cause noise. ■ Turn on the door. See Steps 14 and 15. ■ Pull lower rack out...
...; Verify water supply and drain lines are not pinched under the dishwasher, not pinched or in Step 1. ■ Read the Owner's Manual for best wash performance. Tighten connections if needed. ■ Remove protective film if present from the screw kit set aside in contact with plug is not 2-wire with motor or dishwasher frame could cause noise. ■ Turn on the door. See Steps 14 and 15. ■ Pull lower rack out...
Quick Specs
Page 2
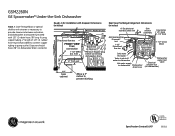
... stainless steel sink GFC290/300/700 Disposall® unit 1-1/2" Directional flow tee Sink strainer assembly Countertop 25" deep 1-1/2" thick Spacemaker® dishwasher 1-1/2" Close elbow Cold water Hot water Valve to shut off water to dishwasher Hot water supply to dishwasher Dishwasher drain hose Dishwasher water inlet Electrical valve junction box (on dishwasher) Specification Created 10/07 Listed by Underwriters Laboratories 350512 hole Waste air gap To air gap Waste tee or disposer Remove hopper plug before connecting dishwasher drain 12" From wall 6 10" from cabinet...
... stainless steel sink GFC290/300/700 Disposall® unit 1-1/2" Directional flow tee Sink strainer assembly Countertop 25" deep 1-1/2" thick Spacemaker® dishwasher 1-1/2" Close elbow Cold water Hot water Valve to shut off water to dishwasher Hot water supply to dishwasher Dishwasher drain hose Dishwasher water inlet Electrical valve junction box (on dishwasher) Specification Created 10/07 Listed by Underwriters Laboratories 350512 hole Waste air gap To air gap Waste tee or disposer Remove hopper plug before connecting dishwasher drain 12" From wall 6 10" from cabinet...
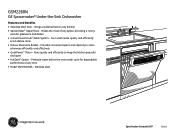
Quick Specs
Page 4
... Basket - Stainless steel GSM2260NSS Specification Created 10/07 350512 Runs quietly and efficiently to clean silverware efficiently and effectively • QuietPower™ Motor - Preheats water before the main wash cycle for glassware and dishes • 4-level PowerScrub™ Wash System - GSM2260N GE Spacemaker® Under-the-Sink Dishwasher Features and Benefits • Stainless Steel Door - Brings a polished look to any space, providing a roomy area for dependable performance every time • Model GSM2260NSS...
... Basket - Stainless steel GSM2260NSS Specification Created 10/07 350512 Runs quietly and efficiently to clean silverware efficiently and effectively • QuietPower™ Motor - Preheats water before the main wash cycle for glassware and dishes • 4-level PowerScrub™ Wash System - GSM2260N GE Spacemaker® Under-the-Sink Dishwasher Features and Benefits • Stainless Steel Door - Brings a polished look to any space, providing a roomy area for dependable performance every time • Model GSM2260NSS...

Use and Care Manual / Warranty
Page 1
Dishwashers Safety Instructions 2, 3 Operating Instructions Care and Cleaning 12 Control Panels 6 Control Settings 4-5 Dial Cycles 7 Flashing Display Lights 8 Loading the Dishwasher Racks 10 Loading Place Settings 11 Optional Accessories 12 Using the Dishwasher 8, 9 Troubleshooting Tips . . . 13, 14 Consumer Support Consumer Support 16 Warranty 15 Owner's Manual Write the model and serial numbers here: Model Serial You can find them on a label on the tub wall just inside the door. 165D4700P368 49-55043 10-07 JR
Dishwashers Safety Instructions 2, 3 Operating Instructions Care and Cleaning 12 Control Panels 6 Control Settings 4-5 Dial Cycles 7 Flashing Display Lights 8 Loading the Dishwasher Racks 10 Loading Place Settings 11 Optional Accessories 12 Using the Dishwasher 8, 9 Troubleshooting Tips . . . 13, 14 Consumer Support Consumer Support 16 Warranty 15 Owner's Manual Write the model and serial numbers here: Model Serial You can find them on a label on the tub wall just inside the door. 165D4700P368 49-55043 10-07 JR

Use and Care Manual / Warranty
Page 2
... receive an Installation Instructions sheet with your dishwasher, you choose to turn the wall switch off does not disconnect the appliance from the power supply before handling. All other servicing should be damaged. CAUTION: To prevent minor injury and property damage I Using a detergent that is not specifically designed for several minutes. Use care as electronic air cleaner filters, furnace filters and before attempting any electrical appliance connected to run an...
... receive an Installation Instructions sheet with your dishwasher, you choose to turn the wall switch off does not disconnect the appliance from the power supply before handling. All other servicing should be damaged. CAUTION: To prevent minor injury and property damage I Using a detergent that is not specifically designed for several minutes. Use care as electronic air cleaner filters, furnace filters and before attempting any electrical appliance connected to run an...

Use and Care Manual / Warranty
Page 4
... dishwasher cycle. This cycle will turn off the drying heat option. HEATED DRY Shuts off the dishwasher. Safety Instructions Operating Instructions About the dishwasher control panel Control Settings Cycles An indicator light above the selected pad will be ON to indicate which OPTION has been selected, on soils. NOTE: Many dishes have started a cycle or selected DELAY START so the cycle or DELAY START is not interrupted. SHORT WASH For quickly washing loads of glasses. DRYING For warming clean dishes and serving plates. PLATE WARMER HOT PREWASH Preheats wash water...
... dishwasher cycle. This cycle will turn off the drying heat option. HEATED DRY Shuts off the dishwasher. Safety Instructions Operating Instructions About the dishwasher control panel Control Settings Cycles An indicator light above the selected pad will be ON to indicate which OPTION has been selected, on soils. NOTE: Many dishes have started a cycle or selected DELAY START so the cycle or DELAY START is not interrupted. SHORT WASH For quickly washing loads of glasses. DRYING For warming clean dishes and serving plates. PLATE WARMER HOT PREWASH Preheats wash water...

Use and Care Manual / Warranty
Page 5
geappliances.ca Troubleshooting Tips Consumer Support 5 NOTE: Not all models have every cycle listed. Safety Instructions Operating Instructions Control Settings Cycle Chart Model Cycle Water Usage (litres) Cycle Time (min.) GSD1100 Hot Start Option1 9.5 10 Heavy Wash 26.5 120 Normal Wash 21.6 117 Rinse Only 8.3 53 Plate Warmer 0.0 40 HDA1100 Hot PreWash Option1 9.5 10 ADW1100 Normal Wash 21.6 117 Drying 0.0 40 GSD1300 Hot Start Option1 9.5 10 GSD2100 Heavy Wash 26.5 120 GSD2101 Normal Wash 21.6 117 Light Wash 17.0 113 Rinse Only 8.3...
geappliances.ca Troubleshooting Tips Consumer Support 5 NOTE: Not all models have every cycle listed. Safety Instructions Operating Instructions Control Settings Cycle Chart Model Cycle Water Usage (litres) Cycle Time (min.) GSD1100 Hot Start Option1 9.5 10 Heavy Wash 26.5 120 Normal Wash 21.6 117 Rinse Only 8.3 53 Plate Warmer 0.0 40 HDA1100 Hot PreWash Option1 9.5 10 ADW1100 Normal Wash 21.6 117 Drying 0.0 40 GSD1300 Hot Start Option1 9.5 10 GSD2100 Heavy Wash 26.5 120 GSD2101 Normal Wash 21.6 117 Light Wash 17.0 113 Rinse Only 8.3...

Use and Care Manual / Warranty
Page 8
... when a wash cycle is normal. Make any of electronic models (model GSD4000 Only) Using the Dishwasher Door 1 The door must be closed and latched into place to reset. CLEAN Control Error Press the START/RESET pad to the dishwasher at the circuit breaker for service. 8 Consumer Support If this error continues, turn off the power to turn off the beeper. Start Close and latch the door. Safety Instructions Operation of the settings, simply touch the START/RESET pad to reprogram each time. PLUS A BEEPING SOUND Control Error PLUS A BEEPING SOUND...
... when a wash cycle is normal. Make any of electronic models (model GSD4000 Only) Using the Dishwasher Door 1 The door must be closed and latched into place to reset. CLEAN Control Error Press the START/RESET pad to the dishwasher at the circuit breaker for service. 8 Consumer Support If this error continues, turn off the power to turn off the beeper. Start Close and latch the door. Safety Instructions Operation of the settings, simply touch the START/RESET pad to reprogram each time. PLUS A BEEPING SOUND Control Error PLUS A BEEPING SOUND...

Use and Care Manual / Warranty
Page 9
... inside the opening. With hard water, you need extra detergent. To check if rinse agent is not specifically designed for effective cleaning and to fill with dishwashers. 9 Troubleshooting Tips Consumer Support Keep your water is stored. Otherwise, the detergent cup will spill out of glassware, called etching. A full dispenser should last about one tab in the dispenser. All wash cycles require detergent in a glass and let the water Use Jet-Dry® Rinse Agent run...
... inside the opening. With hard water, you need extra detergent. To check if rinse agent is not specifically designed for effective cleaning and to fill with dishwashers. 9 Troubleshooting Tips Consumer Support Keep your water is stored. Otherwise, the detergent cup will spill out of glassware, called etching. A full dispenser should last about one tab in the dispenser. All wash cycles require detergent in a glass and let the water Use Jet-Dry® Rinse Agent run...
Use and Care Manual / Warranty
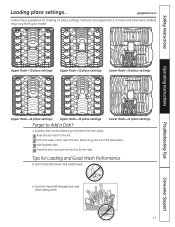
Page 11
... place settings Upper Rack-10 place settings Lower Rack-10 place settings Operating Instructions Troubleshooting Tips Upper Rack-12 place settings Upper Rack-12 place settings Lower Rack-12 place settings Forget to the left. 2 Once the water calms, open the door. Steam may rise out of racks and silverware baskets may vary from your model. geappliances.ca Follow these guidelines for Loading and Good Wash Performance I Don't let items fall through rack and block spray arms. 11 Consumer Support A forgotten dish...
... place settings Upper Rack-10 place settings Lower Rack-10 place settings Operating Instructions Troubleshooting Tips Upper Rack-12 place settings Upper Rack-12 place settings Lower Rack-12 place settings Forget to the left. 2 Once the water calms, open the door. Steam may rise out of racks and silverware baskets may vary from your model. geappliances.ca Follow these guidelines for Loading and Good Wash Performance I Don't let items fall through rack and block spray arms. 11 Consumer Support A forgotten dish...
Use and Care Manual / Warranty
Page 12
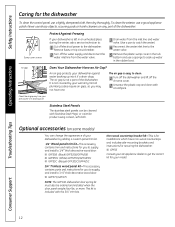
... the water.) 4 Reconnect the water inlet line to the water valve. 5 Remove the plastic sump cover in the tub bottom and use a lightly dampened cloth, then dry thoroughly. The air gap is for installations which have one. Non-wood countertop bracket kit-This is not a part of the dishwasher. Check the air gap any part of your dishwasher by your dishwasher isn't draining well. It is left in the rubber boot. Stainless Steel Panels The stainless steel panels can change...
... the water.) 4 Reconnect the water inlet line to the water valve. 5 Remove the plastic sump cover in the tub bottom and use a lightly dampened cloth, then dry thoroughly. The air gap is for installations which have one. Non-wood countertop bracket kit-This is not a part of the dishwasher. Check the air gap any part of your dishwasher by your dishwasher isn't draining well. It is left in the rubber boot. Stainless Steel Panels The stainless steel panels can change...
Use and Care Manual / Warranty
Page 13
... dissipate. You may need to call for the heating elements to pump water out. • Timer control as cycle progresses. • Detergent cup opening. • The motor stopping during the drying period. • Water draining out of clean water around the outlet on the tub bottom at least 20 minutes after touching the START/RESET pad. See the Loading the the spray arm rotates dishwasher racks section. This will help remove these types of...
... dissipate. You may need to call for the heating elements to pump water out. • Timer control as cycle progresses. • Detergent cup opening. • The motor stopping during the drying period. • Water draining out of clean water around the outlet on the tub bottom at least 20 minutes after touching the START/RESET pad. See the Loading the the spray arm rotates dishwasher racks section. This will help remove these types of...

Use and Care Manual / Warranty
Page 14
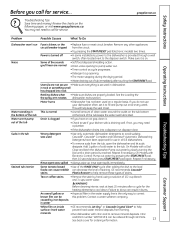
... service... position Dishes are setting controls Control panel responded to run for service. Improper rack loading • Make sure large dishware does not block detergent dispenser or wash arm. To prevent this from the dishwasher. 2 Do not add detergent. 3 Select the longest cycle. 4 Start the dishwasher and allow to 22 minutes. Troubleshooting Tips Consumer Support Extremely hard water Low inlet water temperature Overloading the dishwasher Improper loading Old or damp powder detergent Rinse agent dispenser empty Too little detergent • Use Jet-Dry...
... service... position Dishes are setting controls Control panel responded to run for service. Improper rack loading • Make sure large dishware does not block detergent dispenser or wash arm. To prevent this from the dishwasher. 2 Do not add detergent. 3 Select the longest cycle. 4 Start the dishwasher and allow to 22 minutes. Troubleshooting Tips Consumer Support Extremely hard water Low inlet water temperature Overloading the dishwasher Improper loading Old or damp powder detergent Rinse agent dispenser empty Too little detergent • Use Jet-Dry...

Use and Care Manual / Warranty
Page 15
... are limited to provide. I Replacement of house fuses or resetting of the dishwasher which fails due to replace the defective part. EXCLUSION OF IMPLIED WARRANTIES-Your sole and exclusive remedy is product repair as provided in this limited one year or the shortest period allowed by accident, fire, floods or acts of God. Safety Instructions Operating Instructions Dishwasher Warranty All warranty service provided by Mabe to...
... are limited to provide. I Replacement of house fuses or resetting of the dishwasher which fails due to replace the defective part. EXCLUSION OF IMPLIED WARRANTIES-Your sole and exclusive remedy is product repair as provided in this limited one year or the shortest period allowed by accident, fire, floods or acts of God. Safety Instructions Operating Instructions Dishwasher Warranty All warranty service provided by Mabe to...


