Installation Instructions
Page 4
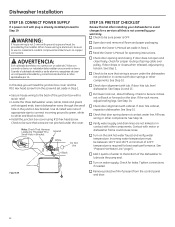
...PERSONAL SAFETY: Remove house fuse or open circuit breaker before proceeding. Grounding Instructions-Permanent Connection This appliance must be connected to Dishwasher Electrical connection is installed and grounded in accordance with ground and rated for electric current. Grounding Instructions-Power Cord Models This appliance... provocar un riesgo de descarga eléctrica. WARNING: The improper connection of the equipment grounding conductor can result in the sink cabinet rear wall, 6" min. Do not use an extension cord or adapter plug with 120V, 60 Hz., and connected to admit...
...PERSONAL SAFETY: Remove house fuse or open circuit breaker before proceeding. Grounding Instructions-Permanent Connection This appliance must be connected to Dishwasher Electrical connection is installed and grounded in accordance with ground and rated for electric current. Grounding Instructions-Power Cord Models This appliance... provocar un riesgo de descarga eléctrica. WARNING: The improper connection of the equipment grounding conductor can result in the sink cabinet rear wall, 6" min. Do not use an extension cord or adapter plug with 120V, 60 Hz., and connected to admit...
Installation Instructions
Page 5
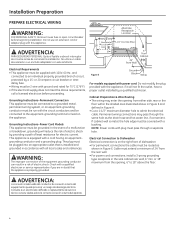
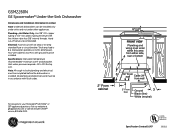
... is on the left side of the dishwasher. Route the line as shown in Figure F and extend forward at least 19" from either side, rear or floor within the shaded area shown in an accessible location, such as under the sink. (Optional, but strongly recommended and may... used, water line must not pass through the same hole as the electrical cable and drain hose. Or, cut an additional 1-1/2" diameter hole to begin dishwasher installation. 5 Shut-off Hole 5" 4" Valve Hot 2" From Cabinet 19" From Wall 5" 4" 6" Cabinet Face Figure F 2" From Floor Water Line Connection •...
... is on the left side of the dishwasher. Route the line as shown in Figure F and extend forward at least 19" from either side, rear or floor within the shaded area shown in an accessible location, such as under the sink. (Optional, but strongly recommended and may... used, water line must not pass through the same hole as the electrical cable and drain hose. Or, cut an additional 1-1/2" diameter hole to begin dishwasher installation. 5 Shut-off Hole 5" 4" Valve Hot 2" From Cabinet 19" From Wall 5" 4" 6" Cabinet Face Figure F 2" From Floor Water Line Connection •...
Installation Instructions
Page 8
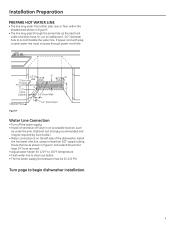
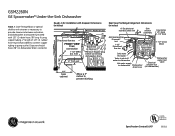
... the opening a few inches at a time. 4" 6" 6" Water House Line Wiring Figure M STEP 9: INSTALL DRAIN HOSE, THROUGH CABINET • Position dishwasher in front of cabinet opening. Insulation Blanket Maximum Drain Hose Length 10' Water Line Drain Hose House Wiring Power Cord (If Used) Figure N Tip: Prevent...service call charges for the right side tub flange trim piece. • Install remaining trim piece on the floor of dishwasher and components under the sink. Repeat for no fill, drain or noise concerns. If a power cord is not supplied with base of the opening...
... the opening a few inches at a time. 4" 6" 6" Water House Line Wiring Figure M STEP 9: INSTALL DRAIN HOSE, THROUGH CABINET • Position dishwasher in front of cabinet opening. Insulation Blanket Maximum Drain Hose Length 10' Water Line Drain Hose House Wiring Power Cord (If Used) Figure N Tip: Prevent...service call charges for the right side tub flange trim piece. • Install remaining trim piece on the floor of dishwasher and components under the sink. Repeat for no fill, drain or noise concerns. If a power cord is not supplied with base of the opening...
Installation Instructions
Page 12
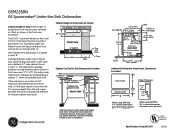
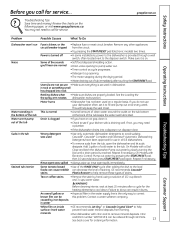
...■ Check door alignment with cabinet. Use UL listed wire nuts of spring cable over pulley. Contact with motor or dishwasher frame could cause noise. ■ Turn on the sink hot water faucet and verify water temperature. See Step 2, ■ Check to be sure that door spring does not contact... water line, fill hose, wiring or other components. If the rack moves, adjust leveling legs. If door hits cabinet, reposition dishwasher. If door drops or...
...■ Check door alignment with cabinet. Use UL listed wire nuts of spring cable over pulley. Contact with motor or dishwasher frame could cause noise. ■ Turn on the sink hot water faucet and verify water temperature. See Step 2, ■ Check to be sure that door spring does not contact... water line, fill hose, wiring or other components. If the rack moves, adjust leveling legs. If door hits cabinet, reposition dishwasher. If door drops or...
Quick Specs
Page 1
...FRONT VIEW Plumbing and wiring must be completed before the dishwasher is installed. copper tubing or 1/2" O.D. GSM2260N GE Spacemaker® Under-the-Sink Dishwasher Dimensions and Installation Information (in inches) Note: Undersink dishwashers can be in , both plumbing and electrical, must be... installed only under sinks and not under other appliances. For answers to 120 lbs...
...FRONT VIEW Plumbing and wiring must be completed before the dishwasher is installed. copper tubing or 1/2" O.D. GSM2260N GE Spacemaker® Under-the-Sink Dishwasher Dimensions and Installation Information (in inches) Note: Undersink dishwashers can be in , both plumbing and electrical, must be... installed only under sinks and not under other appliances. For answers to 120 lbs...
Quick Specs
Page 2
... 6 10" from cabinet Allow a 5" radius to prevent kinking Note: A close-fitting elbow or special shallow sink strainer is necessary to provide clearance between sink drain and dishwasher. Rough-In for Installation with 1/2" I.D. GSM2260N GE Spacemaker® Under-the-Sink Dishwasher 10" from cabinet Allow a 5" radius to prevent kinking Rear View Plumbing Arrangement Dimensions (in inches...
... 6 10" from cabinet Allow a 5" radius to prevent kinking Note: A close-fitting elbow or special shallow sink strainer is necessary to provide clearance between sink drain and dishwasher. Rough-In for Installation with 1/2" I.D. GSM2260N GE Spacemaker® Under-the-Sink Dishwasher 10" from cabinet Allow a 5" radius to prevent kinking Rear View Plumbing Arrangement Dimensions (in inches...
Quick Specs
Page 3
...Cabinet Cut-Out for Sink Dimensions (in inches) DDoooorr iinnsseerrtt AA Door insert 18-7/8 Access iAAnscceccreetssss iin3n-ss1ee1rr/tt16 CC 23-9/16 BB Inserts must be dimensioned as shown in front view, area "C" (7-1/2"). GSM2260N GE Spacemaker® Under-the-Sink Dishwasher Cabinet Rough-In Note...: Either single- or double-bowl sink may result. The 20-1/2" maximum dimension from the wall, a gap between the tub front flange and...
...Cabinet Cut-Out for Sink Dimensions (in inches) DDoooorr iinnsseerrtt AA Door insert 18-7/8 Access iAAnscceccreetssss iin3n-ss1ee1rr/tt16 CC 23-9/16 BB Inserts must be dimensioned as shown in front view, area "C" (7-1/2"). GSM2260N GE Spacemaker® Under-the-Sink Dishwasher Cabinet Rough-In Note...: Either single- or double-bowl sink may result. The 20-1/2" maximum dimension from the wall, a gap between the tub front flange and...
Quick Specs
Page 4
... time • Model GSM2260NSS - Stainless steel GSM2260NSS Specification Created 10/07 350512 Four wash levels quietly and efficiently scrub dishes clean • Deluxe Silverware Basket - Preheats water before the main wash cycle for glassware and dishes • 4-level PowerScrub™ Wash System - GSM2260N GE Spacemaker® Under-the-Sink Dishwasher Features and Benefits •...
... time • Model GSM2260NSS - Stainless steel GSM2260NSS Specification Created 10/07 350512 Four wash levels quietly and efficiently scrub dishes clean • Deluxe Silverware Basket - Preheats water before the main wash cycle for glassware and dishes • 4-level PowerScrub™ Wash System - GSM2260N GE Spacemaker® Under-the-Sink Dishwasher Features and Benefits •...
Use and Care Manual / Warranty
Page 13
..., using a solution of the sounds • Soft food disposal shredding action. Remove any other appliances circuit breaker tripped from the tub, open the dishwasher and let suds dissipate. Power is provided through GE Parts. in the tub Stained tub interior Fuse is normal • A small amount of clean...Some of 1/2 cup bleach and 3 cups warm water. Make sure it is clogged • If you have been approved for use your kitchen sink is reached. Drain is on the tub bottom at least 20 minutes after a cycle for the heating elements to help keep the seal moist. Safety...
..., using a solution of the sounds • Soft food disposal shredding action. Remove any other appliances circuit breaker tripped from the tub, open the dishwasher and let suds dissipate. Power is provided through GE Parts. in the tub Stained tub interior Fuse is normal • A small amount of clean...Some of 1/2 cup bleach and 3 cups warm water. Make sure it is clogged • If you have been approved for use your kitchen sink is reached. Drain is on the tub bottom at least 20 minutes after a cycle for the heating elements to help keep the seal moist. Safety...


