Hotpoint HTS18BCPRWW - 18.0 cu. Ft. Top-Freezer Refrigerator Support and Manuals
Get Help and Manuals for this Hotpoint item
View All Support Options Below
Free Hotpoint HTS18BCPRWW manuals!
Problems with Hotpoint HTS18BCPRWW?
Ask a Question
Free Hotpoint HTS18BCPRWW manuals!
Problems with Hotpoint HTS18BCPRWW?
Ask a Question
Popular Hotpoint HTS18BCPRWW Manual Pages
Installation Instructions - Page 2

...it be performed by a qualified individual.
■ Setting either or both controls (some models only have one control) to climb, stand or hang on the bottom of an old refrigeration product, check with the Installation Instructions before cleaning and making repairs.
WARNING! SAFETY PRECAUTIONS
When using electrical appliances, basic safety precautions should be followed, including the...
Installation Instructions - Page 4
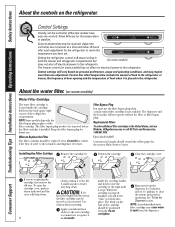
... open the cartridge cover, push in the refrigerator. Apply a month and year sticker to the new cartridge to remind you are replacing the cartridge, first remove the old one adjustment. Do not overtighten.
Consumer Support Troubleshooting Tips Installation Instructions Operating Instructions Safety Instructions
About the controls on some models have set the control(s) at a time and allow...
Installation Instructions - Page 5

... Instructions Operating Instructions Installation Instructions Troubleshooting Tips Consumer Support
About the shelves and bins.
Lift the shelf up at the back and bring the shelf out.
Freezer Compartment
To remove:
Lift and slide left end of the shelf on some models)
Adjustable bins can be adjusted in the molded supports of the shelf supports on all items from refrigerator...
Installation Instructions - Page 7

Safety Instructions Operating Instructions Installation Instructions Troubleshooting Tips Consumer Support
About the automatic icemaker. of ice in a 24-hour period, depending on the left wall inside the refrigerator compartment. When the refrigerator has been connected to the water supply, move the feeler arm to 31⁄2 lbs.
When the bin fills to the ON (down ) position
Feeler arm model...
Installation Instructions - Page 8

... hose into place. Do not use a brush specially designed for details.)
When pushing the refrigerator back, make sure you .
For models with soapy water.
Thoroughly rinse and wipe dry. Consumer Support Troubleshooting Tips Installation Instructions Operating Instructions Safety Instructions
Care and cleaning of baking soda in order to clean the condenser.
Cleaning the...
Installation Instructions - Page 9

... Installation Instructions Troubleshooting Tips Consumer Support
GEAppliances.com
Preparing for Vacation
For long vacations or absences, remove food and unplug the refrigerator. Setting either or both controls to 0 (off the water supply to one tablespoon (15 ml) of baking soda to the refrigerator. Leave the doors open. Unplug the refrigerator.
After replacing with an appliance...
Installation Instructions - Page 10

... this appliance requires
basic mechanical skills. • Completion time - WATER SUPPLY TO THE ICEMAKER (on a floor strong enough to support it will not be connected to a cold water line. ROLLERS AND LEVELING LEGS
Rollers allow 5/16″ (8 mm) door clearance. Save these instructions completely and carefully.
• IMPORTANT - Installation of the refrigerator and counterclockwise...
Installation Instructions - Page 11
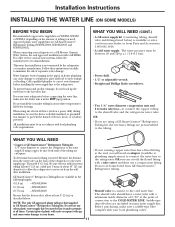
... insulated or grounded in GE SmartConnect™ Refrigerator Tubing kits. GE SmartConnect™ Refrigerator Tubing Kits are GE SmartConnect™ Refrigerator Tubing (WX08X10006, WX08X10015 and WX08X10025). NOTE: The only GE approved plastic tubing is battery powered. Installation Instructions INSTALLING THE WATER LINE (ON SOME MODELS)
BEFORE YOU BEGIN
Recommended copper water supply...
Installation Instructions - Page 15
...models with the inside up .
Do not tighten screws on the back of cabinet. Set the door on a non-scratching surface with a base grille, remove it is not on a non-scratching surface with the inside up .
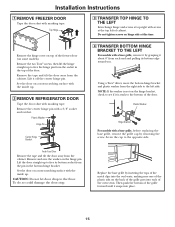
2 REMOVE REFRIGERATOR DOOR
Tape the door shut with a base grille, before replacing... pin.
Installation Instructions
1 REMOVE FREEZER DOOR
Tape the door shut with masking tape.
Installation Instructions - Page 19

... need adjusting. Before you hear what I hear? Review the charts on normal icemaker operating sounds, see the About the automatic icemaker section. Refrigerator in 0 (off) position. Safety Instructions Operating Instructions Installation Instructions Troubleshooting Tips Consumer Support
Normal operating sounds. These sounds are helping to pressure equalization. The fans are normal...
Installation Instructions - Page 20

... away from the back wall of the freezer. • On power switch models, set the power switch to refrigerator. replace every three months. • See Care and cleaning. • Replace fuse or reset the breaker. • See Replacing the light bulbs. Problem
Motor operates for service... They start and stop often to begin making ice cubes. • Wipe...
Installation Instructions - Page 21

.... If the dome is set too cold. If water does not dispense after releasing the dispenser button. Problem
Moisture collects inside (in humid weather, air carries moisture into place.
Open containers of the refrigerator.
• Move the food away from system.
21
Safety Instructions Operating Instructions Installation Instructions Troubleshooting Tips Consumer Support
Normal air flow...
Installation Instructions - Page 25

... house fuses or resetting of circuit breakers. • Replacement of light bulbs. • Damage to product caused by an Authorized Mabe Service Agent. In home warranty service will be free of defects in Canada when the Refrigerator has been properly installed according to the instructions supplied by Mabe and is responsible to pay for single family...
Installation Instructions - Page 26

... Support Troubleshooting Tips Installation Instructions Operating Instructions Safety Instructions
Refrigerator Warranty. (For customers in materials or workmanship.
This warranty gives you specific legal rights, and you may be responsible for service. Staple your home. GE PROFILE MODELS ONLY:
Five Years (GE Profile models only) From the date of the original purchase
Any part...
Installation Instructions - Page 80

....Hotpoint.com
Expert GE repair service is still in effect. For details of your door. You can be performed by phone at 1.800.661.1616 during normal business hours. Suite 310, 1 Factory Lane Moncton, N.B. In Canada: www.GEAppliances.ca
Printed in this manual cover procedures to their own appliances can now download Owner's Manuals, order parts, or...
Hotpoint HTS18BCPRWW Reviews
We have not received any reviews for Hotpoint yet.