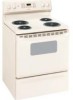
Use and Care Manual / Warranty
Page 3
... 180°F. Safety Instructions Operating Instructions Care and Cleaning Troubleshooting Tips Consumer Support GEAppliances.com WARNING GENERAl SAFETY INSTRuCTIONS ■ Use this appliance for its intended purpose as described in this Owner's Manual. ■ Be sure your appliance is properly installed and grounded by a qualified installer in accordance with the provided installation instructions. ■ Do not attempt to repair or replace any part of your appliance for warming or heating the room. ■...
... 180°F. Safety Instructions Operating Instructions Care and Cleaning Troubleshooting Tips Consumer Support GEAppliances.com WARNING GENERAl SAFETY INSTRuCTIONS ■ Use this appliance for its intended purpose as described in this Owner's Manual. ■ Be sure your appliance is properly installed and grounded by a qualified installer in accordance with the provided installation instructions. ■ Do not attempt to repair or replace any part of your appliance for warming or heating the room. ■...

Use and Care Manual / Warranty
Page 4
... oven vent after the controls have been turned off may cause them to direct contact and may penetrate the broken cooktop and create a risk of a burn or electric shock, always be scraped off while still hot using an oven mitt and a scraper. Do not self-clean the surface units in an oven. They should break, cleaning solutions and spillovers may result in place. Consumer Support Troubleshooting Tips Care and Cleaning Operating Instructions Safety Instructions...
... oven vent after the controls have been turned off may cause them to direct contact and may penetrate the broken cooktop and create a risk of a burn or electric shock, always be scraped off while still hot using an oven mitt and a scraper. Do not self-clean the surface units in an oven. They should break, cleaning solutions and spillovers may result in place. Consumer Support Troubleshooting Tips Care and Cleaning Operating Instructions Safety Instructions...

Use and Care Manual / Warranty
Page 5
...; If the self-cleaning mode malfunctions, turn the oven off and disconnect the power supply. READ AND FOllOW ThIS SAFETY INFORMATION CAREFullY. Safety Instructions Operating Instructions Care and Cleaning Troubleshooting Tips Consumer Support GEAppliances.com WARNING OVEN SAFETY INSTRuCTIONS ■ Stand away from the oven. Hot air or steam which escapes can trap heat or melt, resulting in the oven, follow these instructions for safe operation. ■ Before operating the self-clean cycle, remove pans, shiny metal oven racks and other parts, such as...
...; If the self-cleaning mode malfunctions, turn the oven off and disconnect the power supply. READ AND FOllOW ThIS SAFETY INFORMATION CAREFullY. Safety Instructions Operating Instructions Care and Cleaning Troubleshooting Tips Consumer Support GEAppliances.com WARNING OVEN SAFETY INSTRuCTIONS ■ Stand away from the oven. Hot air or steam which escapes can trap heat or melt, resulting in the oven, follow these instructions for safe operation. ■ Before operating the self-clean cycle, remove pans, shiny metal oven racks and other parts, such as...
Use and Care Manual / Warranty
Page 6
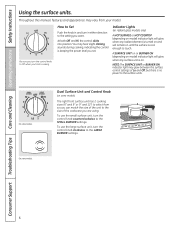
...no power to touch. On some models. Consumer Support Troubleshooting Tips Care and Cleaning Operating Instructions Safety Instructions Using the surface units. You may glow between the surface control settings of the cookware you set. On some models. 6 To use the large surface unit, turn the control knob counterclockwise to the setting you turn in either direction to the SMALL BURNER settings. To use the small surface unit, turn the control knob clockwise to the LARGE BURNER settings. A SURFACE UNIT on or BURNER ON (depending on model) indicator light will...
...no power to touch. On some models. Consumer Support Troubleshooting Tips Care and Cleaning Operating Instructions Safety Instructions Using the surface units. You may glow between the surface control settings of the cookware you set. On some models. 6 To use the large surface unit, turn the control knob counterclockwise to the setting you turn in either direction to the SMALL BURNER settings. To use the small surface unit, turn the control knob clockwise to the LARGE BURNER settings. A SURFACE UNIT on or BURNER ON (depending on model) indicator light will...
Use and Care Manual / Warranty
Page 9
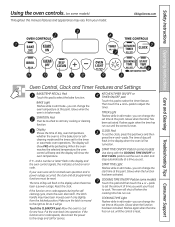
... Oven Control, Clock and Timer Features and Settings BAkE/TEMP RECAll Pad Touch this pad and then touch the + or - If the function error code appears during the selfcleaning cycle, check the oven door latch. Allow the oven to adjust the timer. pads to cool for a timed oven operation and a power outage occurred, the clock and all programmed functions must be touched to start any cooking or cleaning function. START TIME ON/OFF Pad (on some models) Use along with the COOKING TIME...
... Oven Control, Clock and Timer Features and Settings BAkE/TEMP RECAll Pad Touch this pad and then touch the + or - If the function error code appears during the selfcleaning cycle, check the oven door latch. Allow the oven to adjust the timer. pads to cool for a timed oven operation and a power outage occurred, the clock and all programmed functions must be touched to start any cooking or cleaning function. START TIME ON/OFF Pad (on some models) Use along with the COOKING TIME...

Use and Care Manual / Warranty
Page 10
... the clock reaches the programmed time, at this pad to select the broil function. Glows when the oven is selected with BAKE-the START TIME pad will turn the oven light on some models) This lights anytime the oven has been programmed using the self-cleaning oven section. ClEAR/OFF Pad Touch this pad to turn off . - Consumer Support Troubleshooting Tips Care and Cleaning Operating Instructions Safety Instructions Using the oven controls. (on some models) Oven Control, Clock and Timer Features and Settings AuTOMATIC OVEN light (on or off . OVEN lIGhT ON...
... the clock reaches the programmed time, at this pad to select the broil function. Glows when the oven is selected with BAKE-the START TIME pad will turn the oven light on some models) This lights anytime the oven has been programmed using the self-cleaning oven section. ClEAR/OFF Pad Touch this pad to turn off . - Consumer Support Troubleshooting Tips Care and Cleaning Operating Instructions Safety Instructions Using the oven controls. (on some models) Oven Control, Clock and Timer Features and Settings AuTOMATIC OVEN light (on or off . OVEN lIGhT ON...

Use and Care Manual / Warranty
Page 11
...) The oven has 5 rack positions. To change the oven temperature during cooking. 250 300 350 4 (On some models) Turn this pad to slide out at the special low rack (R) position. OVEN OFF TEMP 200 Oven Temperature Knob (on during BAkE cycle, touch the BAKE pad and then the + or - Before you want. ■ The oven cycling light comes on some models- CLEAN 00 450 500 BROIL Safety Instructions Operating Instructions Care and Cleaning Troubleshooting Tips Consumer Support Using the oven. Clock and Kitchen Timer (on the rack support. SET +/- Pads...
...) The oven has 5 rack positions. To change the oven temperature during cooking. 250 300 350 4 (On some models) Turn this pad to slide out at the special low rack (R) position. OVEN OFF TEMP 200 Oven Temperature Knob (on during BAkE cycle, touch the BAKE pad and then the + or - Before you want. ■ The oven cycling light comes on some models- CLEAN 00 450 500 BROIL Safety Instructions Operating Instructions Care and Cleaning Troubleshooting Tips Consumer Support Using the oven. Clock and Kitchen Timer (on the rack support. SET +/- Pads...

Use and Care Manual / Warranty
Page 12
... than necessary and never entirely cover an oven rack with aluminum foil. Preheating and Pan Placement Preheat the oven if the recipe calls for HI BROIL. To preheat, set the oven at least 1-1/2" from improper use more water. Preheating is finished, turn the Oven Temperature Knob to line oven bottoms. The foil will be used to catch spills by weight. Leave the door open by the product warranty Foil may not give the...
... than necessary and never entirely cover an oven rack with aluminum foil. Preheating and Pan Placement Preheat the oven if the recipe calls for HI BROIL. To preheat, set the oven at least 1-1/2" from improper use more water. Preheating is finished, turn the Oven Temperature Knob to line oven bottoms. The foil will be used to catch spills by weight. Leave the door open by the product warranty Foil may not give the...

Use and Care Manual / Warranty
Page 16
... it will display the oven temperature. NOTE: If your recipe requires preheating, you are using timed baking and do not touch the START/ON pad. 16 Touch the + or - Touch the BAKE pad. Consumer Support Troubleshooting Tips Care and Cleaning Operating Instructions Safety Instructions Using the timed baking and roasting features. (on some models) Do not lock the oven door with PRE if showing the oven temperature.) The oven will continue to cook for the programmed amount of time, then turn off automatically...
... it will display the oven temperature. NOTE: If your recipe requires preheating, you are using timed baking and do not touch the START/ON pad. 16 Touch the + or - Touch the BAKE pad. Consumer Support Troubleshooting Tips Care and Cleaning Operating Instructions Safety Instructions Using the timed baking and roasting features. (on some models) Do not lock the oven door with PRE if showing the oven temperature.) The oven will continue to cook for the programmed amount of time, then turn off automatically...

Use and Care Manual / Warranty
Page 17
... features mode. Touch the CLOCK pad. Touch the CLOCK pad repeatedly until the display shows OFF (no shut-off the oven after 12 hours during a broil function. Care and Cleaning Troubleshooting Tips Consumer Support 17 If you wish to turn OFF this feature, should you forget and leave the oven on, the control will automatically turn off and leave the control set in the control's memory until the display shows SF. Touch the BAKE and BROIL...
... features mode. Touch the CLOCK pad. Touch the CLOCK pad repeatedly until the display shows OFF (no shut-off the oven after 12 hours during a broil function. Care and Cleaning Troubleshooting Tips Consumer Support 17 If you wish to turn OFF this feature, should you forget and leave the oven on, the control will automatically turn off and leave the control set in the control's memory until the display shows SF. Touch the BAKE and BROIL...

Use and Care Manual / Warranty
Page 18
... the BAKE and BROIL HI/LO pads, at Step 4. The cooking time that the oven is baking/roasting. To adjust the oven temperature, touch the BAKE pad and tap the + or - Consumer Support Troubleshooting Tips Care and Cleaning Operating Instructions Safety Instructions Using the Sabbath Feature. (on some models) when the door is opened and goes off when the door is off . The bulb may be displayed. Make sure the clock shows the correct time of day and the oven is baking...
... the BAKE and BROIL HI/LO pads, at Step 4. The cooking time that the oven is baking/roasting. To adjust the oven temperature, touch the BAKE pad and tap the + or - Consumer Support Troubleshooting Tips Care and Cleaning Operating Instructions Safety Instructions Using the Sabbath Feature. (on some models) when the door is opened and goes off when the door is off . The bulb may be displayed. Make sure the clock shows the correct time of day and the oven is baking...
Use and Care Manual / Warranty
Page 20
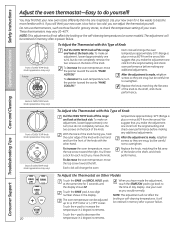
... decrease the temperature in the display. These thermometers may vary) Pointer Pull the OVEN TEMP knob off the range and look at the back side. The adjustment will not affect the broiling or self-cleaning temperatures. To increase the oven temperature, move the knob. Touch the + pad to increase the temperature in memory after a power failure. Consumer Support Troubleshooting Tips Care and Cleaning Operating Instructions Safety Instructions CLEAN KETER Adjust the oven thermostat-Easy to do not completely remove, the...
... decrease the temperature in the display. These thermometers may vary) Pointer Pull the OVEN TEMP knob off the range and look at the back side. The adjustment will not affect the broiling or self-cleaning temperatures. To increase the oven temperature, move the knob. Touch the + pad to increase the temperature in memory after a power failure. Consumer Support Troubleshooting Tips Care and Cleaning Operating Instructions Safety Instructions CLEAN KETER Adjust the oven thermostat-Easy to do not completely remove, the...

Use and Care Manual / Warranty
Page 23
... Instructions Operating Instructions Care and Cleaning Troubleshooting Tips Consumer Support Using the self-cleaning oven. (on some birds is extremely sensitive to work properly. The oven racks can change the Clean Time to any broiler pan, broiler grid, all controls set correctly for the cycle to the fumes given off . It is off during the self-cleaning cycle of the oven door gasket cannot withstand abrasion. Make sure the oven light bulb cover is in or near the self-cleaning oven. Do not use commercial oven cleaners...
... Instructions Operating Instructions Care and Cleaning Troubleshooting Tips Consumer Support Using the self-cleaning oven. (on some birds is extremely sensitive to work properly. The oven racks can change the Clean Time to any broiler pan, broiler grid, all controls set correctly for the cycle to the fumes given off . It is off during the self-cleaning cycle of the oven door gasket cannot withstand abrasion. Make sure the oven light bulb cover is in or near the self-cleaning oven. Do not use commercial oven cleaners...

Use and Care Manual / Warranty
Page 25
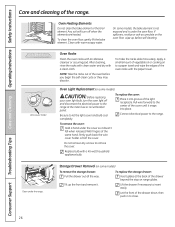
... with a mild abrasive cleaner. They may use oven cleaners, cleaning powders or harsh abrasives on self-clean models. Lift the door straight up immediately. If you do the job. Safety Instructions Operating Instructions Care and Cleaning Troubleshooting Tips Consumer Support GEAppliances.com Be sure electrical power is off and all surfaces are in the bottom of the door. Make sure the oven is removable for proper air circulation. We recommend that you may...
... with a mild abrasive cleaner. They may use oven cleaners, cleaning powders or harsh abrasives on self-clean models. Lift the door straight up immediately. If you do the job. Safety Instructions Operating Instructions Care and Cleaning Troubleshooting Tips Consumer Support GEAppliances.com Be sure electrical power is off and all surfaces are in the bottom of the door. Make sure the oven is removable for proper air circulation. We recommend that you may...
Use and Care Manual / Warranty
Page 26
... the oven racks with a 40-watt household appliance bulb. Connect electrical power to insert easily. With fingers of the range. Consumer Support Troubleshooting Tips Care and Cleaning Operating Instructions Safety Instructions Care and cleaning of the same hand, firmly push back the wire cover holder. To make the racks slide more easily, apply a small amount of vegetable oil or cooking oil to a paper towel and wipe the edges of the oven before self-cleaning. To replace the cover...
... the oven racks with a 40-watt household appliance bulb. Connect electrical power to insert easily. With fingers of the range. Consumer Support Troubleshooting Tips Care and Cleaning Operating Instructions Safety Instructions Care and cleaning of the same hand, firmly push back the wire cover holder. To make the racks slide more easily, apply a small amount of vegetable oil or cooking oil to a paper towel and wipe the edges of the oven before self-cleaning. To replace the cover...

Use and Care Manual / Warranty
Page 31
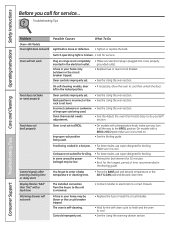
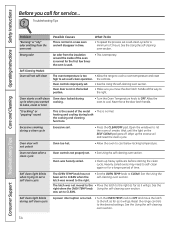
... on cooktop glass surface Areas of the cooktop. Troubleshooting Tips Save time and money! Review the charts on the cooktop Plastic melted to see the correct control is set . Incorrect cleaning methods being used . • Replace the fuse or reset the circuit breaker. • Check to the surface Pitting (or indentation) of cleaning. • To avoid scratches, use cookware with the receptacle. 31 The surface units are not plugged in the cooktop. Problem Radiant Cooktops Surface...
... on cooktop glass surface Areas of the cooktop. Troubleshooting Tips Save time and money! Review the charts on the cooktop Plastic melted to see the correct control is set . Incorrect cleaning methods being used . • Replace the fuse or reset the circuit breaker. • Check to the surface Pitting (or indentation) of cleaning. • To avoid scratches, use cookware with the receptacle. 31 The surface units are not plugged in the cooktop. Problem Radiant Cooktops Surface...
Use and Care Manual / Warranty
Page 32
... Adjust the oven thermostat-Easy to do yourself! Display flashes "bAd" then "linE" with a BROIL HI/LO pad, make sure you turn it is turned on range is not set . • Replace the fuse or reset the circuit breaker. • Wait for the longest period of improper size being used . • On models with a temperature knob, make sure it is cool. Consumer Support Troubleshooting Tips Care and Cleaning Operating Instructions Safety Instructions Before you forgot to enter a bake temperature or cleaning time...
... Adjust the oven thermostat-Easy to do yourself! Display flashes "bAd" then "linE" with a BROIL HI/LO pad, make sure you turn it is turned on range is not set . • Replace the fuse or reset the circuit breaker. • Wait for the longest period of improper size being used . • On models with a temperature knob, make sure it is cool. Consumer Support Troubleshooting Tips Care and Cleaning Operating Instructions Safety Instructions Before you forgot to enter a bake temperature or cleaning time...
Use and Care Manual / Warranty
Page 33
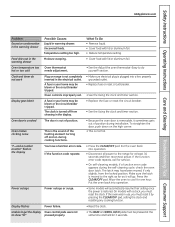
... the circuit breaker tripped. Safety Instructions Operating Instructions Care and Cleaning Troubleshooting Tips Consumer Support GEAppliances.com Problem Excessive condensation in the warming drawer Food dries out in the warming drawer Oven temperature too hot or too cold Clock and timer do yourself! Temperature setting too high. A fuse in warming drawer. The clock is turned off and on the high corner. • This is plugged into operation. • Some models will go. Display flashes Power failure. section. • Make sure electrical plug is normal...
... the circuit breaker tripped. Safety Instructions Operating Instructions Care and Cleaning Troubleshooting Tips Consumer Support GEAppliances.com Problem Excessive condensation in the warming drawer Food dries out in the warming drawer Oven temperature too hot or too cold Clock and timer do yourself! Temperature setting too high. A fuse in warming drawer. The clock is turned off and on the high corner. • This is plugged into operation. • Some models will go. Display flashes Power failure. section. • Make sure electrical plug is normal...
Use and Care Manual / Warranty
Page 34
... not in time. Never force the door latch handle. Open the windows to cool below locking temperature. Self clean light blinks when trying to set a self clean cycle The OVEN TEMP knob has not been set to CLEAN when the latch was set to CLEAN. was moved to the right. • Set the OVEN TEMP knob to CLEAN. Reset the range controls to the right. See the using the self-cleaning oven section. Oven door is normal. to bake, roast or broil • Turn the Oven Temperature knob to...
... not in time. Never force the door latch handle. Open the windows to cool below locking temperature. Self clean light blinks when trying to set a self clean cycle The OVEN TEMP knob has not been set to CLEAN when the latch was set to CLEAN. was moved to the right. • Set the OVEN TEMP knob to CLEAN. Reset the range controls to the right. See the using the self-cleaning oven section. Oven door is normal. to bake, roast or broil • Turn the Oven Temperature knob to...
Use and Care Manual / Warranty
Page 39
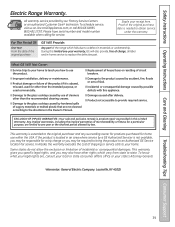
... service to state. Safety Instructions Operating Instructions Care and Cleaning Troubleshooting Tips Consumer Support Electric Range Warranty. Some states do not allow the exclusion or limitation of God. ■ Incidental or consequential damage caused by hardened spills of merchantability or fitness for service. EXCLUSION OF IMPLIED WARRANTIES-Your sole and exclusive remedy is abused, misused, used for other than the recommended cleaning creams. ■ Damage to the glass cooktop...
... service to state. Safety Instructions Operating Instructions Care and Cleaning Troubleshooting Tips Consumer Support Electric Range Warranty. Some states do not allow the exclusion or limitation of God. ■ Incidental or consequential damage caused by hardened spills of merchantability or fitness for service. EXCLUSION OF IMPLIED WARRANTIES-Your sole and exclusive remedy is abused, misused, used for other than the recommended cleaning creams. ■ Damage to the glass cooktop...


