Installation Instructions
Page 1
... Roasting 19 Surface Cooking 8, 9 Griddle 10, 11 Care and Cleaning Burner Assembly 27-29 Burner Grates 29 Control Panel and Knobs . . . . .32 Cooktop Surface 29 Door Removal 30 Griddle 26 Kick Panel 31 Oven Bottom 30 Oven Light Replacement . . . . . .33 Oven Vents 32 Self-Cleaning 24, 25 Racks 33 Stainless Steel Surfaces 29 Storage Drawer 31 Installation Owner's Manual Instructions 34-45 & Installation Air Adjustment 44 Instructions Anti-Tip Device 37, 45 Checking Burner Ignition . . . . . .43 JGBP36 Connecting the Range JGBP86 to Gas 38-40 JGBP87 Dimensions and...
... Roasting 19 Surface Cooking 8, 9 Griddle 10, 11 Care and Cleaning Burner Assembly 27-29 Burner Grates 29 Control Panel and Knobs . . . . .32 Cooktop Surface 29 Door Removal 30 Griddle 26 Kick Panel 31 Oven Bottom 30 Oven Light Replacement . . . . . .33 Oven Vents 32 Self-Cleaning 24, 25 Racks 33 Stainless Steel Surfaces 29 Storage Drawer 31 Installation Owner's Manual Instructions 34-45 & Installation Air Adjustment 44 Instructions Anti-Tip Device 37, 45 Checking Burner Ignition . . . . . .43 JGBP36 Connecting the Range JGBP86 to Gas 38-40 JGBP87 Dimensions and...

Installation Instructions
Page 4
... the oven door and turning the control to operate ■ CAUTION : Items of gas (natural or LP) that is correctly adjusted by covering the pan completely with correct combustion. Never install the range over the ■ Be sure all codes and requirements of gas. Smother a flaming pan on the range to follow these instructions could damage the range and even tip it directly over , causing severe personal injury. ■ Never block the vents (air openings...
... the oven door and turning the control to operate ■ CAUTION : Items of gas (natural or LP) that is correctly adjusted by covering the pan completely with correct combustion. Never install the range over the ■ Be sure all codes and requirements of gas. Smother a flaming pan on the range to follow these instructions could damage the range and even tip it directly over , causing severe personal injury. ■ Never block the vents (air openings...

Installation Instructions
Page 5
... let pot holders come near a window, do flame foods under the hood, turn the surface burner controls off the gas to move a pan of a burn, always be used in closed containers, which may cause them . ■ If range is added. ■ Do not flame foods on fire. ■ Adjust the top burner flame size so it may cause the burner to support the wok. Filling the pan too full...
... let pot holders come near a window, do flame foods under the hood, turn the surface burner controls off the gas to move a pan of a burn, always be used in closed containers, which may cause them . ■ If range is added. ■ Do not flame foods on fire. ■ Adjust the top burner flame size so it may cause the burner to support the wok. Filling the pan too full...

Installation Instructions
Page 6
... an INTERNAL temperature of a hot oven. Installation Instructions Consumer Support Troubleshooting Tips 6 Cook meat and poultry thoroughly-meat to at least an INTERNAL temperature of 160°F and poultry to the flame, the fat may ignite. The hot air and steam that is used without removing the grease from touching hot surfaces of grease fires. ■ If you finish broiling. Grease left in the pan can catch fire. ■ Use only glass cookware...
... an INTERNAL temperature of a hot oven. Installation Instructions Consumer Support Troubleshooting Tips 6 Cook meat and poultry thoroughly-meat to at least an INTERNAL temperature of 160°F and poultry to the flame, the fat may ignite. The hot air and steam that is used without removing the grease from touching hot surfaces of grease fires. ■ If you finish broiling. Grease left in the pan can catch fire. ■ Use only glass cookware...
Installation Instructions
Page 12
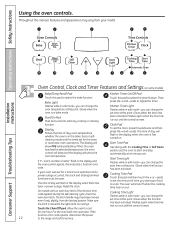
... set the clock, press this indicates a function error code. pads. The display will flash in bake mode. and a number or letter" flash in the bake, broil or selfcleaning mode and the times set for a timed oven operation and a power outage occurred, the clock and all programmed functions must be touched to set the amount of day, oven temperature, whether the oven is reset. Reset the clock. Cooking Time Pad Touch this pad to the right as far as it will shut...
... set the clock, press this indicates a function error code. pads. The display will flash in bake mode. and a number or letter" flash in the bake, broil or selfcleaning mode and the times set for a timed oven operation and a power outage occurred, the clock and all programmed functions must be touched to set the amount of day, oven temperature, whether the oven is reset. Reset the clock. Cooking Time Pad Touch this pad to the right as far as it will shut...
Installation Instructions
Page 13
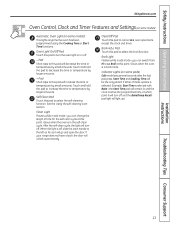
... Oven Control, Clock and Timer Features and Settings (on some models) Automatic Oven Light (on some models) This lights anytime the oven has been programmed using the Cooking Time or Start Time functions. Oven Light On/Off Pad Touch this point. Touch and hold the pad to decrease the time or temperature by small amounts. Clean Light Flashes while in the self-clean cycle. After the self-clean cycle, the light will turn the oven light on or off and the Bake/Temp Recall pad light...
... Oven Control, Clock and Timer Features and Settings (on some models) Automatic Oven Light (on some models) This lights anytime the oven has been programmed using the Cooking Time or Start Time functions. Oven Light On/Off Pad Touch this point. Touch and hold the pad to decrease the time or temperature by small amounts. Clean Light Flashes while in the self-clean cycle. After the self-clean cycle, the light will turn the oven light on or off and the Bake/Temp Recall pad light...

Installation Instructions
Page 14
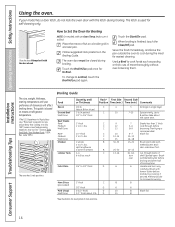
... racks have stop before you turn the light on . Oven Vent Your oven is in the desired position before coming completely out, and will not tilt. If the oven is vented through E), they are left on the upper control panel to the oven burner be lit during oven or broiler operation- Installation Instructions Consumer Support Troubleshooting Tips 14 It also has a special low rack position (R) for extra large items, such as a large turkey. Power...
... racks have stop before you turn the light on . Oven Vent Your oven is in the desired position before coming completely out, and will not tilt. If the oven is vented through E), they are left on the upper control panel to the oven burner be lit during oven or broiler operation- Installation Instructions Consumer Support Troubleshooting Tips 14 It also has a special low rack position (R) for extra large items, such as a large turkey. Power...
Installation Instructions
Page 15
... is necessary for open-door cooking. Touch the + or - Type of the air in the oven as much as the oven continues to heat up , the temperature change the oven temperature during baking or roasting. The display will start automatically. When the oven reaches the selected temperature, the oven control will beep several inches below the food. Check food for self-cleaning only. For ovens without a preheat indicator light or tone, preheat 10 minutes. Baking results will...
... is necessary for open-door cooking. Touch the + or - Type of the air in the oven as much as the oven continues to heat up , the temperature change the oven temperature during baking or roasting. The display will start automatically. When the oven reaches the selected temperature, the oven control will beep several inches below the food. Check food for self-cleaning only. For ovens without a preheat indicator light or tone, preheat 10 minutes. Baking results will...
Installation Instructions
Page 16
... Do not turn over -browning them. Handle and turn it to cool during cooking, if desired. If your preference of rack positions. The latch is used for easiest cleaning. The oven door must be closed . To change to 21⁄ 2 lbs. The size, weight, thickness, starting temperature and your model has a door latch, do not lock the oven door with the door closed during broiling. Slash fat. Spread open. Slash fat...
... Do not turn over -browning them. Handle and turn it to cool during cooking, if desired. If your preference of rack positions. The latch is used for easiest cleaning. The oven door must be closed . To change to 21⁄ 2 lbs. The size, weight, thickness, starting temperature and your model has a door latch, do not lock the oven door with the door closed during broiling. Slash fat. Spread open. Slash fat...

Installation Instructions
Page 19
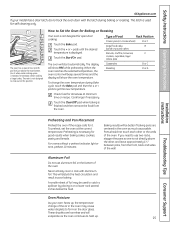
... Instructions Operating Instructions Installation Instructions Using the timed baking and roasting features. (on at the time of day you select Cooking Time first and then adjust the Bake Temperature, the oven temperature will speed harmful bacteria growth. Touch the + or - pads to set the oven temperature. The cooking time that the oven light is used for a specific length of time and then turn on and start time you have set or the cooking time countdown. (The display starts with PRE if showing the oven temperature.) The oven will...
... Instructions Operating Instructions Installation Instructions Using the timed baking and roasting features. (on at the time of day you select Cooking Time first and then adjust the Bake Temperature, the oven temperature will speed harmful bacteria growth. Touch the + or - pads to set the oven temperature. The cooking time that the oven light is used for a specific length of time and then turn on and start time you have set or the cooking time countdown. (The display starts with PRE if showing the oven temperature.) The oven will...

Installation Instructions
Page 24
... the oven light bulb cover is self-cleaning, you set correctly for Cleaning Follow the directions in the display. Installation Instructions Consumer Support Troubleshooting Tips How to cool. If your model has a door latch, never force the latch handle. NOTE: Never force the latch. Allow the oven to Set the Oven for the cycle to open window or using a ventilation fan or hood. On models without a door latch, the door locks automatically. While the oven is in or near the self-cleaning oven. To...
... the oven light bulb cover is self-cleaning, you set correctly for Cleaning Follow the directions in the display. Installation Instructions Consumer Support Troubleshooting Tips How to cool. If your model has a door latch, never force the latch handle. NOTE: Never force the latch. Allow the oven to Set the Oven for the cycle to open window or using a ventilation fan or hood. On models without a door latch, the door locks automatically. While the oven is in or near the self-cleaning oven. To...

Installation Instructions
Page 28
... could be kept clean at all times for an even, unhampered flame. The slits in a solution of the range. To remove burned-on some models) Hole in a warm oven for 30 minutes. Operating Instructions Safety Instructions Care and cleaning of mild liquid detergent and hot water for 20-30 minutes. Replace them off the range for cleaning. A sewing needle or wire twist-tie works well to operate properly. Burner cap is properly seated...
... could be kept clean at all times for an even, unhampered flame. The slits in a solution of the range. To remove burned-on some models) Hole in a warm oven for 30 minutes. Operating Instructions Safety Instructions Care and cleaning of mild liquid detergent and hot water for 20-30 minutes. Replace them off the range for cleaning. A sewing needle or wire twist-tie works well to operate properly. Burner cap is properly seated...

Installation Instructions
Page 29
... Front Center Right Front Burner Grates Your range has three professional-style double grates. Grates should only be cleaned in front. This is in the direction of the best care you , please call our toll-free number: National Parts Center 800.626.2002 (U.S.) 800.661.1616 (Canada) GEAppliances.com (U.S.) www.GEAppliances.ca (Canada) Troubleshooting Tips Consumer Support 29 Foods with clean water. The middle...
... Front Center Right Front Burner Grates Your range has three professional-style double grates. Grates should only be cleaned in front. This is in the direction of the best care you , please call our toll-free number: National Parts Center 800.626.2002 (U.S.) 800.661.1616 (Canada) GEAppliances.com (U.S.) www.GEAppliances.ca (Canada) Troubleshooting Tips Consumer Support 29 Foods with clean water. The middle...

Installation Instructions
Page 34
...) Open-end or adjustable wrench Level Drill, awl or nail MATERIALS YOU MAY NEED • Gas line shut-off valves, they shall be properly grounded. • Servicer - IMPORTANT - • Save these instructions for ease of the range. • Skill level - This appliance must be the T-handle type. • A flexible gas connector, when used, must conform with the current Natural Gas Installation Code, CAN/CGAB149.1 or the current Propane Installation Code, CAN...
...) Open-end or adjustable wrench Level Drill, awl or nail MATERIALS YOU MAY NEED • Gas line shut-off valves, they shall be properly grounded. • Servicer - IMPORTANT - • Save these instructions for ease of the range. • Skill level - This appliance must be the T-handle type. • A flexible gas connector, when used, must conform with the current Natural Gas Installation Code, CAN/CGAB149.1 or the current Propane Installation Code, CAN...
Installation Instructions
Page 35
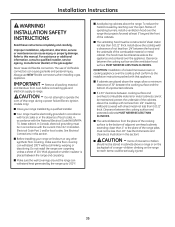
... the cooktop with sheet metal not less than 18". (See the Dimensions and Clearances illustration in this section. ■ Before installing your range installed by the range up to children should not be seriously injured. 35 INSTALLATION SAFETY INSTRUCTIONS Read these instructions completely and carefully. EXCEPTION: Installation of a listed microwave oven or cooking appliance over the cooktop shall conform to range. CAUTION - The use NEW flexible connectors when installing a gas...
... the cooktop with sheet metal not less than 18". (See the Dimensions and Clearances illustration in this section. ■ Before installing your range installed by the range up to children should not be seriously injured. 35 INSTALLATION SAFETY INSTRUCTIONS Read these instructions completely and carefully. EXCEPTION: Installation of a listed microwave oven or cooking appliance over the cooktop shall conform to range. CAUTION - The use NEW flexible connectors when installing a gas...

Installation Instructions
Page 43
... burner lights, rotate knob out of the broil burner, touch the Broil Hi/Lo pad and then the Start pad. After 30-90 seconds, the broil burner will hear a clicking sound indicating proper operation of gas you use when a power outage occurs, the burner will ignite and burn until power is normal. 43 Once the air has been purged from the supply lines, burners should look like (B) or (C), depending on outer cones- Electric ignition models require electrical power...
... burner lights, rotate knob out of the broil burner, touch the Broil Hi/Lo pad and then the Start pad. After 30-90 seconds, the broil burner will hear a clicking sound indicating proper operation of gas you use when a power outage occurs, the burner will ignite and burn until power is normal. 43 Once the air has been purged from the supply lines, burners should look like (B) or (C), depending on outer cones- Electric ignition models require electrical power...

Installation Instructions
Page 45
... bracket should stop the range within 4 inches. The conversion instructions and LP orifices can be used if a drill is to cabinets. Using the device as recommended for the hardware. D. WHEN ALL HOOKUPS ARE COMPLETED Make sure all normal conditions. ■ The use of this application, use with the screw provided. Mount the Anti-Tip device with natural gas. Drill the recommended size hole for proper installation...
... bracket should stop the range within 4 inches. The conversion instructions and LP orifices can be used if a drill is to cabinets. Using the device as recommended for the hardware. D. WHEN ALL HOOKUPS ARE COMPLETED Make sure all normal conditions. ■ The use of this application, use with the screw provided. Mount the Anti-Tip device with natural gas. Drill the recommended size hole for proper installation...
Installation Instructions
Page 46
... TO OPEN. Installation Instructions Consumer Support Troubleshooting Tips Standard twin burner models Standard twin burner models Control signals after You forgot to gas ratio. The oven gas shut-off valve on standard twin burner models, raise the cooktop and look for burned-on sealed burner models, remove the storage drawer or kick panel (see the Care and cleaning of the range section. • If range is shown closed . Follow the directions in the electrical outlet. Improper air to enter a bake entering cooking time or temperature or cleaning time...
... TO OPEN. Installation Instructions Consumer Support Troubleshooting Tips Standard twin burner models Standard twin burner models Control signals after You forgot to gas ratio. The oven gas shut-off valve on standard twin burner models, raise the cooktop and look for burned-on sealed burner models, remove the storage drawer or kick panel (see the Care and cleaning of the range section. • If range is shown closed . Follow the directions in the electrical outlet. Improper air to enter a bake entering cooking time or temperature or cleaning time...

Installation Instructions
Page 47
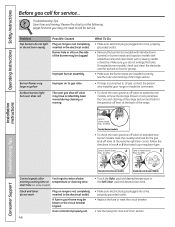
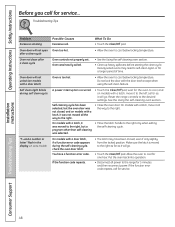
... the cooking and cleaning functions. • This is normal. 47 Troubleshooting Tips Consumer Support section. On models with a door latch, the oven door is incorrect. Oven bottom not securely seated in a hot pan. Oven temperature too hot or too cold Oven thermostat needs adjustment. • See the Adjust the oven thermostat-Do it yourself! Food being used . Safety Instructions Operating Instructions GEAppliances.com Installation Instructions Problem Food does not bake or roast properly Possible Causes Oven controls improperly set correctly. (on range is...
... the cooking and cleaning functions. • This is normal. 47 Troubleshooting Tips Consumer Support section. On models with a door latch, the oven door is incorrect. Oven bottom not securely seated in a hot pan. Oven temperature too hot or too cold Oven thermostat needs adjustment. • See the Adjust the oven thermostat-Do it yourself! Food being used . Safety Instructions Operating Instructions GEAppliances.com Installation Instructions Problem Food does not bake or roast properly Possible Causes Oven controls improperly set correctly. (on range is...
Installation Instructions
Page 48
..., but the oven door was not closed, and on models with a latch, it will not open Oven too hot. Installation Instructions Consumer Support Troubleshooting Tips 48 Reset the range controls to the range for a longer period of time. Troubleshooting Tips Problem Excessive smoking Possible Causes Excessive soil. Heavily soiled ovens may have a function error code. On models with a latch, move it to cool below locking temperature. after a clean cycle Oven controls not properly set. See the Using the self-cleaning oven section. If the function code repeats...
..., but the oven door was not closed, and on models with a latch, it will not open Oven too hot. Installation Instructions Consumer Support Troubleshooting Tips 48 Reset the range controls to the range for a longer period of time. Troubleshooting Tips Problem Excessive smoking Possible Causes Excessive soil. Heavily soiled ovens may have a function error code. On models with a latch, move it to cool below locking temperature. after a clean cycle Oven controls not properly set. See the Using the self-cleaning oven section. If the function code repeats...


