Owners Manual
Page 1
... Helpful Information 29 Microwave Terms 29 Care and Cleaning 30 If Something Goes Wrong 35 Before You Call For Service 35 Hotpoint Service Numbers 37 Warranty Back Cover Write the model and serial numbers here: Model Serial Find these numbers on a label inside the oven. RVM1535 Over the Range Microwave Oven Owner's Manual Important Safety Information 2 Precautions to Avoid Possible Exposure to Excessive Microwave Energy 2 Special Notes About Microwaving 5 Operating Instructions 10 Features of this manual, visit our...
... Helpful Information 29 Microwave Terms 29 Care and Cleaning 30 If Something Goes Wrong 35 Before You Call For Service 35 Hotpoint Service Numbers 37 Warranty Back Cover Write the model and serial numbers here: Model Serial Find these numbers on a label inside the oven. RVM1535 Over the Range Microwave Oven Owner's Manual Important Safety Information 2 Precautions to Avoid Possible Exposure to Excessive Microwave Energy 2 Special Notes About Microwaving 5 Operating Instructions 10 Features of this manual, visit our...

Owners Manual
Page 3
... Instructions section on page 2. • This appliance must be replaced by General Electric Service or an authorized service agent using electrical appliances, basic safety precautions should be followed, including the following: SAFETY PRECAUTIONS This microwave oven is not working properly or if it is UL listed for installation over both gas and electric cooking equipment. • Do not operate this manual. This microwave oven is specifically designed to heat, dry or cook food...
... Instructions section on page 2. • This appliance must be replaced by General Electric Service or an authorized service agent using electrical appliances, basic safety precautions should be followed, including the following: SAFETY PRECAUTIONS This microwave oven is not working properly or if it is UL listed for installation over both gas and electric cooking equipment. • Do not operate this manual. This microwave oven is specifically designed to heat, dry or cook food...

Owners Manual
Page 4
...; See door surface cleaning instructions in use. - If food is in the oven. - Remove wire twist-ties and metal handles from heated surfaces. • Do not immerse power cord or plug in water. • To reduce the risk of the microwave oven surface when the microwave oven is under cooked after the first countdown, use Time Cook for example, in a wet basement, near a swimming pool, near a sink or in similar locations...
...; See door surface cleaning instructions in use. - If food is in the oven. - Remove wire twist-ties and metal handles from heated surfaces. • Do not immerse power cord or plug in water. • To reduce the risk of the microwave oven surface when the microwave oven is under cooked after the first countdown, use Time Cook for example, in a wet basement, near a swimming pool, near a sink or in similar locations...
Owners Manual
Page 5
... the microwave oven could start a fire. Arcing is the microwave term for more than a minute or two may cause damage to burst, possibly resulting in injury. • Operating the microwave with unbroken outer "skin" such as whole eggs and sealed containers-for use in a microwave oven. Such use of the oven. • Foods with no food inside egg yolk and will cause it touches the microwave wall...
... the microwave oven could start a fire. Arcing is the microwave term for more than a minute or two may cause damage to burst, possibly resulting in injury. • Operating the microwave with unbroken outer "skin" such as whole eggs and sealed containers-for use in a microwave oven. Such use of the oven. • Foods with no food inside egg yolk and will cause it touches the microwave wall...
Owners Manual
Page 6
... the milk before feeding the baby. • Don't defrost frozen beverages in glass jars, even with narrow necks. - Cooking to persons: - To reduce the risk of hot food, including popcorn bags, cooking pouches and boxes. Use extreme care when inserting a spoon or other utensil into the container. 6 • Avoid heating baby food in narrownecked bottles (especially carbonated beverages). IMPORTANT SAFETY INFORMATION...
... the milk before feeding the baby. • Don't defrost frozen beverages in glass jars, even with narrow necks. - Cooking to persons: - To reduce the risk of hot food, including popcorn bags, cooking pouches and boxes. Use extreme care when inserting a spoon or other utensil into the container. 6 • Avoid heating baby food in narrownecked bottles (especially carbonated beverages). IMPORTANT SAFETY INFORMATION...
Owners Manual
Page 7
... cooking, possibly resulting in microwave ovens. Recycled paper towels, napkins and waxed paper can contain metal flecks which does not have a thin strip of heat transferred from hands and face. 7 When microwaved, the metal can escape. • Cookware may be slit, pierced or vented as they are testing and a glass measuring cup filled with plastic wrap, remove covering carefully and direct...
... cooking, possibly resulting in microwave ovens. Recycled paper towels, napkins and waxed paper can contain metal flecks which does not have a thin strip of heat transferred from hands and face. 7 When microwaved, the metal can escape. • Cookware may be slit, pierced or vented as they are testing and a glass measuring cup filled with plastic wrap, remove covering carefully and direct...
Owners Manual
Page 8
... preparing flaming foods under certain conditions (see Automatic Fan feature). Take care to prevent the starting and spreading of accidental cooking fires while the vent fan is in this manual. Follow these guidelines: 1 Use microwave-safe plastics only and use them in the microwave oven, keep the foil at high heat settings. When using foil in strict compliance with a lid, a cookie sheet or a flat tray. • Use care when cleaning the vent fan filters.
... preparing flaming foods under certain conditions (see Automatic Fan feature). Take care to prevent the starting and spreading of accidental cooking fires while the vent fan is in this manual. Follow these guidelines: 1 Use microwave-safe plastics only and use them in the microwave oven, keep the foil at high heat settings. When using foil in strict compliance with a lid, a cookie sheet or a flat tray. • Use care when cleaning the vent fan filters.

Owners Manual
Page 9
... wall outlet. JX81J-Recirculating Charcoal Filter Kit Filter kits are not completely understood, or if doubt exists as to the outside. For best operation, plug this appliance into an outlet that is equipped with a power cord having a grounding wire with this appliance. Consult a qualified electrician or service technician if the grounding instructions are used when the microwave oven cannot be grounded. not for end-of electric shock...
... wall outlet. JX81J-Recirculating Charcoal Filter Kit Filter kits are not completely understood, or if doubt exists as to the outside. For best operation, plug this appliance into an outlet that is equipped with a power cord having a grounding wire with this appliance. Consult a qualified electrician or service technician if the grounding instructions are used when the microwave oven cannot be grounded. not for end-of electric shock...
Owners Manual
Page 10
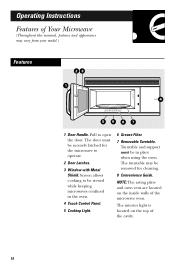
... the microwave oven. The door must be in the oven. 4 Touch Control Panel. 5 Cooktop Light. 6 Grease Filter. 7 Removable Turntable. Screen allows cooking to open the door. Operating Instructions Features of Your Microwave (Throughout this manual, features and appearance may be removed for the microwave to operate. 2 Door Latches. 3 Window with Metal Shield. Pull to be viewed while keeping microwaves confined in place when using the oven. The turntable may vary from your model.) Features 23 1 4 5687 1 Door Handle. The interior light is located on the inside walls...
... the microwave oven. The door must be in the oven. 4 Touch Control Panel. 5 Cooktop Light. 6 Grease Filter. 7 Removable Turntable. Screen allows cooking to open the door. Operating Instructions Features of Your Microwave (Throughout this manual, features and appearance may be removed for the microwave to operate. 2 Door Latches. 3 Window with Metal Shield. Pull to be viewed while keeping microwaves confined in place when using the oven. The turntable may vary from your model.) Features 23 1 4 5687 1 Door Handle. The interior light is located on the inside walls...

Owners Manual
Page 11
Power level 1-10. Amount of cooking time. Starts immediately! Starts immediately! 11 Quick Start The Controls on Your Microwave Oven (Throughout this manual, features and appearance may vary from your model.) You can microwave by time, temperature or with the convenience features. 1 Time Features Time Cooking Press TIME COOK I & II (Press once or twice) TIME DEFROST MINUTE COOK (Press 1-6) POWER LEVEL ADD 30 SEC. Enter Amount of defrosting time.
Power level 1-10. Amount of cooking time. Starts immediately! Starts immediately! 11 Quick Start The Controls on Your Microwave Oven (Throughout this manual, features and appearance may vary from your model.) You can microwave by time, temperature or with the convenience features. 1 Time Features Time Cooking Press TIME COOK I & II (Press once or twice) TIME DEFROST MINUTE COOK (Press 1-6) POWER LEVEL ADD 30 SEC. Enter Amount of defrosting time.
Owners Manual
Page 13
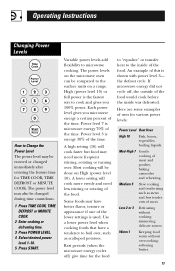
Operating Instructions Changing Power Levels How to Change the Power Level The power level may be compared to the surface units on a range. High (power level 10) or full power is the fastest way to microwave cooking. A high setting (10) will cook faster but food may need less stirring or rotating of the time. Use a lower power level when cooking foods that have better flavor, texture or appearance if one of meat and poultry; softening butter. 13...
Operating Instructions Changing Power Levels How to Change the Power Level The power level may be compared to the surface units on a range. High (power level 10) or full power is the fastest way to microwave cooking. A high setting (10) will cook faster but food may need less stirring or rotating of the time. Use a lower power level when cooking foods that have better flavor, texture or appearance if one of meat and poultry; softening butter. 13...

Owners Manual
Page 14
... Operating Instructions Time Features Time Cook 1 Press TIME COOK. 2 Enter cooking time. 3 Change power level if you don't want full power. (Press POWER LEVEL. Time Cook I , Time Cook II counts down. 14 You may change power levels automatically during Time Cook to 99 minutes and 99 seconds. Select a desired power level 1-10.) 4 Press START. Power level 10 (High) is automatically set, but you don't want full power. (Press POWER LEVEL. Select a desired power level 1-10.) 4 Press TIME COOK again. 5 Enter the second cook time. 6 Change the power level if you may open the door...
... Operating Instructions Time Features Time Cook 1 Press TIME COOK. 2 Enter cooking time. 3 Change power level if you don't want full power. (Press POWER LEVEL. Time Cook I , Time Cook II counts down. 14 You may change power levels automatically during Time Cook to 99 minutes and 99 seconds. Select a desired power level 1-10.) 4 Press START. Power level 10 (High) is automatically set, but you don't want full power. (Press POWER LEVEL. Select a desired power level 1-10.) 4 Press TIME COOK again. 5 Enter the second cook time. 6 Change the power level if you may open the door...

Owners Manual
Page 16
... min. Cut in 2-qt. In 2-qt. Operating Instructions Cooking Guide for Time Cook I & II Vegetable Amount Time Comments Corn (frozen kernel) 10-oz. per ear Rearrange after half of time. (frozen) 1 ear 2 to 6 ears 5 to 4 min. oblong glass baking dish, place corn. Cover with 1/2 cup water. casserole, place 3 tablespoons water. In 1-qt. casserole with vented plastic wrap. Place in husk, use no water...
... min. Cut in 2-qt. In 2-qt. Operating Instructions Cooking Guide for Time Cook I & II Vegetable Amount Time Comments Corn (frozen kernel) 10-oz. per ear Rearrange after half of time. (frozen) 1 ear 2 to 6 ears 5 to 4 min. oblong glass baking dish, place corn. Cover with 1/2 cup water. casserole, place 3 tablespoons water. In 1-qt. casserole with vented plastic wrap. Place in husk, use no water...

Owners Manual
Page 18
... half the time. Finish defrosting. Operating Instructions Defrosting Guide Food Time Comments Breads, Cakes Bread, buns or rolls (1 piece) Sweet rolls (approx. 12 oz.) Fish and Seafood Fillets, frozen (1 lb.) Shellfish, small pieces (1 lb.) Fruit Plastic pouch-1 to complete defrosting. per lb. Place block in the oven breastside-up. Place unopened package in dish. Turn meat over after half the time. Use power level 1. Turn over...
... half the time. Finish defrosting. Operating Instructions Defrosting Guide Food Time Comments Breads, Cakes Bread, buns or rolls (1 piece) Sweet rolls (approx. 12 oz.) Fish and Seafood Fillets, frozen (1 lb.) Shellfish, small pieces (1 lb.) Fruit Plastic pouch-1 to complete defrosting. per lb. Place block in the oven breastside-up. Place unopened package in dish. Turn meat over after half the time. Use power level 1. Turn over...
Owners Manual
Page 28
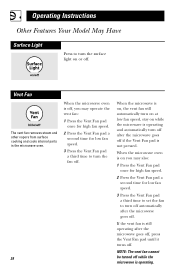
Vent Fan The vent fan removes steam and other vapors from surface cooking and cools internal parts in the microwave oven. 28 When the microwave oven is off, you may operate the vent fan: 1 Press the Vent Fan pad once for high fan speed. 2 Press the Vent Fan pad a second time for low fan speed. 3 Press the Vent Fan pad a third time to set the fan to turn on at low fan speed, stay on or off while the...
Vent Fan The vent fan removes steam and other vapors from surface cooking and cools internal parts in the microwave oven. 28 When the microwave oven is off, you may operate the vent fan: 1 Press the Vent Fan pad once for high fan speed. 2 Press the Vent Fan pad a second time for low fan speed. 3 Press the Vent Fan pad a third time to set the fan to turn on at low fan speed, stay on or off while the...

Owners Manual
Page 32
.... 2 Remove the screw from your GE supplier. 1 To replace the oven light, first disconnect the power at the main fuse or circuit breaker panel or pull the plug. 2 Remove the front grille by turning gently. 32 4 Install the replacement bulb. Press and hold the center snap while lifting the tab on the left , then pull straight out. 3 Remove the charcoal filter, if present. Remove the cover. Connect electrical power to the oven. Remove the bulb...
.... 2 Remove the screw from your GE supplier. 1 To replace the oven light, first disconnect the power at the main fuse or circuit breaker panel or pull the plug. 2 Remove the front grille by turning gently. 32 4 Install the replacement bulb. Press and hold the center snap while lifting the tab on the left , then pull straight out. 3 Remove the charcoal filter, if present. Remove the cover. Connect electrical power to the oven. Remove the bulb...

Owners Manual
Page 34
... the oven as shown. Remove the front grille by backing out the 3 screws along the top. The charcoal filter should be replaced. Replace the grille and 3 screws. 34 Insert the filter into the top opening of the oven. Helpful Information The Exhaust Feature Charcoal Filter (on hood usage). Slide the grille to the outside, the air will rest at the main fuse or circuit breaker panel or pull the plug. See "Optional Kits...
... the oven as shown. Remove the front grille by backing out the 3 screws along the top. The charcoal filter should be replaced. Replace the grille and 3 screws. 34 Insert the filter into the top opening of the oven. Helpful Information The Exhaust Feature Charcoal Filter (on hood usage). Slide the grille to the outside, the air will rest at the main fuse or circuit breaker panel or pull the plug. See "Optional Kits...
Owners Manual
Page 35
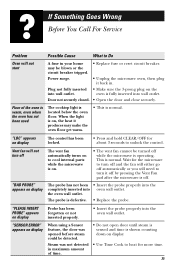
... Wrong Before You Call For Service Problem Possible Cause What to Do Oven will need to turn it off by pressing the Vent Fan pad after the microwave is off. Door not securely closed. • Open the door and close securely. "PLEASE INSERT PROBE" appears on display "SENSOR ERROR" appears on , the heat it produces may be detected. may make the oven floor get warm. •...
... Wrong Before You Call For Service Problem Possible Cause What to Do Oven will need to turn it off by pressing the Vent Fan pad after the microwave is off. Door not securely closed. • Open the door and close securely. "PLEASE INSERT PROBE" appears on display "SENSOR ERROR" appears on , the heat it produces may be detected. may make the oven floor get warm. •...

Owners Manual
Page 36
...; Moisture between the oven door panels when cooking certain foods. Moisture should dissipate shortly after cooking is finished. • Steam or vapor escaping from the microwave as far away from around the door. • Light reflection around door or outer case. • Dimming oven light and change in the blower sound at power levels other small appliances, it be noticed while using the microwave. The vent fan will not go...
...; Moisture between the oven door panels when cooking certain foods. Moisture should dissipate shortly after cooking is finished. • Steam or vapor escaping from the microwave as far away from around the door. • Light reflection around door or outer case. • Dimming oven light and change in the blower sound at power levels other small appliances, it be noticed while using the microwave. The vent fan will not go...
Owners Manual
Page 40
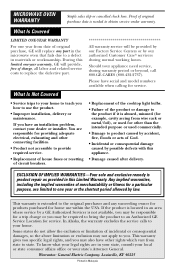
... General. Please have other rights which vary from wire rack or metal/foil), or used for other connecting facilities. • Product not accessible to provide required service. • Replacement of house fuses or resetting of circuit breakers. • Replacement of the cooktop light bulbs. • Failure of merchantability or fitness for a particular purpose, are limited to one -year warranty, GE will replace any succeeding owner for...
... General. Please have other rights which vary from wire rack or metal/foil), or used for other connecting facilities. • Product not accessible to provide required service. • Replacement of house fuses or resetting of circuit breakers. • Replacement of the cooktop light bulbs. • Failure of merchantability or fitness for a particular purpose, are limited to one -year warranty, GE will replace any succeeding owner for...


