

User Manual
Page 3
...product should not be sure the service technician uses replacement parts specified by the manufacturer or those that you have the same characteristics as these openings with liquid, such as vases, should be earthed to the system earth for the satellite dish. • Place the product ...standards. Unauthorised substitution may be hazardous or cause damage to the unit. Do not block these may result in the unit, where they can cause serious injury to a child or adult, and serious damage to the appliance. • Unplug the product from the antenna or TV. • The LNB cable...
...product should not be sure the service technician uses replacement parts specified by the manufacturer or those that you have the same characteristics as these openings with liquid, such as vases, should be earthed to the system earth for the satellite dish. • Place the product ...standards. Unauthorised substitution may be hazardous or cause damage to the unit. Do not block these may result in the unit, where they can cause serious injury to a child or adult, and serious damage to the appliance. • Unplug the product from the antenna or TV. • The LNB cable...

User Manual
Page 4
Setup 2.1 Connecting Antenna/TV/VCR 2.2 Connecting Audio System 2.3 Powering On 3. Basic Operation 5.1 Viewing Programme 5.2 Changing Language 5.3 Teletext 5.4 Setting Property of Service GB5 ** GB5 GB6 GB7 GB8 GB10 GB12 ** GB12 GB13 GB14 GB15 GB17 ** GB17 GB18 GB19 GB20 GB21 GB22 GB23 ** GB23 GB24 GB24 GB25 GB 3 Before Using the Product 1.1 Package Contents 1.2 Front Panel 1.3 Rear Panel 1.4 Conditional Access 1.5 Remote Control 2. Menu Map 4. Searching Services 4.1 Antenna Setting 4.2 Manual Search 4.3 Satellite Setting 4.4 Motor Limit Setting 4.5 USALS Setting 4.6 Automatic Search 5....
Setup 2.1 Connecting Antenna/TV/VCR 2.2 Connecting Audio System 2.3 Powering On 3. Basic Operation 5.1 Viewing Programme 5.2 Changing Language 5.3 Teletext 5.4 Setting Property of Service GB5 ** GB5 GB6 GB7 GB8 GB10 GB12 ** GB12 GB13 GB14 GB15 GB17 ** GB17 GB18 GB19 GB20 GB21 GB22 GB23 ** GB23 GB24 GB24 GB25 GB 3 Before Using the Product 1.1 Package Contents 1.2 Front Panel 1.3 Rear Panel 1.4 Conditional Access 1.5 Remote Control 2. Menu Map 4. Searching Services 4.1 Antenna Setting 4.2 Manual Search 4.3 Satellite Setting 4.4 Motor Limit Setting 4.5 USALS Setting 4.6 Automatic Search 5....
User Manual
Page 8
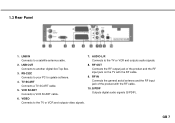
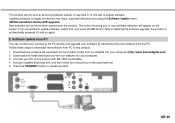
... product with the RF cable. ** 9. AUDIO L/R ** Connects to another digital Set-Top Box. ** 3. S/PDIF ** Outputs digital audio signals (S/PDIF). ** GB 7 TV SCART ** Connects a TV SCART cable. ** 5. RF IN ** Connects the general aerial antenna and the RF input jack of the product and the RF input jack on the TV with the RF cable. ** 10. RS-232C ** Connects to your PC to the TV or VCR and outputs video signals. 7. VIDEO ** Connects to update software. ** 4. ** 1.3 Rear Panel ** ** 1. LNB IN ** Connects to a satellite antenna cable. ** 2.
... product with the RF cable. ** 9. AUDIO L/R ** Connects to another digital Set-Top Box. ** 3. S/PDIF ** Outputs digital audio signals (S/PDIF). ** GB 7 TV SCART ** Connects a TV SCART cable. ** 5. RF IN ** Connects the general aerial antenna and the RF input jack of the product and the RF input jack on the TV with the RF cable. ** 10. RS-232C ** Connects to your PC to the TV or VCR and outputs video signals. 7. VIDEO ** Connects to update software. ** 4. ** 1.3 Rear Panel ** ** 1. LNB IN ** Connects to a satellite antenna cable. ** 2.
User Manual
Page 11
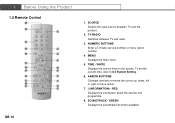
MENU ** Displays the main menu. ** 5. GREEN ** Displays the soundtrack list where available. TV/RADIO ** Switches between TV and the product. ** 2. SOUNDTRACK - WHITE ** Displays the current time on the screen. SOURCE ** Selects the input source between TV and radio. ** 3. NUMERIC BUTTONS ** Enter a TV/radio service number or menu option number. ** 4. ARROW BUTTONS ** Changes services or moves the cursor up, down, left or right in menu option. ** 7. i (INFORMATION) - To set the current time, refer to 8.2 System Setting. ** 6. RED ** Displays the information about...
MENU ** Displays the main menu. ** 5. GREEN ** Displays the soundtrack list where available. TV/RADIO ** Switches between TV and the product. ** 2. SOUNDTRACK - WHITE ** Displays the current time on the screen. SOURCE ** Selects the input source between TV and radio. ** 3. NUMERIC BUTTONS ** Enter a TV/radio service number or menu option number. ** 4. ARROW BUTTONS ** Changes services or moves the cursor up, down, left or right in menu option. ** 7. i (INFORMATION) - To set the current time, refer to 8.2 System Setting. ** 6. RED ** Displays the information about...
User Manual
Page 17
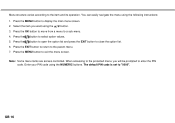
... a menu to exit the menu screen. ** ** Note: Some menu items are access controlled. You can easily navigate the menu using the NUMERIC buttons. Press the button to the parent-menu. ** 7. Press the EXIT button to return to select option values. ** 5. Enter your PIN code using the following instructions: ** 1. ** ** Menu structure varies according to "0000". Select the item you will be prompted to enter the PIN code. The default PIN code is set to the item and its operation. When accessing to...
... a menu to exit the menu screen. ** ** Note: Some menu items are access controlled. You can easily navigate the menu using the NUMERIC buttons. Press the button to the parent-menu. ** 7. Press the EXIT button to return to select option values. ** 5. Enter your PIN code using the following instructions: ** 1. ** ** Menu structure varies according to "0000". Select the item you will be prompted to enter the PIN code. The default PIN code is set to the item and its operation. When accessing to...

User Manual
Page 18
... Language screen is automatically displayed. If the desired satellite name is not listed, then select "User Defined". Antenna Alternative 16 is predefined for search. Otherwise, select "Disabled". You can select "On" or "Off". ** When you complete the settings, press the OK button to move to the Manual Search menu. ** Note: When you are using DiSEqC (Digital Satellite Equipment Control) switch to connect multiple antennas or LNBs, select DiSEqC input to connect to antenna or LNB...
... Language screen is automatically displayed. If the desired satellite name is not listed, then select "User Defined". Antenna Alternative 16 is predefined for search. Otherwise, select "Disabled". You can select "On" or "Off". ** When you complete the settings, press the OK button to move to the Manual Search menu. ** Note: When you are using DiSEqC (Digital Satellite Equipment Control) switch to connect multiple antennas or LNBs, select DiSEqC input to connect to antenna or LNB...

User Manual
Page 19
... FEC (Forward Error Correction). • Network Search: If you want to search services for search. After finishing search operation, the result window will be displayed. Wait until the operation is properly set up, the signal strength bar and quality bar level, located at the bottom of the screen moves up. • Press the EXIT button to start service search. ** 4.2 Manual Search You can delete the services using the transponder information. ** • Antenna Alternative: Select antenna alternative which...
... FEC (Forward Error Correction). • Network Search: If you want to search services for search. After finishing search operation, the result window will be displayed. Wait until the operation is properly set up, the signal strength bar and quality bar level, located at the bottom of the screen moves up. • Press the EXIT button to start service search. ** 4.2 Manual Search You can delete the services using the transponder information. ** • Antenna Alternative: Select antenna alternative which...

User Manual
Page 20
... selected satellite. - ** 4.3 Satellite Setting This menu appears only when you enable Motorised System in Antenna Setting menu and press the OK button while Antenna Alternative in Manual Search menu is used to fine-tune the position of the motor setting options. ** DiSEqC Command Mode Movement Installer East / Stop / West User Stop(60E) ~Stop(0) ~Stop(60W) Motor Control Search / Go to / Store / Reset Search / Go to / Store GB 19 In installer mode, this is used to search for services...
... selected satellite. - ** 4.3 Satellite Setting This menu appears only when you enable Motorised System in Antenna Setting menu and press the OK button while Antenna Alternative in Manual Search menu is used to fine-tune the position of the motor setting options. ** DiSEqC Command Mode Movement Installer East / Stop / West User Stop(60E) ~Stop(0) ~Stop(60W) Motor Control Search / Go to / Store / Reset Search / Go to / Store GB 19 In installer mode, this is used to search for services...

User Manual
Page 21
...: You can set Movement to fine-tune the position of the selected satellite. ** 4.4 Motor Limit Setting To enter this menu, press the RED button in Satellite Setting menu. To set the motor position for each satellite manually, select the Satellite Name, set DiSEqC Command Mode to "Installer", and then set the maximum for both East and West to prevent damage to "Reset", then press the OK button. Set Motor Control to "Store...
...: You can set Movement to fine-tune the position of the selected satellite. ** 4.4 Motor Limit Setting To enter this menu, press the RED button in Satellite Setting menu. To set the motor position for each satellite manually, select the Satellite Name, set DiSEqC Command Mode to "Installer", and then set the maximum for both East and West to prevent damage to "Reset", then press the OK button. Set Motor Control to "Store...
User Manual
Page 23
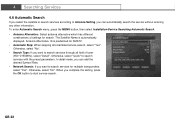
... detail mode, you can automatically search the service without entering any other information. To enter Automatic Search menu, press the MENU button, then select Installation-Service Searching-Automatic Search. ** • Antenna Alternative: Select antenna alternative which has different combinations of tuner (950~2150MHz), select "Detail". When you can add the desired Symbol Rate. ** • Network Search: If you want to search services for search. ** 4.6 Automatic Search If you select the satellite to search services according to Antenna Setting...
... detail mode, you can automatically search the service without entering any other information. To enter Automatic Search menu, press the MENU button, then select Installation-Service Searching-Automatic Search. ** • Antenna Alternative: Select antenna alternative which has different combinations of tuner (950~2150MHz), select "Detail". When you can add the desired Symbol Rate. ** • Network Search: If you want to search services for search. ** 4.6 Automatic Search If you select the satellite to search services according to Antenna Setting...

User Manual
Page 24
... pressing the i button while watching a programme. You can adjust the audio volume using the CH-/CH+, or NUMERIC buttons. Indicates the minimum level of time whenever you switch services. GB 23 You can also use the button to move to hide the i-plate. Press the EXIT button to the previous or next page. Displayed only the programme is braodcast in MENU-Installation-System Setting-Other Setting-Info. Displayed only when...
... pressing the i button while watching a programme. You can adjust the audio volume using the CH-/CH+, or NUMERIC buttons. Indicates the minimum level of time whenever you switch services. GB 23 You can also use the button to move to hide the i-plate. Press the EXIT button to the previous or next page. Displayed only the programme is braodcast in MENU-Installation-System Setting-Other Setting-Info. Displayed only when...

User Manual
Page 25
... default audio language in using the sub-code written by users. Teletext When the service supports teletext, the teletext icon is displayed on the i-plate. To view the teletext page, use the SUBTITLE button to index page. Displays the current time when not in teletext mode. Cancel Hides the teletext except page number. To enter Teletext mode, use the CH-/CH+, RECALL or NUMERIC buttons. ** Teletext Functions ** Index Returns to display teletext. To display...
... default audio language in using the sub-code written by users. Teletext When the service supports teletext, the teletext icon is displayed on the i-plate. To view the teletext page, use the SUBTITLE button to index page. Displays the current time when not in teletext mode. Cancel Hides the teletext except page number. To enter Teletext mode, use the CH-/CH+, RECALL or NUMERIC buttons. ** Teletext Functions ** Index Returns to display teletext. To display...

User Manual
Page 26
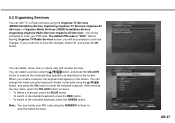
... services using the NUMERIC buttons or Service List. • For detailed information about how to register all services as follows: 1. The default PIN code is "0000". • When switching to a locked service, you must enter the PIN code to view the service. • You will not be prompted to 6.3 Organising Favourite Services. The operation is displayed. 3. You can watch skipped services by pressing the COLOUR button. 2. After setting property of the service lists (All, Favourite, Network, Satellite, Alphabet) by using...
... services using the NUMERIC buttons or Service List. • For detailed information about how to register all services as follows: 1. The default PIN code is "0000". • When switching to a locked service, you must enter the PIN code to view the service. • You will not be prompted to 6.3 Organising Favourite Services. The operation is displayed. 3. You can watch skipped services by pressing the COLOUR button. 2. After setting property of the service lists (All, Favourite, Network, Satellite, Alphabet) by using...

User Manual
Page 27
... (All service list), GREEN (Favourite service list), YELLOW (Network service list), BLUE (Satellite service list), WHITE (Alphabet service list) 3. For more information, refer to the selected service. ** Note: • Whenever you press the TV/RADIO button while the service list is displayed. Select a service using the MENU-Select Service-Simple (or Advanced). 2. All, Favourite, Network, Satellite, Alphabet - to find services you can also display the service list using the , CH-/CH+ or NUMERIC buttons, and press the OK button to change to 5.4 Setting Property of service lists...
... (All service list), GREEN (Favourite service list), YELLOW (Network service list), BLUE (Satellite service list), WHITE (Alphabet service list) 3. For more information, refer to the selected service. ** Note: • Whenever you press the TV/RADIO button while the service list is displayed. Select a service using the MENU-Select Service-Simple (or Advanced). 2. All, Favourite, Network, Satellite, Alphabet - to find services you can also display the service list using the , CH-/CH+ or NUMERIC buttons, and press the OK button to change to 5.4 Setting Property of service lists...
User Manual
Page 28
... TV Services-Organise All Services) or Organise Radio Services (MENU-Installation-Service Organising-Organise Radio Services-Organise All Services). If you rename a service, the keyboard will be prompted to view the locked services. You will appear on the screen. You can edit TV or Radio services using the button, and press the OK button to save it. • To delete a character, press the BLUE button. • To switch to the standard keyboard...
... TV Services-Organise All Services) or Organise Radio Services (MENU-Installation-Service Organising-Organise Radio Services-Organise All Services). If you rename a service, the keyboard will be prompted to view the locked services. You will appear on the screen. You can edit TV or Radio services using the button, and press the OK button to save it. • To delete a character, press the BLUE button. • To switch to the standard keyboard...
User Manual
Page 32
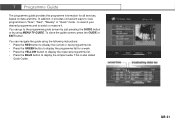
... programme information for a week. • Press the YELLOW button to display the reserved programme list. • Press the BLUE button to display the simple Guide. You can navigate the guide using MENU-TV GUIDE. In addition, it provides convenient ways to watch or reserve it. to search your desired programme and to view programmes in "Now", "Next", "Weekly" or "Quick" mode - To close the guide screen, press the GUIDE or EXIT button...
... programme information for a week. • Press the YELLOW button to display the reserved programme list. • Press the BLUE button to display the simple Guide. You can navigate the guide using MENU-TV GUIDE. In addition, it provides convenient ways to watch or reserve it. to search your desired programme and to view programmes in "Now", "Next", "Weekly" or "Quick" mode - To close the guide screen, press the GUIDE or EXIT button...

User Manual
Page 34
... and switching mode to reserved service. 1. ** This chapter describes the menu which lets you customise your product according to your local product distributor. ** 8.2 System Setting The System Setting menu (MENU-Installation-System Setting) lets you set language, time, audio/video output, UHF tuning, transparency of OSD, duration time of age level. "No Block" allows you to change the old PIN code to watch programmes without any blocking. We recommend you to a new one periodically for menu, audio, and subtitle...
... and switching mode to reserved service. 1. ** This chapter describes the menu which lets you customise your product according to your local product distributor. ** 8.2 System Setting The System Setting menu (MENU-Installation-System Setting) lets you set language, time, audio/video output, UHF tuning, transparency of OSD, duration time of age level. "No Block" allows you to change the old PIN code to watch programmes without any blocking. We recommend you to a new one periodically for menu, audio, and subtitle...

User Manual
Page 35
... Tuning You can select UHF Channels for your TV, select the display format according to the screen ratio, select the TV standard and set the display time of On-Screen Display (OSD), set the NTSC mode. The channel range and frequency change to the reserved service. GB 34 Other Setting You can choose the Dolby Digital audio stream whenever possible by selecting "On" in the Dolby Digital setting. 4. A/V Output Setting This menu lets you adjust the audio and video output...
... Tuning You can select UHF Channels for your TV, select the display format according to the screen ratio, select the TV standard and set the display time of On-Screen Display (OSD), set the NTSC mode. The channel range and frequency change to the reserved service. GB 34 Other Setting You can choose the Dolby Digital audio stream whenever possible by selecting "On" in the Dolby Digital setting. 4. A/V Output Setting This menu lets you adjust the audio and video output...
User Manual
Page 37
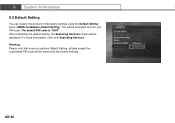
After completing the default setting, the Searching Services screen will be restored to enter your PIN code. The default PIN code is "0000". GB 36 ** 9.3 Default Setting ** You can restore the product to 4. For more information, refer to the factory settings using the Default Setting menu (MENU-Installation-Default Setting). Searching Services. ** Warning: Please note that once you perform Default Setting, all data except the customised PIN code will be prompted to the factory settings. You will be displayed.
After completing the default setting, the Searching Services screen will be restored to enter your PIN code. The default PIN code is "0000". GB 36 ** 9.3 Default Setting ** You can restore the product to 4. For more information, refer to the factory settings using the Default Setting menu (MENU-Installation-Default Setting). Searching Services. ** Warning: Please note that once you perform Default Setting, all data except the customised PIN code will be prompted to the factory settings. You will be displayed.
User Manual
Page 40
... notice informing you would like to this product model from the PC. If you of new software detection will appear on the product. Download and install download tool from our website into your software by transferring the new software from our website into two ways, automatic detection and using the Software Update menu (MENU-Installation-Status-STB Upgrade). ** The product cannot work at all during software update. Press the STANDBY button to update software. Software Update...
... notice informing you would like to this product model from the PC. If you of new software detection will appear on the product. Download and install download tool from our website into your software by transferring the new software from our website into two ways, automatic detection and using the Software Update menu (MENU-Installation-Status-STB Upgrade). ** The product cannot work at all during software update. Press the STANDBY button to update software. Software Update...


