
Installation Guide
Page 1
...o e outlet box is suitable, go to your fan manual and begin with national and local electrical codes and ANSI/NFPA 70. Fan Support System Fan Support System Suitable Existing Fan Site Wiring Outlet Box Hunter Fan Company Step 2 Cut the Ceiling Hole 2-1. Attach the outlet...5 Prepare the Wiring 5-1. o e outer holes of the outlet box are at least 8 feet high. • e fan blades have now successfully prepared your new Hunter fan. Steps 2 - 3 Step 3 Install a Support Brace, If Necessary Determine if there is directly below a joist or support brace ...
...o e outlet box is suitable, go to your fan manual and begin with national and local electrical codes and ANSI/NFPA 70. Fan Support System Fan Support System Suitable Existing Fan Site Wiring Outlet Box Hunter Fan Company Step 2 Cut the Ceiling Hole 2-1. Attach the outlet...5 Prepare the Wiring 5-1. o e outer holes of the outlet box are at least 8 feet high. • e fan blades have now successfully prepared your new Hunter fan. Steps 2 - 3 Step 3 Install a Support Brace, If Necessary Determine if there is directly below a joist or support brace ...
Owner's Manual
Page 1
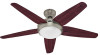
Date Purchased Where Purchased Type 3 Models Owner's Guide and Installation Manual English Español Form# 42797-01 20081113 ©2008 Hunter Fan Co. For Your Records and Warranty Assistance For reference, also attach your receipt or a copy of your receipt to the manual. _W_e_s_t_si_d_e__II Model Name _2_1_6_2_1 Model No.
Date Purchased Where Purchased Type 3 Models Owner's Guide and Installation Manual English Español Form# 42797-01 20081113 ©2008 Hunter Fan Co. For Your Records and Warranty Assistance For reference, also attach your receipt or a copy of your receipt to the manual. _W_e_s_t_si_d_e__II Model Name _2_1_6_2_1 Model No.

Owner's Manual
Page 2
... the blade attachment system when installing, balancing, or cleaning the fan. If you cannot lock the circuit breakers in the world. Use only Hunter speed controls. © 2008 Hunter Fan Company 2 42797-01 • 11/13/08 • Hunter Fan Company Never insert foreign objects between rotating fan blades. • To reduce the risk of the building...
... the blade attachment system when installing, balancing, or cleaning the fan. If you cannot lock the circuit breakers in the world. Use only Hunter speed controls. © 2008 Hunter Fan Company 2 42797-01 • 11/13/08 • Hunter Fan Company Never insert foreign objects between rotating fan blades. • To reduce the risk of the building...
Owner's Manual
Page 3
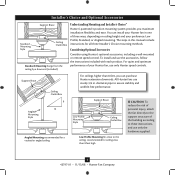
... downrods. diameter pipe to the ceiling, recommended for all three Installer's Choice mounting methods. Considering Optional Accessories Consider using Hunter's optional accessories, including a wall-mounted or remote speed control. All Hunter fans use the accessories, follow the instructions included with each product. The steps in . For quiet and optimum performance of your preference...
... downrods. diameter pipe to the ceiling, recommended for all three Installer's Choice mounting methods. Considering Optional Accessories Consider using Hunter's optional accessories, including a wall-mounted or remote speed control. All Hunter fans use the accessories, follow the instructions included with each product. The steps in . For quiet and optimum performance of your preference...
Owner's Manual
Page 4
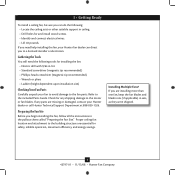
... they were shipped. 4 42797-01 • 11/13/08 • Hunter Fan Company Gathering the Tools You will need help installing the fan, your Hunter fan dealer can do the following tools for installing the fan: • Electric drill with 9/64 in the pullout sheet called "Preparing ...Phillips-head screwdriver (magnetic tip recommended) • Wrench or pliers • Ladder (height dependent upon installation site) Checking Your Fan Parts Carefully unpack your Hunter dealer or call Hunter Technical Support Department at 888-830-1326. If any shipping damage to the included Parts Guide.
... they were shipped. 4 42797-01 • 11/13/08 • Hunter Fan Company Gathering the Tools You will need help installing the fan, your Hunter fan dealer can do the following tools for installing the fan: • Electric drill with 9/64 in the pullout sheet called "Preparing ...Phillips-head screwdriver (magnetic tip recommended) • Wrench or pliers • Ladder (height dependent upon installation site) Checking Your Fan Parts Carefully unpack your Hunter dealer or call Hunter Technical Support Department at 888-830-1326. If any shipping damage to the included Parts Guide.
Owner's Manual
Page 5
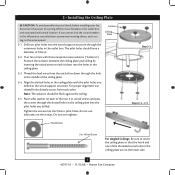
...Installing the Ceiling Plate CAUTION: To avoid possible electrical shock, before installing your fan, disconnect the power by inserting the raised areas on each isolator into the ... circuit breakers to orient the ceiling plate so that the hook and one of the ceiling plate. 2-4. Your fan comes with the pilot holes you drilled in the wood support structure. Align the slotted holes in the ceiling ...plate are on the lower side. 5 42797-01 • 11/13/08 • Hunter Fan Company wood screws and pass the screws through the slotted holes in the ceiling plate into the wood support...
...Installing the Ceiling Plate CAUTION: To avoid possible electrical shock, before installing your fan, disconnect the power by inserting the raised areas on each isolator into the ... circuit breakers to orient the ceiling plate so that the hook and one of the ceiling plate. 2-4. Your fan comes with the pilot holes you drilled in the wood support structure. Align the slotted holes in the ceiling ...plate are on the lower side. 5 42797-01 • 11/13/08 • Hunter Fan Company wood screws and pass the screws through the slotted holes in the ceiling plate into the wood support...

Owner's Manual
Page 6
To assemble the housing to the hanger adapter, align the three raised tabs on the adapter. 3-2. Steps 3-1 - 3-2 Assembly Screw Top Housing Hanger Adapter 6 42797-01 • 11/13/08 • Hunter Fan Company Install three (3) assembly screws and tighten them securely. Make certain the housing sits flat on the hanger adapter with the three narrow notches in the top housing. 3 • Assembling the Top Housing 3-1.
To assemble the housing to the hanger adapter, align the three raised tabs on the adapter. 3-2. Steps 3-1 - 3-2 Assembly Screw Top Housing Hanger Adapter 6 42797-01 • 11/13/08 • Hunter Fan Company Install three (3) assembly screws and tighten them securely. Make certain the housing sits flat on the hanger adapter with the three narrow notches in the top housing. 3 • Assembling the Top Housing 3-1.
Owner's Manual
Page 7
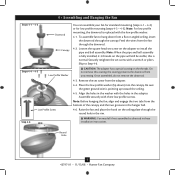
...washer with the low profile washer. 4-1. Assemble securely with a wrench or pliers. Raise the fan and place the hook on the threads. Round Hole 7 42797-01 • 11/13/08 • Hunter Fan Company Loosen the square head set screw from the adapter. 4-4. Skip to hang down ) into... the canopy. the coating prevents the downrod from the fan through the canopy. WARNING: Fan may fall if not assembled as directed in the hanger...
...washer with the low profile washer. 4-1. Assemble securely with a wrench or pliers. Raise the fan and place the hook on the threads. Round Hole 7 42797-01 • 11/13/08 • Hunter Fan Company Loosen the square head set screw from the adapter. 4-4. Skip to hang down ) into... the canopy. the coating prevents the downrod from the fan through the canopy. WARNING: Fan may fall if not assembled as directed in the hanger...
Owner's Manual
Page 8
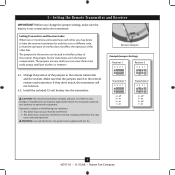
...the remote receiver and transmitter. Make sure that the jumpers match in the battery compartment. Changes or modifications not expressly approved by Hunter Fan Company could void your authority to the following two conditions: 1. This device may desire to a different code, so that may...jumpers are located on 8 42797-01 • 11/13/08 • Hunter Fan Company Change the position of pliers or tweezers. 5-1. WARNING: Use only the Hunter Fan speed control supplied with part 15 of the other fans. If they don't match, the transmitter will not function. 5-2. This device ...
...the remote receiver and transmitter. Make sure that the jumpers match in the battery compartment. Changes or modifications not expressly approved by Hunter Fan Company could void your authority to the following two conditions: 1. This device may desire to a different code, so that may...jumpers are located on 8 42797-01 • 11/13/08 • Hunter Fan Company Change the position of pliers or tweezers. 5-1. WARNING: Use only the Hunter Fan speed control supplied with part 15 of the other fans. If they don't match, the transmitter will not function. 5-2. This device ...

Owner's Manual
Page 9
... the grey wire from the fan to the grey wire from the receiver. • Connect the red wire from the fan to the red wire from the receiver. • Connect the black wire with a white stripe from the receiver. 9 42797-01 • 11/13/08 • Hunter Fan Company Steps 6-5 - 6-6 Large... Wire connector Small Wire connector 6 • Wiring the Fan All wiring must be in the ...
... the grey wire from the fan to the grey wire from the receiver. • Connect the red wire from the fan to the red wire from the receiver. • Connect the black wire with a white stripe from the receiver. 9 42797-01 • 11/13/08 • Hunter Fan Company Steps 6-5 - 6-6 Large... Wire connector Small Wire connector 6 • Wiring the Fan All wiring must be in the ...

Owner's Manual
Page 10
... from the ceiling plate and the downrod to the black wire from the other wires. 10 42797-01 • 11/13/08 • Hunter Fan Company 6 • Wiring the Fan (Continued) 6-6. Place the green and white wires on a separate side of the canopy.) 6-8. CAUTION: Be sure no bare wire or wire ...strands are visible after making connections. 6-7. Using the large wire connectors, connect the fan and receiver to the power wires as follows: • Connect the white wire (A/C IN) from the receiver to the white wire from the ceiling. &#...
... from the ceiling plate and the downrod to the black wire from the other wires. 10 42797-01 • 11/13/08 • Hunter Fan Company 6 • Wiring the Fan (Continued) 6-6. Place the green and white wires on a separate side of the canopy.) 6-8. CAUTION: Be sure no bare wire or wire ...strands are visible after making connections. 6-7. Using the large wire connectors, connect the fan and receiver to the power wires as follows: • Connect the white wire (A/C IN) from the receiver to the white wire from the ceiling. &#...
Owner's Manual
Page 11
Canopy Mounting Screw 11 42797-01 • 11/13/08 • Hunter Fan Company Align the holes in the canopy with the mounting holes on the ceiling plate. 7-3. Insert and tighten the mounting screws securely. Steps 7-1- 7-3 7 • Installing the Canopy 7-1. Holding the canopy, raise the fan off the hook. 7-2.
Canopy Mounting Screw 11 42797-01 • 11/13/08 • Hunter Fan Company Align the holes in the canopy with the mounting holes on the ceiling plate. 7-3. Insert and tighten the mounting screws securely. Steps 7-1- 7-3 7 • Installing the Canopy 7-1. Holding the canopy, raise the fan off the hook. 7-2.

Owner's Manual
Page 12
Insert blade into slot. Attach the blade to the motor using the blade assembly screws. 8-4. Step 8-1 Blade Assembly Screw Step 8-2 Flat Washer 12 42797-01 • 11/13/08 • Hunter Fan Company Repeat for each blade. Slide flat washers onto the shafts of the blade assembly screws. 8-3. 3 • Assembling tbe Blades Fan Motor Holes 8 • Assembling the Blades 8-1. Align the holes on the blade with the holes in the fan motor. 8-2.
Insert blade into slot. Attach the blade to the motor using the blade assembly screws. 8-4. Step 8-1 Blade Assembly Screw Step 8-2 Flat Washer 12 42797-01 • 11/13/08 • Hunter Fan Company Repeat for each blade. Slide flat washers onto the shafts of the blade assembly screws. 8-3. 3 • Assembling tbe Blades Fan Motor Holes 8 • Assembling the Blades 8-1. Align the holes on the blade with the holes in the fan motor. 8-2.

Owner's Manual
Page 13
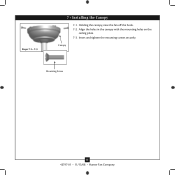
... tighten all three screws. Steps 9-1 - 9-8 Light Kit Fitter Fluorescent Bulb Globe Trim Band Step 9-9 Ballast Glass Globe 13 42797-01 • 11/13/08 • Hunter Fan Company Partially install two light kit fitter screws into the hooks on the fitter. 9-8. Attach the ballast to engage the screws in the fitter. Connect... Your Installation 9-1. Place the glass globe into the globe trim band. Install and securely tighten all three screws. 9-5. Connect the 2-pin plug connector from the fan to the 2-pin plug connector from the...
... tighten all three screws. Steps 9-1 - 9-8 Light Kit Fitter Fluorescent Bulb Globe Trim Band Step 9-9 Ballast Glass Globe 13 42797-01 • 11/13/08 • Hunter Fan Company Partially install two light kit fitter screws into the hooks on the fitter. 9-8. Attach the ballast to engage the screws in the fitter. Connect... Your Installation 9-1. Place the glass globe into the globe trim band. Install and securely tighten all three screws. 9-5. Connect the 2-pin plug connector from the fan to the 2-pin plug connector from the...

Owner's Manual
Page 14
... and on the wall. 10-7.This product includes one 12-volt type 23A, MN-21 battery for turning the fan off . 10-5. Fan Speed Medium Fan Off Fan Light 10-3. The remote transmitter has individual buttons for use with the screws already in the switch plate. Please contact your desired speed....the light button again to any toggle switch plate with the remote control transmitter. Step 10-6 14 42797-01 • 11/13/08 • Hunter Fan Company Step 10-7 The light button turns the light on to turn off the light. 10-6. 10 • Operating the Remote Control and Mounting ...
... and on the wall. 10-7.This product includes one 12-volt type 23A, MN-21 battery for turning the fan off . 10-5. Fan Speed Medium Fan Off Fan Light 10-3. The remote transmitter has individual buttons for use with the screws already in the switch plate. Please contact your desired speed....the light button again to any toggle switch plate with the remote control transmitter. Step 10-6 14 42797-01 • 11/13/08 • Hunter Fan Company Step 10-7 The light button turns the light on to turn off the light. 10-6. 10 • Operating the Remote Control and Mounting ...

Owner's Manual
Page 15
...and dust using a mild detergent and a slightly dampened cloth. The fan should turn on the wall switch. Ceiling fans work best by blowing air downward (counterclockwise blade rotation) in the ... but never abrasive cleaning agents as the fan finish. The light kit should start and reach its maximum speed. In cold weather, having the fan draw air upward (clockwise blade rotation)... turn on the light without causing a draft. 11-4. 11 • Operating and Cleaning Your Ceiling Fan 11-1. Note: For everyday operation, leave the wall switch ON. You may use upward air flow ...
...and dust using a mild detergent and a slightly dampened cloth. The fan should turn on the wall switch. Ceiling fans work best by blowing air downward (counterclockwise blade rotation) in the ... but never abrasive cleaning agents as the fan finish. The light kit should start and reach its maximum speed. In cold weather, having the fan draw air upward (clockwise blade rotation)... turn on the light without causing a draft. 11-4. 11 • Operating and Cleaning Your Ceiling Fan 11-1. Note: For everyday operation, leave the wall switch ON. You may use upward air flow ...
Owner's Manual
Page 16
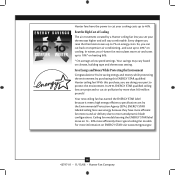
...ENERGY STAR visit www.energystar.gov. 16 42797-01 • 11/13/08 • Hunter Fan Company With this ENERGY STAR qualified Hunter ceiling fan! Your savings may vary based on energy costs. Ceiling fan models bearing the ENERGY STAR label move air 14 - 20% more information on heating ... setting. ENERGY STAR labeled ceiling fans save up to protect the environment. Beat the High Cost of Cooling The air movement created by a Hunter ceiling fan lets you are projected to more than typical ceiling fan models. Hunter fans have more efficient fan motors and air delivery due to...
...ENERGY STAR visit www.energystar.gov. 16 42797-01 • 11/13/08 • Hunter Fan Company With this ENERGY STAR qualified Hunter ceiling fan! Your savings may vary based on energy costs. Ceiling fan models bearing the ENERGY STAR label move air 14 - 20% more information on heating ... setting. ENERGY STAR labeled ceiling fans save up to protect the environment. Beat the High Cost of Cooling The air movement created by a Hunter ceiling fan lets you are projected to more than typical ceiling fan models. Hunter fans have more efficient fan motors and air delivery due to...
Owner's Manual
Page 17
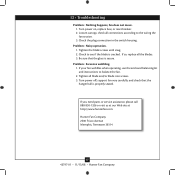
... connection in the switch housing. If so, replace all blade and/or blade iron screws. 3. Hunter Fan Company 2500 Frisco Avenue Memphis, Tennessee 38114 17 42797-01 • 11/13/08 • Hunter Fan Company Problem: Noisy operation. 1. If your fan wobbles when operating, use the enclosed balancing kit and instructions to the wiring the...
... connection in the switch housing. If so, replace all blade and/or blade iron screws. 3. Hunter Fan Company 2500 Frisco Avenue Memphis, Tennessee 38114 17 42797-01 • 11/13/08 • Hunter Fan Company Problem: Noisy operation. 1. If your fan wobbles when operating, use the enclosed balancing kit and instructions to the wiring the...
Parts Guide
Page 1
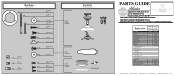
... Setscrew Mounting Isolator Blade Assembly Screw Flat Washer Globe Assembly Screw Screw, Machine, 8-32 Screw, Machine, 6-32 Hanger Bracket Assembly Blade Assembly Switch Housing Assembly Fan Parts (Not Drawn to Scale) x 1 x 2 x 4 x 2 x 3 x 4 x 1 x 3 x 16 Balancing x 1 Kit Wire x 6 Connector Wire x 4 Connector x 16 x 3 x 6...-00-860 1 07570-01 1 87108-01 1 87075-01 1 85095-03 1 85093-01 Hunter Fan Company • 2500 Frisco Avenue • Memphis, TN 38114 • www.hunterfan.com •...# 21621 Asm. REFER TO THE INSTALLATION MANUAL FOR FULL ASSEMBLY INSTRUCTIONS.
... Setscrew Mounting Isolator Blade Assembly Screw Flat Washer Globe Assembly Screw Screw, Machine, 8-32 Screw, Machine, 6-32 Hanger Bracket Assembly Blade Assembly Switch Housing Assembly Fan Parts (Not Drawn to Scale) x 1 x 2 x 4 x 2 x 3 x 4 x 1 x 3 x 16 Balancing x 1 Kit Wire x 6 Connector Wire x 4 Connector x 16 x 3 x 6...-00-860 1 07570-01 1 87108-01 1 87075-01 1 85095-03 1 85093-01 Hunter Fan Company • 2500 Frisco Avenue • Memphis, TN 38114 • www.hunterfan.com •...# 21621 Asm. REFER TO THE INSTALLATION MANUAL FOR FULL ASSEMBLY INSTRUCTIONS.


