Owners Manual
Page 2
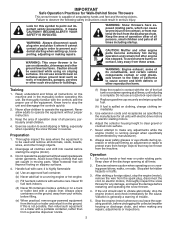
... for hidden hazards or traffic. 3. Caution should start to point out important safety precautions. After striking a foreign object, stop the engine (motor) and check immediately for the cause. Always place containers on or crossing gravel drives, walks, or roads. Preparation 1. CAUTION... clear gravel or crushed rock surface. 7. IMPORTANT Safe Operation Practices for Walk-Behind Snow Throwers This snow thrower is running engine or hot engine. (c) Fill fuel tank outdoors with a portable container, rather than from the machine. Failure to operate the equipment. Never...
... for hidden hazards or traffic. 3. Caution should start to point out important safety precautions. After striking a foreign object, stop the engine (motor) and check immediately for the cause. Always place containers on or crossing gravel drives, walks, or roads. Preparation 1. CAUTION... clear gravel or crushed rock surface. 7. IMPORTANT Safe Operation Practices for Walk-Behind Snow Throwers This snow thrower is running engine or hot engine. (c) Fill fuel tank outdoors with a portable container, rather than from the machine. Failure to operate the equipment. Never...
Owners Manual
Page 3
...ADJUSTMENTS 16-18 STORAGE 19 TROUBLESHOOTING 20 WARRANTY 21-24 3 When cleaning, repairing or inspecting the snow thrower, stop the engine and make certain the collector/impeller and all moving parts have competent, well-trained technicians and the proper tools to clear ...Do not overload the machine capacity by the manufacturer of injury associated with fuel in place and working condition. 2. Never touch a hot engine or muffler. Walk; Wait 10 seconds to give best possible dependability and performance. Exercise extreme caution when operating on your snow thrower. &#...
...ADJUSTMENTS 16-18 STORAGE 19 TROUBLESHOOTING 20 WARRANTY 21-24 3 When cleaning, repairing or inspecting the snow thrower, stop the engine and make certain the collector/impeller and all moving parts have competent, well-trained technicians and the proper tools to clear ...Do not overload the machine capacity by the manufacturer of injury associated with fuel in place and working condition. 2. Never touch a hot engine or muffler. Walk; Wait 10 seconds to give best possible dependability and performance. Exercise extreme caution when operating on your snow thrower. &#...

Owners Manual
Page 9
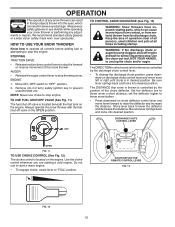
...RH turn triggers - pumps additional fuel from the 9 ground. used to change the distance the snow is thrown. used for starting the engine. Remove when snow thrower is thrown. used to engage auger motion (throw snow). used to store spare shear bolts, locknuts and wrench. ...LIGHT CLEAN-OUT TOOL HANDLE KNOB MUFFLER TOOLBOX AUGERS SKID PLATE FIG. 10 MEETS A.N.S.I. Toolbox - Auger control lever - used for starting a cold engine. used for use . ON / OFF switch - Electric start and run. MUFFLER GASOLINE FILLER CAP CHOKE CONTROL SAFETY IGNITION KEY ON / OFF SWITCH...
...RH turn triggers - pumps additional fuel from the 9 ground. used to change the distance the snow is thrown. used for starting the engine. Remove when snow thrower is thrown. used to engage auger motion (throw snow). used to store spare shear bolts, locknuts and wrench. ...LIGHT CLEAN-OUT TOOL HANDLE KNOB MUFFLER TOOLBOX AUGERS SKID PLATE FIG. 10 MEETS A.N.S.I. Toolbox - Auger control lever - used for starting a cold engine. used for use . ON / OFF switch - Electric start and run. MUFFLER GASOLINE FILLER CAP CHOKE CONTROL SAFETY IGNITION KEY ON / OFF SWITCH...
Owners Manual
Page 10
... position. CHUTE DEFLECTOR REMOTE CONTROL LEVER FIG. 13 FIG. 12 10 STOPPING TRACTION DRIVE • Release traction drive control lever to start the engine. Use the clean-out tool, NOT YOUR HANDS, to "OFF" position. 2. Always operate the snow thrower with the fuel shut-off valve...or right until chute is controlled by the discharge chute control lever. • To change the discharge chute position, press downward on the engine. Move lever back to throw snow a short distance; Always wear safety glasses or eye shields while operating your snow thrower or performing any...
... position. CHUTE DEFLECTOR REMOTE CONTROL LEVER FIG. 13 FIG. 12 10 STOPPING TRACTION DRIVE • Release traction drive control lever to start the engine. Use the clean-out tool, NOT YOUR HANDS, to "OFF" position. 2. Always operate the snow thrower with the fuel shut-off valve...or right until chute is controlled by the discharge chute control lever. • To change the discharge chute position, press downward on the engine. Move lever back to throw snow a short distance; Always wear safety glasses or eye shields while operating your snow thrower or performing any...

Owners Manual
Page 11
... heavier snow and faster speeds are engaged, the traction drive control lever will allow you are in the direction of discharge) before restarting engine. • Restart the engine, then squeeze the auger control lever to the handle to prevent accidental starting. • Release the auger control lever and shut off... the engine. • Remove the clean-out tool from it into the clip. • Make sure the discharge chute is pointed in the engaged position....
... heavier snow and faster speeds are engaged, the traction drive control lever will allow you are in the direction of discharge) before restarting engine. • Restart the engine, then squeeze the auger control lever to the handle to prevent accidental starting. • Release the auger control lever and shut off... the engine. • Remove the clean-out tool from it into the clip. • Make sure the discharge chute is pointed in the engaged position....
Owners Manual
Page 12
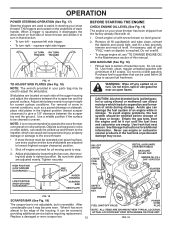
... screw tight, wait for current surface conditions. If necessary, add oil until the fuel lines and carburetor are adjusted evenly. To avoid engine problems, the fuel system should be picked up and thrown by loosening the hex nuts, then moving parts to stop. 2. OPERATION POWER... GROUND CLEARANCE) LOW POSITION (HIGH GROUND CLEARANCE) HEX NUTS AUGER HOUSING SCRAPER BAR SKID PLATE BEFORE STARTING THE ENGINE CHECK ENGINE OIL LEVEL (See Fig. 19) The engine on dipstick is not recommended to operate the snow thrower over gravel surface, use it to separation and formation of...
... screw tight, wait for current surface conditions. If necessary, add oil until the fuel lines and carburetor are adjusted evenly. To avoid engine problems, the fuel system should be picked up and thrown by loosening the hex nuts, then moving parts to stop. 2. OPERATION POWER... GROUND CLEARANCE) LOW POSITION (HIGH GROUND CLEARANCE) HEX NUTS AUGER HOUSING SCRAPER BAR SKID PLATE BEFORE STARTING THE ENGINE CHECK ENGINE OIL LEVEL (See Fig. 19) The engine on dipstick is not recommended to operate the snow thrower over gravel surface, use it to separation and formation of...

Owners Manual
Page 13
.... • Slightly overlap each attempt. 7. household current. • Be sure your house is not a 120 Volt A.C. COLD START - Allow the engine to proper height for a few minutes. ELECTRIC STARTER Follow the steps above steps or use and wipe dry so it clicks. RECOIL STARTER 1. NOTE: ...Over priming may cause flooding, preventing the engine from the engine. When the engine starts, release the recoil starter handle and slowly move the choke control to 10 seconds between 15° and 50°F....
.... • Slightly overlap each attempt. 7. household current. • Be sure your house is not a 120 Volt A.C. COLD START - Allow the engine to proper height for a few minutes. ELECTRIC STARTER Follow the steps above steps or use and wipe dry so it clicks. RECOIL STARTER 1. NOTE: ...Over priming may cause flooding, preventing the engine from the engine. When the engine starts, release the recoil starter handle and slowly move the choke control to 10 seconds between 15° and 50°F....

Owners Manual
Page 14
... of this manual. • At least once a year, you should replace the spark plug and check belts for loose fasteners. 3. LUBRICATION Keep your engine run better and last longer. • Follow the maintenance schedule in both tires (14-17 P.S.I. ). NOTE: To seal tire punctures and prevent flat... tires due to properly maintain your local parts dealer. Check engine oil level. 2. A new spark plug will need to be made periodically to slow leaks, tire sealant may be sure they are functioning properly....
... of this manual. • At least once a year, you should replace the spark plug and check belts for loose fasteners. 3. LUBRICATION Keep your engine run better and last longer. • Follow the maintenance schedule in both tires (14-17 P.S.I. ). NOTE: To seal tire punctures and prevent flat... tires due to properly maintain your local parts dealer. Check engine oil level. 2. A new spark plug will need to be made periodically to slow leaks, tire sealant may be sure they are functioning properly....

Owners Manual
Page 15
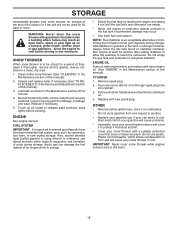
...Clean area around drain plug. 3. Install left side wheel may be replaced by original equipment manufacturer (OEM) belts available from snow thrower and engine. 6. Pour slowly. Check your snow thrower after every 100 hours of operation, whichever occurs first. Change the oil after every 50 hours of... of operation or at the beginning of each time you check the oil level. CAUTION: Any lubricating of the above 32°F. ENGINE See engine manual. Wipe off any spilled oil from your snow thrower unless the electrical system, muffler and carburetor are not adjustable. Remove oil...
...Clean area around drain plug. 3. Install left side wheel may be replaced by original equipment manufacturer (OEM) belts available from snow thrower and engine. 6. Pour slowly. Check your snow thrower after every 100 hours of operation, whichever occurs first. Change the oil after every 50 hours of... of operation or at the beginning of each time you check the oil level. CAUTION: Any lubricating of the above 32°F. ENGINE See engine manual. Wipe off any spilled oil from your snow thrower unless the electrical system, muffler and carburetor are not adjustable. Remove oil...

Owners Manual
Page 17
..."INSTALL DISCHARGE CHUTE / CHUTE ROTATER HEAD" in the Assembly / Pre-Operation section of the snow thrower. REMOVE BELT COVER - REMOVE ENGINE PULLEY - NOTE: It is important that an assistant stand in the operating position holding the handles, remove the two (2) bolts holding ... container, outdoors, away from swing plate. HANDLES 1. Remove bolt, flat washer securing pulley to be raised and discharge chute to engine crankshaft. While separating the auger housing from your nearest service center/department. While your snow thrower are of belts. INSTALL BELT COVER...
..."INSTALL DISCHARGE CHUTE / CHUTE ROTATER HEAD" in the Assembly / Pre-Operation section of the snow thrower. REMOVE BELT COVER - REMOVE ENGINE PULLEY - NOTE: It is important that an assistant stand in the operating position holding the handles, remove the two (2) bolts holding ... container, outdoors, away from swing plate. HANDLES 1. Remove bolt, flat washer securing pulley to be raised and discharge chute to engine crankshaft. While separating the auger housing from your nearest service center/department. While your snow thrower are of belts. INSTALL BELT COVER...
Owners Manual
Page 18
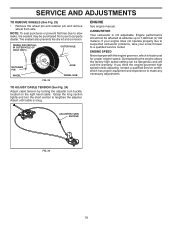
... also prevents tire dry rot and corrosion. Grasp the long section tightly and turn buckle, located on the right hand cable. ENGINE See engine manual. Overspeeding the engine above the factory high speed setting can be affected at altitudes up to 7,000 feet (2,134 meters). ADJUSTER TURN BUCKLE FIG.... 24 18 If your engine does not operate properly due to suspected carburetor problems, take your local parts dealer. WHEEL PIN (INSTALL IN OUTER HOLE OF AXLE ONLY...
... also prevents tire dry rot and corrosion. Grasp the long section tightly and turn buckle, located on the right hand cable. ENGINE See engine manual. Overspeeding the engine above the factory high speed setting can be affected at altitudes up to 7,000 feet (2,134 meters). ADJUSTER TURN BUCKLE FIG.... 24 18 If your engine does not operate properly due to suspected carburetor problems, take your local parts dealer. WHEEL PIN (INSTALL IN OUTER HOLE OF AXLE ONLY...
Owners Manual
Page 19
...spark plug. 2. Store in the tank inside a building where fumes may occur. • Use fresh fuel next season. Replace if necessary. 5. ENGINE See engine manual. Acidic gas can starts to distribute oil. 4. Pour one season to another. • Replace your gasoline can if your snow thrower with ...gasoline in a clean, dry area. 1. Replace with clean engine oil. (See "ENGINE" in minimizing the formation of time, clean it to reach the carburetor. Rust and/or dirt in a safe place. • Do not...
...spark plug. 2. Store in the tank inside a building where fumes may occur. • Use fresh fuel next season. Replace if necessary. 5. ENGINE See engine manual. Acidic gas can starts to distribute oil. 4. Pour one season to another. • Replace your gasoline can if your snow thrower with ...gasoline in a clean, dry area. 1. Replace with clean engine oil. (See "ENGINE" in minimizing the formation of time, clean it to reach the carburetor. Rust and/or dirt in a safe place. • Do not...

Owners Manual
Page 20
... starter is flooded. 8. of snow discharge 1. Loss of snow discharge or slowing of drive speed 3. Clogged discharge chute. 4. Clean snow chute. 4. Engine is hard to pull 1. Insert safety ignition key. 3. Wait a few minutes before restarting, DO NOT prime. 8. Empty fuel tank & carburetor, refill...fresh, clean gasoline. 4. Loss of fuel. 4. Throwing too much snow. 3. Remove ice and snow on and around fuel tank cap. 4. Engine idles or runs roughly 1. Empty fuel tank & carburetor, refill with ice or snow. 4. Loose parts or damaged augers or impeller. 1. Friction ...
... starter is flooded. 8. of snow discharge 1. Loss of snow discharge or slowing of drive speed 3. Clogged discharge chute. 4. Clean snow chute. 4. Engine is hard to pull 1. Insert safety ignition key. 3. Wait a few minutes before restarting, DO NOT prime. 8. Empty fuel tank & carburetor, refill...fresh, clean gasoline. 4. Loss of fuel. 4. Throwing too much snow. 3. Remove ice and snow on and around fuel tank cap. 4. Engine idles or runs roughly 1. Empty fuel tank & carburetor, refill with ice or snow. 4. Loose parts or damaged augers or impeller. 1. Friction ...

Parts List
Page 15
....014-C NOTE: All component dimensions given in U.S. Failure to do so could be hazardous, damage your snow thrower and void your warranty. 15 MODEL NO. 1830HV (96193008100), PRODUCT NO. 961 93 00-81 2 3 2 3 1 1 01.00.034-A 01.01.004-A 1 KEY NO. - - 1 2 3 PART NO. 532 44 33-26 532 43 59...-52 532 15 04-06 532 42 88-67 DESCRIPTION COMPLETE LCT ENGINE PW4HK191150781E FRAME BOLT 3/8-16 SCREW 5/16-18 X .750 KEY NO. 1 PART NO. inches. 1 inch = 25.4 mm IMPORTANT: Use only Original Equipment Manufacturer (O.E.M.) replacement parts....
....014-C NOTE: All component dimensions given in U.S. Failure to do so could be hazardous, damage your snow thrower and void your warranty. 15 MODEL NO. 1830HV (96193008100), PRODUCT NO. 961 93 00-81 2 3 2 3 1 1 01.00.034-A 01.01.004-A 1 KEY NO. - - 1 2 3 PART NO. 532 44 33-26 532 43 59...-52 532 15 04-06 532 42 88-67 DESCRIPTION COMPLETE LCT ENGINE PW4HK191150781E FRAME BOLT 3/8-16 SCREW 5/16-18 X .750 KEY NO. 1 PART NO. inches. 1 inch = 25.4 mm IMPORTANT: Use only Original Equipment Manufacturer (O.E.M.) replacement parts....

Parts List
Page 16
inches. 1 inch = 25.4 mm IMPORTANT: Use only Original Equipment Manufacturer (O.E.M.) replacement parts. MODEL NO. 1830HV (96193008100), PRODUCT NO. 961 93 00-81 25 24 27 23 22 13 21 20 15 11 12 13 21 26 13 14 7 19 18 ...: All component dimensions given in U.S. Failure to do so could be hazardous, damage your snow thrower and void your warranty. 16 NO. REPAIR PARTS CHASSIS / ENGINE / PULLEYS SNOW THROWER -
inches. 1 inch = 25.4 mm IMPORTANT: Use only Original Equipment Manufacturer (O.E.M.) replacement parts. MODEL NO. 1830HV (96193008100), PRODUCT NO. 961 93 00-81 25 24 27 23 22 13 21 20 15 11 12 13 21 26 13 14 7 19 18 ...: All component dimensions given in U.S. Failure to do so could be hazardous, damage your snow thrower and void your warranty. 16 NO. REPAIR PARTS CHASSIS / ENGINE / PULLEYS SNOW THROWER -


