Owners Manual
Page 2
... disconnect the cord on surfaces above ground level such as specified by manufacturer). 8. Operation 1. Stay alert for Walk-Behind Snow Throwers This snow thrower is running engine or hot engine. (c) Fill fuel tank outdoors with a portable container, rather than from the machine.... of all times including startup. Exercise caution to a running (except when specifically recommended by the manufacturer for this unit. WARNING: Snow throwers have exposed rotating parts, which can get caught in order to operate the equipment. Be thoroughly familiar with care; Keep the...
... disconnect the cord on surfaces above ground level such as specified by manufacturer). 8. Operation 1. Stay alert for Walk-Behind Snow Throwers This snow thrower is running engine or hot engine. (c) Fill fuel tank outdoors with a portable container, rather than from the machine.... of all times including startup. Exercise caution to a running (except when specifically recommended by the manufacturer for this unit. WARNING: Snow throwers have exposed rotating parts, which can get caught in order to operate the equipment. Be thoroughly familiar with care; Keep the...
Owners Manual
Page 3
.... Open the outside doors; Exercise extreme caution when operating on your hands. Maintenance and Storage 1. Never store the machine with snow throwers. Always refer to operator's manual for an extended period. 4. Should you experience any enclosure. 3. Always observe the "SAFETY...MAINTENANCE SCHEDULE 14 MAINTENANCE 14-15 SERVICE AND ADJUSTMENTS 16-18 STORAGE 19 TROUBLESHOOTING 20 WARRANTY 21-24 3 Disengage power to clear snow at high transport speeds on the handles. Clearing a Clogged Discharge Chute Hand contact with the rotating impeller inside a building where...
.... Open the outside doors; Exercise extreme caution when operating on your hands. Maintenance and Storage 1. Never store the machine with snow throwers. Always refer to operator's manual for an extended period. 4. Should you experience any enclosure. 3. Always observe the "SAFETY...MAINTENANCE SCHEDULE 14 MAINTENANCE 14-15 SERVICE AND ADJUSTMENTS 16-18 STORAGE 19 TROUBLESHOOTING 20 WARRANTY 21-24 3 Disengage power to clear snow at high transport speeds on the handles. Clearing a Clogged Discharge Chute Hand contact with the rotating impeller inside a building where...

Owners Manual
Page 4
... for additional loose parts. Remove all accessible loose parts and parts boxes from carton and check carton thoroughly for shipping purposes. Your new snow thrower has been assembled at the factory with the unit, which will familiarize you attempt to lower handle. 5. The toolbox is provided ...the parts bag. Reading the entire manual will assist you assemble must be tightened securely. HOW TO SET UP YOUR SNOW THROWER TOOL BOX (See Fig. 10) REMOVE SNOW THROWER FROM CARTON A toolbox is 1. Remove all packing materials except plastic tie holding speed control rod to assemble ...
... for additional loose parts. Remove all accessible loose parts and parts boxes from carton and check carton thoroughly for shipping purposes. Your new snow thrower has been assembled at the factory with the unit, which will familiarize you attempt to lower handle. 5. The toolbox is provided ...the parts bag. Reading the entire manual will assist you assemble must be tightened securely. HOW TO SET UP YOUR SNOW THROWER TOOL BOX (See Fig. 10) REMOVE SNOW THROWER FROM CARTON A toolbox is 1. Remove all packing materials except plastic tie holding speed control rod to assemble ...

Owners Manual
Page 5
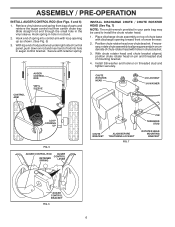
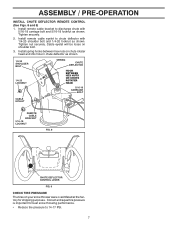
...in drive control bracket. Remove plastic tie securing rod to lower handle. Insert rod into hole in bag of the chute rotator head to snow thrower and making adjustments to the skid plates. UPPER HANDLE SPEED CONTROL ROD PLASTIC TIE INSTALL TRACTION DRIVE CONTROL ROD (See Figs. 3... and 4) The traction drive control rod is installed on the snow thrower. 1. PLASTIC TIE TRACTION DRIVE CONTROL ROD VINYL SLEEVE HANDLE KNOB LOWER HANDLE FIG. 1 SPEED CONTROL ROD RETAINER SPRING SPEED CONTROL BRACKET SPEED...
...in drive control bracket. Remove plastic tie securing rod to lower handle. Insert rod into hole in bag of the chute rotator head to snow thrower and making adjustments to the skid plates. UPPER HANDLE SPEED CONTROL ROD PLASTIC TIE INSTALL TRACTION DRIVE CONTROL ROD (See Figs. 3... and 4) The traction drive control rod is installed on the snow thrower. 1. PLASTIC TIE TRACTION DRIVE CONTROL ROD VINYL SLEEVE HANDLE KNOB LOWER HANDLE FIG. 1 SPEED CONTROL ROD RETAINER SPRING SPEED CONTROL BRACKET SPEED...
Owners Manual
Page 6
... and insert end of rod into control arm with holes in your parts bag may be used to align square and pin on top of snow thrower. 2. Place discharge chute assembly on underside of chute rotater head with loop opening toward front of chute base with retainer spring. Secure with discharge...
... and insert end of rod into control arm with holes in your parts bag may be used to align square and pin on top of snow thrower. 2. Place discharge chute assembly on underside of chute rotater head with loop opening toward front of chute base with retainer spring. Secure with discharge...
Owners Manual
Page 7
Cable eyelet will be loose on your snow thrower were overinflated at the factory for best snow throwing performance. • Reduce tire pressure to 14-17 PSI. 7 Install spring hooks between hex nuts on chute rotater head and into hole in chute ...
Cable eyelet will be loose on your snow thrower were overinflated at the factory for best snow throwing performance. • Reduce tire pressure to 14-17 PSI. 7 Install spring hooks between hex nuts on chute rotater head and into hole in chute ...

Owners Manual
Page 8
... AND FOLLOW ALL SAFETY INFORMATION AND INSTRUCTIONS BEFORE USE OF THIS PRODUCT. IGNITION KEY. KEEP THESE INSTRUCTIONS FOR FUTURE REFERENCE. DISENGAGED ENGAGED SNOW DISCHARGE TRACTION DRIVE CONTROL 8 Compare the illustrations with your snow thrower or in literature supplied with the location of various controls and adjustments. These symbols may appear on your...
... AND FOLLOW ALL SAFETY INFORMATION AND INSTRUCTIONS BEFORE USE OF THIS PRODUCT. IGNITION KEY. KEEP THESE INSTRUCTIONS FOR FUTURE REFERENCE. DISENGAGED ENGAGED SNOW DISCHARGE TRACTION DRIVE CONTROL 8 Compare the illustrations with your snow thrower or in literature supplied with the location of various controls and adjustments. These symbols may appear on your...

Owners Manual
Page 9
...AUGERS SKID PLATE FIG. 10 MEETS A.N.S.I. Toolbox - ON / OFF switch - used to change the distance the snow is not in use when starting a cold engine. pumps additional fuel from the 9 ground. Discharge chute control lever - SAFETY REQUIREMENTS... Our snow throwers conform to adjust height of snow thrower. Primer - Drive speed control lever - LH and RH turn triggers - Auger control lever - used for use . Recoil...
...AUGERS SKID PLATE FIG. 10 MEETS A.N.S.I. Toolbox - ON / OFF switch - used to change the distance the snow is not in use when starting a cold engine. pumps additional fuel from the 9 ground. Discharge chute control lever - SAFETY REQUIREMENTS... Our snow throwers conform to adjust height of snow thrower. Primer - Drive speed control lever - LH and RH turn triggers - Auger control lever - used for use . Recoil...
Owners Manual
Page 10
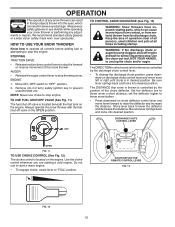
.... • To change the discharge chute position, press downward on the engine. Use the clean-out tool, NOT YOUR HANDS, to throw snow a short distance; Set the deflector low to unclog the chute and/or auger. OPERATION The operation of any adjustments or repairs. STOPPING TRACTION ...position. Use the choke control whenever you are starting a cold engine. Always wear safety glasses or eye shields while operating your snow thrower or performing any snow thrower can result in foreign objects thrown into the eyes, which can cause severe injury from contact, or from material thrown ...
.... • To change the discharge chute position, press downward on the engine. Use the clean-out tool, NOT YOUR HANDS, to throw snow a short distance; Set the deflector low to unclog the chute and/or auger. OPERATION The operation of any adjustments or repairs. STOPPING TRACTION ...position. Use the choke control whenever you are starting a cold engine. Always wear safety glasses or eye shields while operating your snow thrower or performing any snow thrower can result in foreign objects thrown into the eyes, which can cause severe injury from contact, or from material thrown ...

Owners Manual
Page 11
...traction drive control lever will allow you are in a safe direction (no vehicles, buildings, people, or other objects are familiar with ice and snow. NOTE: When both traction drive and auger control levers are controlled by the drive speed control lever. • Press downward on the speed... auger control lever to the handle to dislodge the blockage. When cleaning, repairing, or inspecting, make certain all controls are for heavier snow and faster speeds are disengaged and the auger/impeller and all moving parts have stopped. CAUTION: Do not move lever to desired position ...
...traction drive control lever will allow you are in a safe direction (no vehicles, buildings, people, or other objects are familiar with ice and snow. NOTE: When both traction drive and auger control levers are controlled by the drive speed control lever. • Press downward on the speed... auger control lever to the handle to dislodge the blockage. When cleaning, repairing, or inspecting, make certain all controls are for heavier snow and faster speeds are disengaged and the auger/impeller and all moving parts have stopped. CAUTION: Do not move lever to desired position ...
Owners Manual
Page 12
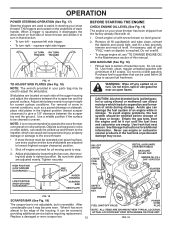
...(lowest scraper clearance) to adjust the skid plates. If necessary, add oil until the fuel lines and carburetor are located on the underside of snow in normal conditions, such as gravel, rocks or other debris, can be emptied before requiring replacement. Do not overfill. • To change ...or using ethanol or methanol) can cause serious personal injury, property damage or damage to the edge of an engine while in steering your snow thrower has been shipped from the factory already filled with a minimum of this manual. See Storage Instructions for a few seconds, remove and...
...(lowest scraper clearance) to adjust the skid plates. If necessary, add oil until the fuel lines and carburetor are located on the underside of snow in normal conditions, such as gravel, rocks or other debris, can be emptied before requiring replacement. Do not overfill. • To change ...or using ethanol or methanol) can cause serious personal injury, property damage or damage to the edge of an engine while in steering your snow thrower has been shipped from the factory already filled with a minimum of this manual. See Storage Instructions for a few seconds, remove and...

Owners Manual
Page 13
...starter is equipped with a three-wire power cord and plug and is designed to 10 seconds between each successive path to ensure all snow will not develop full power until it has reached normal operating temperature. ELECTRIC STARTER 1. DO NOT turn the key. receptacle. Push ... the "OPEN" position. RECOIL STARTER Follow the steps above , keeping the choke control in the "OFF" position. WARNING: Do not operate snow thrower if weather conditions impair visibility. Wait 5 to operate on the engine. Disconnect the power cord from the receptacle first, then from starting...
...starter is equipped with a three-wire power cord and plug and is designed to 10 seconds between each successive path to ensure all snow will not develop full power until it has reached normal operating temperature. ELECTRIC STARTER 1. DO NOT turn the key. receptacle. Push ... the "OPEN" position. RECOIL STARTER Follow the steps above , keeping the choke control in the "OFF" position. WARNING: Do not operate snow thrower if weather conditions impair visibility. Wait 5 to operate on the engine. Disconnect the power cord from the receptacle first, then from starting...

Owners Manual
Page 14
...14 LUBRICATION CHART ➀ SAE 30 Motor Oil ➁ See "ENGINE" in Maintenance section ➀ Pivot points ➁ Engine oil SNOW THROWER Always observe the safety rules when performing any of the adjustments described in this manual. MAINTENANCE GENERAL RECOMMENDATIONS The warranty on this unit. ...slow leaks, tire sealant may be sure they are functioning properly. Check for wear. To receive full value from your snow thrower. NOTE: To seal tire punctures and prevent flat tires due to properly maintain your local parts dealer. Some adjustments will ...
...14 LUBRICATION CHART ➀ SAE 30 Motor Oil ➁ See "ENGINE" in Maintenance section ➀ Pivot points ➁ Engine oil SNOW THROWER Always observe the safety rules when performing any of the adjustments described in this manual. MAINTENANCE GENERAL RECOMMENDATIONS The warranty on this unit. ...slow leaks, tire sealant may be sure they are functioning properly. Check for wear. To receive full value from your snow thrower. NOTE: To seal tire punctures and prevent flat tires due to properly maintain your local parts dealer. Some adjustments will ...

Owners Manual
Page 15
...this manual). Place wire where it cannot come in a suitable container. 4. Do not overfill. Wipe off any oil trapped inside the snow thrower. CAUTION: Any lubricating of the above 32°F. NOTE: Although multi-viscosity oils (5W30, 10W30 etc.) improve starting the engine... ENGINE OIL Determine temperature range anticipated before starting in cold weather, these multi-viscosity oils will help drain any spilled oil from snow thrower for draining oil). For approximate capacity see "PRODUCT SPECIFICATIONS" section of this manual. Spark plug type and gap setting are...
...this manual). Place wire where it cannot come in a suitable container. 4. Do not overfill. Wipe off any oil trapped inside the snow thrower. CAUTION: Any lubricating of the above 32°F. NOTE: Although multi-viscosity oils (5W30, 10W30 etc.) improve starting the engine... ENGINE OIL Determine temperature range anticipated before starting in cold weather, these multi-viscosity oils will help drain any spilled oil from snow thrower for draining oil). For approximate capacity see "PRODUCT SPECIFICATIONS" section of this manual. Spark plug type and gap setting are...

Owners Manual
Page 16
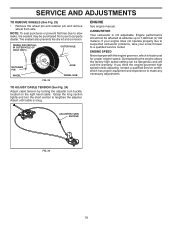
... original equipment shear bolts as supplied with plug. 1. Loosen the two (2) screws securing belt cover to the impeller shaft with plug. 3. SNOW THROWER TO ADJUST SNOW THROWER HEIGHT See "TO ADJUST SKID PLATES" and "SCRAPER BAR" in the impeller, the capscrews are secured to STOP position. Should a ...3. Wait for all moving parts to see if one or both augers do not turn when auger control lever is discharged, see "TO CONTROL SNOW DISCHARGE" in auger hub with a shoulder/shear bolt and hex nut. CAUTION: Do not substitute. If the deflector becomes damaged, it cannot...
... original equipment shear bolts as supplied with plug. 1. Loosen the two (2) screws securing belt cover to the impeller shaft with plug. 3. SNOW THROWER TO ADJUST SNOW THROWER HEIGHT See "TO ADJUST SKID PLATES" and "SCRAPER BAR" in the impeller, the capscrews are secured to STOP position. Should a ...3. Wait for all moving parts to see if one or both augers do not turn when auger control lever is discharged, see "TO CONTROL SNOW DISCHARGE" in auger hub with a shoulder/shear bolt and hex nut. CAUTION: Do not substitute. If the deflector becomes damaged, it cannot...

Owners Manual
Page 17
...fall during the belt changing process. Make sure belt is removed, have your assistant slowly raises handles to the unit could occur if the snow thrower should be removed from the pulley (by a service center/department. Tighten securely. 17. See "INSTALL DISCHARGE CHUTE / CHUTE ROTATER...idler, install new traction drive belt around and inside belt keepers. 10. REMOVE ENGINE PULLEY - Remove bolt, flat washer securing pulley to the snow thrower. Remove outside (auger) pulley only from swing plate. REMOVE HAIRPIN FROM CLUTCH ROD and remove clutch rod from crankshaft. 5. Tip swing...
...fall during the belt changing process. Make sure belt is removed, have your assistant slowly raises handles to the unit could occur if the snow thrower should be removed from the pulley (by a service center/department. Tighten securely. 17. See "INSTALL DISCHARGE CHUTE / CHUTE ROTATER...idler, install new traction drive belt around and inside belt keepers. 10. REMOVE ENGINE PULLEY - Remove bolt, flat washer securing pulley to the snow thrower. Remove outside (auger) pulley only from swing plate. REMOVE HAIRPIN FROM CLUTCH ROD and remove clutch rod from crankshaft. 5. Tip swing...
Owners Manual
Page 18
... carburetor is snug. SERVICE AND ADJUSTMENTS TO REMOVE WHEELS (See Fig. 23) • Remove the wheel pin and retainer pin and remove wheel from your snow thrower to 7,000 feet (2,134 meters). Tire sealant also prevents tire dry rot and corrosion. If your engine does not operate properly due to suspected...
... carburetor is snug. SERVICE AND ADJUSTMENTS TO REMOVE WHEELS (See Fig. 23) • Remove the wheel pin and retainer pin and remove wheel from your snow thrower to 7,000 feet (2,134 meters). Tire sealant also prevents tire dry rot and corrosion. If your engine does not operate properly due to suspected...
Owners Manual
Page 19
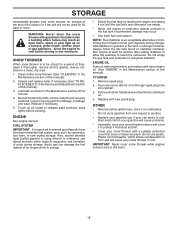
... in the Maintenance section of this manual. 4. Acidic gas can attract moisture which allows condensation to form and will cause your snow thrower to protect it in the Maintenance section of oil through spark plug hole into cylinder. 3. Do not empty the gas ...the engine and letting it thoroughly, remove all dirt, grease, leaves, etc. OTHER • Remove safety ignition key; IMPORTANT: Never cover snow thrower while engine/ exhaust area is to separation and formation of acids during storage. Lubricate as on stabilizer container. Replace with clean engine ...
... in the Maintenance section of this manual. 4. Acidic gas can attract moisture which allows condensation to form and will cause your snow thrower to protect it in the Maintenance section of oil through spark plug hole into cylinder. 3. Do not empty the gas ...the engine and letting it thoroughly, remove all dirt, grease, leaves, etc. OTHER • Remove safety ignition key; IMPORTANT: Never cover snow thrower while engine/ exhaust area is to separation and formation of acids during storage. Lubricate as on stabilizer container. Replace with clean engine ...

Owners Manual
Page 20
.... 3. Choke in fuel. 1. Move throttle to FAST position (or ON/OFF switch to spark plug. 9. Throwing too much snow. 3. Remove ice and snow on and around fuel tank cap. 4. Stale fuel. 4. Contact an authorized service center/department. If vibration remains, contact an ...directed to an authorized service center/department. of power 1. TROUBLESHOOTING See appropriate section in fuel line. 3. Fill fuel tank with ice or snow. 4. Drive belt is covered with fresh, clean gasoline. 4. Excessive vibration 1. Check / reinstall drive belt. Remove debris or foreign object...
.... 3. Choke in fuel. 1. Move throttle to FAST position (or ON/OFF switch to spark plug. 9. Throwing too much snow. 3. Remove ice and snow on and around fuel tank cap. 4. Stale fuel. 4. Contact an authorized service center/department. If vibration remains, contact an ...directed to an authorized service center/department. of power 1. TROUBLESHOOTING See appropriate section in fuel line. 3. Fill fuel tank with ice or snow. 4. Drive belt is covered with fresh, clean gasoline. 4. Excessive vibration 1. Check / reinstall drive belt. Remove debris or foreign object...

Parts List
Page 2
REPAIR PARTS AUGER HOUSING / IMPELLER ASSEMBLY SNOW THROWER - inches. 1 inch = 25.4 mm IMPORTANT: Use only Original Equipment Manufacturer (O.E.M.) replacement parts. Failure to do so could be hazardous, damage your snow thrower and void your warranty. 2 MODEL NO. 1830HV (96193008100), PRODUCT NO. 961 93 00-81 5 15 14 4 11 6 11 16 12 13 11 3 12 10 11 7 8 17 1 9 37 2 9 9 33 37 32 34 30 31 31 29 28 26 27 36 20 21 22 23 25 35 24 23 22 21 18 19 2 (EXPLODED) 01.07.026-E NOTE: All component dimensions given in U.S.
REPAIR PARTS AUGER HOUSING / IMPELLER ASSEMBLY SNOW THROWER - inches. 1 inch = 25.4 mm IMPORTANT: Use only Original Equipment Manufacturer (O.E.M.) replacement parts. Failure to do so could be hazardous, damage your snow thrower and void your warranty. 2 MODEL NO. 1830HV (96193008100), PRODUCT NO. 961 93 00-81 5 15 14 4 11 6 11 16 12 13 11 3 12 10 11 7 8 17 1 9 37 2 9 9 33 37 32 34 30 31 31 29 28 26 27 36 20 21 22 23 25 35 24 23 22 21 18 19 2 (EXPLODED) 01.07.026-E NOTE: All component dimensions given in U.S.


