
Owners Manual
Page 2
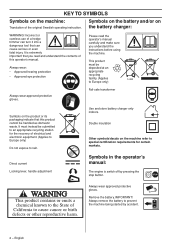
... started by pressing the stop button. Remove the battery. Double insulation Other symbols/decals on the machine refer to Europe only) Always wear approved protective gloves. IMPORTANT! English Direct current Locking lever, handle adjustment Use and store battery charger only indoors. Incorrect or careless use of the original Swedish operating instruction. KEY TO SYMBOLS Symbols on the machine: Translation of a hedge trimmer can turn...
... started by pressing the stop button. Remove the battery. Double insulation Other symbols/decals on the machine refer to Europe only) Always wear approved protective gloves. IMPORTANT! English Direct current Locking lever, handle adjustment Use and store battery charger only indoors. Incorrect or careless use of the original Swedish operating instruction. KEY TO SYMBOLS Symbols on the machine: Translation of a hedge trimmer can turn...
Owners Manual
Page 4
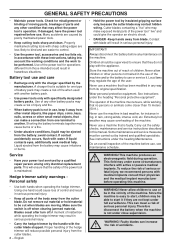
... read the operator's manual carefully. Always use approved hearing protection. WARNING! WARNING! WARNING! Your warranty may ! the design of the machine be modified without the permission of nonauthorized accessories or replacement parts. hedge trimmer can cause serious or even fatal injury. It is what 6 GENERAL SAFETY PRECAUTIONS General power tool safety warnings 7 Personal protective equipment 9 Battery and battery charger...
... read the operator's manual carefully. Always use approved hearing protection. WARNING! WARNING! WARNING! Your warranty may ! the design of the machine be modified without the permission of nonauthorized accessories or replacement parts. hedge trimmer can cause serious or even fatal injury. It is what 6 GENERAL SAFETY PRECAUTIONS General power tool safety warnings 7 Personal protective equipment 9 Battery and battery charger...

Owners Manual
Page 5
... borrower or buyer gets the operator′s manual, so they will be satisfied with repairs and service whenever this operator′s manual as our highest priority. In 1956, the first motor driven lawn mowers appeared, followed by chain saws in the world of our authorized dealers, ask for building and construction industry. Today Husqvarna is our wish that you...
... borrower or buyer gets the operator′s manual, so they will be satisfied with repairs and service whenever this operator′s manual as our highest priority. In 1956, the first motor driven lawn mowers appeared, followed by chain saws in the world of our authorized dealers, ask for building and construction industry. Today Husqvarna is our wish that you...
Owners Manual
Page 6
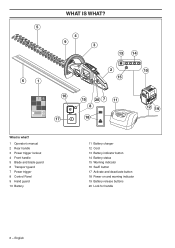
English 5 6 1 WHAT IS WHAT? 4 9 3 13 14 2 10 15 16 17 15 20 7 11 8 18 12 19 What is what? 1 Operator's manual 2 Rear handle 3 Power trigger lockout 4 Front handle 5 Blade and blade guard 6 Transport guard 7 Power trigger 8 Control Panel 9 Hand guard 10 Battery 11 Battery charger 12 Cord 13 Battery indicator button 14 Battery status 15 Warning indicator 16 SavE button 17 Activate and deactivate button 18 Power on and warning indicator 19 Battery release buttons 20 Lock for handle 6 -
English 5 6 1 WHAT IS WHAT? 4 9 3 13 14 2 10 15 16 17 15 20 7 11 8 18 12 19 What is what? 1 Operator's manual 2 Rear handle 3 Power trigger lockout 4 Front handle 5 Blade and blade guard 6 Transport guard 7 Power trigger 8 Control Panel 9 Hand guard 10 Battery 11 Battery charger 12 Cord 13 Battery indicator button 14 Battery status 15 Warning indicator 16 SavE button 17 Activate and deactivate button 18 Power on and warning indicator 19 Battery release buttons 20 Lock for handle 6 -
Owners Manual
Page 7
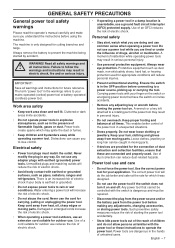
... remove the battery to lose control. Read all warnings and instructions for future reference. Save all safety warnings and ! Electrical safety • Power tool plugs must be caught in unexpected situations. • Dress properly. Unmodified plugs and matching outlets will reduce personal injuries. • Prevent unintentional starting the power tool accidentally. • Store idle power tools out of the reach of electric shock. Never use...
... remove the battery to lose control. Read all warnings and instructions for future reference. Save all safety warnings and ! Electrical safety • Power tool plugs must be caught in unexpected situations. • Dress properly. Unmodified plugs and matching outlets will reduce personal injuries. • Prevent unintentional starting the power tool accidentally. • Store idle power tools out of the reach of electric shock. Never use...
Owners Manual
Page 8
..., have the power tool repaired before operating this manual. Liquid ejected from the cutter blade. The operator of children. Carry out the safety checks, maintenance and service instructions described in any maintenace on the machine. Never allow children or other condition that they are not kept under some circumstances interfere with the cutter blade stopped. This can increase ! Do not remove cut material or...
..., have the power tool repaired before operating this manual. Liquid ejected from the cutter blade. The operator of children. Carry out the safety checks, maintenance and service instructions described in any maintenace on the machine. Never allow children or other condition that they are not kept under some circumstances interfere with the cutter blade stopped. This can increase ! Do not remove cut material or...
Owners Manual
Page 9
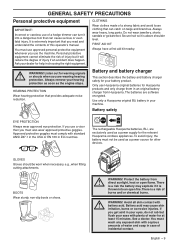
... have a first aid kit nearby. Only use of burns and/or chemical burns. GLOVES Gloves should be used as a power supply for Husqvarna products and only charge them in your eyes, do not rub but it into an open flame. Always wear heavy, long pants. Always remove your battery product. If you are wearing hearing...
... have a first aid kit nearby. Only use of burns and/or chemical burns. GLOVES Gloves should be used as a power supply for Husqvarna products and only charge them in your eyes, do not rub but it into an open flame. Always wear heavy, long pants. Always remove your battery product. If you are wearing hearing...

Owners Manual
Page 10
... protect operators in doors, fences or the like. If you materials. Do not cover the battery need further information please contact your machine. Never insert objects into the charger's cooling slots. See also instructions under the heading Maintenance. • Store the battery out of reach of electric shock. • Use only three-wire outdoor extension cords that have three-prong grounding plugs and...
... protect operators in doors, fences or the like. If you materials. Do not cover the battery need further information please contact your machine. Never insert objects into the charger's cooling slots. See also instructions under the heading Maintenance. • Store the battery out of reach of electric shock. • Use only three-wire outdoor extension cords that have three-prong grounding plugs and...

Owners Manual
Page 11
.... Never use a machine with the moving blades, for the address of the checks described below you release the handle, the power trigger and the power Release the power trigger and check thereby the free back movement of professional repairs and service. Control Panel Make sure the machine is switched on the front handle. Power trigger lockout The power trigger is necessary to apply full power and, at no operation state. Hand guard Li...
.... Never use a machine with the moving blades, for the address of the checks described below you release the handle, the power trigger and the power Release the power trigger and check thereby the free back movement of professional repairs and service. Control Panel Make sure the machine is switched on the front handle. Power trigger lockout The power trigger is necessary to apply full power and, at no operation state. Hand guard Li...

Owners Manual
Page 12
...; Use the screw and the nut on the cutting deck.Tighten to your mains-operated (corded) power tool or battery-operated (cordless) power tool. Save all warnings and instructions for future reference. Replace the cutting unit if it is not damaged or distorted. Fitting the end protection on the cutting deck The tip protector is used to protect the outer end of the blades (1) are shaped as blade guards. 1 Check that the blade guard is...
...; Use the screw and the nut on the cutting deck.Tighten to your mains-operated (corded) power tool or battery-operated (cordless) power tool. Save all warnings and instructions for future reference. Replace the cutting unit if it is not damaged or distorted. Fitting the end protection on the cutting deck The tip protector is used to protect the outer end of the blades (1) are shaped as blade guards. 1 Check that the blade guard is...

Owners Manual
Page 13
... time. Charging status Lithium-ion batteries can be charged before using it from the wall socket. • Remove the battery from the battery charger. A fully charged battery will not be charged if the battery temperature is fully charged. Connect the battery to the battery charger Regularly check that the battery is fully charged. 1 23 4 • Pull out the plug. BATTERY HANDLING Battery status The display shows the battery capacity...
... time. Charging status Lithium-ion batteries can be charged before using it from the wall socket. • Remove the battery from the battery charger. A fully charged battery will not be charged if the battery temperature is fully charged. Connect the battery to the battery charger Regularly check that the battery is fully charged. 1 23 4 • Pull out the plug. BATTERY HANDLING Battery status The display shows the battery capacity...

Owners Manual
Page 14
.... • Store the battery and the battery charger in a dry, moisture-free and frost-free space. • To prevent accidents, ensure that it cannot move around in the packing. • Secure the machine during transport. • Always remove the battery for the recovery of this product. Li-ion 14 - By ensuring that a complete service is between 5 °...
.... • Store the battery and the battery charger in a dry, moisture-free and frost-free space. • To prevent accidents, ensure that it cannot move around in the packing. • Secure the machine during transport. • Always remove the battery for the recovery of this product. Li-ion 14 - By ensuring that a complete service is between 5 °...
Owners Manual
Page 15
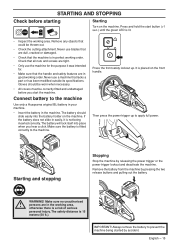
... a part or has been modified outside its specifications. Check that all nuts and screws are in the working order. Make sure the battery is lit. • Inspect the working order. STARTING AND STOPPING Check before you hear a click. Then press the power trigger up . Remove any objects that the handle and safety features are tight. • Only use...
... a part or has been modified outside its specifications. Check that all nuts and screws are in the working order. Make sure the battery is lit. • Inspect the working order. STARTING AND STOPPING Check before you hear a click. Then press the power trigger up . Remove any objects that the handle and safety features are tight. • Only use...
Owners Manual
Page 16
... work from the machine and check that deactivates the machine if not used. Read the safety instructions carefully. Avoid all times. • Turn off the machine when it off the engine. The machine can be moved. • Never put the machine down without first switching off first and always remove the battery. Keep unauthorised persons at all...
... work from the machine and check that deactivates the machine if not used. Read the safety instructions carefully. Avoid all times. • Turn off the machine when it off the engine. The machine can be moved. • Never put the machine down without first switching off first and always remove the battery. Keep unauthorised persons at all...

Owners Manual
Page 17
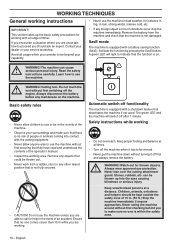
... battery. • Make sure that could damage the cutting attachment, such as possible to the cutting attachment when the machine is switched off the engine and wait until it has stopped completely before cleaning, carrying out repairs or an inspection. Basic working techniques • Work with the motor running. WORKING TECHNIQUES • Always use . • Make sure the cutting attachment has stopped before cleaning the blades...
... battery. • Make sure that could damage the cutting attachment, such as possible to the cutting attachment when the machine is switched off the engine and wait until it has stopped completely before cleaning, carrying out repairs or an inspection. Basic working techniques • Work with the motor running. WORKING TECHNIQUES • Always use . • Make sure the cutting attachment has stopped before cleaning the blades...
Owners Manual
Page 18
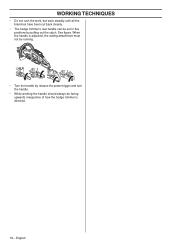
English WORKING TECHNIQUES • Do not rush the work, but work steadily until all the branches have been cut back cleanly. • The hedge trimmer's rear handle can be set in five positions by release the power trigger and turn the handle. • While working the handle should always be running. • Turn the handle by pulling out the catch. See figure. When the handle is adjusted, the cutting attachment must not be facing upwards irrespective of how the hedge trimmer is directed. 18 -
English WORKING TECHNIQUES • Do not rush the work, but work steadily until all the branches have been cut back cleanly. • The hedge trimmer's rear handle can be set in five positions by release the power trigger and turn the handle. • While working the handle should always be running. • Turn the handle by pulling out the catch. See figure. When the handle is adjusted, the cutting attachment must not be facing upwards irrespective of how the hedge trimmer is directed. 18 -

Owners Manual
Page 19
... machine fails any of professional repairs and service. File away any of our products we guarantee the availability of the checks described below you buy any burrs. This is placed in the battery charger. Lubricate the blade bars with special grease, part no. 531 00 75-12 (UL 21) before and after use original spare parts. battery before any resin and plant...
... machine fails any of professional repairs and service. File away any of our products we guarantee the availability of the checks described below you buy any burrs. This is placed in the battery charger. Lubricate the blade bars with special grease, part no. 531 00 75-12 (UL 21) before and after use original spare parts. battery before any resin and plant...

Owners Manual
Page 20
... are pressed at the same time. Clean with that stated on the rating plate on the machine. Release the cutting attachment. Contact your service agent. 20 - MAINTENANCE Troubleshooting schedule Control Panel Troubleshooting takes place from the battery charger. Error LED is lit Battery charger Cell difference too much (1V) Possible action Charge the battery Use the battery in battery connectors. Release the power trigger and the machine is...
... are pressed at the same time. Clean with that stated on the rating plate on the machine. Release the cutting attachment. Contact your service agent. 20 - MAINTENANCE Troubleshooting schedule Control Panel Troubleshooting takes place from the battery charger. Error LED is lit Battery charger Cell difference too much (1V) Possible action Charge the battery Use the battery in battery connectors. Release the power trigger and the machine is...

Owners Manual
Page 21
... screws that nuts and screws are correctly tightened. Maintenance Before use Weekly Monthly maintenance maintenance Clean the outside of view. X Check that must be performed on the machine. X Check that the battery charger is not damaged. Replace the guard if damaged. X Check that the hand guard is intact and functional. Most of the maintenance that all controls are described in working order. Replace the cutting unit if it is a list...
... screws that nuts and screws are correctly tightened. Maintenance Before use Weekly Monthly maintenance maintenance Clean the outside of view. X Check that must be performed on the machine. X Check that the battery charger is not damaged. Replace the guard if damaged. X Check that the hand guard is intact and functional. Most of the maintenance that all controls are described in working order. Replace the cutting unit if it is a list...
Owners Manual
Page 22
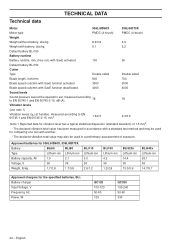
... Motor 536LiHD60X Motor type PMDC (4-brush) Weight Weight without battery, Lbs/kg 8.4/3.8 Weight with battery, Lbs/kg 5.1 Default battery BLi150 Battery runtime Battery runtime, min, (free run) with SavE activated 100 Default battery BLi150 Cutter Type Double sided Blade length, inch/mm 600 Blade speed cuts/min with SavE function activated 3500 Blade speed cuts/min with a standard test method and may also be used in accordance with SavE function deactivated 4000 Sound levels...
... Motor 536LiHD60X Motor type PMDC (4-brush) Weight Weight without battery, Lbs/kg 8.4/3.8 Weight with battery, Lbs/kg 5.1 Default battery BLi150 Battery runtime Battery runtime, min, (free run) with SavE activated 100 Default battery BLi150 Cutter Type Double sided Blade length, inch/mm 600 Blade speed cuts/min with SavE function activated 3500 Blade speed cuts/min with a standard test method and may also be used in accordance with SavE function deactivated 4000 Sound levels...


