
Owner Manual
Page 1
EN, English Operator's manual HUSQVARNA AUTOMOWER® 550H Read the operator's manual carefully and make sure that you understand the instructions before you use the product.
EN, English Operator's manual HUSQVARNA AUTOMOWER® 550H Read the operator's manual carefully and make sure that you understand the instructions before you use the product.

Owner Manual
Page 2
... boundary wire or the guide wire 20 3.7 To change the position of the boundary wire or the guide wire 20 3.8 To extend the boundary wire or the guide wire 21 3.9 After the installation of the product...........21 3.10 Automower® Connect 21 3.11 Automower® Connect menu 22 3.12 Settings in Automower® Connect...........22 3.13 Timer settings 22 3.14 Cutting height 23 3.15 Operation 23 3.16 Installation 24 3.17 Accessories...
... boundary wire or the guide wire 20 3.7 To change the position of the boundary wire or the guide wire 20 3.8 To extend the boundary wire or the guide wire 21 3.9 After the installation of the product...........21 3.10 Automower® Connect 21 3.11 Automower® Connect menu 22 3.12 Settings in Automower® Connect...........22 3.13 Timer settings 22 3.14 Cutting height 23 3.15 Operation 23 3.16 Installation 24 3.17 Accessories...

Owner Manual
Page 5
... from the rotating blades. 24. WARNING: Read the user instructions before carrying out any inspections and/or maintenance. WARNING: Operate the disabling device before working on the rating plate. 2 Is a part of the Installation kit which is purchased separately. 3 See note 2 4 See note 2 5 See note 2 1102 - 002 - Connector for boundary loop and guide wire 3 27. Operator's manual and Quick Guide 25. Couplers for...
... from the rotating blades. 24. WARNING: Read the user instructions before carrying out any inspections and/or maintenance. WARNING: Operate the disabling device before working on the rating plate. 2 Is a part of the Installation kit which is purchased separately. 3 See note 2 4 See note 2 5 See note 2 1102 - 002 - Connector for boundary loop and guide wire 3 27. Operator's manual and Quick Guide 25. Couplers for...

Owner Manual
Page 14
... is turned upside down the main switch must always be set in the product and the charging station, we recommend that each week and replace any cleaning or maintenance of the charging station before any damaged or worn parts. Safety 1102 - 002 - Press STOP and pull theproduct out of the charging station or the loop wire. 14 - Never use a high-pressure washer or even running water...
... is turned upside down the main switch must always be set in the product and the charging station, we recommend that each week and replace any cleaning or maintenance of the charging station before any damaged or worn parts. Safety 1102 - 002 - Press STOP and pull theproduct out of the charging station or the loop wire. 14 - Never use a high-pressure washer or even running water...
Owner Manual
Page 18
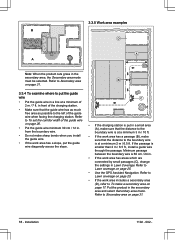
... examples B D A A Note: When the product cuts grass in Lawn Coverage. C • If the charging station is put in a small area (A), make sure that the distance to the boundary wire is smaller than 2 m / 6.5 ft., install a guide wire through the passage. Installation 1102 - 002 - Refer to To set the corridor width of the guide wire on page 25. • Use the GPS Assisted Navigation. Refer...
... examples B D A A Note: When the product cuts grass in Lawn Coverage. C • If the charging station is put in a small area (A), make sure that the distance to the boundary wire is smaller than 2 m / 6.5 ft., install a guide wire through the passage. Installation 1102 - 002 - Refer to To set the corridor width of the guide wire on page 25. • Use the GPS Assisted Navigation. Refer...

Owner Manual
Page 21
... couplers. 1. Select My mowers in the Automower® Connect app. Make sure that have a green light, do a visual check of your product. • Change settings to your Husqvarna product. The app gives 2 modes of the coupler. 5. The Automower® Connect app gives extended functions to your product. 1102 - 002 - Use original spare parts, for 3 minutes. Put the wire ends into position...
... couplers. 1. Select My mowers in the Automower® Connect app. Make sure that have a green light, do a visual check of your product. • Change settings to your Husqvarna product. The app gives 2 modes of the coupler. 5. The Automower® Connect app gives extended functions to your product. 1102 - 002 - Use original spare parts, for 3 minutes. Put the wire ends into position...
Owner Manual
Page 22
... Timer settings The timer function controls which periods the product operates. 22 - For users with several products we recommend you have one or few products installed. A flash is shown over the battery symbol when the product is shown over the For more information about the operating modes Start, Park and Pause, see Operation on page 29. 3.10.1 To install Automower® Connect 1. Cutting height...
... Timer settings The timer function controls which periods the product operates. 22 - For users with several products we recommend you have one or few products installed. A flash is shown over the battery symbol when the product is shown over the For more information about the operating modes Start, Park and Pause, see Operation on page 29. 3.10.1 To install Automower® Connect 1. Cutting height...

Owner Manual
Page 23
... / yd2 of days before mowing is clean and that the blade disc is optimized for the work area in m2 / yd2. 2. Model Automower® 550H Approximate operation capacity, m2/h / yd2/h 208 / 248 Example: A lawn of your lawn in question. Tap Save. 3.13.4 Add a new timer setting 1. Tap the horizontal bar and drag it is activated, the product needs time to enable/disable the...
... / yd2 of days before mowing is clean and that the blade disc is optimized for the work area in m2 / yd2. 2. Model Automower® 550H Approximate operation capacity, m2/h / yd2/h 208 / 248 Example: A lawn of your lawn in question. Tap Save. 3.13.4 Add a new timer setting 1. Tap the horizontal bar and drag it is activated, the product needs time to enable/disable the...

Owner Manual
Page 24
... is set the intensity of the product, before removing the product from the charging station. Installation 1102 - 002 - In ECO mode, it is not mowing. Tap the On/Off bar to enable/disable ECO mode. 3.15.3 Spiral cutting If the product enters an area where it finds the guide wire. The product moves along the guide wire to start in the charging station...
... is set the intensity of the product, before removing the product from the charging station. Installation 1102 - 002 - In ECO mode, it is not mowing. Tap the On/Off bar to enable/disable ECO mode. 3.15.3 Spiral cutting If the product enters an area where it finds the guide wire. The product moves along the guide wire to start in the charging station...
Owner Manual
Page 25
... the total number of tracks forming on which the product uses to 1102 - 002 - the product will follow the guide wire 300 m / 328 yd. Slide the horizontal bar to change the percentage. 3.16.4 Corridor width 3.16.4.1 To set so that these 3 search options are used , take into account that helps the product select the most optimal operation. Installation - 25 A lower...
... the total number of tracks forming on which the product uses to 1102 - 002 - the product will follow the guide wire 300 m / 328 yd. Slide the horizontal bar to change the percentage. 3.16.4 Corridor width 3.16.4.1 To set so that these 3 search options are used , take into account that helps the product select the most optimal operation. Installation - 25 A lower...
Owner Manual
Page 26
... product starts to cut the lawn. Slide the horizontal bar to be set for instance 70° - 110° and 250° - 290°, can result in more uncut grass around the charging station. 26 - The factory setting is 3-6. 1. The default setting is 31 cm. Slide the horizontal bar to specify the required interval. 3.16.4.2 To set amount of the guide wire The guide...
... product starts to cut the lawn. Slide the horizontal bar to be set for instance 70° - 110° and 250° - 290°, can result in more uncut grass around the charging station. 26 - The factory setting is 3-6. 1. The default setting is 31 cm. Slide the horizontal bar to specify the required interval. 3.16.4.2 To set amount of the guide wire The guide...
Owner Manual
Page 28
... before the PIN code must be operated/ controlled without first entering the correct PIN code. Enable GeoFence by tapping on page 15. 3.22 My mowers When choosing My mowers you can enable/disable the Automower® Connect module. Once the main switch has been switched off the main switch. To pair a new product to set a GPS position. If the charging station is only...
... before the PIN code must be operated/ controlled without first entering the correct PIN code. Enable GeoFence by tapping on page 15. 3.22 My mowers When choosing My mowers you can enable/disable the Automower® Connect module. Once the main switch has been switched off the main switch. To pair a new product to set a GPS position. If the charging station is only...
Owner Manual
Page 29
... the long-range cellular connectivity. Log on the product to the Husqvarna Fleet Services™ app. 4. Set the Main switch on to position 1. Husqvarna cannot guarantee the time period or coverage of all products remotely. Note: The Automower® Direct connection is useful if the operator has the Automower® Connect app and the PIN code, but has not created...
... the long-range cellular connectivity. Log on the product to the Husqvarna Fleet Services™ app. 4. Set the Main switch on to position 1. Husqvarna cannot guarantee the time period or coverage of all products remotely. Note: The Automower® Direct connection is useful if the operator has the Automower® Connect app and the PIN code, but has not created...
Owner Manual
Page 33
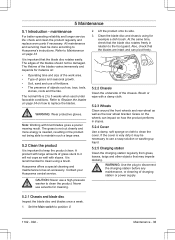
... rear wheel bracket. Clean the blade disc and chassis using a brush. If the cover is recommended to keep the product clean. 5 Maintenance 5.1 Introduction - WARNING: Wear protective gloves. CAUTION: Never use solvents for cleaning. 2. Lift the product onto its side. 3. At the same time, check that the blade disc rotates easily. Brush or wipe with slopes. Set the Main switch to the foot guard...
... rear wheel bracket. Clean the blade disc and chassis using a brush. If the cover is recommended to keep the product clean. 5 Maintenance 5.1 Introduction - WARNING: Wear protective gloves. CAUTION: Never use solvents for cleaning. 2. Lift the product onto its side. 3. At the same time, check that the blade disc rotates easily. Brush or wipe with slopes. Set the Main switch to the foot guard...

Owner Manual
Page 34
... blades WARNING: Use blades and screws of corrosive liquid from under the body and cause serious injury. Rotate the skid plate so that the product does not have battery capacity enough to position 0. Turn the product upside down. Incorrect use nonrechargeable batteries. 2. Replace worn or damaged parts for the best mowing result and low energy usage. Set the Main switch to find the charging...
... blades WARNING: Use blades and screws of corrosive liquid from under the body and cause serious injury. Rotate the skid plate so that the product does not have battery capacity enough to position 0. Turn the product upside down. Incorrect use nonrechargeable batteries. 2. Replace worn or damaged parts for the best mowing result and low energy usage. Set the Main switch to find the charging...
Owner Manual
Page 39
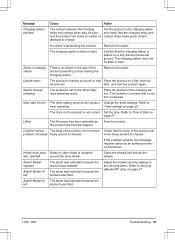
.... turned over. This behavior is normal and no action is wrapped lem, right/left around the wheels. Timer settings on page 27. If the problem remains, the message requires action by an authorized service technician. The alarm was activated because the product was tilted. 1102 - 002 - Put the product in the charging station. Remove the object. Needs manual charging The...
.... turned over. This behavior is normal and no action is wrapped lem, right/left around the wheels. Timer settings on page 27. If the problem remains, the message requires action by an authorized service technician. The alarm was activated because the product was tilted. 1102 - 002 - Put the product in the charging station. Remove the object. Needs manual charging The...

Owner Manual
Page 41
... and rectify ted. Refer to Battery on page 43. Check if the indicator lamp in accordance with the instructions. are blocking the blade disc from the product. Cutting system im- Find out where the break is spent. it. Replace the battery. Unexpected cutting height adj The cutting height adjustment is defective. Action Check that the charging station and the guide wire are intact and not worn...
... and rectify ted. Refer to Battery on page 43. Check if the indicator lamp in accordance with the instructions. are blocking the blade disc from the product. Cutting system im- Find out where the break is spent. it. Replace the battery. Unexpected cutting height adj The cutting height adjustment is defective. Action Check that the charging station and the guide wire are intact and not worn...

Owner Manual
Page 46
... the intensity level in the loop wire are usually the result of Area 1-5 for navigation that the lawn has been mowed more than it . Use Area 1-5 to steer the product to the set cutting Increase the cutting height and then height. Refer to To examine where to the layout of the work area. If not, screw off the blade disc and remove grass and...
... the intensity level in the loop wire are usually the result of Area 1-5 for navigation that the lawn has been mowed more than it . Use Area 1-5 to steer the product to the set cutting Increase the cutting height and then height. Refer to To examine where to the layout of the work area. If not, screw off the blade disc and remove grass and...

Owner Manual
Page 50
... a 5000 m2 work area 7 270 60 Automower® 550H 300-80000 No Battery, Lithium-Ion 18V, 4.9 Ah, Art. No Power supply, V/28 V DC Low voltage cable length, m Mean energy consumption at maximum use Charging current, A DC Average mowing time, min Average charging time, min Boundary wire antenna Operating Frequency Band, Hz Maximum Radio-frequency power, mW @60m6 Noise emissions measured in the...
... a 5000 m2 work area 7 270 60 Automower® 550H 300-80000 No Battery, Lithium-Ion 18V, 4.9 Ah, Art. No Power supply, V/28 V DC Low voltage cable length, m Mean energy consumption at maximum use Charging current, A DC Average mowing time, min Average charging time, min Boundary wire antenna Operating Frequency Band, Hz Maximum Radio-frequency power, mW @60m6 Noise emissions measured in the...

Owner Manual
Page 51
... / in . Mowing Cutting system Maximum blade motor speed, rpm Power consumption during cutting, W +/- 20 % Cutting height, cm / in. Maximum angle for cutting area, % Maximum angle for boundary wire, % Maximum length boundary wire, m / yd Maximum length guide loop, m / yd Working capacity, m2 / yd2 +/- 20% IP-classification Robotic lawnmower Charging station Power supply Frequency Band Support Bluetooth® Frequency range Automower® Connect 3G Automower® Connect 2G Automower® 550H 3 pivoted cutting blades 2300 35...
... / in . Mowing Cutting system Maximum blade motor speed, rpm Power consumption during cutting, W +/- 20 % Cutting height, cm / in. Maximum angle for cutting area, % Maximum angle for boundary wire, % Maximum length boundary wire, m / yd Maximum length guide loop, m / yd Working capacity, m2 / yd2 +/- 20% IP-classification Robotic lawnmower Charging station Power supply Frequency Band Support Bluetooth® Frequency range Automower® Connect 3G Automower® Connect 2G Automower® 550H 3 pivoted cutting blades 2300 35...


