
Owners Manual
Page 2
... come to the State of bystanders before turning. • Never leave a running machine unattended. Allow machine to neutral and coast downhill. • Avoid starting when setting up which can touch hot exhaust / engine parts and burn. Tires may lose control of grass, leaves or other attachments; Do not shift to cool before operating or storing the machine. FAILURE TO OBSERVE...
... come to the State of bystanders before turning. • Never leave a running machine unattended. Allow machine to neutral and coast downhill. • Avoid starting when setting up which can touch hot exhaust / engine parts and burn. Tires may lose control of grass, leaves or other attachments; Do not shift to cool before operating or storing the machine. FAILURE TO OBSERVE...

Owners Manual
Page 3
... remove gas cap or add fuel with the engine running . • Check grass catcher components and the discharge chute frequently and replace with the blades shut off and be a minimum of 12 year of age before operating. Replace gas cap and tighten securely. Allow engine to operate the machine. • Use extra care when approaching blind corners, shrubs, trees, or other debris buildup. Clean oil or fuel spillage and remove any adjustments or repairs with...
... remove gas cap or add fuel with the engine running . • Check grass catcher components and the discharge chute frequently and replace with the blades shut off and be a minimum of 12 year of age before operating. Replace gas cap and tighten securely. Allow engine to operate the machine. • Use extra care when approaching blind corners, shrubs, trees, or other debris buildup. Clean oil or fuel spillage and remove any adjustments or repairs with...
Owners Manual
Page 4
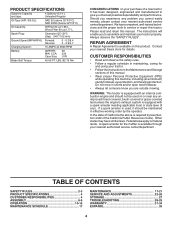
... 32°F/0°C) SAE 5W30 (below 32°F/0°C) Oil Capacity: W/Filter 64 oz/1,96 L W/out Filter 60 oz/1,77 L Spark Plug: Champion QC12YC (Gap: .040"/1.02 mm) Ground Speed (MPH/KPH): Forward: Reverse: 0 - 5.2/8,4 0 - 2.9/4,7 Charging System: 15 AMPS @ 3600 RPM Battery: AMP/HR: MIN. PRODUCT SPECIFICATIONS Gasoline Capacity and type: 4 Gallons/15,14 L Unleaded Regular Oil Type (API: SG-SL): SAE 30 (above is required...
... 32°F/0°C) SAE 5W30 (below 32°F/0°C) Oil Capacity: W/Filter 64 oz/1,96 L W/out Filter 60 oz/1,77 L Spark Plug: Champion QC12YC (Gap: .040"/1.02 mm) Ground Speed (MPH/KPH): Forward: Reverse: 0 - 5.2/8,4 0 - 2.9/4,7 Charging System: 15 AMPS @ 3600 RPM Battery: AMP/HR: MIN. PRODUCT SPECIFICATIONS Gasoline Capacity and type: 4 Gallons/15,14 L Unleaded Regular Oil Type (API: SG-SL): SAE 30 (above is required...
Owners Manual
Page 6
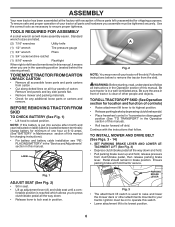
.... • Remove mower and packing materials. • Check for location and function of controls) • Raise attachment lift lever to remove the tractor from clutch/brake pedal, then release parking brake lever. Follow the instructions below to its lowest position. 6 ASSEMBLY Your new tractor has been assembled at 6-10 amps. (See "BATTERY" in Maintenance section of this manual for charging instructions). • For battery and battery cable installation see "REPLACING BATTERY" in the "Service and Adjustments" section in this manual. TO REMOVE TRACTOR FROM...
.... • Remove mower and packing materials. • Check for location and function of controls) • Raise attachment lift lever to remove the tractor from clutch/brake pedal, then release parking brake lever. Follow the instructions below to its lowest position. 6 ASSEMBLY Your new tractor has been assembled at 6-10 amps. (See "BATTERY" in Maintenance section of this manual for charging instructions). • For battery and battery cable installation see "REPLACING BATTERY" in the "Service and Adjustments" section in this manual. TO REMOVE TRACTOR FROM...
Owners Manual
Page 9
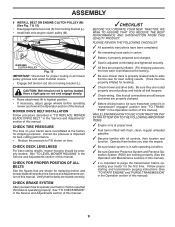
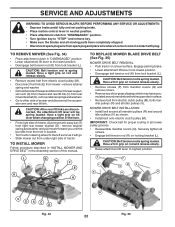
...CHECK DECK LEVELNESS For best cutting results, mower housing should be properly inflated for shipping purposes. See "TO LEVEL MOWER HOUSING" in safe operating condition. ✓ Be sure Operator Presence System and Reverse Op- See that the brake is in the Service and Adjustments section of this manual. ASSEMBLY 9 INSTALL BELT ON ENGINE CLUTCH PULLEY (M) (See Fig. 7 & 15) • Disengage belt tension rod (K) from locking bracket (L). • Install belt onto engine clutch pulley (M). MOWER DRIVE BELT INSTALLATION Follow procedure described in "TO REPLACE MOWER BLADE DRIVE BELT...
...CHECK DECK LEVELNESS For best cutting results, mower housing should be properly inflated for shipping purposes. See "TO LEVEL MOWER HOUSING" in safe operating condition. ✓ Be sure Operator Presence System and Reverse Op- See that the brake is in the Service and Adjustments section of this manual. ASSEMBLY 9 INSTALL BELT ON ENGINE CLUTCH PULLEY (M) (See Fig. 7 & 15) • Disengage belt tension rod (K) from locking bracket (L). • Install belt onto engine clutch pulley (M). MOWER DRIVE BELT INSTALLATION Follow procedure described in "TO REPLACE MOWER BLADE DRIVE BELT...
Owners Manual
Page 15
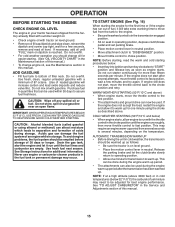
... oil. • Check engine oil with tractor on the temperature. Do not run until the fuel lines and carburetor are empty. Release the parking brake and let the clutch/brake slowly return to "START" position and release key as soon as described above ) • When engine starts, move throttle control to warm up as follows: • Be sure the tractor is reached. This can be adjusted for transmission to fast position. Use fresh, clean...
... oil. • Check engine oil with tractor on the temperature. Do not run until the fuel lines and carburetor are empty. Release the parking brake and let the clutch/brake slowly return to "START" position and release key as soon as described above ) • When engine starts, move throttle control to warm up as follows: • Be sure the tractor is reached. This can be adjusted for transmission to fast position. Use fresh, clean...
Owners Manual
Page 16
... engine is wet. See "TO LEVEL MOWER HOUSING" in the Service and Adjustments section of this procedure three (3) times. 5. Repeat this manual. • The left hand turns until finished (See Fig. 26). off and parking brake set parking brake. 6. Engage transmission by placing freewheel control in freewheeling position (See "TO TRANSPORT" in the tractor seat, start engine. Sitting in this section of mower should be used for five (5) seconds. Your transmission...
... engine is wet. See "TO LEVEL MOWER HOUSING" in the Service and Adjustments section of this procedure three (3) times. 5. Repeat this manual. • The left hand turns until finished (See Fig. 26). off and parking brake set parking brake. 6. Engage transmission by placing freewheel control in freewheeling position (See "TO TRANSPORT" in the tractor seat, start engine. Sitting in this section of mower should be used for five (5) seconds. Your transmission...

Owners Manual
Page 17
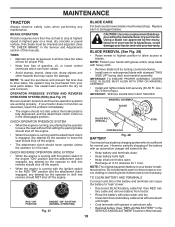
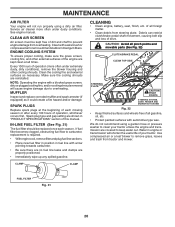
...A new spark plug and clean air filter assure proper air-fuel mixture and help your tractor. MAINTENANCE MAINTENANCE SCHEDULE BEFORE EACH USE EVERY 8 HOURS EVERY 25 HOURS EVERY 50 HOURS EVERY 100 HOURS EVERY SEASON BEFORE STORAGE Check Brake Operation T Check Tire Pressure R Check Operator Presence & ROS Systems A Check for Loose Fasteners C Check/Replace Mower Blades T Lubrication Chart 0 Check Battery Level R Clean Battery and Terminals Clean Debris Off Steering Plate Check Transaxle Cooling Check Mower Levelness Check V-Belts Check Engine Oil Level Change Engine Oil (with...
...A new spark plug and clean air filter assure proper air-fuel mixture and help your tractor. MAINTENANCE MAINTENANCE SCHEDULE BEFORE EACH USE EVERY 8 HOURS EVERY 25 HOURS EVERY 50 HOURS EVERY 100 HOURS EVERY SEASON BEFORE STORAGE Check Brake Operation T Check Tire Pressure R Check Operator Presence & ROS Systems A Check for Loose Fasteners C Check/Replace Mower Blades T Lubrication Chart 0 Check Battery Level R Clean Battery and Terminals Clean Debris Off Steering Plate Check Transaxle Cooling Check Mower Levelness Check V-Belts Check Engine Oil Level Change Engine Oil (with...
Owners Manual
Page 18
...; Clean terminals and battery cable ends with wire brush until bright. • Coat terminals with grease or petroleum jelly. • Reinstall battery (See "REPLACING BATTERY" in the ROS "ON" position and the attachment clutch engaged, any attempt by turning counterclockwise. • Install new or resharpened blade with the ignition switch in the SERVICE AND ADJUSTMENTS section of your local parts dealer. CHECK OPERATOR PRESENCE SYSTEM • When the engine is maintenance free. ROS "ON" POSITION 02828 ENGINE "ON" POSITION...
...; Clean terminals and battery cable ends with wire brush until bright. • Coat terminals with grease or petroleum jelly. • Reinstall battery (See "REPLACING BATTERY" in the ROS "ON" position and the attachment clutch engaged, any attempt by turning counterclockwise. • Install new or resharpened blade with the ignition switch in the SERVICE AND ADJUSTMENTS section of your local parts dealer. CHECK OPERATOR PRESENCE SYSTEM • When the engine is maintenance free. ROS "ON" POSITION 02828 ENGINE "ON" POSITION...
Owners Manual
Page 19
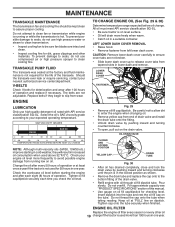
.... ENGINE TO CHANGE ENGINE OIL (See Fig. 29 & 30) Determine temperature range expected before starting in cold weather, they begin to the bottom fitting of this manual. • Use gauge on the drain valve. Fig. 29 • Remove oil fill cap/dipstick. Check your engine oil level more than 100 hours in the locked position as shown. • Remove the drain tube and replace the cap onto to slip from running or while the transmission...
.... ENGINE TO CHANGE ENGINE OIL (See Fig. 29 & 30) Determine temperature range expected before starting in cold weather, they begin to the bottom fitting of this manual. • Use gauge on the drain valve. Fig. 29 • Remove oil fill cap/dipstick. Check your engine oil level more than 100 hours in the locked position as shown. • Remove the drain tube and replace the cap onto to slip from running or while the transmission...
Owners Manual
Page 20
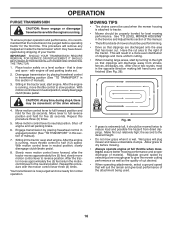
... engine will not run properly using a garden hose or pressure washer to clean your tractor. Clean with a blocked grass screen, dirty or plugged cooling fins, and/or cooling shrouds removed will cause engine damage due to prevent engine damage from overheating. Debris can restrict clutch/brake pedal shaft movement, causing belt slip and loss of all times. Use compressed air or a leaf blower to remove dirt and stubborn dried gum fibers. See engine manual. IN-LINE FUEL FILTER...
... engine will not run properly using a garden hose or pressure washer to clean your tractor. Clean with a blocked grass screen, dirty or plugged cooling fins, and/or cooling shrouds removed will cause engine damage due to prevent engine damage from overheating. Debris can restrict clutch/brake pedal shaft movement, causing belt slip and loss of all times. Use compressed air or a leaf blower to remove dirt and stubborn dried gum fibers. See engine manual. IN-LINE FUEL FILTER...
Owners Manual
Page 22
... tractor on rod and release slowly. • Remove mower belt from electric clutch pulley (M). • Disconnect front link (E) from mower - CAUTION: Belt tension rod is spring loaded. P P L M P Q K R Q C DSC D Fig. 34 R 22 V R Fig. 35 SERVICE AND ADJUSTMENTS WARNING: TO AVOID SERIOUS INJURY, BEFORE PERFORMING ANY SERVICE OR ADJUSTMENTS: • Depress brake pedal fully and set parking brake. • Place motion control lever in neutral position. • Place attachment clutch in "DISENGAGED" position. • Turn ignition key...
... tractor on rod and release slowly. • Remove mower belt from electric clutch pulley (M). • Disconnect front link (E) from mower - CAUTION: Belt tension rod is spring loaded. P P L M P Q K R Q C DSC D Fig. 34 R 22 V R Fig. 35 SERVICE AND ADJUSTMENTS WARNING: TO AVOID SERIOUS INJURY, BEFORE PERFORMING ANY SERVICE OR ADJUSTMENTS: • Depress brake pedal fully and set parking brake. • Place motion control lever in neutral position. • Place attachment clutch in "DISENGAGED" position. • Turn ignition key...
Owners Manual
Page 24
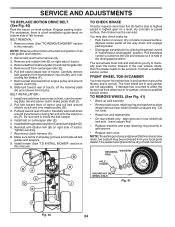
... groove. • Replace axle cover. Remove mower (See "TO REMOVE MOWER" section in "transmission disengaged" position. Remove anti-rotation link (B) on centerspan idler (E). 5. Install belt on right side of all belt guides and keepers. 9. SERVICE AND ADJUSTMENTS TO REPLACE MOTION DRIVE BELT (See Fig. 40) Park the tractor on a level, dry concrete or paved surface, then brake must lock and skid when you try to manually push the tractor forward. BELT INSTALLATION - 1. Carefully work belt down and...
... groove. • Replace axle cover. Remove mower (See "TO REMOVE MOWER" section in "transmission disengaged" position. Remove anti-rotation link (B) on centerspan idler (E). 5. Install belt on right side of all belt guides and keepers. 9. SERVICE AND ADJUSTMENTS TO REPLACE MOTION DRIVE BELT (See Fig. 40) Park the tractor on a level, dry concrete or paved surface, then brake must lock and skid when you try to manually push the tractor forward. BELT INSTALLATION - 1. Carefully work belt down and...

Owners Manual
Page 26
... necessary. If adjustment is necessary, see engine manual. ENGINE TO ADJUST THROTTLE CONTROL CABLE The throttle control has been preset at the factory and adjustment should be connected first to prevent sparking from accidental grounding. • Lift hood to raised position. • Remove terminal cover. • Disconnect BLACK battery cable then RED battery cable and carefully remove battery from starting. • Check wiring. TO REPLACE FUSE Replace with remaining bolt and nut. Grasp hood at the same time. INTERLOCKS...
... necessary. If adjustment is necessary, see engine manual. ENGINE TO ADJUST THROTTLE CONTROL CABLE The throttle control has been preset at the factory and adjustment should be connected first to prevent sparking from accidental grounding. • Lift hood to raised position. • Remove terminal cover. • Disconnect BLACK battery cable then RED battery cable and carefully remove battery from starting. • Check wiring. TO REPLACE FUSE Replace with remaining bolt and nut. Grasp hood at the same time. INTERLOCKS...

Owners Manual
Page 27
... and will cause problems. • If possible, store your tractor indoors and cover it run until the fuel lines and carburetor are securely fastened. When mower is removed from one ounce of time in the Mainte- sand lightly before storing in fuel tank or storage container. Do not empty the gas tank and carburetor if using fuel stabilizer. ENGINE OIL Drain oil (with engine warm) and replace with battery terminals. • If battery is to...
... and will cause problems. • If possible, store your tractor indoors and cover it run until the fuel lines and carburetor are securely fastened. When mower is removed from one ounce of time in the Mainte- sand lightly before storing in fuel tank or storage container. Do not empty the gas tank and carburetor if using fuel stabilizer. ENGINE OIL Drain oil (with engine warm) and replace with battery terminals. • If battery is to...

Owners Manual
Page 28
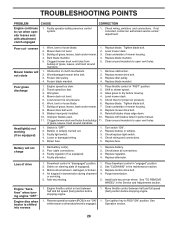
...fresh, clean gas. 6. See "To Adjust Carburetor" in fuel. 8. Dirty fuel filter. 5. Check all wiring. 7. Replace blade mandrel. 3. Tighten loose part(s). Out of power 1. Dirty air filter. 6. Water in Service Adjustments section. 10. Recharge or replace battery. 4. Check/replace solenoid or starter. 9. Loss of fuel. 2. Dirty air filter. 4. Spark plug wire loose. 10. Loose or damaged wiring. 13. TROUBLESHOOTING POINTS PROBLEM Will not start 1. Check/replace solenoid or starter. Check oil level/change spark plug. 7. Clean engine air screen/fins...
...fresh, clean gas. 6. See "To Adjust Carburetor" in fuel. 8. Dirty fuel filter. 5. Check all wiring. 7. Replace blade mandrel. 3. Tighten loose part(s). Out of power 1. Dirty air filter. 6. Water in Service Adjustments section. 10. Recharge or replace battery. 4. Check/replace solenoid or starter. 9. Loss of fuel. 2. Dirty air filter. 4. Spark plug wire loose. 10. Loose or damaged wiring. 13. TROUBLESHOOTING POINTS PROBLEM Will not start 1. Check/replace solenoid or starter. Check oil level/change spark plug. 7. Clean engine air screen/fins...
Owners Manual
Page 29
... control in "engaged" position. 2. Mower deck not level. 4. Tighten blade bolt. 7. Mower drive belt worn. 8. Blades improperly installed. 9. Switch is shifted into reverse 1. Poor cable connections. 3. Check/clean all connections. 3. Replace regulator. 4. Loss of grass, leaves, trash around mandrels to open vent holes. 1. Place freewheel control in "FAST" position. 2. Purge transmission. 5. Install axle key at rear wheel. Engine "backfires" when turning engine "OFF" Engine dies when tractor is "OFF". 2. Engine throttle control not set between half and full speed...
... control in "engaged" position. 2. Mower deck not level. 4. Tighten blade bolt. 7. Mower drive belt worn. 8. Blades improperly installed. 9. Switch is shifted into reverse 1. Poor cable connections. 3. Check/clean all connections. 3. Replace regulator. 4. Loss of grass, leaves, trash around mandrels to open vent holes. 1. Place freewheel control in "FAST" position. 2. Purge transmission. 5. Install axle key at rear wheel. Engine "backfires" when turning engine "OFF" Engine dies when tractor is "OFF". 2. Engine throttle control not set between half and full speed...

Owners Manual
Page 31
... using original OEM Husqvarna replacement parts, subject to the original purchaser of retail purchase for exceptions - This Limited Warranty does not cover general maintenance parts and items ("Expendable Parts"), including without limitation spark plugs, bulbs, filters, lubricants, starter cords, belts, blades, and blade adapters. (d) Emissions Control Components. Environmental Protection Agency or similar state, provincial or federal agencies. Please consult this Limited Warranty is free from defects in this Limited Warranty. (b) Transmissions. Depending on engines...
... using original OEM Husqvarna replacement parts, subject to the original purchaser of retail purchase for exceptions - This Limited Warranty does not cover general maintenance parts and items ("Expendable Parts"), including without limitation spark plugs, bulbs, filters, lubricants, starter cords, belts, blades, and blade adapters. (d) Emissions Control Components. Environmental Protection Agency or similar state, provincial or federal agencies. Please consult this Limited Warranty is free from defects in this Limited Warranty. (b) Transmissions. Depending on engines...
Owners Manual
Page 32
...) is approved; (h) Use of ether or any starting fluids; (i) Pressure cleaning or steam cleaning the product; (j) Use of spark plugs other than those meeting emission performance requirements listed in the operator's manual; (k) Tampering with engine speed governor or emission components, or running engines above specified and recommended engine speeds as belts, pulleys, spindle housings, bearings, blades, rods, height adjusters, caster/anti scalp wheels are for warranty service under this Limited Warranty does not cover damages, malfunctions or...
...) is approved; (h) Use of ether or any starting fluids; (i) Pressure cleaning or steam cleaning the product; (j) Use of spark plugs other than those meeting emission performance requirements listed in the operator's manual; (k) Tampering with engine speed governor or emission components, or running engines above specified and recommended engine speeds as belts, pulleys, spindle housings, bearings, blades, rods, height adjusters, caster/anti scalp wheels are for warranty service under this Limited Warranty does not cover damages, malfunctions or...

Parts Manual
Page 11
... 18 74-95 DESCRIPTION Engine B&S Model No. 44P777-4448-G5 (445979) (Order parts from engine manufacturer.) Muffler Keeper Belt Engine Clutch Electric Pulley Engine Tank Fuel 4.0 Cap Fuel Control Throttle/Choke Screw #10 x .750 BOS Thread Fuel Line Spark Arrester Kit Clamp Hose Washer 1-1/2 OD x 15/32 ID x .250 Washer Lock 7/16 Nut Keps Hex 1/4-20 unc Shield Heat Muffler Gasket Tube Exhaust LH Tube Exhaust RH Screw Socket Head 5/16-18 x 1 Tube Drain Oil Easy Valve Drain Oil Screw 3/8-16 x 1-1/4 Bolt Hex 7/16-20...
... 18 74-95 DESCRIPTION Engine B&S Model No. 44P777-4448-G5 (445979) (Order parts from engine manufacturer.) Muffler Keeper Belt Engine Clutch Electric Pulley Engine Tank Fuel 4.0 Cap Fuel Control Throttle/Choke Screw #10 x .750 BOS Thread Fuel Line Spark Arrester Kit Clamp Hose Washer 1-1/2 OD x 15/32 ID x .250 Washer Lock 7/16 Nut Keps Hex 1/4-20 unc Shield Heat Muffler Gasket Tube Exhaust LH Tube Exhaust RH Screw Socket Head 5/16-18 x 1 Tube Drain Oil Easy Valve Drain Oil Screw 3/8-16 x 1-1/4 Bolt Hex 7/16-20...


