
Owners Manual
Page 2
...Keep machine free of grass, leaves or other safety devices in a large percentage of riding mower-related injuries. Use common sense when towing. GENERAL OPERATION • Read, understand, and follow all parts to come to prevent accidental starting , stopping, or turning on the slopes slow and gradual... Do not operate the machine while under the machine. Operation on all movement on a slope. Tall grass can touch hot exhaust / engine parts and burn. WARNING: In order to a complete stop before cleaning the machine, removing the grass catcher, or unclogging the discharge chute. &#...
...Keep machine free of grass, leaves or other safety devices in a large percentage of riding mower-related injuries. Use common sense when towing. GENERAL OPERATION • Read, understand, and follow all parts to come to prevent accidental starting , stopping, or turning on the slopes slow and gradual... Do not operate the machine while under the machine. Operation on all movement on a slope. Tall grass can touch hot exhaust / engine parts and burn. WARNING: In order to a complete stop before cleaning the machine, removing the grass catcher, or unclogging the discharge chute. &#...

Owners Manual
Page 3
...176; Max), not across. SAFETY RULES Safe Operation Practices for small children. • Never carry children, even with manufacturer's recommended parts, when necessary. • Mower blades are often attracted to the presence of 15°. Repair, if necessary, before restarting. • Never make any fuel-soaked ... shrubs, trees, or other than the operator. • Be alert and turn machine off . Mow up and down for Ride-On Mowers III. Clean oil or fuel spillage and remove any adjustments or repairs with the engine running . Adjust and service as required. •...
...176; Max), not across. SAFETY RULES Safe Operation Practices for small children. • Never carry children, even with manufacturer's recommended parts, when necessary. • Mower blades are often attracted to the presence of 15°. Repair, if necessary, before restarting. • Never make any fuel-soaked ... shrubs, trees, or other than the operator. • Be alert and turn machine off . Mow up and down for Ride-On Mowers III. Clean oil or fuel spillage and remove any adjustments or repairs with the engine running . Adjust and service as required. •...

Owners Manual
Page 5
Washer (1) 3/8-16 Locknut Slope Sheet (2) Hex Bolts (2) Nut Keps *Installed by Dealer *Brush Guard Kit (1) Quick Connect 5 Washers (1) Small Retainer Springs Battery (1) Shoulder Bolt (1) Wheel (1) Oil Drain Tube Keys (2) Keys (1) 1-1/4 O.D. Washers (2) Rear Lift Link Assemblies (1) Small Retainer Springs (5) Large Retainer Springs (1) Front Lift Link Assembly If Equipped (1) Anti-Sway Bar (1) 3/4 O.D. UNASSEMBLED PARTS Mower Mower Front Wheel (5) 1-3/16 O.D.
Washer (1) 3/8-16 Locknut Slope Sheet (2) Hex Bolts (2) Nut Keps *Installed by Dealer *Brush Guard Kit (1) Quick Connect 5 Washers (1) Small Retainer Springs Battery (1) Shoulder Bolt (1) Wheel (1) Oil Drain Tube Keys (2) Keys (1) 1-1/4 O.D. Washers (2) Rear Lift Link Assemblies (1) Small Retainer Springs (5) Large Retainer Springs (1) Front Lift Link Assembly If Equipped (1) Anti-Sway Bar (1) 3/4 O.D. UNASSEMBLED PARTS Mower Mower Front Wheel (5) 1-3/16 O.D.
Owners Manual
Page 6
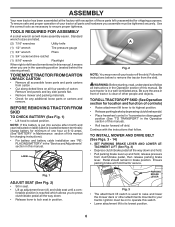
...wrench sizes are in the operating position (seated behind the steering wheel). TO REMOVE TRACTOR FROM CARTON UNPACK CARTON • Remove all accessible loose parts and parts cartons from carton . • Cut along dotted lines on all the way down and hold. • Pull parking brake lever up adjustment...in this manual, it means when you are listed. Remove end panels and lay side panels flat. • Remove mower and packing materials. • Check for any additional loose parts or cartons and remove. LABEL Fig. 2 NOTE: You may now roll your tractor all the way down . •...
...wrench sizes are in the operating position (seated behind the steering wheel). TO REMOVE TRACTOR FROM CARTON UNPACK CARTON • Remove all accessible loose parts and parts cartons from carton . • Cut along dotted lines on all the way down and hold. • Pull parking brake lever up adjustment...in this manual, it means when you are listed. Remove end panels and lay side panels flat. • Remove mower and packing materials. • Check for any additional loose parts or cartons and remove. LABEL Fig. 2 NOTE: You may now roll your tractor all the way down . •...
Owners Manual
Page 9
... section of this manual. PLEASE REVIEW THE FOLLOWING CHECKLIST: ✓ All assembly instructions have been completed. ✓ No remaining loose parts in carton. ✓ Battery is properly prepared and charged. ✓ Seat is important to purge the transmission before you learn how...instructions (See "TO START ENGINE" and "PURGE TRANSMISSION" in this manual. Correct tire pressure is operating properly. See "TO LEVEL MOWER HOUSING" in "transmission engaged" position (see that all connections are still secure and wires are routed properly around pulleys and inside all ...
... section of this manual. PLEASE REVIEW THE FOLLOWING CHECKLIST: ✓ All assembly instructions have been completed. ✓ No remaining loose parts in carton. ✓ Battery is properly prepared and charged. ✓ Seat is important to purge the transmission before you learn how...instructions (See "TO START ENGINE" and "PURGE TRANSMISSION" in this manual. Correct tire pressure is operating properly. See "TO LEVEL MOWER HOUSING" in "transmission engaged" position (see that all connections are still secure and wires are routed properly around pulleys and inside all ...
Owners Manual
Page 18
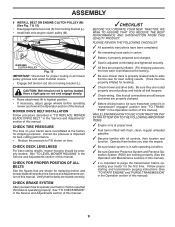
...replacement blade approved by the operator to slow leaks, tire sealant may cause tire damage. BLADE REMOVAL (See Fig. 28) • Raise mower to highest position to allow access to "leak" power. • Disconnect BLACK battery cable first then RED battery cable and remove battery from...clutch should shut off the engine. • When the engine is maintenance free. Using a blade not approved by the manufacturer of your local parts dealer. IMPORTANT: SPECIAL BLADE BOLT HEAT TREATED. MANDREL ASSEMBLY BLADE BLADE BOLT (SPECIAL) STAR CENTER HOLE BATTERY Fig. 28 Your tractor has ...
...replacement blade approved by the operator to slow leaks, tire sealant may cause tire damage. BLADE REMOVAL (See Fig. 28) • Raise mower to highest position to allow access to "leak" power. • Disconnect BLACK battery cable first then RED battery cable and remove battery from...clutch should shut off the engine. • When the engine is maintenance free. Using a blade not approved by the manufacturer of your local parts dealer. IMPORTANT: SPECIAL BLADE BOLT HEAT TREATED. MANDREL ASSEMBLY BLADE BLADE BOLT (SPECIAL) STAR CENTER HOLE BATTERY Fig. 28 Your tractor has ...
Owners Manual
Page 20
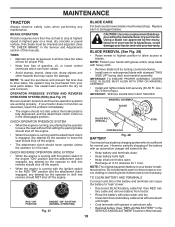
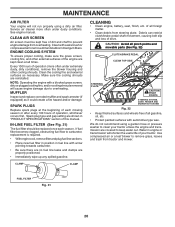
...washer to prevent engine damage from overheating. CAUTION: Avoid all pinch points and movable parts (See Fig. 32) CLUTCH/BRAKE PEDAL CLEAN TOP SIDE STEERING PLATE CAUTION: PINCH POINTS STEERING SYSTEM, DASH, FENDER AND MOWER NOT SHOWN Fig. 32 • Keep finished surfaces and wheels free of all ... could create a fire hazard and/or damage. SPARK PLUGS Replace spark plugs at all foreign matter. • Clean debris from tractor and mower. Debris can restrict clutch/brake pedal shaft movement, causing belt slip and loss of dirt and chaff to clean your tractor. CLAMP CLAMP CLEANING...
...washer to prevent engine damage from overheating. CAUTION: Avoid all pinch points and movable parts (See Fig. 32) CLUTCH/BRAKE PEDAL CLEAN TOP SIDE STEERING PLATE CAUTION: PINCH POINTS STEERING SYSTEM, DASH, FENDER AND MOWER NOT SHOWN Fig. 32 • Keep finished surfaces and wheels free of all ... could create a fire hazard and/or damage. SPARK PLUGS Replace spark plugs at all foreign matter. • Clean debris from tractor and mower. Debris can restrict clutch/brake pedal shaft movement, causing belt slip and loss of dirt and chaff to clean your tractor. CLAMP CLAMP CLEANING...
Owners Manual
Page 21
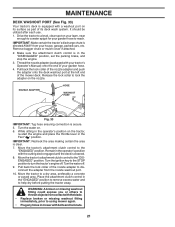
... from the nozzle washout port. 10. Turn the water on its deck wash system. Pull back the lock collar of its surface as part of the nozzle adapter to lock the adapter on the nozzle. Place the attachment clutch control in the operator's position with the cutting deck...you or others to thrown objects from your garden hose. 4. Thread the nozzle adapter (packaged with your tractor's Operator's Manual) onto the end of the mower deck. MAINTENANCE DECK WASHOUT PORT (See Fig. 33) Your tractor's deck is equipped with a washout port on . 6. Move the tractor's attachment clutch ...
... from the nozzle washout port. 10. Turn the water on its deck wash system. Pull back the lock collar of its surface as part of the nozzle adapter to lock the adapter on the nozzle. Place the attachment clutch control in the operator's position with the cutting deck...you or others to thrown objects from your garden hose. 4. Thread the nozzle adapter (packaged with your tractor's Operator's Manual) onto the end of the mower deck. MAINTENANCE DECK WASHOUT PORT (See Fig. 33) Your tractor's deck is equipped with a washout port on . 6. Move the tractor's attachment clutch ...
Owners Manual
Page 22
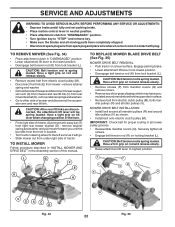
... from electric clutch pulley (M). • Disconnect front link (E) from right rear mower bracket (D) - Have a tight grip on rod and release slowly. • Raise attachment lift lever to "STOP" and remove key. • Make sure the blades and all moving parts have accumulated around mandrels and entire upper deck surface. • Remove belt...
... from electric clutch pulley (M). • Disconnect front link (E) from right rear mower bracket (D) - Have a tight grip on rod and release slowly. • Raise attachment lift lever to "STOP" and remove key. • Make sure the blades and all moving parts have accumulated around mandrels and entire upper deck surface. • Remove belt...
Owners Manual
Page 24
...Remove anti-rotation link (B) on right side of tractor and roll belt around electric clutch (G). 8. Remove belt from your local parts dealer. Install new belt from transmission input pulley and over the steering plate (H) and above clutch brake pedal shaft (J). 2. ... placing freewheel control in the disengaged position. If damage has occurred to front, over cooling fan blades (F). 7. Remove mower (See "TO REMOVE MOWER" section in this manual). Pull belt slack toward rear of left footrest. Installbeltthroughstationaryidler(C)andclutchingidler(D). 6. Do not lose). &#...
...Remove anti-rotation link (B) on right side of tractor and roll belt around electric clutch (G). 8. Remove belt from your local parts dealer. Install new belt from transmission input pulley and over the steering plate (H) and above clutch brake pedal shaft (J). 2. ... placing freewheel control in the disengaged position. If damage has occurred to front, over cooling fan blades (F). 7. Remove mower (See "TO REMOVE MOWER" section in this manual). Pull belt slack toward rear of left footrest. Installbeltthroughstationaryidler(C)andclutchingidler(D). 6. Do not lose). &#...

Owners Manual
Page 27
...are empty. • Never use plastic. ENGINE FUEL SYSTEM IMPORTANT: IT IS IMPORTANT TO PREVENT GUM DEPOSITS FROM FORMING IN ESSENTIAL FUEL SYSTEM PARTS SUCH AS CARBURETOR, FUEL FILTER, FUEL HOSE, OR TANK DURING STORAGE. Allow the engine to cool before painting. Run engine at the end... least 10 minutes after adding stabilizer to allow the stabilizer to reach the carburetor. WARNING: Never store the tractor with new spark plug(s). TRACTOR Remove mower from one ounce of time, clean it thoroughly, remove all dirt, grease, leaves, etc. Store in a clean, dry area. • Clean ...
...are empty. • Never use plastic. ENGINE FUEL SYSTEM IMPORTANT: IT IS IMPORTANT TO PREVENT GUM DEPOSITS FROM FORMING IN ESSENTIAL FUEL SYSTEM PARTS SUCH AS CARBURETOR, FUEL FILTER, FUEL HOSE, OR TANK DURING STORAGE. Allow the engine to cool before painting. Run engine at the end... least 10 minutes after adding stabilizer to allow the stabilizer to reach the carburetor. WARNING: Never store the tractor with new spark plug(s). TRACTOR Remove mower from one ounce of time, clean it thoroughly, remove all dirt, grease, leaves, etc. Store in a clean, dry area. • Clean ...

Owners Manual
Page 28
.... 12. Clean/replace muffler. 13. Carburetor out of grass, leaves, trash under mower. 3. Contact an authorized service center/department. Loose/damaged part(s). 1. Dirty fuel filter. 7. Wait several minutes before attempting to start 1. Empty fuel... Recharge or replace battery. 4. Weak or dead battery. 4. Connect and tighten spark plug wire. 11. Excessive vibration 1. Tighten loose part(s). Out of adjustment. 15. Engine flooded. 4. Disengage attachment clutch. 3. Replace fuse. 5. Corroded battery terminals. 3. Faulty solenoid or...
.... 12. Clean/replace muffler. 13. Carburetor out of grass, leaves, trash under mower. 3. Contact an authorized service center/department. Loose/damaged part(s). 1. Dirty fuel filter. 7. Wait several minutes before attempting to start 1. Empty fuel... Recharge or replace battery. 4. Weak or dead battery. 4. Connect and tighten spark plug wire. 11. Excessive vibration 1. Tighten loose part(s). Out of adjustment. 15. Engine flooded. 4. Disengage attachment clutch. 3. Replace fuse. 5. Corroded battery terminals. 3. Faulty solenoid or...
Owners Manual
Page 29
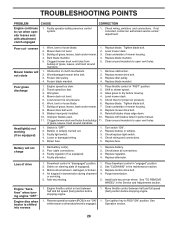
...Blades improperly installed. 9. Reinstall blades sharp edge down. 10. Check/clean all connections. 3. Replace regulator. 4. Axle key missing. 1. Mower deck not level. 3. Replace idler pulley. 4. Improper blades used. 10. Turn switch "ON". 2. Replace fuse. Freewheel control in... air pressure. 6. Switch is "OFF". 2. Clogged mower deck vent holes from buildup of mower housing. 8. TROUBLESHOOTING POINTS PROBLEM CAUSE Engine continues to run when operator leaves seat with blades listed in parts manual. 11. Tighten blade bolt. 2. Replace blade mandrel...
...Blades improperly installed. 9. Reinstall blades sharp edge down. 10. Check/clean all connections. 3. Replace regulator. 4. Axle key missing. 1. Mower deck not level. 3. Replace idler pulley. 4. Improper blades used. 10. Turn switch "ON". 2. Replace fuse. Freewheel control in... air pressure. 6. Switch is "OFF". 2. Clogged mower deck vent holes from buildup of mower housing. 8. TROUBLESHOOTING POINTS PROBLEM CAUSE Engine continues to run when operator leaves seat with blades listed in parts manual. 11. Tighten blade bolt. 2. Replace blade mandrel...
Owners Manual
Page 32
... only mechanical components/parts such as belts, pulleys, spindle housings, bearings, blades, rods, height adjusters, caster/anti scalp wheels are NOT covered: (a) Abrasion to mower decks, including sand wear; (b) Damage to help ensure, among other than an authorized Husqvarna servicing dealer during the... hours of 8:00 AM to an authorized Husqvarna Servicing Dealer for pick-up or return of your ...
... only mechanical components/parts such as belts, pulleys, spindle housings, bearings, blades, rods, height adjusters, caster/anti scalp wheels are NOT covered: (a) Abrasion to mower decks, including sand wear; (b) Damage to help ensure, among other than an authorized Husqvarna servicing dealer during the... hours of 8:00 AM to an authorized Husqvarna Servicing Dealer for pick-up or return of your ...

Owners Manual
Page 33
...* Other Non-Expendable Components* Spreaders * * *2 Years (2nd Year Parts Only) *2 Years-1365GN (2nd Year Parts Only) * No Warranty 33 Consumer Wheeled Limited Warranty Chart 2012 Consumer ...Tillers, Snow Throwers Engine* * Other Non-Expendable Components 2 Years Tiller Tines *** Walk Behind Mowers, High Wheel Trimmer Engine* * Battery 1 Year Pro-rated Other Non-Expendable Components 3 ..., Chassis, Front Axle 5 Years No Warranty Engine* * * Transmission (if made by Husqvarna/Peerless) 3 Years No Warranty Transmission (if third party)** ** ** XLS Models only ...
...* Other Non-Expendable Components* Spreaders * * *2 Years (2nd Year Parts Only) *2 Years-1365GN (2nd Year Parts Only) * No Warranty 33 Consumer Wheeled Limited Warranty Chart 2012 Consumer ...Tillers, Snow Throwers Engine* * Other Non-Expendable Components 2 Years Tiller Tines *** Walk Behind Mowers, High Wheel Trimmer Engine* * Battery 1 Year Pro-rated Other Non-Expendable Components 3 ..., Chassis, Front Axle 5 Years No Warranty Engine* * * Transmission (if made by Husqvarna/Peerless) 3 Years No Warranty Transmission (if third party)** ** ** XLS Models only ...

Owners Manual
Page 34
...shell is for the BALANCE of the warranty period applicable to the part or accessory that was replaced. Two (2) Year Consumer warranty, parts & labor, with Husqvarna. One (1) Year Commercial warranty, parts & labor, with Hydro-Gear Distributor network. Deck Shell replacement will... than Product/Component Rental Use) 1 Year 1 Year Exhibit A Rental (any rental usage) 1 Year Robotic Mowers Robotic Mower 2 Years 90 days 90 days Battery 1 Year 1 Year 1 Year Parts & Accessories (if purchased) Accessories (e.g., grass catcher, bumper guard accessories, etc. 1 Year No Warranty No...
...shell is for the BALANCE of the warranty period applicable to the part or accessory that was replaced. Two (2) Year Consumer warranty, parts & labor, with Husqvarna. One (1) Year Commercial warranty, parts & labor, with Hydro-Gear Distributor network. Deck Shell replacement will... than Product/Component Rental Use) 1 Year 1 Year Exhibit A Rental (any rental usage) 1 Year Robotic Mowers Robotic Mower 2 Years 90 days 90 days Battery 1 Year 1 Year 1 Year Parts & Accessories (if purchased) Accessories (e.g., grass catcher, bumper guard accessories, etc. 1 Year No Warranty No...

Parts Manual
Page 15
... Shaft Asm. Bushing Tension Relief Nut Lock Flange 7/16-14 Gr. 5 Stud Fastener w/"D" Anti-Rotation Nut Lock Hex Flange Arm Susp. LGT2654 (96045004000), PRODUCT NO. 960 45 00-40 MOWER DECK KEY PART NO. w/Lower Bearing Housing, Mandrel Washer 3/8 Bearing, Ball, Mandrel Bolt Carriage 5/16-18 x 5/8 Pin Cotter 5/16 Bowtie Nut, Crownlock 5/16...
... Shaft Asm. Bushing Tension Relief Nut Lock Flange 7/16-14 Gr. 5 Stud Fastener w/"D" Anti-Rotation Nut Lock Hex Flange Arm Susp. LGT2654 (96045004000), PRODUCT NO. 960 45 00-40 MOWER DECK KEY PART NO. w/Lower Bearing Housing, Mandrel Washer 3/8 Bearing, Ball, Mandrel Bolt Carriage 5/16-18 x 5/8 Pin Cotter 5/16 Bowtie Nut, Crownlock 5/16...

Parts Manual
Page 16
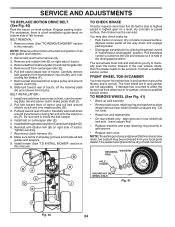
... RH Grip, Lever Spring Torsion Pin Cotter 7/16 Bow Tie Lock Spring Lift Assist Washer Clear Zinc KEY PART NO. inches 1 inch = 25.4 mm 16 MODEL NO. LGT2654 (96045004000), PRODUCT NO. 960 45 00-40 MOWER LIFT 87 7 87 3 10 97 90 98 89 88 2 91 87 89 97 91 lift-tex_23 89... 87 KEY PART NO. Front Mower NOTE: All component dimensions given in U.S. NO. 90 532 19 42-08 91 532 40...
... RH Grip, Lever Spring Torsion Pin Cotter 7/16 Bow Tie Lock Spring Lift Assist Washer Clear Zinc KEY PART NO. inches 1 inch = 25.4 mm 16 MODEL NO. LGT2654 (96045004000), PRODUCT NO. 960 45 00-40 MOWER LIFT 87 7 87 3 10 97 90 98 89 88 2 91 87 89 97 91 lift-tex_23 89... 87 KEY PART NO. Front Mower NOTE: All component dimensions given in U.S. NO. 90 532 19 42-08 91 532 40...
Parts Manual
Page 18
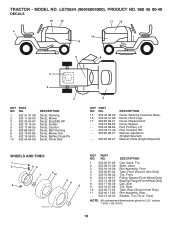
Decal, Battery Dnge/Poi Decal, Panel Side 6 KEY PART NO. Tube) NOTE: All component dimensions given in U.S. inches 1 inch = 25.4 ...85 9 532 14 50-05 14 532 44 64-69 DESCRIPTION Decal, Warning Decal, Mower Decal, Eng B&S HP Decal, Fender Decal, Caution Decal, E85 Warning Decal, Mower Sch. NO. 1 532 05 91-92 2 532 06 51-39 3 532 ... 95 96-27 - - 580 95 98-27 DESCRIPTION Decal, Warning Customer Resp. LGT2654 (96045004000), PRODUCT NO. 960 45 00-40 DECALS 16 15 17 16 4 14 1 14 9 8 3 5 2 KEY PART NO. Decal, Hood Logo Decal, Replacement Decal, Bypass Pad, Footrest, LH Pad,...
Decal, Battery Dnge/Poi Decal, Panel Side 6 KEY PART NO. Tube) NOTE: All component dimensions given in U.S. inches 1 inch = 25.4 ...85 9 532 14 50-05 14 532 44 64-69 DESCRIPTION Decal, Warning Decal, Mower Decal, Eng B&S HP Decal, Fender Decal, Caution Decal, E85 Warning Decal, Mower Sch. NO. 1 532 05 91-92 2 532 06 51-39 3 532 ... 95 96-27 - - 580 95 98-27 DESCRIPTION Decal, Warning Customer Resp. LGT2654 (96045004000), PRODUCT NO. 960 45 00-40 DECALS 16 15 17 16 4 14 1 14 9 8 3 5 2 KEY PART NO. Decal, Hood Logo Decal, Replacement Decal, Bypass Pad, Footrest, LH Pad,...


