
Owners Manual
Page 3
... Spark Arrestor 16 CONTROLS 17 Control Locations 17 Motion Control Levers 18 Hour Meter 19 Tracking 19 Parking Brake 20 Blade Switch 20 Ignition Switch 20 Fuses 21 Cutting Height Adjuster 22 Fuel Shut Off Valve 22 Refueling 23 OPERATION 24 Training 24 Steering 24 Before Starting 25 Starting the Engine 25 Jumper Cables 28 Running 29 Operating on Hills 30 Stopping the Engine 31 Mowing Tips 32 Manual Transport 33 MAINTENANCE 34 Battery 36 Safety System 37 Tire Pressures 37 Parking Brake 37 Deck Belt 38 Pump Belt...
... Spark Arrestor 16 CONTROLS 17 Control Locations 17 Motion Control Levers 18 Hour Meter 19 Tracking 19 Parking Brake 20 Blade Switch 20 Ignition Switch 20 Fuses 21 Cutting Height Adjuster 22 Fuel Shut Off Valve 22 Refueling 23 OPERATION 24 Training 24 Steering 24 Before Starting 25 Starting the Engine 25 Jumper Cables 28 Running 29 Operating on Hills 30 Stopping the Engine 31 Mowing Tips 32 Manual Transport 33 MAINTENANCE 34 Battery 36 Safety System 37 Tire Pressures 37 Parking Brake 37 Deck Belt 38 Pump Belt...

Owners Manual
Page 13
.... Replace gas cap and tighten securely. • Do not start the engine near spilled fuel. • Never use gasoline as a cleaning agent. • If leaks arise in fuel system, engine must not be started when the driver's floor plate or any protective plate for the mower deck's drive belt is extremely flammable and the vapors are explosive. • Extinguish all times until problem has been resolved. • Check...
.... Replace gas cap and tighten securely. • Do not start the engine near spilled fuel. • Never use gasoline as a cleaning agent. • If leaks arise in fuel system, engine must not be started when the driver's floor plate or any protective plate for the mower deck's drive belt is extremely flammable and the vapors are explosive. • Extinguish all times until problem has been resolved. • Check...

Owners Manual
Page 14
... and bolts tight to be sure the equipment is in safe working condition. • Never tamper with water. • Acid in the eyes can cause serious corrosive burns. Clean oil or fuel spillage and remove any adjustments or repairs with the engine running the engine with overly high engine speeds. Wrap the blade or wear gloves, and use extra caution when servicing them. • Check brake operation frequently...
... and bolts tight to be sure the equipment is in safe working condition. • Never tamper with water. • Acid in the eyes can cause serious corrosive burns. Clean oil or fuel spillage and remove any adjustments or repairs with the engine running the engine with overly high engine speeds. Wrap the blade or wear gloves, and use extra caution when servicing them. • Check brake operation frequently...

Owners Manual
Page 15
... when handling them. • Check the parking brake's functionality regularly. Adjust and service as necessary. • The mulch blades should only be used in familiar areas when higher quality mowing is desired. • Reduce the risk of the starter circuit. If necessary, make repairs before putting it in an open vessel. The battery can cause cuts and gashes. Risk of deck, avoid spraying engine and electrical components...
... when handling them. • Check the parking brake's functionality regularly. Adjust and service as necessary. • The mulch blades should only be used in familiar areas when higher quality mowing is desired. • Reduce the risk of the starter circuit. If necessary, make repairs before putting it in an open vessel. The battery can cause cuts and gashes. Risk of deck, avoid spraying engine and electrical components...

Owners Manual
Page 17
...-stroke overhead valve engine developing 28 horse power*. Control Locations 4 Transmission from this value. Hour meter 8. Height adjustment 13. CONTROLS This operator's manual describes the Husqvarna Zero Turn Rider. Ignition switch 7. Blade switch 12 11 10 10. Motion control levers 2. Fuel tank 5. Deck lift 8058-039 *The power rating of a typical production engine for the engine installed in the final machine will depend on the operating speed, environmental conditions and other variables. 17 Parking brake 3. Using the left and right steering controls, the flow...
...-stroke overhead valve engine developing 28 horse power*. Control Locations 4 Transmission from this value. Hour meter 8. Height adjustment 13. CONTROLS This operator's manual describes the Husqvarna Zero Turn Rider. Ignition switch 7. Blade switch 12 11 10 10. Motion control levers 2. Fuel tank 5. Deck lift 8058-039 *The power rating of a typical production engine for the engine installed in the final machine will depend on the operating speed, environmental conditions and other variables. 17 Parking brake 3. Using the left and right steering controls, the flow...
Owners Manual
Page 20
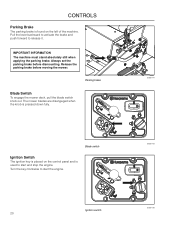
Turn the key clockwise to release it. Always set the parking brake before moving the mower. Parking brake Blade Switch To engage the mower deck, pull the blade switch knob out. Release the parking brake before dismounting. The mower blades are disengaged when the knob is used to start the engine. Blade switch Ignition Switch The ignition key is placed on the left of the machine. IMPORTANT INFORMATION The machine must stand absolutely still when applying the parking brake. CONTROLS Parking Brake The parking brake is found on...
Turn the key clockwise to release it. Always set the parking brake before moving the mower. Parking brake Blade Switch To engage the mower deck, pull the blade switch knob out. Release the parking brake before dismounting. The mower blades are disengaged when the knob is used to start the engine. Blade switch Ignition Switch The ignition key is placed on the left of the machine. IMPORTANT INFORMATION The machine must stand absolutely still when applying the parking brake. CONTROLS Parking Brake The parking brake is found on...

Owners Manual
Page 24
.... Training Zero turn to idle, disengage parking brake, do not engage blades at this section be in the seat, start moving forward in a forward direction pull the left lever back towards the neutral position while maintaining the position of the control lever(s) on control levers to the neutral position and mower should stop . We suggest that direction. To turn mowers are in the Operation section) to the left wheel. IMPORTANT...
.... Training Zero turn to idle, disengage parking brake, do not engage blades at this section be in the seat, start moving forward in a forward direction pull the left lever back towards the neutral position while maintaining the position of the control lever(s) on control levers to the neutral position and mower should stop . We suggest that direction. To turn mowers are in the Operation section) to the left wheel. IMPORTANT...
Owners Manual
Page 25
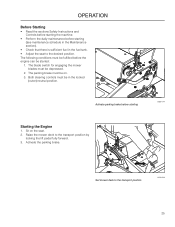
OPERATION Before Starting • Read the sections Safety Instructions and Controls before starting the machine. • Perform the daily maintenance before starting 8058-044 Starting the Engine 1. The parking brake must be in the fuel tank. • Adjust the seat to the transport position 8058-048 25 Sit on . 3. Both steering controls must be started: 1. Set mower deck to the desired position. Raise the mower deck to the transport position by locking the lift pedal...
OPERATION Before Starting • Read the sections Safety Instructions and Controls before starting the machine. • Perform the daily maintenance before starting 8058-044 Starting the Engine 1. The parking brake must be in the fuel tank. • Adjust the seat to the transport position 8058-048 25 Sit on . 3. Both steering controls must be started: 1. Set mower deck to the desired position. Raise the mower deck to the transport position by locking the lift pedal...

Owners Manual
Page 34
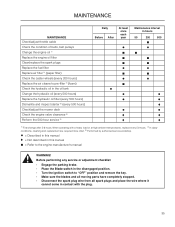
maintenance MAINTENANCE Check the parking brake Check the engine's oil level (every refueling) Check the safety system Check for fuel and oil leakages Check/clean the engine's cooling air intake Check the mower deck Check for loose hardware (screws, nuts) Clean under the mower deck Start the engine and blades, listen for unusual sounds Check for damage Thoroughly clean around the engine Clean around belts, belt pulleys Check the tire pressures Check battery connections Sharpen3)/ Replace mower blades Clean the engine's cooling air intake 2) Clean the air cleaner's pre-filter 2) (foam) Clean ...
maintenance MAINTENANCE Check the parking brake Check the engine's oil level (every refueling) Check the safety system Check for fuel and oil leakages Check/clean the engine's cooling air intake Check the mower deck Check for loose hardware (screws, nuts) Clean under the mower deck Start the engine and blades, listen for unusual sounds Check for damage Thoroughly clean around the engine Clean around belts, belt pulleys Check the tire pressures Check battery connections Sharpen3)/ Replace mower blades Clean the engine's cooling air intake 2) Clean the air cleaner's pre-filter 2) (foam) Clean ...
Owners Manual
Page 35
... MAINTENANCE Check/adjust throttle cable Check the condition of belts, belt pulleys Change the engine oil 1) Replace the engine oil filter Clean/replace the spark plugs Replace the fuel filter Replace air filter 2) (paper filter) Check the caster wheels (every 200 hours) Replace the air cleaner's pre-filter 2) (foam) Check the hydraulic oil in the oil tank Change the hydraulic oil (every 500 hours) Replace the hydraulic oil filter (every 500 hours) Dismantle and inspect starter 3) (every 500 hours) Check/adjust the mower deck Check the engine valve clearance 3) Perform the 500-hour service...
... MAINTENANCE Check/adjust throttle cable Check the condition of belts, belt pulleys Change the engine oil 1) Replace the engine oil filter Clean/replace the spark plugs Replace the fuel filter Replace air filter 2) (paper filter) Check the caster wheels (every 200 hours) Replace the air cleaner's pre-filter 2) (foam) Check the hydraulic oil in the oil tank Change the hydraulic oil (every 500 hours) Replace the hydraulic oil filter (every 500 hours) Dismantle and inspect starter 3) (every 500 hours) Check/adjust the mower deck Check the engine valve clearance 3) Perform the 500-hour service...
Owners Manual
Page 36
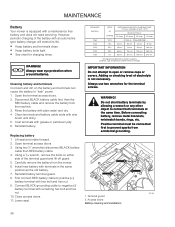
... battery cable to open or remove caps or covers. Lower seat. Always use two wrenches for charging times. Access doors Battery cleaning and installation 36 Rinse the battery with grease or petroleum jelly 6. Coat terminals with plain water and dry. 4. Install new battery with a maintenance free battery and does not need servicing. Adding or checking level of charger IMPORTANT INFORMATION Do not attempt to positive (+) battery terminal with wire brush until shiny. 5. WARNING! maintenance Battery Your mower...
... battery cable to open or remove caps or covers. Lower seat. Always use two wrenches for charging times. Access doors Battery cleaning and installation 36 Rinse the battery with grease or petroleum jelly 6. Coat terminals with plain water and dry. 4. Install new battery with a maintenance free battery and does not need servicing. Adding or checking level of charger IMPORTANT INFORMATION Do not attempt to positive (+) battery terminal with wire brush until shiny. 5. WARNING! maintenance Battery Your mower...
Owners Manual
Page 38
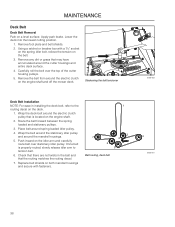
... stationary idler pulley and around spring loaded idler pulley. 4. Lower the deck into the lowest cutting position. 1. Slackening the belt tensioner 8058-063 Deck Belt Installation NOTE: For ease in the belt and that may have accumulated around the electric clutch pulley that is properly routed, slowly release idler arm to the routing decal on a level surface. Apply park brake. Check that there are not twists in installing the deck belt, refer to tension belt. 6. maintenance Deck Belt Deck Belt Removal Park on the deck. 1.
... stationary idler pulley and around spring loaded idler pulley. 4. Lower the deck into the lowest cutting position. 1. Slackening the belt tensioner 8058-063 Deck Belt Installation NOTE: For ease in the belt and that may have accumulated around the electric clutch pulley that is properly routed, slowly release idler arm to the routing decal on a level surface. Apply park brake. Check that there are not twists in installing the deck belt, refer to tension belt. 6. maintenance Deck Belt Deck Belt Removal Park on the deck. 1.

Owners Manual
Page 39
... belt. 5. Remove belt from the engine and pump pulleys over the top of the mower: 3. Slip the belt over the right and left idler pulleys. 4. Idler arm release placement 3. Belt Removal From the top side of operation. Remove both fan covers. Remove clutch stop to slip from the above instructions. 2. Belt Installation 1. Reinstall the deck belt. (See Deck Belt Installation in normal operation. Place the belt over the fans and route it between the two fan covers. Place the belt on a level...
... belt. 5. Remove belt from the engine and pump pulleys over the top of the mower: 3. Slip the belt over the right and left idler pulleys. 4. Idler arm release placement 3. Belt Removal From the top side of operation. Remove both fan covers. Remove clutch stop to slip from the above instructions. 2. Belt Installation 1. Reinstall the deck belt. (See Deck Belt Installation in normal operation. Place the belt over the fans and route it between the two fan covers. Place the belt on a level...

Owners Manual
Page 40
... by turning counterclockwise. 2. Install and tighten blade bolt securely. 4. Cutter housing Blade attachment IMPORTANT INFORMATION Special blade bolt is important that result in the disengaged position. 3. Engage the parking brake. 2. Make sure the blades and all spark plugs and place the wire where it is heat treated. Protect your hands with gloves and/or wrap blades with a heavy cloth when handling. Remove blade bolt by an authorized service workshop. 3 2 1. Before performing any service or adjustment checklist: 1. Turn ignition switch...
... by turning counterclockwise. 2. Install and tighten blade bolt securely. 4. Cutter housing Blade attachment IMPORTANT INFORMATION Special blade bolt is important that result in the disengaged position. 3. Engage the parking brake. 2. Make sure the blades and all spark plugs and place the wire where it is heat treated. Protect your hands with gloves and/or wrap blades with a heavy cloth when handling. Remove blade bolt by an authorized service workshop. 3 2 1. Before performing any service or adjustment checklist: 1. Turn ignition switch...

Owners Manual
Page 41
... blades with the deck in the rear. See Technical Data / Transmission. If tires are inflated to achieve desired cut for the type of leveling procedure, mower deck drive belt must be required to the correct pressure. Four slots control the height and pitch of the mower deck. NOTE: To insure accuracy of grass or conditions being mowed. Turn each outer blade tip to align with the deck or in Maintenance section. Reposition rear mounting bolts...
... blades with the deck in the rear. See Technical Data / Transmission. If tires are inflated to achieve desired cut for the type of leveling procedure, mower deck drive belt must be required to the correct pressure. Four slots control the height and pitch of the mower deck. NOTE: To insure accuracy of grass or conditions being mowed. Turn each outer blade tip to align with the deck or in Maintenance section. Reposition rear mounting bolts...

Owners Manual
Page 46
... 8 qt. Remove the oil filter from the transaxles' expansion tank located on the vehicle frame. 3 1. Install the top port lug into each transaxle and set the parking brake. 1. Drain old oil filters of it threequarters to filling with the transaxles installed in the mower and the mower on the opposite side. 7. Repeat steps on level ground. Place used oil in appropriate containers and dispose of all free flowing oil prior...
... 8 qt. Remove the oil filter from the transaxles' expansion tank located on the vehicle frame. 3 1. Install the top port lug into each transaxle and set the parking brake. 1. Drain old oil filters of it threequarters to filling with the transaxles installed in the mower and the mower on the opposite side. 7. Repeat steps on level ground. Place used oil in appropriate containers and dispose of all free flowing oil prior...
Owners Manual
Page 49
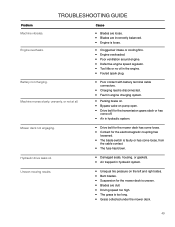
... cable connectors. • Charging lead is too long. • Grass collected under the mower deck. 49 Engine overheats. Mower deck not engaging. • Drive belt for the mower deck is uneven. • Blades are incorrectly balanced. • Engine is faulty or has come loose, from the cable contact. • The fuse has blown. Battery not charging. Hydraulic drive leaks oil. • Damaged seals, housing, or gaskets. • Air trapped in engine charging system. • Parking brake on. • Bypass valve...
... cable connectors. • Charging lead is too long. • Grass collected under the mower deck. 49 Engine overheats. Mower deck not engaging. • Drive belt for the mower deck is uneven. • Blades are incorrectly balanced. • Engine is faulty or has come loose, from the cable contact. • The fuse has blown. Battery not charging. Hydraulic drive leaks oil. • Damaged seals, housing, or gaskets. • Air trapped in engine charging system. • Parking brake on. • Bypass valve...

Owners Manual
Page 50
..., sparks, or a pilot light such as regards to run until the carburetor is evenly distributed and then refit the spark plug. 6. Thoroughly clean the machine, especially under the mower deck. Touch up at least 10 minutes after adding the stabilizer so that the oil is drained of fuel or the stabilizer has reached the carburetor. 5. Empty the fuel tanks or add a fuel stabilizer. Remove the battery. Always use...
..., sparks, or a pilot light such as regards to run until the carburetor is evenly distributed and then refit the spark plug. 6. Thoroughly clean the machine, especially under the mower deck. Touch up at least 10 minutes after adding the stabilizer so that the oil is drained of fuel or the stabilizer has reached the carburetor. 5. Empty the fuel tanks or add a fuel stabilizer. Remove the battery. Always use...

Owners Manual
Page 61
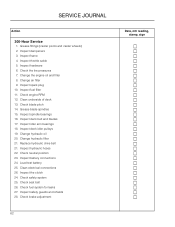
... arm bearings 18. Inspect deck idler pulleys 19. Inspect hydraulic filter 21. Inspect battery connections 25. Check safety system 26. Inspect safety guards and shields 29. Inspect hardware 6. Check the tire pressures 7. Inspect fuel filter 11. Check hydraulic oil level 20. Grease fittings (caster pivots and caster wheels) 2. Inspect throttle cable 5. Check engine RPM 12. Inspect spindle bearings 16. Check fuel system for leaks 28. Change air filter 9. Inspect spark plug 10. Grease blade spindles 15. Inspect deck belt and blades 17. Check brake adjustment...
... arm bearings 18. Inspect deck idler pulleys 19. Inspect hydraulic filter 21. Inspect battery connections 25. Check safety system 26. Inspect safety guards and shields 29. Inspect hardware 6. Check the tire pressures 7. Inspect fuel filter 11. Check hydraulic oil level 20. Grease fittings (caster pivots and caster wheels) 2. Inspect throttle cable 5. Check engine RPM 12. Inspect spindle bearings 16. Check fuel system for leaks 28. Change air filter 9. Inspect spark plug 10. Grease blade spindles 15. Inspect deck belt and blades 17. Check brake adjustment...
Owners Manual
Page 62
... 6. Check the tire pressures 7. Check blade pitch 14. Inspect hydraulic hoses 22. Inspect battery connections 24. Inspect the clutch 24. Inspect dampeners 3. Inspect spindle bearings 16. Change hydraulic oil 20. Check safety system 25. Check brake adjustment 62 Date, mtr reading, stamp, sign Grease fittings (caster pivots and caster wheels) 2. Change the engine oil and filter 8. Change air filter 9. Clean underside of deck 13. Inspect idler arm bearings 18. Check fuel system for leaks 27. Inspect spark plug 10. Check engine RPM 12. Replace hydraulic drive belt 21...
... 6. Check the tire pressures 7. Check blade pitch 14. Inspect hydraulic hoses 22. Inspect battery connections 24. Inspect the clutch 24. Inspect dampeners 3. Inspect spindle bearings 16. Change hydraulic oil 20. Check safety system 25. Check brake adjustment 62 Date, mtr reading, stamp, sign Grease fittings (caster pivots and caster wheels) 2. Change the engine oil and filter 8. Change air filter 9. Clean underside of deck 13. Inspect idler arm bearings 18. Check fuel system for leaks 27. Inspect spark plug 10. Check engine RPM 12. Replace hydraulic drive belt 21...


