

Owners Manual
Page 3
... 16 Towing 16 Spark Arrestor 16 CONTROLS 17 Control Locations 17 Motion Control Levers 18 Hour Meter 19 Tracking 19 Parking Brake 20 Blade Switch 20 Ignition Switch 20 Fuses 21 Cutting Height Adjuster 22 Fuel Shut Off Valve 22 Refueling 23 OPERATION 24 Training 24 Steering ...MAINTENANCE 34 Battery 36 Safety System 37 Tire Pressures 37 Parking Brake 37 Deck Belt 38 Pump Belt 39 V-belts 39 Cutting Blades 40 Adjusting the Mower Deck 41 Leveling deck 41 Anti-scalp rollers 42 Caster Wheels 43 Hardware 43 Cleaning 43 LUBRICATION 44 Lubrication Schedule 44 Wheel ...
... 16 Towing 16 Spark Arrestor 16 CONTROLS 17 Control Locations 17 Motion Control Levers 18 Hour Meter 19 Tracking 19 Parking Brake 20 Blade Switch 20 Ignition Switch 20 Fuses 21 Cutting Height Adjuster 22 Fuel Shut Off Valve 22 Refueling 23 OPERATION 24 Training 24 Steering ...MAINTENANCE 34 Battery 36 Safety System 37 Tire Pressures 37 Parking Brake 37 Deck Belt 38 Pump Belt 39 V-belts 39 Cutting Blades 40 Adjusting the Mower Deck 41 Leveling deck 41 Anti-scalp rollers 42 Caster Wheels 43 Hardware 43 Cleaning 43 LUBRICATION 44 Lubrication Schedule 44 Wheel ...

Owners Manual
Page 14
... free of governors and avoid running . • Check grass catcher components and the discharge guard frequently and replace with manufacturer's recommended parts, when necessary. • Mower blades are properly tightened and torqued. 14 Never drive the machine in an enclosed space 8011-515 WARNING! Wrap the... blade or wear gloves, and use extra caution when servicing them. • Check brake operation frequently. Allow machine to be sure it works properly. Acid on ...
... free of governors and avoid running . • Check grass catcher components and the discharge guard frequently and replace with manufacturer's recommended parts, when necessary. • Mower blades are properly tightened and torqued. 14 Never drive the machine in an enclosed space 8011-515 WARNING! Wrap the... blade or wear gloves, and use extra caution when servicing them. • Check brake operation frequently. Allow machine to be sure it works properly. Acid on ...
Owners Manual
Page 20
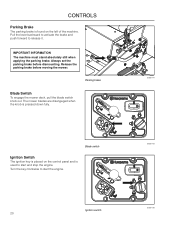
...clockwise to release it. Release the parking brake before dismounting. The mower blades are disengaged when the knob is used to start the engine. IMPORTANT INFORMATION The machine must stand absolutely still when applying the parking brake. Blade switch Ignition Switch The ignition key is placed on the left ...of the machine. CONTROLS Parking Brake The parking brake is found on the control panel and is pressed down fully. Always set the parking brake before moving the mower. Ignition switch 20 ...
...clockwise to release it. Release the parking brake before dismounting. The mower blades are disengaged when the knob is used to start the engine. IMPORTANT INFORMATION The machine must stand absolutely still when applying the parking brake. Blade switch Ignition Switch The ignition key is placed on the left ...of the machine. CONTROLS Parking Brake The parking brake is found on the control panel and is pressed down fully. Always set the parking brake before moving the mower. Ignition switch 20 ...

Owners Manual
Page 24
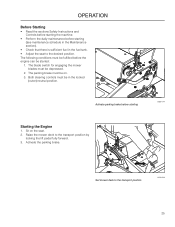
... have not been 24 Training Zero turn in the Operation section) to overly aggressive maneuvers. Additionally, we suggest when first operating the mower, use a reduced throttle speed and reduced ground speed by the movement of the reverse position lever. Push forward on turf. Until ...OPERATION Read the Safety Instructions section and the following pages if you are far more maneuverable than typical riding mowers due to idle, disengage parking brake, do not engage blades at this time, rotate control levers inward. Pull back slightly on control levers to start engine (see...
... have not been 24 Training Zero turn in the Operation section) to overly aggressive maneuvers. Additionally, we suggest when first operating the mower, use a reduced throttle speed and reduced ground speed by the movement of the reverse position lever. Push forward on turf. Until ...OPERATION Read the Safety Instructions section and the following pages if you are far more maneuverable than typical riding mowers due to idle, disengage parking brake, do not engage blades at this time, rotate control levers inward. Pull back slightly on control levers to start engine (see...
Owners Manual
Page 25
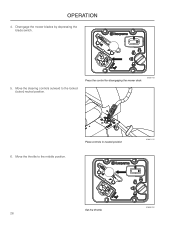
... transport position 8058-048 25 The parking brake must be on the seat. 2. Sit on . 3. Set mower deck to the transport position by locking the lift pedal fully forward. 3. The blade switch for engaging the mower blades must be fulfilled before starting (see maintenance schedule in the Maintenance section). • Check that there is...
... transport position 8058-048 25 The parking brake must be on the seat. 2. Sit on . 3. Set mower deck to the transport position by locking the lift pedal fully forward. 3. The blade switch for engaging the mower blades must be fulfilled before starting (see maintenance schedule in the Maintenance section). • Check that there is...
Owners Manual
Page 26
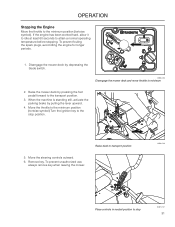
Disengage the mower blades by depressing the blade switch. 5. Move the steering controls outward to the middle position. Place controls in neutral position 80661-012 Set the throttle 80658-050 26 OPERATION 4. Press the control for disengaging the mower deck 8058-043 6. Move the throttle to the locked (outer) neutral position.
Disengage the mower blades by depressing the blade switch. 5. Move the steering controls outward to the middle position. Place controls in neutral position 80661-012 Set the throttle 80658-050 26 OPERATION 4. Press the control for disengaging the mower deck 8058-043 6. Move the throttle to the locked (outer) neutral position.

Owners Manual
Page 29
...stands still. OPERATION Running 1. Release foot pedal latch and lower deck to the neutral position (N). Select the cutting height by pulling out the blade switch. 6. Move throttle control to full throttle (rabbit symbol). 7. Cutting height selection 5. The machine's speed and direction are in a ...setting the parking brake will shut off the engine. 2. Release the parking brake by the rotating blades. 8058-044 WARNING! Parking brake 3. NOTE: The mower is near mower when engaging blade switch. Make sure the work area is running, any attempt by the operator to FULL 29...
...stands still. OPERATION Running 1. Release foot pedal latch and lower deck to the neutral position (N). Select the cutting height by pulling out the blade switch. 6. Move throttle control to full throttle (rabbit symbol). 7. Cutting height selection 5. The machine's speed and direction are in a ...setting the parking brake will shut off the engine. 2. Release the parking brake by the rotating blades. 8058-044 WARNING! Parking brake 3. NOTE: The mower is near mower when engaging blade switch. Make sure the work area is running, any attempt by the operator to FULL 29...
Owners Manual
Page 31
Move the throttle to the minimum position (tortoise symbol) Turn the ignition key to minimum 2. Raise the mower deck by depressing the blade switch. 8058-046 Disengage the mower deck and move throttle to the stop 8061-012 31 Move the steering controls outward. 6. If the engine has been worked hard, allow it to...
Move the throttle to the minimum position (tortoise symbol) Turn the ignition key to minimum 2. Raise the mower deck by depressing the blade switch. 8058-046 Disengage the mower deck and move throttle to the stop 8061-012 31 Move the steering controls outward. 6. If the engine has been worked hard, allow it to...

Owners Manual
Page 32
...be used without negatively affecting the mowing result. • The finest lawns are obtained by the blades. For healthier and better looking lawns, mow often after each use. When cleaning, the mower deck shall be cut relatively high; Never drive the rider on top surface, engine and electrical ...Mowing pattern 8011-603b WARNING! The mowing result is not increased as a higher operating speed can be best with a high engine speed (the blades rotate rapidly) and low speed (the rider moves slowly). Mow slopes up and down, never side to the desired height. • The ...
...be used without negatively affecting the mowing result. • The finest lawns are obtained by the blades. For healthier and better looking lawns, mow often after each use. When cleaning, the mower deck shall be cut relatively high; Never drive the rider on top surface, engine and electrical ...Mowing pattern 8011-603b WARNING! The mowing result is not increased as a higher operating speed can be best with a high engine speed (the blades rotate rapidly) and low speed (the rider moves slowly). Mow slopes up and down, never side to the desired height. • The ...

Owners Manual
Page 34
... for unusual sounds Check for damage Thoroughly clean around the engine Clean around belts, belt pulleys Check the tire pressures Check battery connections Sharpen3)/ Replace mower blades Clean the engine's cooling air intake 2) Clean the air cleaner's pre-filter 2) (foam) Clean the air cleaner's filter cartridge 2) (paper filter) Check/adjust the parking...
... for unusual sounds Check for damage Thoroughly clean around the engine Clean around belts, belt pulleys Check the tire pressures Check battery connections Sharpen3)/ Replace mower blades Clean the engine's cooling air intake 2) Clean the air cleaner's pre-filter 2) (foam) Clean the air cleaner's filter cartridge 2) (paper filter) Check/adjust the parking...
Owners Manual
Page 35
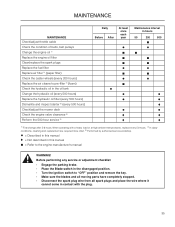
... hydraulic oil (every 500 hours) Replace the hydraulic oil filter (every 500 hours) Dismantle and inspect starter 3) (every 500 hours) Check/adjust the mower deck Check the engine valve clearance 3) Perform the 500-hour service 3) Daily Before After At least once each year ● ♦ ♦...Described in this manual ♦ = Not described in this manual ■ = Refer to "OFF" position and remove the key. • Make sure the blades and all moving parts have completely stopped. • Disconnect the spark plug wire from all spark plugs and place the wire where it cannot come...
... hydraulic oil (every 500 hours) Replace the hydraulic oil filter (every 500 hours) Dismantle and inspect starter 3) (every 500 hours) Check/adjust the mower deck Check the engine valve clearance 3) Perform the 500-hour service 3) Daily Before After At least once each year ● ♦ ♦...Described in this manual ♦ = Not described in this manual ■ = Refer to "OFF" position and remove the key. • Make sure the blades and all moving parts have completely stopped. • Disconnect the spark plug wire from all spark plugs and place the wire where it cannot come...

Owners Manual
Page 37
... under the following conditions. Parking Brake Visually check that no damage is found on . Make daily inspections to ensure that the engine stops if the mower blades are in the seat and release the parking brake before using the machine again. Check that the safety system works by foam filled tires will...
... under the following conditions. Parking Brake Visually check that no damage is found on . Make daily inspections to ensure that the engine stops if the mower blades are in the seat and release the parking brake before using the machine again. Check that the safety system works by foam filled tires will...

Owners Manual
Page 41
... in a side-to the correct pressure. Make sure the tires are equal. Four slots control the height and pitch of the mower deck. Turn each outer blade tip to align with the deck or in a base measurement position. Retain this measurement. Reposition rear mounting bolts up or down in... should be installed prior to -side measurement. Front lift arm 2. NOTE: To insure accuracy of the mower deck. In the rear, blade tips should be level in slot until rear of mower deck is positioned level to 1/8" higher in front-to -side manner. Wear heavy gloves. Additional adjustment...
... in a side-to the correct pressure. Make sure the tires are equal. Four slots control the height and pitch of the mower deck. Turn each outer blade tip to align with the deck or in a base measurement position. Retain this measurement. Reposition rear mounting bolts up or down in... should be installed prior to -side measurement. Front lift arm 2. NOTE: To insure accuracy of the mower deck. In the rear, blade tips should be level in slot until rear of mower deck is positioned level to 1/8" higher in front-to -side manner. Wear heavy gloves. Additional adjustment...
Owners Manual
Page 49
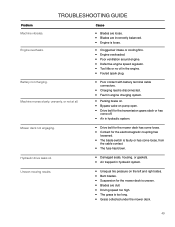
... grass is too long. • Grass collected under the mower deck. 49 Mower deck not engaging. • Drive belt for the mower deck has come loose. • Contact for the electromagnetic coupling has loosened. • The blade switch is loose. • Clogged air intake or cooling ...; Fouled spark plug. Uneven mowing results. • Unequal tire pressure on pump open. • Drive belt for the mower deck is uneven. • Blades are incorrectly balanced. • Engine is faulty or has come off. • Air in hydraulic system. Engine overheats. troubleshooting...
... grass is too long. • Grass collected under the mower deck. 49 Mower deck not engaging. • Drive belt for the mower deck has come loose. • Contact for the electromagnetic coupling has loosened. • The blade switch is loose. • Clogged air intake or cooling ...; Fouled spark plug. Uneven mowing results. • Unequal tire pressure on pump open. • Drive belt for the mower deck is uneven. • Blades are incorrectly balanced. • Engine is faulty or has come off. • Air in hydraulic system. Engine overheats. troubleshooting...
Owners Manual
Page 57
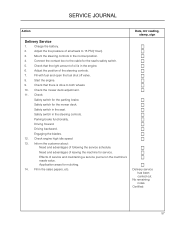
Adjust the position of service and maintaining a service journal on the machine's resale value. Start the engine. 9. Check the mower deck adjustment. 11. Check: Safety switch for the seat's safety switch. 5. Parking brake functionality. Effects of the steering controls. 7. Certified: 57 Adjust... reading, stamp, sign Delivery service has been carried out. Fill with fuel and open the fuel shut off valve. 8. Safety switch for the mower deck. Fill in the seat. Mount the steering controls in the steering controls. Check that the right amount of leaving the machine for mulching. ...
Adjust the position of service and maintaining a service journal on the machine's resale value. Start the engine. 9. Check the mower deck adjustment. 11. Check: Safety switch for the seat's safety switch. 5. Parking brake functionality. Effects of the steering controls. 7. Certified: 57 Adjust... reading, stamp, sign Delivery service has been carried out. Fill with fuel and open the fuel shut off valve. 8. Safety switch for the mower deck. Fill in the seat. Mount the steering controls in the steering controls. Check that the right amount of leaving the machine for mulching. ...

Owners Manual
Page 60
Check the tire pressures. 4. Check/clean the engine's cooling air intake. 7. Clean the air cleaner's pre-filter (foam). Check battery with cables. 5. Lubricate according to lubrication chart. 6. Sharpen/Replace mower blades if required. 3. Date, mtr reading, stamp, sign 60 Check the fuel pump's air filter. 2. SERVICE JOURNAL Action 25-Hour Service 1.
Check the tire pressures. 4. Check/clean the engine's cooling air intake. 7. Clean the air cleaner's pre-filter (foam). Check battery with cables. 5. Lubricate according to lubrication chart. 6. Sharpen/Replace mower blades if required. 3. Date, mtr reading, stamp, sign 60 Check the fuel pump's air filter. 2. SERVICE JOURNAL Action 25-Hour Service 1.

Parts Manual
Page 21
QTY. MOWER DECK / CUTTING DECK ITEM PART NO. DESCRIPTION 25.. 539 101341 2 HCS 3/8-16 ... 1 HCS ½-13 x 3¼ 31.. 539 990799 3 RHSNB 5/16-18 x 5/8 32.. 532 193003 3 BOLT 7/16 BLADE 33.. 539 107608 2 BOLT, SHOULDER 34.. 539 107630 ��12 SCREW, WSH HEAD 35.. 539 107590 3 NUT 9/16... 48.. 539 976998 1 ZERK 21 QTY. DESCRIPTION 1.. 581 505401 1 DECK w/ SAFETY DECALS 2.. 539 104335 1 BELT, DECK 3.. 510 417901 3 BLADE, 21" 4.. 539 112170 3 HOUSING ASSEMBLY 5.. 539 103427 1 BUSHING, PIVOT 6.. 539 112169 2 BUSHING, IDLER 7.. 539 132728 3 PULLEY, IDLER ...
QTY. MOWER DECK / CUTTING DECK ITEM PART NO. DESCRIPTION 25.. 539 101341 2 HCS 3/8-16 ... 1 HCS ½-13 x 3¼ 31.. 539 990799 3 RHSNB 5/16-18 x 5/8 32.. 532 193003 3 BOLT 7/16 BLADE 33.. 539 107608 2 BOLT, SHOULDER 34.. 539 107630 ��12 SCREW, WSH HEAD 35.. 539 107590 3 NUT 9/16... 48.. 539 976998 1 ZERK 21 QTY. DESCRIPTION 1.. 581 505401 1 DECK w/ SAFETY DECALS 2.. 539 104335 1 BELT, DECK 3.. 510 417901 3 BLADE, 21" 4.. 539 112170 3 HOUSING ASSEMBLY 5.. 539 103427 1 BUSHING, PIVOT 6.. 539 112169 2 BUSHING, IDLER 7.. 539 132728 3 PULLEY, IDLER ...


