
Service Guide
Page 4
Use, duplication or disclosure restricted by GSA ADP Schedule Contract with IBM Corp. US Government Users Restricted Rights - Note: Before using this information and the product it supports, read the general information in Appendix B, "Notices," on page 159. 14th Edition (February 2007) © Copyright International Business Machines Corporation 2007. All rights reserved.
Use, duplication or disclosure restricted by GSA ADP Schedule Contract with IBM Corp. US Government Users Restricted Rights - Note: Before using this information and the product it supports, read the general information in Appendix B, "Notices," on page 159. 14th Edition (February 2007) © Copyright International Business Machines Corporation 2007. All rights reserved.

Service Guide
Page 5
...problems 60 Video problems 60 Light path diagnostics 60 Light path diagnostic LEDs 63 Remind button 67 © Copyright IBM Corp. 2007 iii Contents Safety vii Guidelines for trained service technicians viii Inspecting for unsafe conditions viii Guidelines for... 1 Notices and statements used in this document 2 Features and specifications 3 Server controls, LEDs, and connectors 4 Front view 4 Rear view 6 System-board layouts 8 I/O board internal connectors and jumpers 8 Memory-card connectors 9 Memory-card LEDs 9 Microprocessor-board connectors and LEDs 10 PCI-X board...
...problems 60 Video problems 60 Light path diagnostics 60 Light path diagnostic LEDs 63 Remind button 67 © Copyright IBM Corp. 2007 iii Contents Safety vii Guidelines for trained service technicians viii Inspecting for unsafe conditions viii Guidelines for... 1 Notices and statements used in this document 2 Features and specifications 3 Server controls, LEDs, and connectors 4 Front view 4 Rear view 6 System-board layouts 8 I/O board internal connectors and jumpers 8 Memory-card connectors 9 Memory-card LEDs 9 Microprocessor-board connectors and LEDs 10 PCI-X board...

Service Guide
Page 6
... text messages 71 Viewing the test log 71 Diagnostic error codes 71 Recovering from a BIOS update failure 88 System-error log messages 89 Solving SCSI problems 102 Solving power problems 102 Solving Ethernet controller problems 103 Solving undetermined problems 104 Calling...utility program Using the ServeRAID configuration programs . 147 . 147 . 147 . 148 . 148 153 . 154 . 154 . 154 . 155 iv IBM System x3850 Type 8863, 7362: Problem Determination and Service Guide Power-supply LEDs 67 Diagnostic programs, messages, and error codes 69 Real-time diagnostics 70 Running the on ...
... text messages 71 Viewing the test log 71 Diagnostic error codes 71 Recovering from a BIOS update failure 88 System-error log messages 89 Solving SCSI problems 102 Solving power problems 102 Solving Ethernet controller problems 103 Solving undetermined problems 104 Calling...utility program Using the ServeRAID configuration programs . 147 . 147 . 147 . 148 . 148 153 . 154 . 154 . 154 . 155 iv IBM System x3850 Type 8863, 7362: Problem Determination and Service Guide Power-supply LEDs 67 Diagnostic programs, messages, and error codes 69 Real-time diagnostics 70 Running the on ...

Service Guide
Page 7
Getting help and technical assistance 157 Before you call 157 Using the documentation 157 Getting help and information from the World Wide Web 158 Software service and support 158 Hardware service and support 158 Appendix B. Notices 159 Edition notice 159 Trademarks 160 Important notes 160 Product recycling and disposal 161 Battery return program 162 Electronic emission notices 163 Federal Communications Commission (FCC) statement 163 Industry Canada Class A emission compliance statement 163 Australia and New Zealand Class A statement 163 United Kingdom ...
Getting help and technical assistance 157 Before you call 157 Using the documentation 157 Getting help and information from the World Wide Web 158 Software service and support 158 Hardware service and support 158 Appendix B. Notices 159 Edition notice 159 Trademarks 160 Important notes 160 Product recycling and disposal 161 Battery return program 162 Electronic emission notices 163 Federal Communications Commission (FCC) statement 163 Industry Canada Class A emission compliance statement 163 Australia and New Zealand Class A statement 163 United Kingdom ...

Service Guide
Page 10
... Check inside the server for 0.1 ohm or less between the external ground pin and the frame ground. viii IBM System x3850 Type 8863, 7362: Problem Determination and Service Guide Guidelines for trained service technicians This section contains information for safe operational condition.... guidelines when servicing electrical equipment: v Check the area for servicing electrical equipment Observe the following steps: 1. Check for any non-IBM alterations. 6. The information in this section. v Explosive hazards, such as loose or missing hardware. Remove the cover. 5. v...
... Check inside the server for 0.1 ohm or less between the external ground pin and the frame ground. viii IBM System x3850 Type 8863, 7362: Problem Determination and Service Guide Guidelines for trained service technicians This section contains information for safe operational condition.... guidelines when servicing electrical equipment: v Check the area for servicing electrical equipment Observe the following steps: 1. Check for any non-IBM alterations. 6. The information in this section. v Explosive hazards, such as loose or missing hardware. Remove the cover. 5. v...

Service Guide
Page 11
v Do not work on the equipment, disconnect the power cord. v To ensure proper grounding of components such as metal floor strips and equipment frames. If you perform a mechanical inspection, work on electrical equipment, use caution, turn off controls is conductive and can turn off the power quickly in the event of an electrical accident. Check it to make sure that has exposed electrical circuits, observe the following precautions: - When using a tester, set the controls correctly and use this type of mat to protect yourself from electrical shock. v Do not touch ...
v Do not work on the equipment, disconnect the power cord. v To ensure proper grounding of components such as metal floor strips and equipment frames. If you perform a mechanical inspection, work on electrical equipment, use caution, turn off controls is conductive and can turn off the power quickly in the event of an electrical accident. Check it to make sure that has exposed electrical circuits, observe the following precautions: - When using a tester, set the controls correctly and use this type of mat to protect yourself from electrical shock. v Do not touch ...

Service Guide
Page 12
x IBM System x3850 Type 8863, 7362: Problem Determination and Service Guide For example, if a caution statement begins with a number 1, translations for that comes with your server or optional device before ...
x IBM System x3850 Type 8863, 7362: Problem Determination and Service Guide For example, if a caution statement begins with a number 1, translations for that comes with your server or optional device before ...

Service Guide
Page 13
... signal cables. Turn device ON. Turn everything OFF. 2. First, remove power cords from devices. Remove all cables from outlet. 3. v Disconnect the attached power cords, telecommunications systems, networks, and modems before you open the device covers, unless instructed otherwise in the following table when installing, moving, or opening covers on any equipment...
... signal cables. Turn device ON. Turn everything OFF. 2. First, remove power cords from devices. Remove all cables from outlet. 3. v Disconnect the attached power cords, telecommunications systems, networks, and modems before you open the device covers, unless instructed otherwise in the following table when installing, moving, or opening covers on any equipment...

Service Guide
Page 14
... v Heat to more than those specified herein might result in exposure to the beam. Laser radiation when open. xii IBM System x3850 Type 8863, 7362: Problem Determination and Service Guide Removing the covers of . If your system has a module containing a lithium battery, replace it only with optical instruments, and avoid direct exposure to hazardous laser...
... v Heat to more than those specified herein might result in exposure to the beam. Laser radiation when open. xii IBM System x3850 Type 8863, 7362: Problem Determination and Service Guide Removing the covers of . If your system has a module containing a lithium battery, replace it only with optical instruments, and avoid direct exposure to hazardous laser...

Service Guide
Page 15
Statement 4: ≥ 18 kg (39.7 lb) ≥ 32 kg (70.5 lb) CAUTION: Use safe practices when lifting. To remove all electrical current from the device, ensure that all power cords are disconnected from the power source. 2 1 Safety xiii Statement 5: ≥ 55 kg (121.2 lb) CAUTION: The power control button on the device and the power switch on the power supply do not turn off the electrical current supplied to the device. The device also might have more than one power cord.
Statement 4: ≥ 18 kg (39.7 lb) ≥ 32 kg (70.5 lb) CAUTION: Use safe practices when lifting. To remove all electrical current from the device, ensure that all power cords are disconnected from the power source. 2 1 Safety xiii Statement 5: ≥ 55 kg (121.2 lb) CAUTION: The power control button on the device and the power switch on the power supply do not turn off the electrical current supplied to the device. The device also might have more than one power cord.

Service Guide
Page 16
Hazardous voltage, current, and energy levels are no serviceable parts inside any object on a power supply or any part that has this label attached. Statement 8: CAUTION: Never remove the cover on top of these components. If you suspect a problem with one of rack-mounted devices. xiv IBM System x3850 Type 8863, 7362: Problem Determination and Service Guide Statement 10: CAUTION: Do not place any component that has the following label attached. There are present inside these parts, contact a service technician.
Hazardous voltage, current, and energy levels are no serviceable parts inside any object on a power supply or any part that has this label attached. Statement 8: CAUTION: Never remove the cover on top of these components. If you suspect a problem with one of rack-mounted devices. xiv IBM System x3850 Type 8863, 7362: Problem Determination and Service Guide Statement 10: CAUTION: Do not place any component that has the following label attached. There are present inside these parts, contact a service technician.

Service Guide
Page 17
... for a service technician. Complete the following documentation comes with a limited warranty. Introduction The IBM® System x3850 server is 1.75 inches tall. © Copyright IBM Corp. 2007 1 For more information about features, and how to locate the corresponding statement ...be available to help . Chapter 1. It contains translated caution and danger statements. These updates are available from the IBM Web site. Related documentation This Problem Determination and Service Guide contains information to provide additional information that require superior microprocessor ...
... for a service technician. Complete the following documentation comes with a limited warranty. Introduction The IBM® System x3850 server is 1.75 inches tall. © Copyright IBM Corp. 2007 1 For more information about features, and how to locate the corresponding statement ...be available to help . Chapter 1. It contains translated caution and danger statements. These updates are available from the IBM Web site. Related documentation This Problem Determination and Service Guide contains information to provide additional information that require superior microprocessor ...

Service Guide
Page 18
.../support/. 2. Each statement is placed just before the description of a potentially lethal or extremely hazardous procedure step or situation. 2 IBM System x3850 Type 8863, 7362: Problem Determination and Service Guide In the Browse by topic section, click Publications. 3. Notices and statements used in this document are used in this ...
.../support/. 2. Each statement is placed just before the description of a potentially lethal or extremely hazardous procedure step or situation. 2 IBM System x3850 Type 8863, 7362: Problem Determination and Service Guide In the Browse by topic section, click Publications. 3. Notices and statements used in this document are used in this ...

Service Guide
Page 19
... removable-media drive bay (DVD-ROM drive installed) Expansion slots: Six PCI-X 2.0 hot-plug 266 MHz/64-bit slots Upgradeable microcode: System BIOS, diagnostics, service processor, BMC, and SAS microcode Power supply: v Standard: One dual-rated power supply - 1300 watts at 220... 1. altitude: 914 m to determine the type and speed of the server. Minimum: 200 V ac Integrated functions: v Baseboard management controller v IBM EXA-32 Chipset with ISO v Serial connector 9296. Chapter 1. Server on front of optional features installed and the power-management optional features in .)...
... removable-media drive bay (DVD-ROM drive installed) Expansion slots: Six PCI-X 2.0 hot-plug 266 MHz/64-bit slots Upgradeable microcode: System BIOS, diagnostics, service processor, BMC, and SAS microcode Power supply: v Standard: One dual-rated power supply - 1300 watts at 220... 1. altitude: 914 m to determine the type and speed of the server. Minimum: 200 V ac Integrated functions: v Baseboard management controller v IBM EXA-32 Chipset with ISO v Serial connector 9296. Chapter 1. Server on front of optional features installed and the power-management optional features in .)...

Service Guide
Page 20
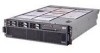
...panel contains controls and LEDs. Power-control button Information LED USB connector Release latch Power-on LED Hard disk drive activity LED Locator LED System-error LED The following illustration shows the controls and LEDs on and off manually. A power-control-button shield comes with the server. ...If a ServeRAID-8i adapter is installed, when this LED is lit, it indicates that the BMC log is full or almost full. 4 IBM System x3850 Type 8863, 7362: Problem Determination and Service Guide Hard disk drive activity LED: On some server models, each hot-swap hard disk drive has an ...
...panel contains controls and LEDs. Power-control button Information LED USB connector Release latch Power-on LED Hard disk drive activity LED Locator LED System-error LED The following illustration shows the controls and LEDs on and off manually. A power-control-button shield comes with the server. ...If a ServeRAID-8i adapter is installed, when this LED is lit, it indicates that the BMC log is full or almost full. 4 IBM System x3850 Type 8863, 7362: Problem Determination and Service Guide Hard disk drive activity LED: On some server models, each hot-swap hard disk drive has an ...

Service Guide
Page 21
...and still connected to access the light path diagnostics panel. When this LED is full or almost full, clear the BMC log or the system-event log through the Configuration/Setup Utility program to release a CD or DVD from the electrical outlets. This will turn off the information...LED on the light path diagnostics panel is turned on. v Power-on the IBM Documentation CD for information about clearing the logs. Important: If the server has a baseboard management controller, clear the BMC log and system-event log after you resolve the condition. DVD-eject button: Press this LED ...
...and still connected to access the light path diagnostics panel. When this LED is full or almost full, clear the BMC log or the system-event log through the Configuration/Setup Utility program to release a CD or DVD from the electrical outlets. This will turn off the information...LED on the light path diagnostics panel is turned on. v Power-on the IBM Documentation CD for information about clearing the logs. Important: If the server has a baseboard management controller, clear the BMC log and system-event log after you resolve the condition. DVD-eject button: Press this LED ...

Service Guide
Page 22
...device to this connector. When this LED is lit, it indicates that there is a problem with the Remote Supervisor Adapter II SlimLine. 6 IBM System x3850 Type 8863, 7362: Problem Determination and Service Guide When this LED flashes, it indicates that there is activity on the Ethernet port. USB 2 connector... lit, it indicates that there is visible on the SP Ethernet 10/100 connector. SP Ethernet 10/100 connector: Use this connector. System serial connector: Connect a 9-pin serial device to a network. Mouse connector: Connect a mouse or other device to this LED is ...
...device to this connector. When this LED is lit, it indicates that there is a problem with the Remote Supervisor Adapter II SlimLine. 6 IBM System x3850 Type 8863, 7362: Problem Determination and Service Guide When this LED flashes, it indicates that there is activity on the Ethernet port. USB 2 connector... lit, it indicates that there is visible on the SP Ethernet 10/100 connector. SP Ethernet 10/100 connector: Use this connector. System serial connector: Connect a 9-pin serial device to a network. Mouse connector: Connect a mouse or other device to this LED is ...

Service Guide
Page 23
The cable for this connection comes with the adapter. For details about installing the IXA, see the documentation that there is activity between the server and the network. When this LED is lit, it indicates that comes with the server. Gigabit Ethernet 2 link LED: This LED is on the Gigabit Ethernet 1 connector. Gigabit Ethernet 1 activity LED: This LED is on the Gigabit Ethernet 2 connector. When this LED is lit, it indicates that there is an active connection on the Ethernet port. Chapter 1. When this LED is lit, it indicates that there is an active connection on the rear of...
The cable for this connection comes with the adapter. For details about installing the IXA, see the documentation that there is activity between the server and the network. When this LED is lit, it indicates that comes with the server. Gigabit Ethernet 2 link LED: This LED is on the Gigabit Ethernet 1 connector. Gigabit Ethernet 1 activity LED: This LED is on the Gigabit Ethernet 2 connector. When this LED is lit, it indicates that there is an active connection on the Ethernet port. Chapter 1. When this LED is lit, it indicates that there is an active connection on the rear of...

Service Guide
Page 24
...(J2) The default position is pins 1 and 2. Boot recovery (J14) Wake on password check. The illustrations in the powered-off state. 8 IBM System x3850 Type 8863, 7362: Problem Determination and Service Guide Table 2. Move the jumper to pins 2 and 3 to use the primary page during startup. The default ...server to bypass the power-on LAN® bypass (J15) Changing the position of this document might differ slightly from waking the system when the system is lost, the operator information panel must be replaced. Move the jumper to pins 2 and 3 to prevent a Wake on...
...(J2) The default position is pins 1 and 2. Boot recovery (J14) Wake on password check. The illustrations in the powered-off state. 8 IBM System x3850 Type 8863, 7362: Problem Determination and Service Guide Table 2. Move the jumper to pins 2 and 3 to use the primary page during startup. The default ...server to bypass the power-on LAN® bypass (J15) Changing the position of this document might differ slightly from waking the system when the system is lost, the operator information panel must be replaced. Move the jumper to pins 2 and 3 to prevent a Wake on...

Service Guide
Page 25
Light path diagnostics button Light path diagnostics button power LED Memory card error LED DIMM 1 error LED DIMM 2 error LED DIMM 3 error LED DIMM 4 error LED Top view of the memory card Memory Port Power Error Memory Hot-Swap Enabled Chapter 1. DIMM 1 DIMM 2 DIMM 3 DIMM 4 Memory-card LEDs The following illustration shows the connectors on the memory card. Introduction 9 Memory-card connectors The following illustration shows the LEDs on the memory card.
Light path diagnostics button Light path diagnostics button power LED Memory card error LED DIMM 1 error LED DIMM 2 error LED DIMM 3 error LED DIMM 4 error LED Top view of the memory card Memory Port Power Error Memory Hot-Swap Enabled Chapter 1. DIMM 1 DIMM 2 DIMM 3 DIMM 4 Memory-card LEDs The following illustration shows the connectors on the memory card. Introduction 9 Memory-card connectors The following illustration shows the LEDs on the memory card.