Image Fitness 3.4 Support and Manuals
Get Help and Manuals for this Image Fitness item

View All Support Options Below
Free Image Fitness 3.4 manuals!
Problems with Image Fitness 3.4?
Ask a Question
Free Image Fitness 3.4 manuals!
Problems with Image Fitness 3.4?
Ask a Question
Popular Image Fitness 3.4 Manual Pages
English Manual - Page 1

... complete satisfaction through direct assistance from our factory. MST
CAUTION
Read all precautions and instructions in the space above for future reference.
¨
Patent Pending
USERÕS MANUAL
Visit our website at www.imagefitness.com
new products, prizes, fitness tips, and much more! Serial Number Decal (under seat)
QUESTIONS? The trained technicians on...
English Manual - Page 2

... is not legible, please call our
Customer Service Department
toll-free at the right has
been placed on the weight
bench. Remove the Part List/Exploded Drawing before beginning assembly. Apply
the replacement decal in the center of Contents
Warning Decal Placement 2 Important Precautions 3 Before You Begin 4 Part Identification Chart 5 Assembly 6 Adjusting the Weight...
English Manual - Page 3

... lat bar.
17. Replace any commercial, rental or institutional setting.
4. Always make sure... to support a maximum of 35 or persons with pre-existing health problems. Read all instructions before using... It is on each side of all parts each time you are adequately informed of your... the cable binds as described in this manual.
2. Always set both weight rests and both safety spotters ...
English Manual - Page 4
... call our Customer Service Department toll-free at 1-800-999-3756, Monday
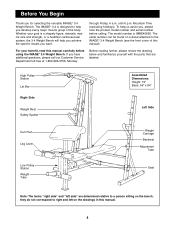
Before reading further, please review the drawing below and familiarize yourself with the parts that are determined relative to a person sitting on a decal attached to the IMAGE¨ 3.4 Weight Bench (see the front cover of the body.
The model number is IMBE40890...
English Manual - Page 5

Part Identification ChartÑModel No. IMBE40890 R0999A
M10 x 19mm Bolt (57)Ð1
M6 Washer (30)Ð4 M8 Washer (23)Ð2
M10 Washer (6)Ð15
M10 x 48mm Bolt (55)Ð2
...
English Manual - Page 6

...; Square Inner Cap (72) into the storage tube on the Right Stabilizer (26). Set the upright assembly aside and make sure it is important to recognize that this manual is completed.
¥ Tighten all parts as you assemble them, unless instructed to make sure that our products can be pre-assembled.
Before beginning assembly...
English Manual - Page 7
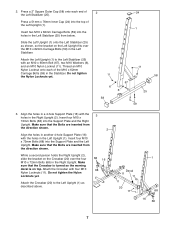
... two M10 Washers (6), and an M10 Nylon Locknut (11). Insert four M10 x
3
72mm Bolts (68) into the Support Plate and the Left Upright. Press a 2Ó Square Outer Cap (58) onto each of the Left Upright (1).
1...
68
7 Make sure that the Crossbar is turned so the warning decal is on the Left Upright fits over the four M10 x 72mm Bolts (68) in the Right Upright (2). Make sure that the ...
English Manual - Page 8

...Press a 48mm Round Inner Cap (12) into the open end of the two Cables.
Slide both parts onto the Rear Upright (9), mak- Identify the Upper Cable (45); Note that the Carriage Bushing (56... to the indicated hole in the same manner.
8
7
6 67
67
6
2
11
17
6 11
9 Attach the parts to the Right Upright (2) with an M10 x 19mm Bolt (57) and an M10 Nylon Locknut (11). Press a 2Ó...
English Manual - Page 10

...
33
Go back and tighten all of the 2-hole Oval Support Plate (74) to the lower set of cable used in steps 1 through the 2-hole Oval Support Plate (74). Make sure that the Cable Trap is between... (61) to the welded tube on the inside of Cable
Cable Guide
12.
Secure the Cable and Plate with the loop through the cable guide on the weight bench may stretch over time. IMPORTANT: The type ...
English Manual - Page 11

... a 48mm Round Inner Cap
16
(12) into each Bolt.
33 70
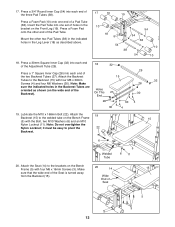
14. it must pivot easily. Insert two M10 x 68mm Bolts (33) into the 2-hole Support Plate (70), the Front Leg (19), and the brack-
13
et on the Front Leg (19) with a Bumper Screw (64).
15
13 23
19
23...
English Manual - Page 12
Press a Foam Pad (10) onto one set of holes in the bracket on the wide end of the Backrest).
15
Holes On This 27
End
28
30
30 4
19. Mount the other ...
English Manual - Page 13

...the locking tabs on
the Adjustment Tube (29) fit into the welded nut on the Uprights (1, ...) and line up one of all parts are hooked around the Uprights. ment... 15
29
13 Also, refer to the exercise guide to a different set the Backrest (15) for important information on the...) to adjust the weight bench. The use solvents.
Replace any of adjustment
brackets on the Front Leg.
36
...
English Manual - Page 14

...barbell is dropped during the exercise. WARNING: Always set both weight rests and both safety spotters at the lowest point ... Service Department (see the front cover of this , pull one Foam Pad off the Safety Spotters and causing injury to order replacement ...the barbell bouncing off the Pad Tube (38). To do this manual) to the user. USING THE WEIGHT RESTS AND SAFETY SPOTTERS
Before...
English Manual - Page 16
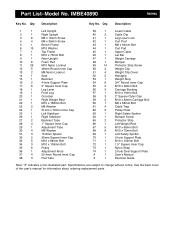
See the back cover of the userÕs manual for information about ordering replacement parts. Description
1
1
Left Upright
2
1
Right Upright
...Support Plate
71
1
M10 x 102mm Bolt
72
1
1.5Ó Square Inner Cap
73
1
Nylon Strap
74
1
2-hole Oval Support Plate
#
1
UserÕs Manual
#
1
Exercise Guide
Note: Ò#Ó indicates a non-illustrated part. Specifications...
English Manual - Page 18

..., for commercial or rental purposes, or products used as store display models. Part No. 157727 R0999A
Printed in connection with the use or performance of the product or damages with all other warranty beyond that specifically set forth herein. Ordering Replacement Parts
To order replacement parts, simply call our Customer Service Department toll-free at the center of this manual).
Image Fitness 3.4 Reviews
We have not received any reviews for Image Fitness yet.