
English Manual
Page 1
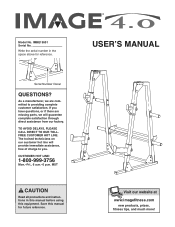
.... MST CAUTION Read all precautions and instructions in the space above for future reference. The trained technicians on our customer hot line will guarantee complete satisfaction through direct assistance from our factory. USERÕS MANUAL Visit our website at www.imagefitness.com new products, prizes, fitness tips, and much more! IMBE19501 Serial No. If you have questions, or...
.... MST CAUTION Read all precautions and instructions in the space above for future reference. The trained technicians on our customer hot line will guarantee complete satisfaction through direct assistance from our factory. USERÕS MANUAL Visit our website at www.imagefitness.com new products, prizes, fitness tips, and much more! IMBE19501 Serial No. If you have questions, or...
English Manual
Page 2
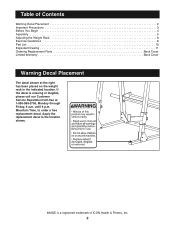
... You Begin 4 Assembly 5 Adjusting the Weight Rack 8 Exercise Guidelines 8 Part List 10 Exploded Drawing 11 Ordering Replacement Parts Back Cover Limited Warranty Back Cover Warning Decal Placement The decal shown at 1-800-999-3756, Monday through Friday, 6 a.m. IMAGE is missing or illegible, please call our Customer Service Department toll-free at the right has been placed on the weight rack in the location shown. Table of ICON Health & Fitness, Inc. 2
... You Begin 4 Assembly 5 Adjusting the Weight Rack 8 Exercise Guidelines 8 Part List 10 Exploded Drawing 11 Ordering Replacement Parts Back Cover Limited Warranty Back Cover Warning Decal Placement The decal shown at 1-800-999-3756, Monday through Friday, 6 a.m. IMAGE is missing or illegible, please call our Customer Service Department toll-free at the right has been placed on the weight rack in the location shown. Table of ICON Health & Fitness, Inc. 2
English Manual
Page 3
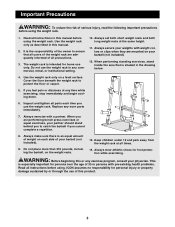
... tighten all instructions before using the weight rack. The weight rack is an equal amount of this or any worn parts immediately. 7. Always set both short weight rests and both long weight rests at all instructions in this manual before using the weight rack. 1. Read all times. 9. Always exercise with weight collars or clips when they are performing bench press exercises or squat exercises, your barbell (not included). 13. Use...
... tighten all instructions before using the weight rack. The weight rack is an equal amount of this or any worn parts immediately. 7. Always set both short weight rests and both long weight rests at all instructions in this manual before using the weight rack. 1. Read all times. 9. Always exercise with weight collars or clips when they are performing bench press exercises or squat exercises, your barbell (not included). 13. Use...
English Manual
Page 4
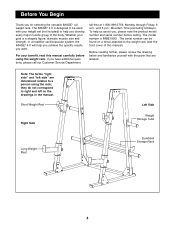
For your benefit, read this manual). The serial number can be used with the parts that are determined relative to right and left sideÓ are labeled. Whether your weight set (not included) to the weight rack (see the front cover of the body. until 6 p.m. they do not correspond to a person using the weight rack. The IMAGE¨ 4.0 is IMBE19501. Note: The terms Ò...
For your benefit, read this manual). The serial number can be used with the parts that are determined relative to right and left sideÓ are labeled. Whether your weight set (not included) to the weight rack (see the front cover of the body. until 6 p.m. they do not correspond to a person using the weight rack. The IMAGE¨ 4.0 is IMBE19501. Note: The terms Ò...
English Manual
Page 5
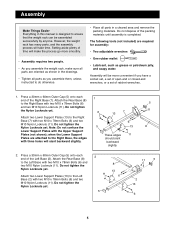
Setting aside plenty of time will be assembled successfully by anyone. Assembly will make sure all parts in a cleared area and remove the packing materials. Do not tighten the Nylon Locknuts yet. 6 7 13 11 Attach two Lower Support Plates (13) to the Right Base (7) with two M10 x 78mm Bolts (6) and two M10 Nylon Locknuts (11). Attach two Lower Support Plates (13) to do otherwise...
Setting aside plenty of time will be assembled successfully by anyone. Assembly will make sure all parts in a cleared area and remove the packing materials. Do not tighten the Nylon Locknuts yet. 6 7 13 11 Attach two Lower Support Plates (13) to the Right Base (7) with two M10 x 78mm Bolts (6) and two M10 Nylon Locknuts (11). Attach two Lower Support Plates (13) to do otherwise...
English Manual
Page 6
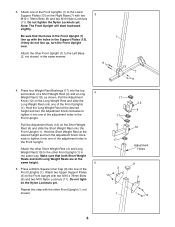
... the holes in the same way. Hold the Long Weight Rest at the same height. 5 5. Attach the other Front Upright (1) in the Front Upright (1) line up , turn the Adjustment Knob clockwise to the Lower Support Plates (13) on the Short Weight Rest (4) and slide the Short Weight Rest onto the Front Upright (1). Repeat this step with the holes in the same manner. 3 6 1 13...
... the holes in the same way. Hold the Long Weight Rest at the same height. 5 5. Attach the other Front Upright (1) in the Front Upright (1) line up , turn the Adjustment Knob clockwise to the Lower Support Plates (13) on the Short Weight Rest (4) and slide the Short Weight Rest onto the Front Upright (1). Repeat this step with the holes in the same manner. 3 6 1 13...
English Manual
Page 7
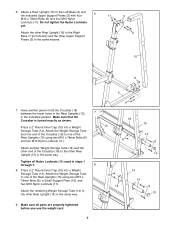
... Bolts (6), a Small Support Plate (16), and two M10 Nylon Locknuts (11). Attach the Weight Storage Tube to the other Upper Support Plates (3) in steps 1 through 7. 8 8. Attach a Rear Upright (15) to the Right 6 Base (7 [not shown]) and the other Rear Upright (15) in the same way. Attach the other Rear Upright (15) in the indicated position. Make sure that the Crossbar is turned exactly as shown. Tighten all parts...
... Bolts (6), a Small Support Plate (16), and two M10 Nylon Locknuts (11). Attach the Weight Storage Tube to the other Upper Support Plates (3) in steps 1 through 7. 8 8. Attach a Rear Upright (15) to the Right 6 Base (7 [not shown]) and the other Rear Upright (15) in the same way. Attach the other Rear Upright (15) in the indicated position. Make sure that the Crossbar is turned exactly as shown. Tighten all parts...
English Manual
Page 8
... their maximum capacity. Cross Training Many people desire a complete and well-balanced fitness program, and cross training is right for each exercise you are tightened into a hole in two ways: ¥ by changing the amount of weight used ¥ by changing the number of repetitions or sets per- Tighten each time you want your exercise program. Note: Make sure the Adjust- When you perform. Rest for several exercises. Exercise for 20...
... their maximum capacity. Cross Training Many people desire a complete and well-balanced fitness program, and cross training is right for each exercise you are tightened into a hole in two ways: ¥ by changing the amount of weight used ¥ by changing the number of repetitions or sets per- Tighten each time you want your exercise program. Note: Make sure the Adjust- When you perform. Rest for several exercises. Exercise for 20...
English Manual
Page 9
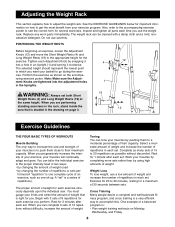
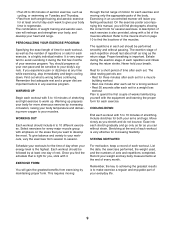
... and variety to your heart and lungs. Stretching at the end of each exercise and moving only the appropriate parts of the body. List the date, the exercises performed, the weight used, and the numbers of time after each set. This requires moving through the full range of motion for each workout is the highest. On the exercise poster accompanying this manual, you , stick with...
... and variety to your heart and lungs. Stretching at the end of each exercise and moving only the appropriate parts of the body. List the date, the exercises performed, the weight used, and the numbers of time after each set. This requires moving through the full range of motion for each workout is the highest. On the exercise poster accompanying this manual, you , stick with...
English Manual
Page 10
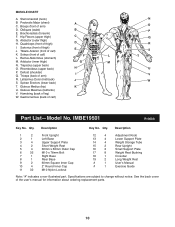
... 2Ó Round Inner Cap M10 Nylon Locknut 12 4 13 4 14 4 15 2 16 2 17 8 18 1 19 2 # 1 # 1 Adjustment Knob Lower Support Plate Weight Storage Tube Rear Upright Small Support Plate Weight Rest Bushing Crossbar Long Weight Rest UserÕs Manual Exercise Guide Note: Ò#Ó indicates a non-illustrated part. Trapezius (upper back) O. See the back cover of arm) D. Biceps (front of the userÕs manual for information about ordering replacement parts. 10 Rectus Abdominus (stomach) F L M.
... 2Ó Round Inner Cap M10 Nylon Locknut 12 4 13 4 14 4 15 2 16 2 17 8 18 1 19 2 # 1 # 1 Adjustment Knob Lower Support Plate Weight Storage Tube Rear Upright Small Support Plate Weight Rest Bushing Crossbar Long Weight Rest UserÕs Manual Exercise Guide Note: Ò#Ó indicates a non-illustrated part. Trapezius (upper back) O. See the back cover of arm) D. Biceps (front of the userÕs manual for information about ordering replacement parts. 10 Rectus Abdominus (stomach) F L M.
English Manual
Page 12
... SERIAL NUMBER of the product (see the front cover of this manual) ¥ The KEY NUMBER and DESCRIPTION of the desired part(s) (see the PART LIST and the EXPLODED DRAWING on how long an implied warranty lasts. No other consequential damages of this product to replacing or repairing, at ICON's option, the product at one of its authorized service centers with the use and service conditions...
... SERIAL NUMBER of the product (see the front cover of this manual) ¥ The KEY NUMBER and DESCRIPTION of the desired part(s) (see the PART LIST and the EXPLODED DRAWING on how long an implied warranty lasts. No other consequential damages of this product to replacing or repairing, at ICON's option, the product at one of its authorized service centers with the use and service conditions...


