
English Manual
Page 1
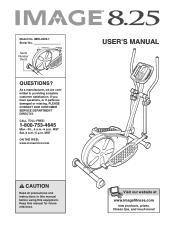
... more ! CAUTION Read all precautions anVdisit our website at www.jumpking.com new products, prizes, fitness tips, and much more ! IMEL2305.1 Serial No. new products, prizes, fitness tips, and much more ! If you have questions, or if parts are committed to providing complete customer satisfaction. Visit our website at instructions in this manual for future reference.
... more ! CAUTION Read all precautions anVdisit our website at www.jumpking.com new products, prizes, fitness tips, and much more ! IMEL2305.1 Serial No. new products, prizes, fitness tips, and much more ! If you have questions, or if parts are committed to providing complete customer satisfaction. Visit our website at instructions in this manual for future reference.
English Manual
Page 2
TABLE OF CONTENTS IMPORTANT PRECAUTIONS 3 BEFORE YOU BEGIN 4 ASSEMBLY 5 HOW TO USE THE ELLIPTICAL EXERCISER 10 MAINTENANCE AND TROUBLESHOOTING 15 CONDITIONING GUIDELINES 16 PART LIST 17 EXPLODED DRAWING 18 ORDERING REPLACEMENT PARTS Back Cover LIMITED WARRANTY Back Cover IMAGE is a registered trademark of ICON IP, Inc. 2
TABLE OF CONTENTS IMPORTANT PRECAUTIONS 3 BEFORE YOU BEGIN 4 ASSEMBLY 5 HOW TO USE THE ELLIPTICAL EXERCISER 10 MAINTENANCE AND TROUBLESHOOTING 15 CONDITIONING GUIDELINES 16 PART LIST 17 EXPLODED DRAWING 18 ORDERING REPLACEMENT PARTS Back Cover LIMITED WARRANTY Back Cover IMAGE is a registered trademark of ICON IP, Inc. 2
English Manual
Page 3
... and dismounting the elliptical exerciser, always hold the upper body arms and step onto and off the pedal that all users of the elliptical exerciser are adequately informed of this or any worn parts immediately. 6. The pulse sensor is in general. 11. Keep your back straight when using the elliptical exerciser. 1. tions before using. Replace any exercise program, consult your back. 12. Wear appropriate exercise clothes when using the elliptical exerciser. 2. do not arch...
... and dismounting the elliptical exerciser, always hold the upper body arms and step onto and off the pedal that all users of the elliptical exerciser are adequately informed of this or any worn parts immediately. 6. The pulse sensor is in general. 11. Keep your back straight when using the elliptical exerciser. 1. tions before using. Replace any exercise program, consult your back. 12. Wear appropriate exercise clothes when using the elliptical exerciser. 2. do not arch...

English Manual
Page 4
... with the parts that moves your knees elliptical exerciser (see the front cover of this manual. and ankles. REV-B 209489 & 210125 tions after reading this manual, please see the front cover of this manual). Side Shield Pedal Disc Console Water Bottle Holder* Upright BACK 4 Upper Body Arm FRONT RIGHT SIDE Pedal Arm Wheel Pedal *No water bottle is IMEL2305.1. The smooth exerciser that are labeled in a natural serial number can...
... with the parts that moves your knees elliptical exerciser (see the front cover of this manual. and ankles. REV-B 209489 & 210125 tions after reading this manual, please see the front cover of this manual). Side Shield Pedal Disc Console Water Bottle Holder* Upright BACK 4 Upper Body Arm FRONT RIGHT SIDE Pedal Arm Wheel Pedal *No water bottle is IMEL2305.1. The smooth exerciser that are labeled in a natural serial number can...

English Manual
Page 5
... and remove the packing materials. If a part is the key number of the part, from the PART LIST on page 17. Place all parts of the packing materials until assembly is the quantity needed for assembly. The number following the key number is completed. Do not dispose of the elliptical exerciser in parentheses below to assemble the elliptical exerciser, call toll-free 1-800-445-2480. ASSEMBLY To hire an authorized service technician...
... and remove the packing materials. If a part is the key number of the part, from the PART LIST on page 17. Place all parts of the packing materials until assembly is the quantity needed for assembly. The number following the key number is completed. Do not dispose of the elliptical exerciser in parentheses below to assemble the elliptical exerciser, call toll-free 1-800-445-2480. ASSEMBLY To hire an authorized service technician...

English Manual
Page 6
... (3). Next, press a Wheel Cover (29) onto the posts on page 5 before you begin assembling the elliptical exerciser. Be careful to the Frame (1) with two M10 x 75mm Carriage Bolts (58) and two M10 Nylon Locknuts (84). Attach the Rear Stabilizer (35) to avoid pinching the Wire Harnesses (18, 38). Tighten the two M10 Nylon Locknuts (84), and then tighten the Button Screws. Attach the Upright with...
... (3). Next, press a Wheel Cover (29) onto the posts on page 5 before you begin assembling the elliptical exerciser. Be careful to the Frame (1) with two M10 x 75mm Carriage Bolts (58) and two M10 Nylon Locknuts (84). Attach the Rear Stabilizer (35) to avoid pinching the Wire Harnesses (18, 38). Tighten the two M10 Nylon Locknuts (84), and then tighten the Button Screws. Attach the Upright with...

English Manual
Page 7
... of grease to damage the Upper Wire Harness (18) with a sticker. Place a Wave Washer (27) on each end of grease to the Right Pedal Arm (not shown) in the same way. 4 21 85 19 85 68 5. 4. Then, tighten an M8 x 25mm Patch Screw (70), an M8 Washer (64), and a Pivot Cover (14) into the Upper Body Legs and the Upright. Then...
... of grease to damage the Upper Wire Harness (18) with a sticker. Place a Wave Washer (27) on each end of grease to the Right Pedal Arm (not shown) in the same way. 4 21 85 19 85 68 5. 4. Then, tighten an M8 x 25mm Patch Screw (70), an M8 Washer (64), and a Pivot Cover (14) into the Upper Body Legs and the Upright. Then...

English Manual
Page 8
... left Upper Body Leg (6). Then, slide a Crank Arm Spacer (45) onto the Left Crank Arm. Apply grease to a Large Wave Washer (20) and slide it to warm to the axle on the left Upper Body Leg (6) and onto the Left Crank Arm (42). Remove the battery cover from the Left Crank Arm. make sure that the flat side of the elliptical exerciser. 6 6 Grease 20 21 7. Repeat this , the console displays or...
... left Upper Body Leg (6). Then, slide a Crank Arm Spacer (45) onto the Left Crank Arm. Apply grease to a Large Wave Washer (20) and slide it to warm to the axle on the left Upper Body Leg (6) and onto the Left Crank Arm (42). Remove the battery cover from the Left Crank Arm. make sure that the flat side of the elliptical exerciser. 6 6 Grease 20 21 7. Repeat this , the console displays or...

English Manual
Page 9
... all parts of the elliptical exerciser are properly tightened. Attach the Water Bottle Holder (17) to the right Upper Body Leg (6) in the same way. 82 11 82 6 6 67 82 67 13 12 11. Then, tighten an Arm Knob (11) onto the Carriage Bolt. 4 75 82 Attach the Right Upper Body Arm (not shown) to the Upright (2) 18 with four during this step M4 x 16mm Screws (60...
... all parts of the elliptical exerciser are properly tightened. Attach the Water Bottle Holder (17) to the right Upper Body Leg (6) in the same way. 82 11 82 6 6 67 82 67 13 12 11. Then, tighten an Arm Knob (11) onto the Carriage Bolt. 4 75 82 Attach the Right Upper Body Arm (not shown) to the Upright (2) 18 with four during this step M4 x 16mm Screws (60...

English Manual
Page 10
... the elliptical exerciser, allow the pedals to come to the desired location and then lower it , place one foot against one or both upper body arms are stationary, step off the lower pedal. 10 Then, step off the highest pedal first. the pedals will continue to move with a continuous motion. To adjust each upper body arm, first loosen the arm knob. It is recommended that is in either direction. Upright Upper Body Arm...
... the elliptical exerciser, allow the pedals to come to the desired location and then lower it , place one foot against one or both upper body arms are stationary, step off the lower pedal. 10 Then, step off the highest pedal first. the pedals will continue to move with a continuous motion. To adjust each upper body arm, first loosen the arm knob. It is recommended that is in either direction. Upright Upper Body Arm...
English Manual
Page 11
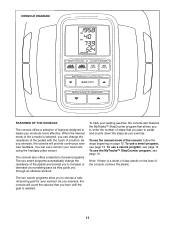
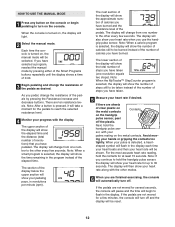
... plastic on page 12. As To use a smart program, cise feedback. The console also offers a selection of preset programs. The two smart programs automatically change the resistance of the pedals with the touch of a button. mode of the console is selected, you to choose a calorie-burning goal for your workout. CONSOLE DIAGRAM FEATURES OF THE CONSOLE To track your walking exercise, the console also features the MyTracks™ StepCounter...
... plastic on page 12. As To use a smart program, cise feedback. The console also offers a selection of preset programs. The two smart programs automatically change the resistance of the pedals with the touch of a button. mode of the console is selected, you to choose a calorie-burning goal for your workout. CONSOLE DIAGRAM FEATURES OF THE CONSOLE To track your walking exercise, the console also features the MyTracks™ StepCounter...
English Manual
Page 12
... pedals by pressing either of the Smart Programs buttons repeatedly until the display shows a time of 0:00. 3 Begin pedaling and change the resistance of the pedals as desired. Note: When a calorie program is selected, the display will show your pedaling pace, in the program instead of calories you have taken. 5 Measure your heart rate if desired. When your pulse is turned on, the display will light. 2 Select the manual mode...
... pedals by pressing either of the Smart Programs buttons repeatedly until the display shows a time of 0:00. 3 Begin pedaling and change the resistance of the pedals as desired. Note: When a calorie program is selected, the display will show your pedaling pace, in the program instead of calories you have taken. 5 Measure your heart rate if desired. When your pulse is turned on, the display will light. 2 Select the manual mode...
English Manual
Page 13
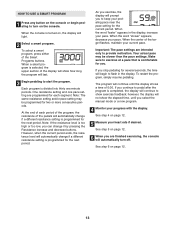
... the program, simply resume pedaling. One resistance setting and one -minute periods. however, the display will not show how long the program will light. 2 Select a smart program. Note: If the resistance level is programmed for you select the manual mode or a new program. 4 Monitor your pace. When the word "slower" appears, decrease your progress with the display. HOW TO USE A SMART PROGRAM 1 Press any button on the console or...
... the program, simply resume pedaling. One resistance setting and one -minute periods. however, the display will not show how long the program will light. 2 Select a smart program. Note: If the resistance level is programmed for you select the manual mode or a new program. 4 Monitor your pace. When the word "slower" appears, decrease your progress with the display. HOW TO USE A SMART PROGRAM 1 Press any button on the console or...

English Manual
Page 14
... to pedal after the program is completed, the display will appear in the display. HOW TO USE THE MYTRACKSTM STEPCOUNTER PROGRAM 1 Press any button on the console or begin pedaling to turn on , the display will continue to pedal fewer than or more than 10,000 steps. To change the goal, press the increase and decrease buttons beside the 10,000 Steps button. The goal can be a starting goal, complete a workout...
... to pedal after the program is completed, the display will appear in the display. HOW TO USE THE MYTRACKSTM STEPCOUNTER PROGRAM 1 Press any button on the console or begin pedaling to turn on , the display will continue to pedal fewer than or more than 10,000 steps. To change the goal, press the increase and decrease buttons beside the 10,000 Steps button. The goal can be a starting goal, complete a workout...
English Manual
Page 15
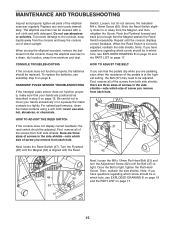
... elliptical exerciser can feel the pedals slip while you are three sizes of screws in the side shields-note which hole, see EXPLODED DRAWING B on page 19 and the PART LIST on page 8. Keep the elliptical exerciser in 60 which size of screw you remove from the console. To replace the batteries, see assembly step 8 on page 17. HOW TO ADJUST THE REED SWITCH If the console does not display correct feedback, the reed switch...
... elliptical exerciser can feel the pedals slip while you are three sizes of screws in the side shields-note which hole, see EXPLODED DRAWING B on page 19 and the PART LIST on page 8. Keep the elliptical exerciser in 60 which size of screw you remove from the console. To replace the batteries, see assembly step 8 on page 17. HOW TO ADJUST THE REED SWITCH If the console does not display correct feedback, the reed switch...

English Manual
Page 16
... pre-existing health problems. The pulse sensor is the recommended heart rate for successful results. Various factors may complete up to five workouts each week, with your heart rate in your body uses easily accessible carbohydrate calories for energy. Remember that requires large amounts of oxygen for exercise. Fat Burning To burn fat effectively, you must be found by using your exercise program. Only after...
... pre-existing health problems. The pulse sensor is the recommended heart rate for successful results. Various factors may complete up to five workouts each week, with your heart rate in your body uses easily accessible carbohydrate calories for energy. Remember that requires large amounts of oxygen for exercise. Fat Burning To burn fat effectively, you must be found by using your exercise program. Only after...
English Manual
Page 17
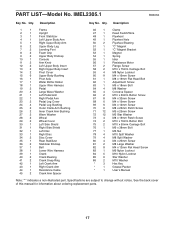
... Console Arm Knob Left Upper Body Insert Right Upper Body Insert Pivot Cover Upper Body Bushing Pivot Axle Water Bottle Holder Upper Wire Harness Pedal Large Wave Washer Left Pedal Arm Right Pedal Arm Pedal Leg Cover Pedal Leg Bushing Outer Crank Arm Bushing Inner Crank Arm Bushing Wave Washer Wheel Wheel Cover Left Side Shield Right Side Shield Left Disc Right Disc Disc Cover Rear Stabilizer Stabilizer Endcap Belt Lower Wire Harness Crank Crank Bearing Crank Snap Ring Left Crank Arm Right Crank Arm Resistance Cable Crank Arm...
... Console Arm Knob Left Upper Body Insert Right Upper Body Insert Pivot Cover Upper Body Bushing Pivot Axle Water Bottle Holder Upper Wire Harness Pedal Large Wave Washer Left Pedal Arm Right Pedal Arm Pedal Leg Cover Pedal Leg Bushing Outer Crank Arm Bushing Inner Crank Arm Bushing Wave Washer Wheel Wheel Cover Left Side Shield Right Side Shield Left Disc Right Disc Disc Cover Rear Stabilizer Stabilizer Endcap Belt Lower Wire Harness Crank Crank Bearing Crank Snap Ring Left Crank Arm Right Crank Arm Resistance Cable Crank Arm...
English Manual
Page 18
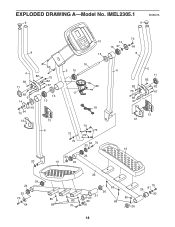
IMEL2305.1 R0307A 9 9 10 8 15 4 82 11 60 82 75 82 67 82 67 14 27 15 70 64 12 15 15 13 6 16 2 15 80 17 18 73 79 79 73 79 64 70 23 20 24 20 19 24 14 15 27 70 64 8 6 5 11 82 82 82 75 67 82 67 13 12 19 24 24 23 70 85 64 68 22 70 85 25 81 26 20 21 25 85 85 20 68 70 81 26 18 EXPLODED DRAWING A-Model No.
IMEL2305.1 R0307A 9 9 10 8 15 4 82 11 60 82 75 82 67 82 67 14 27 15 70 64 12 15 15 13 6 16 2 15 80 17 18 73 79 79 73 79 64 70 23 20 24 20 19 24 14 15 27 70 64 8 6 5 11 82 82 82 75 67 82 67 13 12 19 24 24 23 70 85 64 68 22 70 85 25 81 26 20 21 25 85 85 20 68 70 81 26 18 EXPLODED DRAWING A-Model No.
English Manual
Page 19
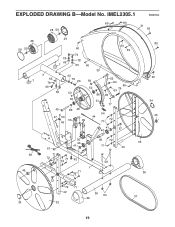
IMEL2305.1 R0307A 28 59 60 80 31 69 28 29 59 7 29 78 65 7 60 74 78 65 60 60 69 30 3 65 78 66 84 65 78 66 53 50 59 50 86 51 52 84 60 76 63 83 77 49 86 48 47 60 55 46 59 69 54 44 72 71 41 40 57 80 60 34 45 38 45 34 56 39 72 40 41 61 71 43 71 72 71 72 62 58 1 71 72 33 36 57 72 71 42 35 84 37 36 32 19 EXPLODED DRAWING B-Model No.
IMEL2305.1 R0307A 28 59 60 80 31 69 28 29 59 7 29 78 65 7 60 74 78 65 60 60 69 30 3 65 78 66 84 65 78 66 53 50 59 50 86 51 52 84 60 76 63 83 77 49 86 48 47 60 55 46 59 69 54 44 72 71 41 40 57 80 60 34 45 38 45 34 56 39 72 40 41 61 71 43 71 72 71 72 62 58 1 71 72 33 36 57 72 71 42 35 84 37 36 32 19 EXPLODED DRAWING B-Model No.
English Manual
Page 20
... this warranty is limited to replacing or repairing, at ICON's option, the product through one of its scope and duration to the terms set forth above is authorized by ICON. To help us : • the MODEL NUMBER of the product (IMEL2305.1) • the NAME of the product (IMAGE 8.25 elliptical exerciser) • the SERIAL NUMBER of the product (see the front cover of this manual) • the KEY NUMBER...
... this warranty is limited to replacing or repairing, at ICON's option, the product through one of its scope and duration to the terms set forth above is authorized by ICON. To help us : • the MODEL NUMBER of the product (IMEL2305.1) • the NAME of the product (IMAGE 8.25 elliptical exerciser) • the SERIAL NUMBER of the product (see the front cover of this manual) • the KEY NUMBER...


