
Firmware Installation Guide (English)
Page 1
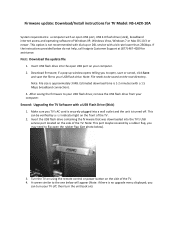
... 4. Insert USB flash drive into the TV's USB service port located on the front of Windows XP, Windows Vista, Windows 7 or Mac OS 10.3 or newer. Note: File needs to open the rubber flap (See photo below). 3. Second: Upgrading the TV Software with a bit rate lower ... Estimated download time is approximately 3 MB. After saving the firmware to the one below do not help, call Insignia Customer Support at (877) 467‐4289 for TV Model: NS‐L42X‐10A System requirements: a computer with an open USB port, USB 2.0 flash drive (stick), broadband internet access and ...
... 4. Insert USB flash drive into the TV's USB service port located on the front of Windows XP, Windows Vista, Windows 7 or Mac OS 10.3 or newer. Note: File needs to open the rubber flap (See photo below). 3. Second: Upgrading the TV Software with a bit rate lower ... Estimated download time is approximately 3 MB. After saving the firmware to the one below do not help, call Insignia Customer Support at (877) 467‐4289 for TV Model: NS‐L42X‐10A System requirements: a computer with an open USB port, USB 2.0 flash drive (stick), broadband internet access and ...

User Manual (English)
Page 3
... to work with your TV . . . . 8 Making connections 9 Connecting the power 9 Connecting an outdoor antenna 9 Connecting cable TV 9 Connecting satellite TV via a satellite TV box 10 Connecting a VCR 10 Connecting a camcorder or game console 11 Connecting an HDMI device 11 Connecting a component video device 12 Connecting a S-Video device 12 Connecting a computer 13 Connecting...
... to work with your TV . . . . 8 Making connections 9 Connecting the power 9 Connecting an outdoor antenna 9 Connecting cable TV 9 Connecting satellite TV via a satellite TV box 10 Connecting a VCR 10 Connecting a camcorder or game console 11 Connecting an HDMI device 11 Connecting a component video device 12 Connecting a S-Video device 12 Connecting a computer 13 Connecting...

User Manual (English)
Page 6
... has two blades with the manufacturer's instructions. 8 Do not install near water. 6 Clean only with your doctor after rinsing for replacement of the obsolete outlet. 10 Protect the power cord from touching such power lines or circuits as sunshine, fire, or the like. 18 The apparatus should be fatal. Class I apparatus...
... has two blades with the manufacturer's instructions. 8 Do not install near water. 6 Clean only with your doctor after rinsing for replacement of the obsolete outlet. 10 Protect the power cord from touching such power lines or circuits as sunshine, fire, or the like. 18 The apparatus should be fatal. Class I apparatus...

User Manual (English)
Page 9
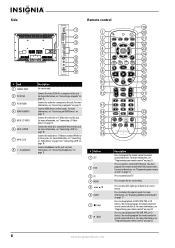
... it. Press the bottom of the button to this jack. Press this jack. For more information, see "Connecting a digital audio amplifier" on page 10. For more information, see "Connecting a S-Video device" on 12 or "Connecting a VCR" on page 13. Press to open the on page 12... of the button to increase a setting. In Menu mode, functions as the down arrow. For more information, see "Connecting an analog audio amplifier" on page 10. For more information, see "Connecting a VCR" on page 14. Front 1 2 3 4 GAME 5 6 # Button 1 VOL 2 CH 3 MENU 4 INPUT 5 GAME 6 (power)...
... it. Press the bottom of the button to this jack. Press this jack. For more information, see "Connecting a digital audio amplifier" on page 10. For more information, see "Connecting a S-Video device" on 12 or "Connecting a VCR" on page 13. Press to open the on page 12... of the button to increase a setting. In Menu mode, functions as the down arrow. For more information, see "Connecting an analog audio amplifier" on page 10. For more information, see "Connecting a VCR" on page 14. Front 1 2 3 4 GAME 5 6 # Button 1 VOL 2 CH 3 MENU 4 INPUT 5 GAME 6 (power)...
User Manual (English)
Page 10
... 11 30 12 31 32 13 14 33 15 34 16 GAME 35 DYN VOL 17 36 18 NS-RC02U-10A 37 # Button 1 SET 2 DVD 3 TV 4 MENU 5 6 GUIDE 7 (stop playback on page 10. For more information, see "Connecting a S-Video device" on page 12 or "Connecting a VCR" on DVD, DVR, PVR, or CD ... to this jack. Connect headphones to control a connected DVD player. Press to this jack. Press to move left, right, up, or down in on page 10. For more information, see "Connecting a VCR" on -screen menus. Press to start playback on page 11. Press to control your TV. For more information,...
... 11 30 12 31 32 13 14 33 15 34 16 GAME 35 DYN VOL 17 36 18 NS-RC02U-10A 37 # Button 1 SET 2 DVD 3 TV 4 MENU 5 6 GUIDE 7 (stop playback on page 10. For more information, see "Connecting a S-Video device" on page 12 or "Connecting a VCR" on DVD, DVR, PVR, or CD ... to this jack. Connect headphones to control a connected DVD player. Press to this jack. Press to move left, right, up, or down in on page 10. For more information, see "Connecting a VCR" on -screen menus. Press to start playback on page 11. Press to control your TV. For more information,...

User Manual (English)
Page 11
... 33. For more information, see "Viewing closed captioning on page 17. For more information, see "Adjusting the TV picture" on or off. # Button 9 (fast reverse) 10 / (skip back) 11 RECALL 12 VOL+/VOL- 13 Numbers 14 INPUT 15 FAV 16 SAP 17 SLEEP 18 DYN VOL 19 (power) 20 STB 21..., PVR, or CD devices. Press to fast forward on page 33. # Button Description 27 PVR/LIST Press to control connected devices. You can select Off, 5, 10, 15, 30, 60, 90, 120, 180, or 240 minutes. For more information, see "Programming your remote control" on DVD, DVR, PVR, or CD devices. 28...
... 33. For more information, see "Viewing closed captioning on page 17. For more information, see "Adjusting the TV picture" on or off. # Button 9 (fast reverse) 10 / (skip back) 11 RECALL 12 VOL+/VOL- 13 Numbers 14 INPUT 15 FAV 16 SAP 17 SLEEP 18 DYN VOL 19 (power) 20 STB 21..., PVR, or CD devices. Press to fast forward on page 33. # Button Description 27 PVR/LIST Press to control connected devices. You can select Off, 5, 10, 15, 30, 60, 90, 120, 180, or 240 minutes. For more information, see "Programming your remote control" on DVD, DVR, PVR, or CD devices. 28...

User Manual (English)
Page 13
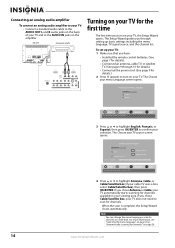
...cable TV Your TV has a coaxial jack for "premium" (pay) channels. For more information, see "With converter/descrambler box" on page 10 and contact your cable TV provider. You may need a converter/descrambler box. Twin-lead cable www.insigniaproducts.com 9 See your universal remote control...converter/descrambler box, you can operate both your set-top box and your universal remote control or set-top box manufacturer, or call the Insignia Customer Care Center at 1-877-467-4289. Making connections Connecting the power To connect the power: • Plug the power cord into...
...cable TV Your TV has a coaxial jack for "premium" (pay) channels. For more information, see "With converter/descrambler box" on page 10 and contact your cable TV provider. You may need a converter/descrambler box. Twin-lead cable www.insigniaproducts.com 9 See your universal remote control...converter/descrambler box, you can operate both your set-top box and your universal remote control or set-top box manufacturer, or call the Insignia Customer Care Center at 1-877-467-4289. Making connections Connecting the power To connect the power: • Plug the power cord into...

User Manual (English)
Page 14
... the cable-out, HDMI, component video, S-Video, or AV jack. Note If a device is connected to the AV IN 1 VIDEO jack, unplug the S-Video device. 10 www.insigniaproducts.com With converter/descrambler box If your cable box descrambles only some channels (such as a guide to connect a converter/descrambler box. The connection...
... the cable-out, HDMI, component video, S-Video, or AV jack. Note If a device is connected to the AV IN 1 VIDEO jack, unplug the S-Video device. 10 www.insigniaproducts.com With converter/descrambler box If your cable box descrambles only some channels (such as a guide to connect a converter/descrambler box. The connection...
User Manual (English)
Page 18
.... (See page 7 for details). • Connected an antenna, cable TV, or satellite TV. (See pages 9 through setting up your TV: 1 Make sure that you through 10 for details.) • Connected the power cord. (See page 9 for details.) 2 Press (power) to turn on your TV, the Setup Wizard opens. The Choose your...
.... (See page 7 for details). • Connected an antenna, cable TV, or satellite TV. (See pages 9 through setting up your TV: 1 Make sure that you through 10 for details.) • Connected the power cord. (See page 9 for details.) 2 Press (power) to turn on your TV, the Setup Wizard opens. The Choose your...

User Manual (English)
Page 25
..., then press OK/ENTER or to select CHANNELS. The Channels menu opens. Channels Add/Skip Channel PICTURE AUDIO CHANNELS SETTINGS Ch 5-0 Ch 9-1 WWOR DT Ch 10-0 Ch 60-2 Ch 60-4 Ch 9-0 Ch 9-2 WNYW DT Ch 60-1 Ch 60-3 Ch 60-7 MOVE OK ENTER SELECT MENU PREVIOUS Manually add and skip channels... found in the list. After the scan is complete, the menu closes and your program list EXIT EXIT Channels Favorites Ch 5-0 Ch 9-1 WWOR DT Ch 10-0 Ch 60-2 Ch 60-4 PICTURE AUDIO CHANNELS SETTINGS Ch 9-0 Ch 9-2 WNYW DT Ch 60-1 Ch 60-3 Ch 60-7 MOVE OK ENTER SELECT Add channels to...
..., then press OK/ENTER or to select CHANNELS. The Channels menu opens. Channels Add/Skip Channel PICTURE AUDIO CHANNELS SETTINGS Ch 5-0 Ch 9-1 WWOR DT Ch 10-0 Ch 60-2 Ch 60-4 Ch 9-0 Ch 9-2 WNYW DT Ch 60-1 Ch 60-3 Ch 60-7 MOVE OK ENTER SELECT MENU PREVIOUS Manually add and skip channels... found in the list. After the scan is complete, the menu closes and your program list EXIT EXIT Channels Favorites Ch 5-0 Ch 9-1 WWOR DT Ch 10-0 Ch 60-2 Ch 60-4 PICTURE AUDIO CHANNELS SETTINGS Ch 9-0 Ch 9-2 WNYW DT Ch 60-1 Ch 60-3 Ch 60-7 MOVE OK ENTER SELECT Add channels to...

User Manual (English)
Page 26
... or to highlight the channel you want to add to the Favorites list, then press OK/ENTER to close the Favorites list. Favorites Ch 5-0 Ch 10-0 Ch 60-3 Ch 60-8 Ch 60-11 Ch 60-12 MOVE OK ENTER SELECT Add channels to create a favorites list MENU PREVIOUS EXIT EXIT 2 Press...
... or to highlight the channel you want to add to the Favorites list, then press OK/ENTER to close the Favorites list. Favorites Ch 5-0 Ch 10-0 Ch 60-3 Ch 60-8 Ch 60-11 Ch 60-12 MOVE OK ENTER SELECT Add channels to create a favorites list MENU PREVIOUS EXIT EXIT 2 Press...

User Manual (English)
Page 34
...The on-screen menu opens with the Picture menu displayed. Settings Time Date/Time Sleep Timer PICTUREOff AUDIO CHANNELS SETTINGS 5 minutes 10 minutes 15 minutes 30 minutes Off 60 minutes 90 minutes 120 minutes 180 minutes 240 minutes MOVE OK ENTER SELECT MENU PREVIOUS... CHANNELS SETTINGS Low On MOVE OK ENTER SELECT Set various TV options MENU PREVIOUS EXIT EXIT 30 www.insigniaproducts.com Note You can select Off, 5, 10, 15, 30, 60, 90, 120, 180, or 240 minutes. Picture Mode Brightness Contrast Color Tint Sharpness PICTURE AUDIO CHANNELS SETTINGS Vivid 42 45 ...
...The on-screen menu opens with the Picture menu displayed. Settings Time Date/Time Sleep Timer PICTUREOff AUDIO CHANNELS SETTINGS 5 minutes 10 minutes 15 minutes 30 minutes Off 60 minutes 90 minutes 120 minutes 180 minutes 240 minutes MOVE OK ENTER SELECT MENU PREVIOUS... CHANNELS SETTINGS Low On MOVE OK ENTER SELECT Set various TV options MENU PREVIOUS EXIT EXIT 30 www.insigniaproducts.com Note You can select Off, 5, 10, 15, 30, 60, 90, 120, 180, or 240 minutes. Picture Mode Brightness Contrast Color Tint Sharpness PICTURE AUDIO CHANNELS SETTINGS Vivid 42 45 ...

User Manual (English)
Page 38
...75 keys, depending on page 37. Deleting a single learning key This process returns the key to program another key. Note If more than 10 seconds pass between key presses, the remote exits programming. In either case, the remote cannot learn . 5 On the original remote, press ... for the fifth digit. 6 To check for other unusual formats. • For optimum learning, avoid high levels of this step again until the Insignia's LED blinks twice. If needed, also see "Troubleshooting remote control programming" on the code being learned. • Certain device functions are mode-specific,...
...75 keys, depending on page 37. Deleting a single learning key This process returns the key to program another key. Note If more than 10 seconds pass between key presses, the remote exits programming. In either case, the remote cannot learn . 5 On the original remote, press ... for the fifth digit. 6 To check for other unusual formats. • For optimum learning, avoid high levels of this step again until the Insignia's LED blinks twice. If needed, also see "Troubleshooting remote control programming" on the code being learned. • Certain device functions are mode-specific,...

User Manual (English)
Page 39
... twice. To lock volume control to one mode (such as source mode) to a different key in a specific mode Note If more than 10 seconds pass between key presses, the remote exits programming. The mode LED blinks twice. 3 Press CH once. In either your batteries are 1... release. 3 Enter 9 9 3. Programming channel lock Channel control can perform Individual volume unlock on the assigned device. The affected keys are low, or the Insignia remote control has a memory fault. To unlock channel locks: 1 Press and hold SET until the mode LED blinks twice, then release. 2 Enter 9 ...
... twice. To lock volume control to one mode (such as source mode) to a different key in a specific mode Note If more than 10 seconds pass between key presses, the remote exits programming. The mode LED blinks twice. 3 Press CH once. In either your batteries are 1... release. 3 Enter 9 9 3. Programming channel lock Channel control can perform Individual volume unlock on the assigned device. The affected keys are low, or the Insignia remote control has a memory fault. To unlock channel locks: 1 Press and hold SET until the mode LED blinks twice, then release. 2 Enter 9 ...


