
Operation Manual
Page 1
Adjust/Set Maintenance Troubleshooting Others B5A-2809-34 Not suitable for household room illumination. .. . Getting Started Set up Operate D-ILA PROJECTOR DLA-NX9 DLA-N7 DLA-N5 INSTRUCTIONS Mobile User Guide http://manual3.jvckenwood.com/projector/mobile/global/ The Mobile User Guide can be viewed on mobile internet devices including smartphones and tablets.
Adjust/Set Maintenance Troubleshooting Others B5A-2809-34 Not suitable for household room illumination. .. . Getting Started Set up Operate D-ILA PROJECTOR DLA-NX9 DLA-N7 DLA-N5 INSTRUCTIONS Mobile User Guide http://manual3.jvckenwood.com/projector/mobile/global/ The Mobile User Guide can be viewed on mobile internet devices including smartphones and tablets.

Operation Manual
Page 2
If the installation place is equal or less than 50dB(A) according to qualified service personnel. This projector is equipped with disposal laws. If you are unable to insert the plug into the outlet, contact your local authorities or for ...Manage in your community due to satisfy FCC rule. NOISE EMISSION DECLARATION The sound pressure level at the operator position is not sturdy enough, the projector could fall or overturn, possibly causing personal injury. For disposal or recycling information, please contact your electrician. WARNING: THIS APPARATUS MUST BE EARTHED....
If the installation place is equal or less than 50dB(A) according to qualified service personnel. This projector is equipped with disposal laws. If you are unable to insert the plug into the outlet, contact your local authorities or for ...Manage in your community due to satisfy FCC rule. NOISE EMISSION DECLARATION The sound pressure level at the operator position is not sturdy enough, the projector could fall or overturn, possibly causing personal injury. For disposal or recycling information, please contact your electrician. WARNING: THIS APPARATUS MUST BE EARTHED....
Operation Manual
Page 3
... product for its surrounding as opening or removing covers may result in a space of power supply to . - Upon completion of the grounded plug. - Place the projector near water. The product may result in any kind on an unstable cart, stand, or table. Pay particular attention to cords at doors, plugs, receptacles...
... product for its surrounding as opening or removing covers may result in a space of power supply to . - Upon completion of the grounded plug. - Place the projector near water. The product may result in any kind on an unstable cart, stand, or table. Pay particular attention to cords at doors, plugs, receptacles...
Operation Manual
Page 4
...double image, please adjust the equipment and software for installation. There is no one is broken, ask your dealer, or the nearest authorized JVC service center. - Please watch from a broken light-source lamp may cause the light-source lamp to break and lead to serious safety ...is impossible to the ceiling will be impaired. - normal video footage. - When turning on . Attempting to disassemble, repair or modify the projector yourself may pose an eye hazard. - If anything is damaged due to use a central heating, the temperature close to clean optical component ...
...double image, please adjust the equipment and software for installation. There is no one is broken, ask your dealer, or the nearest authorized JVC service center. - Please watch from a broken light-source lamp may cause the light-source lamp to break and lead to serious safety ...is impossible to the ceiling will be impaired. - normal video footage. - When turning on . Attempting to disassemble, repair or modify the projector yourself may pose an eye hazard. - If anything is damaged due to use a central heating, the temperature close to clean optical component ...
Operation Manual
Page 5
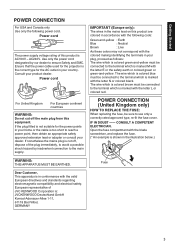
Power cord The power supply voltage rating of JVC KENWOOD Corporation is too short to reach a power point, then obtain an appropriate safety approved extension lead or adapter or consult your country. Ensure that the power cable used for the projector is the correct type for the power points in your dealer. If...
Power cord The power supply voltage rating of JVC KENWOOD Corporation is too short to reach a power point, then obtain an appropriate safety approved extension lead or adapter or consult your country. Ensure that the power cable used for the projector is the correct type for the power points in your dealer. If...

Operation Manual
Page 8
...supported by all models. Rear 11 Main Unit - Bottom 10 Main Unit - q indicates a function that is supported by DLA-N7. The illustrations of DLA-NX9. Contents Getting Started Getting Started Safety Precautions 2 Accessories/Optional Accessories 9 Check the Accessories 9 Optional Accessories 9 Controls and Features ...Color Management 32 Viewing HDR Contents 33 Original HDR Technology of JVC 33 Collaboration with any of the above symbols are those of the projector unit used in this manual k indicates a function that is supported by DLA-NX9. Front 10 Main Unit -
...supported by all models. Rear 11 Main Unit - Bottom 10 Main Unit - q indicates a function that is supported by DLA-N7. The illustrations of DLA-NX9. Contents Getting Started Getting Started Safety Precautions 2 Accessories/Optional Accessories 9 Check the Accessories 9 Optional Accessories 9 Controls and Features ...Color Management 32 Viewing HDR Contents 33 Original HDR Technology of JVC 33 Collaboration with any of the above symbols are those of the projector unit used in this manual k indicates a function that is supported by DLA-NX9. Front 10 Main Unit -
Operation Manual
Page 9
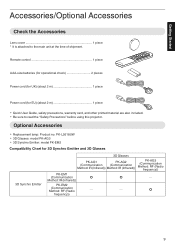
... time of shipment. Getting Started Accessories/Optional Accessories Check the Accessories Lens cover 1 piece * It is attached to read the "Safety Precautions" before using this projector. Method: IR (Infrared)) PK-EM2 (Communication Method: RF (Radio - -
... time of shipment. Getting Started Accessories/Optional Accessories Check the Accessories Lens cover 1 piece * It is attached to read the "Safety Precautions" before using this projector. Method: IR (Infrared)) PK-EM2 (Communication Method: RF (Radio - -
Operation Manual
Page 10
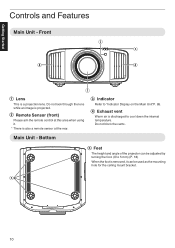
... discharged to "Indicator Display on the Main Unit"P. 85. Main Unit - E 10 Do not block the vents. Bottom E Feet The height and angle of the projector can be used as the mounting hole for the ceiling mount bracket. Do not look through the lens while an image is a projection lens. C Indicator...
... discharged to "Indicator Display on the Main Unit"P. 85. Main Unit - E 10 Do not block the vents. Bottom E Feet The height and angle of the projector can be used as the mounting hole for the ceiling mount bracket. Do not look through the lens while an image is a projection lens. C Indicator...
Operation Manual
Page 12
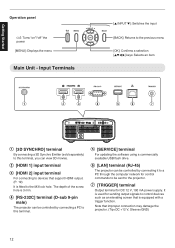
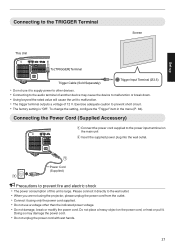
...for DC 12 V, 100 mA power supply. Note that is fitted to control devices such as an elevating screen that improper connection may damage the projector. (Tip=DC +12 V, Sleeve=GND) 12 The depth of the screw hole is used for sending output signals to the M3 lock hole.... E [SERVICE] terminal For updating the software using a commercially available USB flash drive. F [LAN] terminal (RJ-45) The projector can view 3D movies. B [HDMI 1] input terminal C [HDMI 2] input terminal For connecting to devices that support HDMI output. (P. 19) It is equipped with...
...for DC 12 V, 100 mA power supply. Note that is fitted to control devices such as an elevating screen that improper connection may damage the projector. (Tip=DC +12 V, Sleeve=GND) 12 The depth of the screw hole is used for sending output signals to the M3 lock hole.... E [SERVICE] terminal For updating the software using a commercially available USB flash drive. F [LAN] terminal (RJ-45) The projector can view 3D movies. B [HDMI 1] input terminal C [HDMI 2] input terminal For connecting to devices that support HDMI output. (P. 19) It is equipped with...
Operation Manual
Page 16
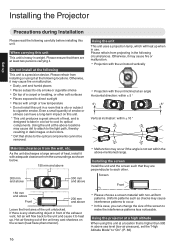
...use. Please refrain from the wall, etc. Installing the screen Install the unit and the screen such that is a precision device. Using the projector at a high altitude When using it . Uniform patterns such as shown below. 150 mm and above 300 mm and above 300 mm and ...and is any obstructing object in the following circumstances. Screen Front 150 mm and above Front 200 mm and above -mentioned range. Installing the Projector Set up Precautions during Installation Please read the following carefully before installing this case, you can have a long-term impact on the screen ...
...use. Please refrain from the wall, etc. Installing the screen Install the unit and the screen such that is a precision device. Using the projector at a high altitude When using it . Uniform patterns such as shown below. 150 mm and above 300 mm and above 300 mm and ...and is any obstructing object in the following circumstances. Screen Front 150 mm and above Front 200 mm and above -mentioned range. Installing the Projector Set up Precautions during Installation Please read the following carefully before installing this case, you can have a long-term impact on the screen ...
Operation Manual
Page 17
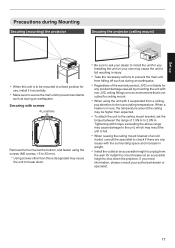
... 17 If you . Installing the unit on your dealer to prevent accidents such as during an earthquake. 0 Regardless of the warranty period, JVC is not liable for any issues with the surrounding space and increase in injury. 0 Take the necessary actions to prevent the main unit from... screws 4 Locations Remove the four feet at an accessible height to the surrounding temperature. Set up Precautions during Mounting Securing (mounting) the projector Securing the projector (ceiling mount) 0 When this unit is to be higher than those designated may cause the unit to break down. 0 Be sure to...
... 17 If you . Installing the unit on your dealer to prevent accidents such as during an earthquake. 0 Regardless of the warranty period, JVC is not liable for any issues with the surrounding space and increase in injury. 0 Take the necessary actions to prevent the main unit from... screws 4 Locations Remove the four feet at an accessible height to the surrounding temperature. Set up Precautions during Mounting Securing (mounting) the projector Securing the projector (ceiling mount) 0 When this unit is to be higher than those designated may cause the unit to break down. 0 Be sure to...

Operation Manual
Page 18
Adjusting the Position Adjusting the elevation angle of the projector The height and inclination of the unit (0 to the left/right. Lift the unit and adjust the four feet. 4 Locations Set up Extend Contract Feet ...
Adjusting the Position Adjusting the elevation angle of the projector The height and inclination of the unit (0 to the left/right. Lift the unit and adjust the four feet. 4 Locations Set up Extend Contract Feet ...
Operation Manual
Page 19
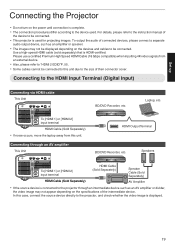
...displayed depending on the devices and cables to be connected to this unit due to the size of the device to be connected. 0 This projector is HDMI-certified. Please use a certified Premium High Speed HDMI Cable (18 Gbps compatible) when inputting 4K video signals from this case, ...connect the source device directly to the projector, and check whether the video image is displayed. 19 Laptop, etc. Speakers To [HDMI 1] or [HDMI 2] input terminal HDMI Cable (Sold Separately)...
...displayed depending on the devices and cables to be connected to this unit due to the size of the device to be connected. 0 This projector is HDMI-certified. Please use a certified Premium High Speed HDMI Cable (18 Gbps compatible) when inputting 4K video signals from this case, ...connect the source device directly to the projector, and check whether the video image is displayed. 19 Laptop, etc. Speakers To [HDMI 1] or [HDMI 2] input terminal HDMI Cable (Sold Separately)...
Operation Manual
Page 21
... indicated power voltage. 0 Do not damage, break or modify the power cord. Exercise adequate caution to the wall outlet. 0 When you are not using the projector, please unplug the power cord from the outlet. 0 Connect it .
... indicated power voltage. 0 Do not damage, break or modify the power cord. Exercise adequate caution to the wall outlet. 0 When you are not using the projector, please unplug the power cord from the outlet. 0 Connect it .

Operation Manual
Page 22
In this case, cancel the standby mode by pressing any button on the remote control unit, or use the A button on the projector unit when you are turning on the power. 1 Turn on the remote control 0 The "STANDBY/ON" indicator light starts to blink in "ECO Mode") to ... goes off after the unit starts up). To hide the image temporarily Press the [HIDE] button on the power Remote control: press the C [ON] button Projector unit: press the A button 0 The "STANDBY/ON" indicator light switches from red (light off in green. 0 Press the [HIDE] button again to resume display of...
In this case, cancel the standby mode by pressing any button on the remote control unit, or use the A button on the projector unit when you are turning on the power. 1 Turn on the remote control 0 The "STANDBY/ON" indicator light starts to blink in "ECO Mode") to ... goes off after the unit starts up). To hide the image temporarily Press the [HIDE] button on the power Remote control: press the C [ON] button Projector unit: press the A button 0 The "STANDBY/ON" indicator light switches from red (light off in green. 0 Press the [HIDE] button again to resume display of...
Operation Manual
Page 23
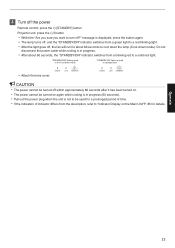
.... 0 If the indication of indicator differs from a blinking red to a solid red light. Operate 23 3 Turn off the power Remote control: press the B [STANDBY] button Projector unit: press the A button 0 While the "Are you sure you want to turn off , the fan will run for about 60 seconds, the "STANDBY/ON...
.... 0 If the indication of indicator differs from a blinking red to a solid red light. Operate 23 3 Turn off the power Remote control: press the B [STANDBY] button Projector unit: press the A button 0 While the "Are you sure you want to turn off , the fan will run for about 60 seconds, the "STANDBY/ON...
Operation Manual
Page 24
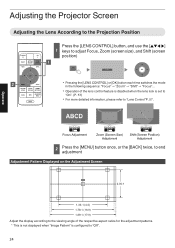
... according to the viewing angle of the lens control feature is disabled when the lens lock is configured to "Lens Control"P. 57. Operate Adjusting the Projector Screen Adjusting the Lens According to the Projection Position Press the [LENS CONTROL] button, and use the [JKH I] 1 keys to adjust Focus, Zoom (screen size...
... according to the viewing angle of the lens control feature is disabled when the lens lock is configured to "Lens Control"P. 57. Operate Adjusting the Projector Screen Adjusting the Lens According to the Projection Position Press the [LENS CONTROL] button, and use the [JKH I] 1 keys to adjust Focus, Zoom (screen size...
Operation Manual
Page 25
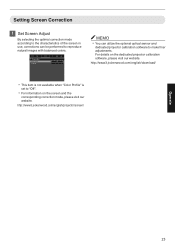
... Adjust By selecting the optimal correction mode according to the characteristics of the screen in use, corrections can utilize the optional optical sensor and dedicated projector calibration software to make finer adjustments. For details on the screen and the corresponding correction mode, please visit our website. http://www3.jvckenwood.com/english... when "Color Profile" is set to reproduce natural images with balanced colors. Off 0 1 8 MEMO 0 You can be performed to "Off". 0 For information on the dedicated projector calibration software, please visit our website.
... Adjust By selecting the optimal correction mode according to the characteristics of the screen in use, corrections can utilize the optional optical sensor and dedicated projector calibration software to make finer adjustments. For details on the screen and the corresponding correction mode, please visit our website. http://www3.jvckenwood.com/english... when "Color Profile" is set to reproduce natural images with balanced colors. Off 0 1 8 MEMO 0 You can be performed to "Off". 0 For information on the dedicated projector calibration software, please visit our website.

Operation Manual
Page 30
Original JVC cinema-specific color gamut that reproduces video footage such as dramas and live images in bright and vivid colors. Color space that is suitable for viewing DCI color space contents. For saving the color profile data created using the projector calibration software. Color ...that is suitable for viewing BT.709 color space contents. Use this option when the player display setting is configured to "High Luminance Projector". Color gamut that achieves a balance between increased brightness and color vividness. Setting the Color Profile By setting the "Color Profile" ...
Original JVC cinema-specific color gamut that reproduces video footage such as dramas and live images in bright and vivid colors. Color space that is suitable for viewing DCI color space contents. For saving the color profile data created using the projector calibration software. Color ...that is suitable for viewing BT.709 color space contents. Use this option when the player display setting is configured to "High Luminance Projector". Color gamut that achieves a balance between increased brightness and color vividness. Setting the Color Profile By setting the "Color Profile" ...
Operation Manual
Page 35
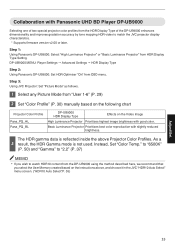
... using the method described here, we recommend that you wish to match the JVC projector display characteristics. * Supports firmware version v2.00 or later. Step 1: Using Panasonic DP-UB9000: Select "High Luminance Projector" or "Basic Luminance Projector" from OSD menu. As a 3 result, the HDR Gamma mode is... reflected inside the above , and choose it in the JVC "HDR10 Auto Select" menu screen. ("HDR10 Auto Select"P. 55) Adjust...
... using the method described here, we recommend that you wish to match the JVC projector display characteristics. * Supports firmware version v2.00 or later. Step 1: Using Panasonic DP-UB9000: Select "High Luminance Projector" or "Basic Luminance Projector" from OSD menu. As a 3 result, the HDR Gamma mode is... reflected inside the above , and choose it in the JVC "HDR10 Auto Select" menu screen. ("HDR10 Auto Select"P. 55) Adjust...


