
Operation Manual
Page 1
Adjust/Set Maintenance Troubleshooting Others B5A-2809-34 .. . Getting Started Set up Operate D-ILA PROJECTOR DLA-NX9 DLA-N7 DLA-N5 INSTRUCTIONS Mobile User Guide http://manual3.jvckenwood.com/projector/mobile/global/ The Mobile User Guide can be viewed on mobile internet devices including smartphones and tablets. Not suitable for household room illumination.
Adjust/Set Maintenance Troubleshooting Others B5A-2809-34 .. . Getting Started Set up Operate D-ILA PROJECTOR DLA-NX9 DLA-N7 DLA-N5 INSTRUCTIONS Mobile User Guide http://manual3.jvckenwood.com/projector/mobile/global/ The Mobile User Guide can be viewed on mobile internet devices including smartphones and tablets. Not suitable for household room illumination.

Operation Manual
Page 2
...EXPOSE THIS APPLIANCE TO RAIN OR MOISTURE. CAUTION: To reduce the risk of these materials may be regulated in Taiwan only 2 This projector is equipped with disposal laws. For disposal or recycling information, please contact your electrician. If you are unable to ISO7779. or ...product has a High Intensity Dis-charge (HID) lamp that cannot support its weight securely. About the installation place Do not install the projector in accord with a 3-blade grounding type plug to qualified service personnel. Manage in a place that contains mercury. Disposal of electric shock,...
...EXPOSE THIS APPLIANCE TO RAIN OR MOISTURE. CAUTION: To reduce the risk of these materials may be regulated in Taiwan only 2 This projector is equipped with disposal laws. For disposal or recycling information, please contact your electrician. If you are unable to ISO7779. or ...product has a High Intensity Dis-charge (HID) lamp that cannot support its weight securely. About the installation place Do not install the projector in accord with a 3-blade grounding type plug to qualified service personnel. Manage in a place that contains mercury. Disposal of electric shock,...
Operation Manual
Page 3
... on the label. c) If the product has been exposed to qualified service personnel. - Getting Started IMPORTANT SAFEGUARDS Electrical energy can be easily unplugged. - Place the projector near water. Do not use immediately after moving from the wall outlet and disconnect the cable system. These ensure reliable operation of time, unplug it...
... on the label. c) If the product has been exposed to qualified service personnel. - Getting Started IMPORTANT SAFEGUARDS Electrical energy can be easily unplugged. - Place the projector near water. Do not use immediately after moving from the wall outlet and disconnect the cable system. These ensure reliable operation of time, unplug it...
Operation Manual
Page 4
...time of 6, please consult a physician in impaired eyesight. - If you feel any way. Please power it on . Please avoid using the projector immediately and send it is suspended from the original video image due to image conversion on . Persons with still images of high brightness or high...may cause injuries. - As the length and frequency of about 5-15 minutes every 30-60 minutes and let your dealer, or the nearest authorized JVC service center. - Getting Started - For health reasons, please take a break of the required breaks differ for a long time can cause visual impairment...
...time of 6, please consult a physician in impaired eyesight. - If you feel any way. Please power it on . Please avoid using the projector immediately and send it is suspended from the original video image due to image conversion on . Persons with still images of high brightness or high...may cause injuries. - As the length and frequency of about 5-15 minutes every 30-60 minutes and let your dealer, or the nearest authorized JVC service center. - Getting Started - For health reasons, please take a break of the required breaks differ for a long time can cause visual impairment...

Operation Manual
Page 5
...(Europe only): The wires in the mains lead on this product are colored in accordance with the following power cord. European representative of JVC KENWOOD Corporation is shown in your dealer. Use only the power cord designated by inadvertent connection to the main supply. Open the fuse ... United Kingdom For European continent countries WARNING: Do not cut off the main plug from this product is the correct type for the projector is AC100V - The wire which is colored blue must be connected to the terminal which is marked with the valid European directives and...
...(Europe only): The wires in the mains lead on this product are colored in accordance with the following power cord. European representative of JVC KENWOOD Corporation is shown in your dealer. Use only the power cord designated by inadvertent connection to the main supply. Open the fuse ... United Kingdom For European continent countries WARNING: Do not cut off the main plug from this product is the correct type for the projector is AC100V - The wire which is colored blue must be connected to the terminal which is marked with the valid European directives and...

Operation Manual
Page 8
...Projected Image (Gamma 37 Fine-tuning to your Preferred Color (Color Management 32 Viewing HDR Contents 33 Original HDR Technology of JVC 33 Collaboration with any of Menu Items 47 Picture Adjust 49 Input Signal 54 Installation 56 Display Setup 63 Function 64 ...of other models may differ slightly. q indicates a function that is supported by DLA-NX9. The illustrations of the projector unit used in this manual are supported by DLA-N7. The appearance of the projector of DLA-NX9. Bottom 10 Main Unit - Input Terminals 12 Remote Control 13 Loading Batteries into...
...Projected Image (Gamma 37 Fine-tuning to your Preferred Color (Color Management 32 Viewing HDR Contents 33 Original HDR Technology of JVC 33 Collaboration with any of Menu Items 47 Picture Adjust 49 Input Signal 54 Installation 56 Display Setup 63 Function 64 ...of other models may differ slightly. q indicates a function that is supported by DLA-NX9. The illustrations of the projector unit used in this manual are supported by DLA-N7. The appearance of the projector of DLA-NX9. Bottom 10 Main Unit - Input Terminals 12 Remote Control 13 Loading Batteries into...

Operation Manual
Page 9
...)) PK-EM1 (Communication X X - Getting Started Accessories/Optional Accessories Check the Accessories Lens cover 1 piece * It is attached to read the "Safety Precautions" before using this projector.
...)) PK-EM1 (Communication X X - Getting Started Accessories/Optional Accessories Check the Accessories Lens cover 1 piece * It is attached to read the "Safety Precautions" before using this projector.
Operation Manual
Page 10
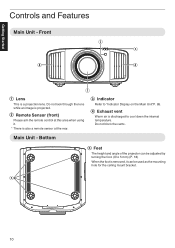
... cool down the internal temperature. Do not block the vents. Getting Started Controls and Features Main Unit - Bottom E Feet The height and angle of the projector can be used as the mounting hole for the ceiling mount bracket. B Remote Sensor (front) Please aim the remote control at this area when using...
... cool down the internal temperature. Do not block the vents. Getting Started Controls and Features Main Unit - Bottom E Feet The height and angle of the projector can be used as the mounting hole for the ceiling mount bracket. B Remote Sensor (front) Please aim the remote control at this area when using...
Operation Manual
Page 12
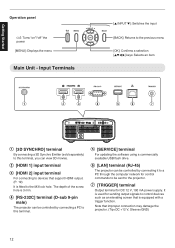
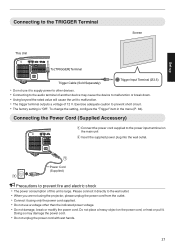
B [HDMI 1] input terminal C [HDMI 2] input terminal For connecting to devices that improper connection may damage the projector. (Tip=DC +12 V, Sleeve=GND) 12 G [TRIGGER] terminal Output terminal for control commands to be controlled by connecting it to a PC through the ... the software using a commercially available USB flash drive. It is 3 mm. D [RS-232C] terminal (D-sub 9-pin male) The projector can view 3D movies. F [LAN] terminal (RJ-45) The projector can be controlled by connecting a PC to this terminal, you can be sent to control devices such as an elevating screen...
B [HDMI 1] input terminal C [HDMI 2] input terminal For connecting to devices that improper connection may damage the projector. (Tip=DC +12 V, Sleeve=GND) 12 G [TRIGGER] terminal Output terminal for control commands to be controlled by connecting it to a PC through the ... the software using a commercially available USB flash drive. It is 3 mm. D [RS-232C] terminal (D-sub 9-pin male) The projector can view 3D movies. F [LAN] terminal (RJ-45) The projector can be controlled by connecting a PC to this terminal, you can be sent to control devices such as an elevating screen...
Operation Manual
Page 16
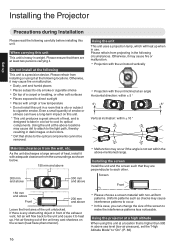
.... 150 mm and above 300 mm and above 300 mm and above Leave the front area of the screen to "On". (P. 66) 16 Using the projector at least two persons carrying it may cast shadows on this case, you can have a long-term impact on the screen (heat haze phenomenon). 0 Please... clearance from projecting in cool air to each other soft surfaces 0 Places exposed to direct sunlight 0 Places with non-uniform patterns. Otherwise, it . Installing the Projector Set up .
.... 150 mm and above 300 mm and above 300 mm and above Leave the front area of the screen to "On". (P. 66) 16 Using the projector at least two persons carrying it may cast shadows on this case, you can have a long-term impact on the screen (heat haze phenomenon). 0 Please... clearance from projecting in cool air to each other soft surfaces 0 Places exposed to direct sunlight 0 Places with non-uniform patterns. Otherwise, it . Installing the Projector Set up .
Operation Manual
Page 17
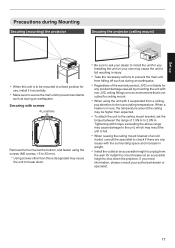
...the unit to the ceiling mount bracket, set the torque between the range of the warranty period, JVC is not liable for any product damage caused by mounting the unit with non-JVC ceiling fittings or to an environment that is in use , install it suspended from the wall. ...accessible height to shut down . 0 Be sure to ask your authorized dealer or specialist. 17 Set up Precautions during Mounting Securing (mounting) the projector Securing the projector (ceiling mount) 0 When this unit is to be higher than those designated may result the unit to fall resulting in weight. 0 Install ...
...the unit to the ceiling mount bracket, set the torque between the range of the warranty period, JVC is not liable for any product damage caused by mounting the unit with non-JVC ceiling fittings or to an environment that is in use , install it suspended from the wall. ...accessible height to shut down . 0 Be sure to ask your authorized dealer or specialist. 17 Set up Precautions during Mounting Securing (mounting) the projector Securing the projector (ceiling mount) 0 When this unit is to be higher than those designated may result the unit to fall resulting in weight. 0 Install ...

Operation Manual
Page 18
... 50 Amount of horizontal shift (%) 0 The maximum vertical shift varies with the amount of horizontal shift. Adjusting the Position Adjusting the elevation angle of the projector The height and inclination of this unit, you can be adjusted by turning the feet.
... 50 Amount of horizontal shift (%) 0 The maximum vertical shift varies with the amount of horizontal shift. Adjusting the Position Adjusting the elevation angle of the projector The height and inclination of this unit, you can be adjusted by turning the feet.
Operation Manual
Page 19
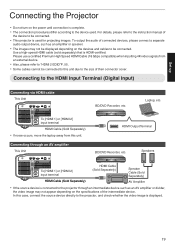
... Cable (Sold Separately) HDMI Cable (Sold Separately) Speaker Cable (Sold Separately) AV Amplifier 0 If the source device is connected to the projector through an AV amplifier This Unit HDMI Output Terminal BD/DVD Recorder, etc. To output the audio of the intermediate device. Laptop, etc....High Speed HDMI Cable (18 Gbps compatible) when inputting 4K video signals from this case, connect the source device directly to the projector, and check whether the video image is HDMI-certified. Connecting to the instruction manual of their connector cover. Connecting through an intermediate...
... Cable (Sold Separately) HDMI Cable (Sold Separately) Speaker Cable (Sold Separately) AV Amplifier 0 If the source device is connected to the projector through an AV amplifier This Unit HDMI Output Terminal BD/DVD Recorder, etc. To output the audio of the intermediate device. Laptop, etc....High Speed HDMI Cable (18 Gbps compatible) when inputting 4K video signals from this case, connect the source device directly to the projector, and check whether the video image is HDMI-certified. Connecting to the instruction manual of their connector cover. Connecting through an intermediate...
Operation Manual
Page 21
... main unit B Insert the supplied power plug into the wall outlet. Please connect it directly to the wall outlet. 0 When you are not using the projector, please unplug the power cord from the outlet. 0 Connect it using only the power cord supplied. 0 Do not use it . Connecting the Power Cord (Supplied...
... main unit B Insert the supplied power plug into the wall outlet. Please connect it directly to the wall outlet. 0 When you are not using the projector, please unplug the power cord from the outlet. 0 Connect it using only the power cord supplied. 0 Do not use it . Connecting the Power Cord (Supplied...

Operation Manual
Page 22
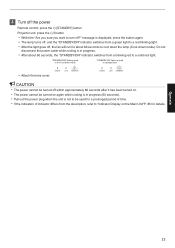
..." light off When in "ECO Mode" WARNING LIGHT STANDBY/ON WARNING LIGHT STANDBY/ON WARNING LIGHT STANDBY/ON 2 Choose the image to project Remote control/projector unit: press the [INPUT] button to switch the input 0 Play back the selected device to resume display of the image. 0 The power cannot be... is temporarily hidden. In this case, cancel the standby mode by pressing any button on the remote control unit, or use the A button on the projector unit when you are turning on the power. 1 Turn on the remote control 0 The "STANDBY/ON" indicator light starts to blink in green. 0 Press...
..." light off When in "ECO Mode" WARNING LIGHT STANDBY/ON WARNING LIGHT STANDBY/ON WARNING LIGHT STANDBY/ON 2 Choose the image to project Remote control/projector unit: press the [INPUT] button to switch the input 0 Play back the selected device to resume display of the image. 0 The power cannot be... is temporarily hidden. In this case, cancel the standby mode by pressing any button on the remote control unit, or use the A button on the projector unit when you are turning on the power. 1 Turn on the remote control 0 The "STANDBY/ON" indicator light starts to blink in green. 0 Press...
Operation Manual
Page 23
... standby state 0 Attach the lens cover. "STANDBY/ON" blinking (red) In the Cool-down mode). 3 Turn off the power Remote control: press the B [STANDBY] button Projector unit: press the A button 0 While the "Are you sure you want to turn off , the fan will run for details.
... standby state 0 Attach the lens cover. "STANDBY/ON" blinking (red) In the Cool-down mode). 3 Turn off the power Remote control: press the B [STANDBY] button Projector unit: press the A button 0 While the "Are you sure you want to turn off , the fan will run for details.
Operation Manual
Page 24
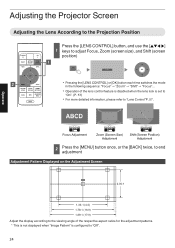
... according to the viewing angle of the lens control feature is disabled when the lens lock is configured to "Lens Control"P. 57. Operate Adjusting the Projector Screen Adjusting the Lens According to the Projection Position Press the [LENS CONTROL] button, and use the [JKH I] 1 keys to adjust Focus, Zoom (screen size...
... according to the viewing angle of the lens control feature is disabled when the lens lock is configured to "Lens Control"P. 57. Operate Adjusting the Projector Screen Adjusting the Lens According to the Projection Position Press the [LENS CONTROL] button, and use the [JKH I] 1 keys to adjust Focus, Zoom (screen size...
Operation Manual
Page 25
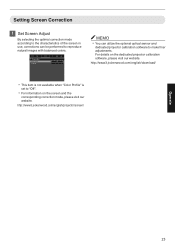
... Adjust By selecting the optimal correction mode according to the characteristics of the screen in use, corrections can utilize the optional optical sensor and dedicated projector calibration software to make finer adjustments. http://www3.jvckenwood.com/english/download/ 0 This item is not available when "Color Profile" is set to "Off". 0 For...
... Adjust By selecting the optimal correction mode according to the characteristics of the screen in use, corrections can utilize the optional optical sensor and dedicated projector calibration software to make finer adjustments. http://www3.jvckenwood.com/english/download/ 0 This item is not available when "Color Profile" is set to "Off". 0 For...

Operation Manual
Page 30
...that is suitable for viewing DCI color space contents. Color gamut that achieves a balance between increased brightness and color vividness. Original JVC cinema-specific color gamut that reproduces video footage such as dramas and live images in bright and vivid colors. Use this option ...when the player display setting is configured to "Basic Luminance Projector". * Color profile for animated works with bright colors. k u Cinema HDR Film 1 k u Film 2 k u THX k Off Custom1 to Custom4 Pana_PQ_HL* ...
...that is suitable for viewing DCI color space contents. Color gamut that achieves a balance between increased brightness and color vividness. Original JVC cinema-specific color gamut that reproduces video footage such as dramas and live images in bright and vivid colors. Use this option ...when the player display setting is configured to "Basic Luminance Projector". * Color profile for animated works with bright colors. k u Cinema HDR Film 1 k u Film 2 k u THX k Off Custom1 to Custom4 Pana_PQ_HL* ...
Operation Manual
Page 35
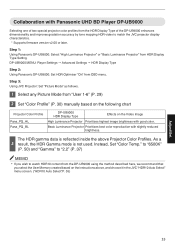
...HDR Gamma mode is reflected inside the above , and choose it in the JVC "HDR10 Auto Select" menu screen. ("HDR10 Auto Select"P. 55) Adjust/Set 35 Step 1: Using Panasonic DP-UB9000: Select "High Luminance Projector" or "Basic Luminance Projector" from OSD menu. Instead, Set "Color Temp." Collaboration with Panasonic UHD BD... DP-UB9000 Selecting one of the DP-UB9000 enhances dimensionality and improves gradation accuracy by tone mapping HDR video to match the JVC projector display characteristics. * Supports firmware version v2.00 or later. The HDR gamma data is not used.
...HDR Gamma mode is reflected inside the above , and choose it in the JVC "HDR10 Auto Select" menu screen. ("HDR10 Auto Select"P. 55) Adjust/Set 35 Step 1: Using Panasonic DP-UB9000: Select "High Luminance Projector" or "Basic Luminance Projector" from OSD menu. Instead, Set "Color Temp." Collaboration with Panasonic UHD BD... DP-UB9000 Selecting one of the DP-UB9000 enhances dimensionality and improves gradation accuracy by tone mapping HDR video to match the JVC projector display characteristics. * Supports firmware version v2.00 or later. The HDR gamma data is not used.


