

Instruction Manual
Page 3
... the wall outlet before use immediately after moving from overheating. Unplug this product yourself as the original part. Adjust only those controls that could result in installation such as a bookcase or rack unless proper ventilation is equipped with same characteristics as opening or removing covers may expose you are provided for cleaning. - f) When the product exhibits a distinct change in the cabinet...
... the wall outlet before use immediately after moving from overheating. Unplug this product yourself as the original part. Adjust only those controls that could result in installation such as a bookcase or rack unless proper ventilation is equipped with same characteristics as opening or removing covers may expose you are provided for cleaning. - f) When the product exhibits a distinct change in the cabinet...
Instruction Manual
Page 4
... image is no problem with still images of high brightness or high contrast, such as cooling fans). It may cause injuries. - The light-source lamp used for installation. Be careful when disposing of use and the respective environment. Please stop watching immediately and consult a physician if necessary. - Estimated replacement time of parts can result in any kind of illness. There is still visible after adjustment. - normal video...
... image is no problem with still images of high brightness or high contrast, such as cooling fans). It may cause injuries. - The light-source lamp used for installation. Be careful when disposing of use and the respective environment. Please stop watching immediately and consult a physician if necessary. - Estimated replacement time of parts can result in any kind of illness. There is still visible after adjustment. - normal video...

Instruction Manual
Page 5
... follow the instruction given below .) WARNING: THIS APPARATUS MUST BE EARTHED. If a new main plug has to be sure to the terminal which is marked M with the blade screwdriver, and replace the fuse. (* An example is shown in the illustration below . Getting Started POWER CONNECTION For USA and Canada only Use only the following cord: Green-and-yellow : Earth Blue : Neutral Brown...
... follow the instruction given below .) WARNING: THIS APPARATUS MUST BE EARTHED. If a new main plug has to be sure to the terminal which is marked M with the blade screwdriver, and replace the fuse. (* An example is shown in the illustration below . Getting Started POWER CONNECTION For USA and Canada only Use only the following cord: Green-and-yellow : Earth Blue : Neutral Brown...

Instruction Manual
Page 8
... Picture Adjust 43 Input Signal 46 Installation 48 Display Setup 54 Function 54 Information 56 Maintenance Replacing the Lamp 57 Lamp Replacement Procedure 57 Resetting the Lamp Time 59 Maintaining the Cabinet and Remote Control ........ 59 Cleaning and Replacing the Filter 60 Troubleshooting Troubleshooting 61 When the following messages appear 65 Others External Control 66 RS-232C Specifications 66 TCP/IP Connection 66 Command Format 67 Remote Control Code 68 Communications Example 69 Specifications 70 Index 77 Symbols used in this manual 4 indicates...
... Picture Adjust 43 Input Signal 46 Installation 48 Display Setup 54 Function 54 Information 56 Maintenance Replacing the Lamp 57 Lamp Replacement Procedure 57 Resetting the Lamp Time 59 Maintaining the Cabinet and Remote Control ........ 59 Cleaning and Replacing the Filter 60 Troubleshooting Troubleshooting 61 When the following messages appear 65 Others External Control 66 RS-232C Specifications 66 TCP/IP Connection 66 Command Format 67 Remote Control Code 68 Communications Example 69 Specifications 70 Index 77 Symbols used in this manual 4 indicates...
Instruction Manual
Page 10
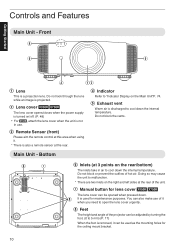
... in air to "Indicator Display on the rear/bottom) The inlets take in use. Getting Started Controls and Features Main Unit - Do not look through the lens while an image is removed, it can be used for lens cover 4 5 The lens cover can be opened when pressed down. B Lens cover 4 5 The lens cover opens/closes when the power supply is turned on/off. (P. 48) 0 For 6, attach the lens cover when the unit is also a remote sensor...
... in air to "Indicator Display on the rear/bottom) The inlets take in use. Getting Started Controls and Features Main Unit - Do not look through the lens while an image is removed, it can be used for lens cover 4 5 The lens cover can be opened when pressed down. B Lens cover 4 5 The lens cover opens/closes when the power supply is turned on/off. (P. 48) 0 For 6, attach the lens cover when the unit is also a remote sensor...

Instruction Manual
Page 17
.... Similarly, the maximum horizontal shift also changes with the amount of horizontal shift. Use them for reference during installation. 17 Set it to your preferred position. Æ "Adjusting the Lens According to the Projection Position" (P. 23) ˙ Horizontal Position Vertical Position: 0% (Center) Up to about 80% of the projected image Vertical lens shift (%) ˙ Lens shift Range 90 80 70 60...
.... Similarly, the maximum horizontal shift also changes with the amount of horizontal shift. Use them for reference during installation. 17 Set it to your preferred position. Æ "Adjusting the Lens According to the Projection Position" (P. 23) ˙ Horizontal Position Vertical Position: 0% (Center) Up to about 80% of the projected image Vertical lens shift (%) ˙ Lens shift Range 90 80 70 60...

Instruction Manual
Page 21
..." indicator light starts to blink in red. Viewing Videos STANDBY/ON LAMP WARNING MEMO 0 When you are using 6, be sure to remove the lens cover. 0 Connect the power cord, and ensure that the "STANDBY/ON" indicator lights up in green. 0 Press the [HIDE] button again to resume display of the image. 0 The power cannot be turned off after the unit starts up (green) During lamp startup STANDBY/ON LAMP WARNING STANDBY/ON LAMP WARNING . 13 2 2 Choose the image to project Remote control: press the [HDMI 1] or [HDMI 2] button Projector unit: press the [INPUT] button to switch...
..." indicator light starts to blink in red. Viewing Videos STANDBY/ON LAMP WARNING MEMO 0 When you are using 6, be sure to remove the lens cover. 0 Connect the power cord, and ensure that the "STANDBY/ON" indicator lights up in green. 0 Press the [HIDE] button again to resume display of the image. 0 The power cannot be turned off after the unit starts up (green) During lamp startup STANDBY/ON LAMP WARNING STANDBY/ON LAMP WARNING . 13 2 2 Choose the image to project Remote control: press the [HDMI 1] or [HDMI 2] button Projector unit: press the [INPUT] button to switch...

Instruction Manual
Page 31
...-tune the image quality according to the movie you are viewing. 1 Configure "Picture Mode" (P. 30), then select "Picture Adjust"""Color Profile" in the menu 0 The selectable "Color Profile" settings vary according to the "Picture Mode" and also whether the signal is set "Color Profile" to "x.v.Color". *3 x.v.Color is suitable for drama footage, etc. Color space suitable for 3D animation works. Standard Standard Color space of "Color Profile" for "Picture Mode" 6 Picture Mode 2D Signal Input 3D Signal Input Description...
...-tune the image quality according to the movie you are viewing. 1 Configure "Picture Mode" (P. 30), then select "Picture Adjust"""Color Profile" in the menu 0 The selectable "Color Profile" settings vary according to the "Picture Mode" and also whether the signal is set "Color Profile" to "x.v.Color". *3 x.v.Color is suitable for drama footage, etc. Color space suitable for 3D animation works. Standard Standard Color space of "Color Profile" for "Picture Mode" 6 Picture Mode 2D Signal Input 3D Signal Input Description...

Instruction Manual
Page 34
... you to enjoy highly expressive 4K images with a greater sense of the selected "Picture Mode" * The factory setting varies with the "Picture Mode". Item Setting Description 4K e-shift On (4K)/Off Switches the display (2K) resolution. Picture Adjust >> MPC Level 4K e-shift On Original Resolution Auto Enhance 0 Dynamic Contrast 0 Smoothing 0 NR 0 Before Exit MENU Select Reset Operate Back BACK Make adjustments according to your 2 preference based on the remote control enables you...
... you to enjoy highly expressive 4K images with a greater sense of the selected "Picture Mode" * The factory setting varies with the "Picture Mode". Item Setting Description 4K e-shift On (4K)/Off Switches the display (2K) resolution. Picture Adjust >> MPC Level 4K e-shift On Original Resolution Auto Enhance 0 Dynamic Contrast 0 Smoothing 0 NR 0 Before Exit MENU Select Reset Operate Back BACK Make adjustments according to your 2 preference based on the remote control enables you...

Instruction Manual
Page 35
... analysis screen Pressing the [P.ANALYZER] button on the setting of the input image are displayed. . 0 The frequency components are distinguished using different colors. 0 When setting the "Original Resolution" manually, select "4K" if high-frequency components constitute the majority, and a lower resolution if there are applied appears in "magenta" color. * You can also perform setting from "Picture Adjust"""MPC Level" in the menu. Frequency Red Low Yellow Green Cyan Blue Purple High . 2 Make adjustments while...
... analysis screen Pressing the [P.ANALYZER] button on the setting of the input image are displayed. . 0 The frequency components are distinguished using different colors. 0 When setting the "Original Resolution" manually, select "4K" if high-frequency components constitute the majority, and a lower resolution if there are applied appears in "magenta" color. * You can also perform setting from "Picture Adjust"""MPC Level" in the menu. Frequency Red Low Yellow Green Cyan Blue Purple High . 2 Make adjustments while...

Instruction Manual
Page 40
... grayed out. INPUT HDMI 1 HDMI 2 INFO. Setting Description Auto 1 Image contrast is changed to the image information. Auto 2 Places emphasis on the gradation. Reduces image blurring. Adjust/Set 40 If the image outline is set to "Off". 1 Select "Picture Adjust"""Blur Reduction"""Motion Enhance" from the menu Off Low High Setting Description Does not perform correction. C.M.D. 1 Press the [LENS AP.] button Pressing the [LENS AP.] button each time switches the setting in real time, and controls the aperture...
... grayed out. INPUT HDMI 1 HDMI 2 INFO. Setting Description Auto 1 Image contrast is changed to the image information. Auto 2 Places emphasis on the gradation. Reduces image blurring. Adjust/Set 40 If the image outline is set to "Off". 1 Select "Picture Adjust"""Blur Reduction"""Motion Enhance" from the menu Off Low High Setting Description Does not perform correction. C.M.D. 1 Press the [LENS AP.] button Pressing the [LENS AP.] button each time switches the setting in real time, and controls the aperture...

Instruction Manual
Page 42
... ...P. 23 9 Image Pattern ...P. 48 9 Lock ...P. 48 9 Lens Memory Select ...P. 25 9 Lens Memory Save ...P. 24 9 Lens Memory Name Edit ...P. 25 9 Lens Center ...P. 48 9 Lens Cover 4 5 ...P. 48 I Pixel Adjust ...P. 49 I Installation Style ...P. 50 I Keystone ...P. 50 I Anamorphic ...P. 50 I High Altitude Mode ...P. 50 I Screen Adjust ...P. 26 Display Setup I Back Color ...P. 54 I Menu Position ...P. 54 I Signal Display ...P. 54 I Logo ...P. 54 I Language ...P. 54 Function I Trigger ...P. 54 I Off Timer ...P. 54 I ECO Mode ...P. 55 I Network ...P. 55 I Remote Code ...P. 56 I Lamp Reset ...P. 59...
... ...P. 23 9 Image Pattern ...P. 48 9 Lock ...P. 48 9 Lens Memory Select ...P. 25 9 Lens Memory Save ...P. 24 9 Lens Memory Name Edit ...P. 25 9 Lens Center ...P. 48 9 Lens Cover 4 5 ...P. 48 I Pixel Adjust ...P. 49 I Installation Style ...P. 50 I Keystone ...P. 50 I Anamorphic ...P. 50 I High Altitude Mode ...P. 50 I Screen Adjust ...P. 26 Display Setup I Back Color ...P. 54 I Menu Position ...P. 54 I Signal Display ...P. 54 I Logo ...P. 54 I Language ...P. 54 Function I Trigger ...P. 54 I Off Timer ...P. 54 I ECO Mode ...P. 55 I Network ...P. 55 I Remote Code ...P. 56 I Lamp Reset ...P. 59...

Instruction Manual
Page 56
...source device. Color Space Displays the color space of image quality data. Lamp Reset For resetting the lamp time to "A" 0 The backlight of this unit. Lamp Time Displays the lamp time. Displays the version of the input signal. Remote Code For changing the remote control code. 0 You need to configure the remote control according to the settings of the remote control blinks 2 times: change the remote control code to "B" Setting A B Description Change the remote control code from "B" to "A". Displays the firmware version. On the remote control unit, press the [MENU] and [BACK] buttons...
...source device. Color Space Displays the color space of image quality data. Lamp Reset For resetting the lamp time to "A" 0 The backlight of this unit. Lamp Time Displays the lamp time. Displays the version of the input signal. Remote Code For changing the remote control code. 0 You need to configure the remote control according to the settings of the remote control blinks 2 times: change the remote control code to "B" Setting A B Description Change the remote control code from "B" to "A". Displays the firmware version. On the remote control unit, press the [MENU] and [BACK] buttons...

Instruction Manual
Page 59
... "Reset Lamp Time?" If the lamp time is reset while a lamp is reset to display the menu 2 Select "Function"""Lamp Reset" from the menu screen 1 Press the [MENU] button to zero. It provides an estimated timing for lamp replacement Resetting the lamp time from the menu Trigger Off Timer ECO Mode Network Remote Code Lamp Reset Function Off Off Off A Resetting the lamp time using the lamp beyond the estimated limit, thereby causing lamp blowout. Resetting the Lamp Time Reset the lamp time when you may lose track of the timing for replacing the lamp. screen...
... "Reset Lamp Time?" If the lamp time is reset while a lamp is reset to display the menu 2 Select "Function"""Lamp Reset" from the menu screen 1 Press the [MENU] button to zero. It provides an estimated timing for lamp replacement Resetting the lamp time from the menu Trigger Off Timer ECO Mode Network Remote Code Lamp Reset Function Off Off Off A Resetting the lamp time using the lamp beyond the estimated limit, thereby causing lamp blowout. Resetting the Lamp Time Reset the lamp time when you may lose track of the timing for replacing the lamp. screen...
Instruction Manual
Page 62
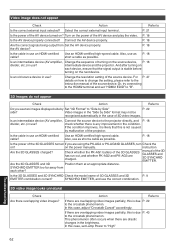
... set Lamp Power to Is the correct external input selected? Is an intermediate device (AV amplifier, Connect the source device to Do you are overlapping video images partially, this is any improvement in use an HDMI-certified Use an HDMI-certified high-speed cable. cable? This phenomenon often occurs when there are drastic changes in use ? Is the 3D GLASSES and 3D SYNCHRO Check the model name of the source...
... set Lamp Power to Is the correct external input selected? Is an intermediate device (AV amplifier, Connect the source device to Do you are overlapping video images partially, this is any improvement in use an HDMI-certified Use an HDMI-certified high-speed cable. cable? This phenomenon often occurs when there are drastic changes in use ? Is the 3D GLASSES and 3D SYNCHRO Check the model name of the source...

Instruction Manual
Page 63
... flickers of the input signal correctly set to ceiling mounted. Is "Lamp Power" set to P. 29 P. 50 Troubleshooting 63 P. 40 Set "Lamp Power" to "High" P. 43 Video image appears horizontally (vertically) extended Check Is "3D Format" set to "Manual" 2"? P. 46 Is the AV device properly connected? Video image is changed from that in the "Information" menu. P. 40 * Flickers may appear slightly reddish immediately after the projector is fuzzy Check Action Is the focus correctly adjusted? Action Set "3D Format" to "Auto" Set...
... flickers of the input signal correctly set to ceiling mounted. Is "Lamp Power" set to P. 29 P. 50 Troubleshooting 63 P. 40 Set "Lamp Power" to "High" P. 43 Video image appears horizontally (vertically) extended Check Is "3D Format" set to "Manual" 2"? P. 46 Is the AV device properly connected? Video image is changed from that in the "Information" menu. P. 40 * Flickers may appear slightly reddish immediately after the projector is fuzzy Check Action Is the focus correctly adjusted? Action Set "3D Format" to "Auto" Set...

Instruction Manual
Page 64
... the surrounding temperature of the projector. Operating sound is not a malfunction. - This is generated by the sound, set to "Open"? P. 14 from the unit? Action Refer to Set "Lens Cover" under "Lens Control" in use . Is the "Picture Mode" or "Color Profile" changed? 4 5 only Did you viewing 3D video images? P. 14 Are the batteries exhausted? P. 14 Is the remote control held too far away Hold the remote control closer to ease viewing P. 43 of signal interference...
... the surrounding temperature of the projector. Operating sound is not a malfunction. - This is generated by the sound, set to "Open"? P. 14 from the unit? Action Refer to Set "Lens Cover" under "Lens Control" in use . Is the "Picture Mode" or "Color Profile" changed? 4 5 only Did you viewing 3D video images? P. 14 Are the batteries exhausted? P. 14 Is the remote control held too far away Hold the remote control closer to ease viewing P. 43 of signal interference...

Instruction Manual
Page 70
..., enlarged or contextualized in the HDCP specifications. *6 The power consumption of this product during standby: 0.4 W *7) Operation Environment Temperature: 5°C to 35°C; of pixels: approx. 6.22 million) Projection Lens 2.0 x power zoom lens (1.4:1 to 2.8:1), motorized zoom and focus Light-source Lamp 265 W ultra-high pressure mercury lamp [product no . humidity: 20% to P. 73. Input Compatibility Signal Refer to 80%; Display Resolution 3840 x 2160 pixels *4 Input Terminal HDMI Input Dual, HDMI 19-pin x 2 (HDCP 2.2-compatible) *5 Output Terminal...
..., enlarged or contextualized in the HDCP specifications. *6 The power consumption of this product during standby: 0.4 W *7) Operation Environment Temperature: 5°C to 35°C; of pixels: approx. 6.22 million) Projection Lens 2.0 x power zoom lens (1.4:1 to 2.8:1), motorized zoom and focus Light-source Lamp 265 W ultra-high pressure mercury lamp [product no . humidity: 20% to P. 73. Input Compatibility Signal Refer to 80%; Display Resolution 3840 x 2160 pixels *4 Input Terminal HDMI Input Dual, HDMI 19-pin x 2 (HDCP 2.2-compatible) *5 Output Terminal...

Instruction Manual
Page 75
...operation x3 Mode (Orange) (Red) Display Blinking x4 . If the Warning mode is blocking the lens cover. Others 75 The "STANDBY/ON" indicator, which shows the operating mode of the unit, is removed power again. Countermeasure: Turn on again while cooling is exceeded, the indicator may light up and unit is 0 Check that the external Internal temperature is abnormally temperature is displayed. x1 STANDBY/ON LAMP WARNING x2 Mode (Orange) (Red) . Indicator Status (Solid/Blinking) Blinking Frequency Description Check and Countermeasure x1 STANDBY/ON LAMP...
...operation x3 Mode (Orange) (Red) Display Blinking x4 . If the Warning mode is blocking the lens cover. Others 75 The "STANDBY/ON" indicator, which shows the operating mode of the unit, is removed power again. Countermeasure: Turn on again while cooling is exceeded, the indicator may light up and unit is 0 Check that the external Internal temperature is abnormally temperature is displayed. x1 STANDBY/ON LAMP WARNING x2 Mode (Orange) (Red) . Indicator Status (Solid/Blinking) Blinking Frequency Description Check and Countermeasure x1 STANDBY/ON LAMP...

Instruction Manual
Page 77
... Display Position 47 E Eco Mode 55 External Control 66 F Filter Product no 60 Filter Replacement 60 Focus 24 Frame Interpolation 39 Frame Packing 29 G GAMMA 36 Gamma Adjustment 36 H HDMI Color Space 46 HDMI Input Level 46 HDMI Input Terminal 18 HIDE 21 High Altitude Mode 50 I Indicator Display 74 INFO 13 Input Resolution 56, 73 Input Signal 56, 73 Input terminals 12 Installation Method 15 Installing the 3D Syncro Emitter 28 K Keystone Correction 50 L Lamp 9 Lamp Power 43 Lamp Time...
... Display Position 47 E Eco Mode 55 External Control 66 F Filter Product no 60 Filter Replacement 60 Focus 24 Frame Interpolation 39 Frame Packing 29 G GAMMA 36 Gamma Adjustment 36 H HDMI Color Space 46 HDMI Input Level 46 HDMI Input Terminal 18 HIDE 21 High Altitude Mode 50 I Indicator Display 74 INFO 13 Input Resolution 56, 73 Input Signal 56, 73 Input terminals 12 Installation Method 15 Installing the 3D Syncro Emitter 28 K Keystone Correction 50 L Lamp 9 Lamp Power 43 Lamp Time...


