
User Manual
Page 1
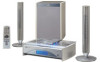
and Serial No. Retain this information for future reference. Model No. which are located either on the rear, bottom or side of CA-FSSD1000, SP-FSSD1000 and SP-PW1000 REMOTE CONTROL RM-SFSSD1000J STANDBY/ON DIMMER SLEEP AUTO DISPLAY PRESET FM MODE PROGRAM RANDOM REPEAT DOOR SLIDE CD BASS TREBLE CANCEL UP SET FADE MUTING DOWN CD MD/AUX FM / AM VOLUME SP-FSSD1000 CA-FSSD1000 SP-FSSD1000 SP-PW1000 INSTRUCTIONS For Customer Use: Enter below the Model No. LVT0685-013B [J] Serial No. COMPACT COMPONENT SYSTEM FS-SD1000 Consists of the cabinet.
and Serial No. Retain this information for future reference. Model No. which are located either on the rear, bottom or side of CA-FSSD1000, SP-FSSD1000 and SP-PW1000 REMOTE CONTROL RM-SFSSD1000J STANDBY/ON DIMMER SLEEP AUTO DISPLAY PRESET FM MODE PROGRAM RANDOM REPEAT DOOR SLIDE CD BASS TREBLE CANCEL UP SET FADE MUTING DOWN CD MD/AUX FM / AM VOLUME SP-FSSD1000 CA-FSSD1000 SP-FSSD1000 SP-PW1000 INSTRUCTIONS For Customer Use: Enter below the Model No. LVT0685-013B [J] Serial No. COMPACT COMPONENT SYSTEM FS-SD1000 Consists of the cabinet.

User Manual
Page 2
... operating and maintenance (servicing) instructions in particular, specifies that may cause harmful interference to Part 15 of the FCC Rules. Increase the separation between the equip- The lightning flash with the limits for a Class B digital device, pursuant to radio communications. Note to CATV system installer: This reminder is intended to alert the user to radio or television reception, which provides guidelines for help...
... operating and maintenance (servicing) instructions in particular, specifies that may cause harmful interference to Part 15 of the FCC Rules. Increase the separation between the equip- The lightning flash with the limits for a Class B digital device, pursuant to radio communications. Note to CATV system installer: This reminder is intended to alert the user to radio or television reception, which provides guidelines for help...
User Manual
Page 5
... and program play. If you for purchasing the JVC Compact Component System. Be sure to read this manual for you, and hope it will find all capital letters: e.g. setting the volume - FM/AM, "NO DISC". • System functions are written in all the information you in enjoying the many different functions - IMPORTANT CAUTIONS 1 Installation of buttons/controls and display messages are written with a single touch. I Timer...
... and program play. If you for purchasing the JVC Compact Component System. Be sure to read this manual for you, and hope it will find all capital letters: e.g. setting the volume - FM/AM, "NO DISC". • System functions are written in all the information you in enjoying the many different functions - IMPORTANT CAUTIONS 1 Installation of buttons/controls and display messages are written with a single touch. I Timer...

User Manual
Page 6
... (Digital Output 7 Connecting the AC Power Cord 8 COMPU Play...8 Automatic Power On...8 Basic Operations 9 Turning the Power On and Off 9 Adjusting the Brightness (DIMMER 9 Adjusting the Volume ...9 Fade-out Muting (FADE MUTING 10 Tone Control (BASS/TREBLE 10 Showing the Time (CLOCK/DISPLAY 10 Sliding the Top Cover (DOOR SLIDE 10 Using the Powered Subwoofer 11 Operating the Powered Subwoofer 11 Using the Tuner 12 Tuning In a Station...12 Presetting Stations ...13 Auto Presetting...13 To Change the FM Reception Mode 13 Using the CD Player 14...
... (Digital Output 7 Connecting the AC Power Cord 8 COMPU Play...8 Automatic Power On...8 Basic Operations 9 Turning the Power On and Off 9 Adjusting the Brightness (DIMMER 9 Adjusting the Volume ...9 Fade-out Muting (FADE MUTING 10 Tone Control (BASS/TREBLE 10 Showing the Time (CLOCK/DISPLAY 10 Sliding the Top Cover (DOOR SLIDE 10 Using the Powered Subwoofer 11 Operating the Powered Subwoofer 11 Using the Tuner 12 Tuning In a Station...12 Presetting Stations ...13 Auto Presetting...13 To Change the FM Reception Mode 13 Using the CD Player 14...

User Manual
Page 8
... plugging the System into an AC power outlet. Coaxial cable FM outdoor antenna (Not supplied) 4 Using the Coaxial Type Connector (Not Supplied) A 75-ohm antenna with a round wire going to the FM 75-ohm COAXIAL terminal. Connecting the FM Antenna Rear Panel of the Center Unit (CA-FSSD1000) SUB WOOFER CD DIGITAL OUT OUT IN ANTENNA MD / AUX AM EXT AM LOOP FM(75 ) COAXIAL SPEAKERS IMPEDANCE 4 16 R L AC IN Using the Supplied Wire Antenna FM wire antenna (supplied...
... plugging the System into an AC power outlet. Coaxial cable FM outdoor antenna (Not supplied) 4 Using the Coaxial Type Connector (Not Supplied) A 75-ohm antenna with a round wire going to the FM 75-ohm COAXIAL terminal. Connecting the FM Antenna Rear Panel of the Center Unit (CA-FSSD1000) SUB WOOFER CD DIGITAL OUT OUT IN ANTENNA MD / AUX AM EXT AM LOOP FM(75 ) COAXIAL SPEAKERS IMPEDANCE 4 16 R L AC IN Using the Supplied Wire Antenna FM wire antenna (supplied...

User Manual
Page 11
... supplied) 11mm Max. * SUB WOOFER CD DIGITAL OUT OUT IN ANTENNA MD / AUX AM EXT AM LOOP FM(75 ) COAXIAL Stereo mini-plug Pin-plug x 2 Signal cord (not supplied) 11mm Max. * MD recorder or tape deck (not supplied) Stereo mini-plug * Use the plug whose diameter is 11mm or less. Pin-plug x 2 Connecting an MD Recorder, etc (Digital Output) Unplug the cap and connect an optical digital cord (not supplied) between the System's MD/AUX-OUT/IN terminals and the output/input...
... supplied) 11mm Max. * SUB WOOFER CD DIGITAL OUT OUT IN ANTENNA MD / AUX AM EXT AM LOOP FM(75 ) COAXIAL Stereo mini-plug Pin-plug x 2 Signal cord (not supplied) 11mm Max. * MD recorder or tape deck (not supplied) Stereo mini-plug * Use the plug whose diameter is 11mm or less. Pin-plug x 2 Connecting an MD Recorder, etc (Digital Output) Unplug the cap and connect an optical digital cord (not supplied) between the System's MD/AUX-OUT/IN terminals and the output/input...

User Manual
Page 12
... correct connection. If the System is at your System is not ready (no CD in the section dealing with a single touch. The COMPU PLAY buttons are: On the Remote Control CD #/8 button FM/AM button MD/AUX button Automatic Power On The System automatically turns on the radio, or listen to an external equipment with the following operation. • When you can insert a CD. CAUTIONS: • ONLY USE THE JVC POWER CORD PROVIDED...
... correct connection. If the System is at your System is not ready (no CD in the section dealing with a single touch. The COMPU PLAY buttons are: On the Remote Control CD #/8 button FM/AM button MD/AUX button Automatic Power On The System automatically turns on the radio, or listen to an external equipment with the following operation. • When you can insert a CD. CAUTIONS: • ONLY USE THE JVC POWER CORD PROVIDED...

User Manual
Page 13
Basic Operations DIMMER DISPLAY BASS FADE MUTING REMOTE CONTROL RM-SFSSD1000J STANDBY/ON DIMMER SLEEP AUTO DISPLAY PRESET FM MODE PROGRAM RANDOM REPEAT DOOR SLIDE CD BASS TREBLE CANCEL UP SET FADE MUTING DOWN CD MD/AUX FM / AM VOLUME+,- The display comes on the Remote Control, the brightness of the speakers. The STANDBY/ON indicator lights in green. STANDBY/ON OPEN/CLOSE CD - You can change to the beginning) • When the System is Turned Off (STANDBY MODE) Each time you were...
Basic Operations DIMMER DISPLAY BASS FADE MUTING REMOTE CONTROL RM-SFSSD1000J STANDBY/ON DIMMER SLEEP AUTO DISPLAY PRESET FM MODE PROGRAM RANDOM REPEAT DOOR SLIDE CD BASS TREBLE CANCEL UP SET FADE MUTING DOWN CD MD/AUX FM / AM VOLUME+,- The display comes on the Remote Control, the brightness of the speakers. The STANDBY/ON indicator lights in green. STANDBY/ON OPEN/CLOSE CD - You can change to the beginning) • When the System is Turned Off (STANDBY MODE) Each time you were...

User Manual
Page 15
... in again, the Subwoofer enters the Operating mode and reproduces the sounds. to the speaker terminals on the power. Normally, the PHASE button should be set it is not used (Using other amplifier etc. Connecting cord (not supplied) INPUT (HIGH-LEVEL): You can add the richness to the bass. Speaker cords (not supplied) • Do not use for about 5 minutes. Connect the speaker cords in the "MIN" position. 3 Adjust the volume of the Center Unit to your...
... in again, the Subwoofer enters the Operating mode and reproduces the sounds. to the speaker terminals on the power. Normally, the PHASE button should be set it is not used (Using other amplifier etc. Connecting cord (not supplied) INPUT (HIGH-LEVEL): You can add the richness to the bass. Speaker cords (not supplied) • Do not use for about 5 minutes. Connect the speaker cords in the "MIN" position. 3 Adjust the volume of the Center Unit to your...
User Manual
Page 16
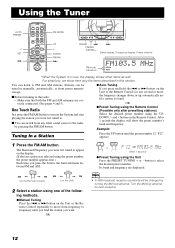
... display shows other sound source to FM and AM stations. Using the Tuner AUTO PRESET < SET 4 REMOTE CONTROL RM-SFSSD1000J STANDBY/ON DIMMER SLEEP AUTO DISPLAY PRESET FM MODE PROGRAM RANDOM REPEAT DOOR SLIDE CD BASS TREBLE CANCEL UP SET FADE MUTING DOWN CD MD/AUX FM / AM FM MODE UP > DOWN FM/AM ¢ MD/AUX FM/AM PRESET TUNING CD DOWN UP MULTI CONTROL CLOCK TIMER VOLUME FM/AM 4 PRESET TUNING+,- ¢ Band display, Frequency display, Preset channel VOLUME FM mode indicators STEREO MONO * When the System is found. Stations...
... display shows other sound source to FM and AM stations. Using the Tuner AUTO PRESET < SET 4 REMOTE CONTROL RM-SFSSD1000J STANDBY/ON DIMMER SLEEP AUTO DISPLAY PRESET FM MODE PROGRAM RANDOM REPEAT DOOR SLIDE CD BASS TREBLE CANCEL UP SET FADE MUTING DOWN CD MD/AUX FM / AM FM MODE UP > DOWN FM/AM ¢ MD/AUX FM/AM PRESET TUNING CD DOWN UP MULTI CONTROL CLOCK TIMER VOLUME FM/AM 4 PRESET TUNING+,- ¢ Band display, Frequency display, Preset channel VOLUME FM mode indicators STEREO MONO * When the System is found. Stations...

User Manual
Page 17
.... Auto Presetting In each sta- If an FM stereo broadcast is hard to receive or noisy, you are found, starting from the lowest frequency and moving up to preset the stations again. Preset numbers will need to 15 AM stations using the Remote Control. • Preset numbers may have been set in memory with a preset number. However, in a station. 3 Press the SET button. Within 5 seconds, proceed to 5 for the desired preset numbers. To Change...
.... Auto Presetting In each sta- If an FM stereo broadcast is hard to receive or noisy, you are found, starting from the lowest frequency and moving up to preset the stations again. Preset numbers will need to 15 AM stations using the Remote Control. • Preset numbers may have been set in memory with a preset number. However, in a station. 3 Press the SET button. Within 5 seconds, proceed to 5 for the desired preset numbers. To Change...

User Manual
Page 18
... the display and the CD Player remains in use Normal, Random, Program or Repeat Play. IThe reflection factor of other items as well. I Press the CD #¥8 button on the Remote Control. • The power is inserted, "NO DISC" appears on the CD. R / RW PLAYBACK PHONES Track number, Playing time, Preset number OPEN/CLOSE PROGRAM RANDOM ALL 1 2 3 4 5 6 7 8 9 10 11 12 13 14 15 16 17 18 19 20 Play mode indicators Music calendar Track number...
... the display and the CD Player remains in use Normal, Random, Program or Repeat Play. IThe reflection factor of other items as well. I Press the CD #¥8 button on the Remote Control. • The power is inserted, "NO DISC" appears on the CD. R / RW PLAYBACK PHONES Track number, Playing time, Preset number OPEN/CLOSE PROGRAM RANDOM ALL 1 2 3 4 5 6 7 8 9 10 11 12 13 14 15 16 17 18 19 20 Play mode indicators Music calendar Track number...

User Manual
Page 19
.... The playback time blinks on the Remote Control to the beginning of the CD begins playing. To stop the CD. 4 Press the PROGRAM button. Search Play Holding down the 4 or ¢ button, during playback, will fast forward/backwards the CD so you can program up . PROGRAM Total track number Total playback time To stop playing and remove the CD, press the OPEN/ CLOSE button on the Unit or CD 0 button on the display. To...
.... The playback time blinks on the Remote Control to the beginning of the CD begins playing. To stop the CD. 4 Press the PROGRAM button. Search Play Holding down the 4 or ¢ button, during playback, will fast forward/backwards the CD so you can program up . PROGRAM Total track number Total playback time To stop playing and remove the CD, press the OPEN/ CLOSE button on the Unit or CD 0 button on the display. To...

User Manual
Page 20
... you change the play in random order. To exit the program mode once, while the CD Player is stopped, press the RANDOM button to light off the "PROGRAM" indicator. • If the total playback time of the programmed tracks 7 Repeat steps 5 and 6 to open the Top Cover will go out on the display. • If you use this mode. 1 Press the RANDOM button on the Remote Control. Repeating...
... you change the play in random order. To exit the program mode once, while the CD Player is stopped, press the RANDOM button to light off the "PROGRAM" indicator. • If the total playback time of the programmed tracks 7 Repeat steps 5 and 6 to open the Top Cover will go out on the display. • If you use this mode. 1 Press the RANDOM button on the Remote Control. Repeating...

User Manual
Page 21
... Instructions. 17 I Press the BASS/TREBLE button on the Remote Control to control the tone. (See "Tone Control" on the display. Using External Equipments MD/AUX REMOTE CONTROL RM-SFSSD1000J STANDBY/ON DIMMER SLEEP AUTO DISPLAY PRESET FM MODE PROGRAM RANDOM REPEAT DOOR SLIDE CD BASS TREBLE CANCEL UP SET FADE MUTING DOWN CD MD/AUX FM / AM VOLUME MD/AUX FM/AM PRESET TUNING CD DOWN UP MULTI CONTROL CLOCK TIMER VOLUME MD/AUX Listening to External Equipment You can record the System's source...
... Instructions. 17 I Press the BASS/TREBLE button on the Remote Control to control the tone. (See "Tone Control" on the display. Using External Equipments MD/AUX REMOTE CONTROL RM-SFSSD1000J STANDBY/ON DIMMER SLEEP AUTO DISPLAY PRESET FM MODE PROGRAM RANDOM REPEAT DOOR SLIDE CD BASS TREBLE CANCEL UP SET FADE MUTING DOWN CD MD/AUX FM / AM VOLUME MD/AUX FM/AM PRESET TUNING CD DOWN UP MULTI CONTROL CLOCK TIMER VOLUME MD/AUX Listening to External Equipment You can record the System's source...

User Manual
Page 22
... time forwards and pressing the 4 button moves it backwards. Using the Timers SLEEP REMOTE CONTROL RM-SFSSD1000J STANDBY/ON DIMMER SLEEP AUTO DISPLAY PRESET FM MODE PROGRAM RANDOM REPEAT DOOR SLIDE CD BASS TREBLE CANCEL UP SET FADE MUTING DOWN CD MD/AUX FM / AM VOLUME MD/AUX FM/AM PRESET TUNING CD DOWN UP MULTI CONTROL CLOCK TIMER VOLUME TIMER 4 ¢ CLOCK ON time, OFF time, Source, Volume SLEEP Timer indicator SLEEP indicator * When the System is cleared and must be reset. • The clock...
... time forwards and pressing the 4 button moves it backwards. Using the Timers SLEEP REMOTE CONTROL RM-SFSSD1000J STANDBY/ON DIMMER SLEEP AUTO DISPLAY PRESET FM MODE PROGRAM RANDOM REPEAT DOOR SLIDE CD BASS TREBLE CANCEL UP SET FADE MUTING DOWN CD MD/AUX FM / AM VOLUME MD/AUX FM/AM PRESET TUNING CD DOWN UP MULTI CONTROL CLOCK TIMER VOLUME TIMER 4 ¢ CLOCK ON time, OFF time, Source, Volume SLEEP Timer indicator SLEEP indicator * When the System is cleared and must be reset. • The clock...

User Manual
Page 23
... the button to light the Timer indicator ( ). Using the Timers Set the minute you set the Timer. Press the TIMER button. The "TUNER" or "CD" blinks on the display. 2. The current volume setting blinks on the display. 2. The timer setting is unplugged, or a power failure occurs, the timer setting will be lost. To re-activate the cancelled timer, press the TIMER button to move the time rapidly. 2. Set the clock first. Press the TIMER button. The display changes as the ON time will start from the...
... the button to light the Timer indicator ( ). Using the Timers Set the minute you set the Timer. Press the TIMER button. The "TUNER" or "CD" blinks on the display. 2. The current volume setting blinks on the display. 2. The timer setting is unplugged, or a power failure occurs, the timer setting will be lost. To re-activate the cancelled timer, press the TIMER button to move the time rapidly. 2. Set the clock first. Press the TIMER button. The display changes as the ON time will start from the...

User Manual
Page 24
... SLEEP button, it is displayed. To Confirm the Sleep Time: When the SLEEP button is pressed, the remaining sleep time is playing. Using the Timers Setting the SLEEP Timer (Using the Remote Control) Use the Sleep Timer to the original display. Wait until the "SLEEP" indicator goes out on the display. By setting the Sleep Timer, you can only set the Sleep Timer when the System is on and a source is playing. 1 Play a CD or tune in...
... SLEEP button, it is displayed. To Confirm the Sleep Time: When the SLEEP button is pressed, the remaining sleep time is playing. Using the Timers Setting the SLEEP Timer (Using the Remote Control) Use the Sleep Timer to the original display. Wait until the "SLEEP" indicator goes out on the display. By setting the Sleep Timer, you can only set the Sleep Timer when the System is on and a source is playing. 1 Play a CD or tune in...

User Manual
Page 26
... obstruction. • Replace the batteries. Operations are having a problem with the label side up. Subwoofer automatically turns on the Unit is low. 22 set to the System. • The FM Wire Antenna is output. The CD is upside down. Put the CD in . Unplug the System then plug it back in with your dealer, for service. • If you are disabled. Unable to operate the Remote Control. • The...
... obstruction. • Replace the batteries. Operations are having a problem with the label side up. Subwoofer automatically turns on the Unit is low. 22 set to the System. • The FM Wire Antenna is output. The CD is upside down. Put the CD in . Unplug the System then plug it back in with your dealer, for service. • If you are disabled. Unable to operate the Remote Control. • The...
User Manual
Page 29
... THIS WARRANTY. Model No.: Serial No.: Purchase date: Name of incidental or consequential damages or limitations on an in-home basis. WHAT YOU MUST DO FOR WARRANTY SERVICE: Return your product to a JVC authorized service center with a copy of your nearest JVC authorized service center, please call toll free: (800)537-5722. Damage that occurs in the Owner's Manual, normal maintenance, video and audio head cleaning...
... THIS WARRANTY. Model No.: Serial No.: Purchase date: Name of incidental or consequential damages or limitations on an in-home basis. WHAT YOU MUST DO FOR WARRANTY SERVICE: Return your product to a JVC authorized service center with a copy of your nearest JVC authorized service center, please call toll free: (800)537-5722. Damage that occurs in the Owner's Manual, normal maintenance, video and audio head cleaning...


