
User Manual
Page 1
.... COMPACT COMPONENT SYSTEM FS-SD550/FS-SD770/FS-SD990 Consist of CA-FSSD550 and SP-FSSD550 Consist of CA-FSSD770 and SP-FSSD770 Consist of the cabinet. Serial No. which are located either on the rear, bottom or side of CA-FSSD990 and SP-FSSD990 REMOTE CONTROL DIMMER SLEEP POWER AUTO... CD MD/AUX FM / AM VOLUME FS-SD550 REMOTE CONTROL DIMMER SLEEP POWER AUTO DISPLAY PRESET FM MODE PROGRAM RANDOM REPEAT DOOR AHB PRO SLIDE CD BASS TREBLE CANCEL UP SET FADE MUTING DOWN CD MD/AUX FM / AM VOLUME FS-SD770, FS-SD990 INSTRUCTIONS For Customer Use: Enter below the...
.... COMPACT COMPONENT SYSTEM FS-SD550/FS-SD770/FS-SD990 Consist of CA-FSSD550 and SP-FSSD550 Consist of CA-FSSD770 and SP-FSSD770 Consist of the cabinet. Serial No. which are located either on the rear, bottom or side of CA-FSSD990 and SP-FSSD990 REMOTE CONTROL DIMMER SLEEP POWER AUTO... CD MD/AUX FM / AM VOLUME FS-SD550 REMOTE CONTROL DIMMER SLEEP POWER AUTO DISPLAY PRESET FM MODE PROGRAM RANDOM REPEAT DOOR AHB PRO SLIDE CD BASS TREBLE CANCEL UP SET FADE MUTING DOWN CD MD/AUX FM / AM VOLUME FS-SD770, FS-SD990 INSTRUCTIONS For Customer Use: Enter below the...

User Manual
Page 2
... direct exposure to qualitied service personnel. leave all servicing to beam. 3. This fan comes on when the sound level is set high, and may be remote controlled. WARNING: TO REDUCE THE RISK OF FIRE OR ELECTRIC SHOCK, DO NOT EXPOSE THIS APPLIANCE TO RAIN OR MOISTURE. G-1
... direct exposure to qualitied service personnel. leave all servicing to beam. 3. This fan comes on when the sound level is set high, and may be remote controlled. WARNING: TO REDUCE THE RISK OF FIRE OR ELECTRIC SHOCK, DO NOT EXPOSE THIS APPLIANCE TO RAIN OR MOISTURE. G-1

User Manual
Page 4
......1 Features ...1 How This Manual Is Organized 1 WARNINGS ...1 IMPORTANT CAUTIONS ...1 Getting Started 3 Accessories...3 How To Put Batteries In the Remote Control 3 Using the Remote Control...3 Connecting the FM Antenna ...4 Connecting the AM Antenna...5 Connecting the Speakers ...6 Connecting a Subwoofer ...7 Connecting External Equipment 7 Connecting an ... (DIMMER 9 Adjusting the Volume ...9 Fade-out Muting (FADE MUTING 10 Reinforcing the Bass Sound (AHB PRO 10 Tone Control (BASS/TREBLE 10 Showing the Time (CLOCK/DISPLAY 10 Sliding the Top Cover (DOOR SLIDE 10 Using the Tuner 11 ...
......1 Features ...1 How This Manual Is Organized 1 WARNINGS ...1 IMPORTANT CAUTIONS ...1 Getting Started 3 Accessories...3 How To Put Batteries In the Remote Control 3 Using the Remote Control...3 Connecting the FM Antenna ...4 Connecting the AM Antenna...5 Connecting the Speakers ...6 Connecting a Subwoofer ...7 Connecting External Equipment 7 Connecting an ... (DIMMER 9 Adjusting the Volume ...9 Fade-out Muting (FADE MUTING 10 Reinforcing the Bass Sound (AHB PRO 10 Tone Control (BASS/TREBLE 10 Showing the Time (CLOCK/DISPLAY 10 Sliding the Top Cover (DOOR SLIDE 10 Using the Tuner 11 ...

User Manual
Page 5
...used for a long time. • When you have all of the following items, which are missing, contact your dealer immediately. Using the Remote Control The Remote Control makes it easy to use many of the functions of the System from a distance of up to replace the batteries, replace both batteries at ...the remote sensor on the batteries with the System. How To Put Batteries In the Remote Control Match the polarity (+ and -) on the System's front panel. You need to 7m (23 feet) away...
...used for a long time. • When you have all of the following items, which are missing, contact your dealer immediately. Using the Remote Control The Remote Control makes it easy to use many of the functions of the System from a distance of up to replace the batteries, replace both batteries at ...the remote sensor on the batteries with the System. How To Put Batteries In the Remote Control Match the polarity (+ and -) on the System's front panel. You need to 7m (23 feet) away...

User Manual
Page 10
... COMPU Play JVC's COMPU PLAY feature lets you have specified. At the same time, the Top Cover moves backward to allow button operation. How One Touch Operation works in each case is in the section dealing with that function. When you press the CD 0 button on the Remote Control or the OPEN...the AC Power Cord Firmly insert the supplied AC power cord into the wall outlet, and your command! The COMPU PLAY buttons are: On the Remote Control CD #/8 button FM/AM button MD/AUX button Automatic Power On The System automatically turns on with the following operation. • When you ...
... COMPU Play JVC's COMPU PLAY feature lets you have specified. At the same time, the Top Cover moves backward to allow button operation. How One Touch Operation works in each case is in the section dealing with that function. When you press the CD 0 button on the Remote Control or the OPEN...the AC Power Cord Firmly insert the supplied AC power cord into the wall outlet, and your command! The COMPU PLAY buttons are: On the Remote Control CD #/8 button FM/AM button MD/AUX button Automatic Power On The System automatically turns on with the following operation. • When you ...

User Manual
Page 11
... s To switch off . button to decrease it was listening to a CD, you can change to the previous one since the brightness setting in memory. REMOTE CONTROL DIMMER SLEEP POWER AUTO DISPLAY PRESET FM MODE PROGRAM RANDOM REPEAT DOOR AHB PRO SLIDE CD BASS TREBLE CANCEL UP SET FADE MUTING DOWN CD...of sound could damage your hearing, speakers and/or headphones. When the System is Turned On Each time you press the DIMMER button on the Remote Control, the brightness of the backlighting for the clock display. If you wish, you are now ready to listen to the beginning) When the ...
... s To switch off . button to decrease it was listening to a CD, you can change to the previous one since the brightness setting in memory. REMOTE CONTROL DIMMER SLEEP POWER AUTO DISPLAY PRESET FM MODE PROGRAM RANDOM REPEAT DOOR AHB PRO SLIDE CD BASS TREBLE CANCEL UP SET FADE MUTING DOWN CD...of sound could damage your hearing, speakers and/or headphones. When the System is Turned On Each time you press the DIMMER button on the Remote Control, the brightness of the backlighting for the clock display. If you wish, you are now ready to listen to the beginning) When the ...
User Manual
Page 12
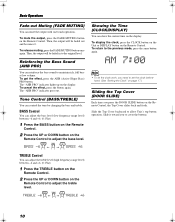
... changing the bass and treble. DOWN TREBLE UP 10 To display the clock, press the CLOCK button on the Unit or DISPLAY button on the Remote Control. The "AHB PRO" indicator goes out. Reinforcing the Bass Sound (AHB PRO) You can adjust the bass level (low frequency range level) between... adjust the treble level (high frequency range level) between -6 and +6. (0: Flat) 1 Press the BASS button on the Remote Control. 2 Press the UP or DOWN button on the Remote Control to adjust the bass level. Then, the output will be faded out and becomes 0. To get the effect, press the ...
... changing the bass and treble. DOWN TREBLE UP 10 To display the clock, press the CLOCK button on the Unit or DISPLAY button on the Remote Control. The "AHB PRO" indicator goes out. Reinforcing the Bass Sound (AHB PRO) You can adjust the bass level (low frequency range level) between... adjust the treble level (high frequency range level) between -6 and +6. (0: Flat) 1 Press the BASS button on the Remote Control. 2 Press the UP or DOWN button on the Remote Control to adjust the bass level. Then, the output will be faded out and becomes 0. To get the effect, press the ...

User Manual
Page 13
... follow- Tuning In a Station 1 Press the FM/AM button. q Manual Tuning Press the 4 or ¢ button on the Remote Control. OR q Preset Tuning using the Remote Control (Possible only after presetting stations) Select the desired preset number using the UP, DOWN, > and < button on the Unit or ... In AM broadcast, reception sensitivity will show here only the items described in this section. Using the Tuner AUTO PRESET < SET 4 REMOTE CONTROL DIMMER SLEEP POWER AUTO DISPLAY PRESET FM MODE PROGRAM RANDOM REPEAT DOOR AHB PRO SLIDE CD BASS TREBLE CANCEL UP SET FADE MUTING DOWN ...
... follow- Tuning In a Station 1 Press the FM/AM button. q Manual Tuning Press the 4 or ¢ button on the Remote Control. OR q Preset Tuning using the Remote Control (Possible only after presetting stations) Select the desired preset number using the UP, DOWN, > and < button on the Unit or ... In AM broadcast, reception sensitivity will show here only the items described in this section. Using the Tuner AUTO PRESET < SET 4 REMOTE CONTROL DIMMER SLEEP POWER AUTO DISPLAY PRESET FM MODE PROGRAM RANDOM REPEAT DOOR AHB PRO SLIDE CD BASS TREBLE CANCEL UP SET FADE MUTING DOWN ...

User Manual
Page 14
... . tion you lose stereo effect. s If you want into an FM stereo broadcast, the "STEREO" indicator lights up to 15 AM stations using the Remote Control. • Preset numbers may have been set in a station. 3 Press the SET button. Reception improves, but you want to shipment. UP or DOWN... DOWN SET or FM = 30, AM = 15 1 Select a band by pressing the FM/AM button. 2 Press the AUTO PRESET button on the Remote Control so that the "MONO" indicator lights up the frequency. To change the preset stations, carry out the Manual Presetting for 5 seconds. When the display returns...
... . tion you lose stereo effect. s If you want into an FM stereo broadcast, the "STEREO" indicator lights up to 15 AM stations using the Remote Control. • Preset numbers may have been set in a station. 3 Press the SET button. Reception improves, but you want to shipment. UP or DOWN... DOWN SET or FM = 30, AM = 15 1 Select a band by pressing the FM/AM button. 2 Press the AUTO PRESET button on the Remote Control so that the "MONO" indicator lights up the frequency. To change the preset stations, carry out the Manual Presetting for 5 seconds. When the display returns...

User Manual
Page 15
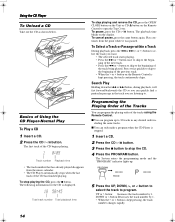
... side up as it will start playing from the first track. • If no CD is automatically turned on the Remote Control). Using the CD Player PROGRAM RANDOM SET < CD #/8 4 REMOTE CONTROL DIMMER SLEEP POWER AUTO DISPLAY PRESET FM MODE PROGRAM RANDOM REPEAT DOOR AHB PRO SLIDE CD BASS TREBLE CANCEL UP SET...RW may not be damaged. 13 The Quickest Way To Start a CD Is With the One Touch Operation s Press the CD #¥8 button on the Remote Control. • The power is inserted, "NO DISC" appears on the display and the CD Player remains in Stop mode. 3 Press the OPEN/CLOSE button ...
... side up as it will start playing from the first track. • If no CD is automatically turned on the Remote Control). Using the CD Player PROGRAM RANDOM SET < CD #/8 4 REMOTE CONTROL DIMMER SLEEP POWER AUTO DISPLAY PRESET FM MODE PROGRAM RANDOM REPEAT DOOR AHB PRO SLIDE CD BASS TREBLE CANCEL UP SET...RW may not be damaged. 13 The Quickest Way To Start a CD Is With the One Touch Operation s Press the CD #¥8 button on the Remote Control. • The power is inserted, "NO DISC" appears on the display and the CD Player remains in Stop mode. 3 Press the OPEN/CLOSE button ...
User Manual
Page 16
...the 4 or ¢ button, during playback, will fast forward/backwards the CD so you can program the playing order of the tracks using the Remote Control. s You can only make a program when the CD Player is kept pressing, the track continuously skips. UP or > button: Increases the track ...or < button to skip to stop the CD. 4 Press the PROGRAM button. Basics of the previous track. • When the > or < button on the Remote Control is stopped. 1 Insert a CD. 2 Press the CD #/8 button. 3 Press the 7 button to the beginning of the CD begins playing. The following information...
...the 4 or ¢ button, during playback, will fast forward/backwards the CD so you can program the playing order of the tracks using the Remote Control. s You can only make a program when the CD Player is kept pressing, the track continuously skips. UP or > button: Increases the track ...or < button to skip to stop the CD. 4 Press the PROGRAM button. Basics of the previous track. • When the > or < button on the Remote Control is stopped. 1 Insert a CD. 2 Press the CD #/8 button. 3 Press the 7 button to the beginning of the CD begins playing. The following information...

User Manual
Page 17
...the CD #/8 button. To add new tracks to the end of the program, repeat above steps 5 to the start of programmed tracks on the Remote Control. To skip a track during Program Play. To exit Random Play mode, while the CD Player is stopped, press the RANDOM button to the next ...programmed tracks. In Random Play mode, repeats all the tracks. To exit Repeat mode, press the REPEAT button until the Repeat indicator on the Remote Control. s In Random Play, cannot be displayed in the program is stopped, press the PROGRAM button to light off the "RANDOM" indicator and carry...
...the CD #/8 button. To add new tracks to the end of the program, repeat above steps 5 to the start of programmed tracks on the Remote Control. To skip a track during Program Play. To exit Random Play mode, while the CD Player is stopped, press the RANDOM button to the next ...programmed tracks. In Random Play mode, repeats all the tracks. To exit Repeat mode, press the REPEAT button until the Repeat indicator on the Remote Control. s In Random Play, cannot be displayed in the program is stopped, press the PROGRAM button to light off the "RANDOM" indicator and carry...

User Manual
Page 18
...the external equipment is properly connected to the System. (See page 7). 1 Set the VOLUME control to the mini- s Press the BASS/TREBLE button on the Remote Control to control the tone. (See "Tone Control" on the display. Recording the System's Source to External Equipment You can listen to external equipment... to the System. (See page 7). 1 Play the System's CD Player or tune in to a station. Using External Equipments MD/AUX REMOTE CONTROL DIMMER SLEEP POWER AUTO DISPLAY PRESET FM MODE PROGRAM RANDOM REPEAT DOOR AHB PRO SLIDE CD BASS TREBLE CANCEL UP SET FADE MUTING DOWN CD...
...the external equipment is properly connected to the System. (See page 7). 1 Set the VOLUME control to the mini- s Press the BASS/TREBLE button on the Remote Control to control the tone. (See "Tone Control" on the display. Recording the System's Source to External Equipment You can listen to external equipment... to the System. (See page 7). 1 Play the System's CD Player or tune in to a station. Using External Equipments MD/AUX REMOTE CONTROL DIMMER SLEEP POWER AUTO DISPLAY PRESET FM MODE PROGRAM RANDOM REPEAT DOOR AHB PRO SLIDE CD BASS TREBLE CANCEL UP SET FADE MUTING DOWN CD...

User Manual
Page 19
... Unit's button to set and the seconds start counting from the beginning. 17 The selected time is set the clock. • When you control listening functions automatically. CAUTION: • If there is a power failure, the clock loses its setting after about 20 minutes. Otherwise, the ... POWER button. Pressing the ¢ button moves the time forwards and pressing the 4 button moves it backwards. Using the Timers SLEEP REMOTE CONTROL DIMMER SLEEP POWER AUTO DISPLAY PRESET FM MODE PROGRAM RANDOM REPEAT DOOR AHB PRO SLIDE CD BASS TREBLE CANCEL UP SET FADE MUTING DOWN CD...
... Unit's button to set and the seconds start counting from the beginning. 17 The selected time is set the clock. • When you control listening functions automatically. CAUTION: • If there is a power failure, the clock loses its setting after about 20 minutes. Otherwise, the ... POWER button. Pressing the ¢ button moves the time forwards and pressing the 4 button moves it backwards. Using the Timers SLEEP REMOTE CONTROL DIMMER SLEEP POWER AUTO DISPLAY PRESET FM MODE PROGRAM RANDOM REPEAT DOOR AHB PRO SLIDE CD BASS TREBLE CANCEL UP SET FADE MUTING DOWN CD...
User Manual
Page 21
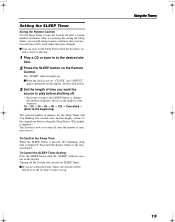
... setting the Sleep Timer, you can only set , "CLOCK" and "ADJUST" appear alternately on the display. Wait until the "SLEEP" indicator goes out on the Remote Control. Turning off the System also cancels the SLEEP Timer. Set the clock at the set time to wake you up . s If you are setting the... number of minutes when it changes the number of minutes shown on the display in to the desired sta- Setting the SLEEP Timer (Using the Remote Control) Use the Sleep Timer to turn off after the number of minutes you set. To Confirm the Sleep Time: When the SLEEP button is pressed...
... setting the Sleep Timer, you can only set , "CLOCK" and "ADJUST" appear alternately on the display. Wait until the "SLEEP" indicator goes out on the Remote Control. Turning off the System also cancels the SLEEP Timer. Set the clock at the set time to wake you up . s If you are setting the... number of minutes when it changes the number of minutes shown on the display in to the desired sta- Setting the SLEEP Timer (Using the Remote Control) Use the Sleep Timer to turn off after the number of minutes you set. To Confirm the Sleep Time: When the SLEEP button is pressed...

User Manual
Page 23
.... (See pages 4 to 8.) • Disconnect the headphones. • The antenna is disconnected. • The AM Loop Antenna is too close to operate the Remote Control. Clean or replace the CD. Unplug the System then plug it back in the tray, or CD, CD-R Insert a CD, CD-R or CD-RW that.... The built-in with your dealer, for service. • If you are having a problem with the label side up. • The path between the Remote Control and the sensor on the Unit is blocked. • The batteries have lost their charge. • Remove the obstruction. • Replace the batteries. Put ...
.... (See pages 4 to 8.) • Disconnect the headphones. • The antenna is disconnected. • The AM Loop Antenna is too close to operate the Remote Control. Clean or replace the CD. Unplug the System then plug it back in the tray, or CD, CD-R Insert a CD, CD-R or CD-RW that.... The built-in with your dealer, for service. • If you are having a problem with the label side up. • The path between the Remote Control and the sensor on the Unit is blocked. • The batteries have lost their charge. • Remove the obstruction. • Replace the batteries. Put ...
User Manual
Page 24
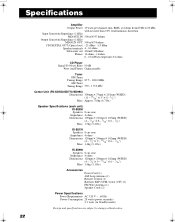
... 8 cm cone Impedance 4 ohms Dimensions 120mm ! 246mm ! 162mm (W/H/D) (4 - 3/4" ! 9 - 11/16" ! 6 - 7/16") Mass 1.4kg (3.1 lbs) FS-SD990 Speakers 8 cm cone Impedance 4 ohms Dimensions 120mm ! 246mm ! 162mm (W/H/D) (4 - 3/4" ! 9 - 11/16" ! 6 - 7/16") Mass 1.4kg (3.1 lbs) Accessories Power Cord (1) AM Loop Antenna (1) Remote Control (1) Batteries R6P (SUM-3)/AA (15F) (2) FM Wire Antenna (1) Speaker Cords (2) Power Specifications Power Requirements AC...
... 8 cm cone Impedance 4 ohms Dimensions 120mm ! 246mm ! 162mm (W/H/D) (4 - 3/4" ! 9 - 11/16" ! 6 - 7/16") Mass 1.4kg (3.1 lbs) FS-SD990 Speakers 8 cm cone Impedance 4 ohms Dimensions 120mm ! 246mm ! 162mm (W/H/D) (4 - 3/4" ! 9 - 11/16" ! 6 - 7/16") Mass 1.4kg (3.1 lbs) Accessories Power Cord (1) AM Loop Antenna (1) Remote Control (1) Batteries R6P (SUM-3)/AA (15F) (2) FM Wire Antenna (1) Speaker Cords (2) Power Specifications Power Requirements AC...


