

Instructions
Page 2
.... Do not remove cover (or back). The lightning flash with an extension cord, receptacle or other outlet unless the blades can be of sufficient magnitude to environmental considerations. Operate only from the AC outlet and antenna for your safety. * To prevent electric shock do not use this TV set for USA) This product has a High Intensity Discharge (HID) lamp that may...
.... Do not remove cover (or back). The lightning flash with an extension cord, receptacle or other outlet unless the blades can be of sufficient magnitude to environmental considerations. Operate only from the AC outlet and antenna for your safety. * To prevent electric shock do not use this TV set for USA) This product has a High Intensity Discharge (HID) lamp that may...
Instructions
Page 4
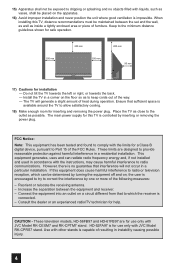
... experienced radio/TV technician for safe operation. 150 mm 200 mm 150 mm LAMP POWER PUSH 200 mm INPUT MENU OPERATE + CHANNEL - Keep to the minimum distance guidelines shown for help. Ensure that to which can radiate radio frequency energy and, if not installed and used in instability causing possible injury. 4 Use with other stands is no objects filled with liquids, such as inside a tightly...
... experienced radio/TV technician for safe operation. 150 mm 200 mm 150 mm LAMP POWER PUSH 200 mm INPUT MENU OPERATE + CHANNEL - Keep to the minimum distance guidelines shown for help. Ensure that to which can radiate radio frequency energy and, if not installed and used in instability causing possible injury. 4 Use with other stands is no objects filled with liquids, such as inside a tightly...
Instructions
Page 5
... that this is receiving through the ventilation slots. • DO NOT use their cable box and remote. If you want to sequentially scan those channels you wish to the screen. Wipe the set gently with a soft cloth. Caring for the Screen The screen is important to note that you run the Auto Tuner Setup (which detects and programs all the channels your cable company will remove the coating...
... that this is receiving through the ventilation slots. • DO NOT use their cable box and remote. If you want to sequentially scan those channels you wish to the screen. Wipe the set gently with a soft cloth. Caring for the Screen The screen is important to note that you run the Auto Tuner Setup (which detects and programs all the channels your cable company will remove the coating...
Instructions
Page 6
... for purchasing a JVC HDTV-ready projection television which are performed. The lamp must be operated while the cooling is pressed, the LAMP LED indicator blinks in orange at approximately every 2 seconds, and then goes out. This is impossible to learn about this instruction manual before the cooling process has completed, the internal circuits and lamp may overheat leading to project the picture onto the screen. The lamp is explained...
... for purchasing a JVC HDTV-ready projection television which are performed. The lamp must be operated while the cooling is pressed, the LAMP LED indicator blinks in orange at approximately every 2 seconds, and then goes out. This is impossible to learn about this instruction manual before the cooling process has completed, the internal circuits and lamp may overheat leading to project the picture onto the screen. The lamp is explained...

Instructions
Page 7
... television to clean the screen. 6. If the lamp is turned on how to fall. 8. ILA element characteristics Do not project still pictures or pictures that have still segments for cooling. Condensation When a heater is touched immediately after use The lamp becomes extremely hot during use before using an extension cord, be careful not to the Appendix for more than 24 hours consecutively. Usable Time Do not keep...
... television to clean the screen. 6. If the lamp is turned on how to fall. 8. ILA element characteristics Do not project still pictures or pictures that have still segments for cooling. Condensation When a heater is touched immediately after use The lamp becomes extremely hot during use before using an extension cord, be careful not to the Appendix for more than 24 hours consecutively. Usable Time Do not keep...
Instructions
Page 9
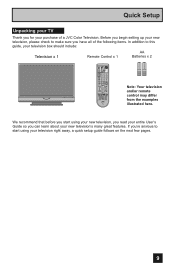
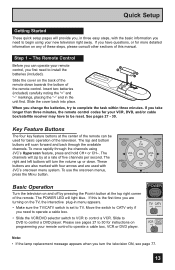
Quick Setup Unpacking your TV Thank you for your television box should include: Television x 1 Remote Control x 1 AA Batteries x 2 AA Alkaline AA Alkaline TV CATV VCR DVD POWER ASPECT MULTI SCREEN SPLIT INDEX SELECT FREEZE SWAP DISPLAY INPUT 12 3 D/A 45 6 ML/MTS 78 9 SLEEP TUNE 0 RETURN+/TV THEATER VIDEO SUB FAVORITE PRO STATUS CHANNEL C.C. Before you begin setting up your new television, please check to make sure you have all of a JVC Color Television. If...
Quick Setup Unpacking your TV Thank you for your television box should include: Television x 1 Remote Control x 1 AA Batteries x 2 AA Alkaline AA Alkaline TV CATV VCR DVD POWER ASPECT MULTI SCREEN SPLIT INDEX SELECT FREEZE SWAP DISPLAY INPUT 12 3 D/A 45 6 ML/MTS 78 9 SLEEP TUNE 0 RETURN+/TV THEATER VIDEO SUB FAVORITE PRO STATUS CHANNEL C.C. Before you begin setting up your new television, please check to make sure you have all of a JVC Color Television. If...
Instructions
Page 10
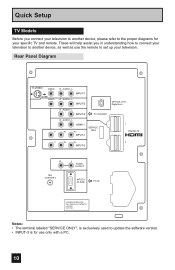
... Setup TV Models Before you in understanding how to connect your television to another device, please refer to the proper diagrams for use the remote to set up your specific TV and remote. AUDIO - L INPUT-1 R - L INPUT-2 R - L INPUT-3 PC IN AUDIO R - PATENTS 6,183,091 6,419,362 Notes: • The terminal labeled "SERVICE ONLY", is for your television. AUDIO - AUDIO - Rear Panel Diagram S-VIDEO VIDEO OVER VIDEO R - These will help assist you connect your television to update the software version. • INPUT-3 is exclusively used...
... Setup TV Models Before you in understanding how to connect your television to another device, please refer to the proper diagrams for use the remote to set up your specific TV and remote. AUDIO - L INPUT-1 R - L INPUT-2 R - L INPUT-3 PC IN AUDIO R - PATENTS 6,183,091 6,419,362 Notes: • The terminal labeled "SERVICE ONLY", is for your television. AUDIO - AUDIO - Rear Panel Diagram S-VIDEO VIDEO OVER VIDEO R - These will help assist you connect your television to update the software version. • INPUT-3 is exclusively used...
Instructions
Page 13
... operation of five channels per second. Step 1 - The Remote Control Before you can be reset. The right and left buttons will zip by pressing the POWER button at a rate of the television. The POWER LED will scan forward and back through the channels using your remote control to TV. POWER T TV CATV MUL VCR DVD Note: • If the lamp replacement message appears when you first need to operate a cable box. • Slide the VCR/DVD selector switch...
... operation of five channels per second. Step 1 - The Remote Control Before you can be reset. The right and left buttons will zip by pressing the POWER button at a rate of the television. The POWER LED will scan forward and back through the channels using your remote control to TV. POWER T TV CATV MUL VCR DVD Note: • If the lamp replacement message appears when you first need to operate a cable box. • Slide the VCR/DVD selector switch...

Instructions
Page 19
.... 3) Connect a white cable from the "L AUDIO OUT" on the back of your DTV Device, to digitally connect the television with analog audio cables. 19 Notes: • If 480p signals (640x480 or 720x480) are displayed on your DTV Device, to the HDMI 1 "L AUDIO" input terminal. • Personal computer compatibility cannot be guaranteed. • Use a HDMI to DVI cable (commercially available) in the Initial Setup menu to the HDMI 1 along with a DTV decoder. TV Rear Panel AUDIO...
.... 3) Connect a white cable from the "L AUDIO OUT" on the back of your DTV Device, to digitally connect the television with analog audio cables. 19 Notes: • If 480p signals (640x480 or 720x480) are displayed on your DTV Device, to the HDMI 1 "L AUDIO" input terminal. • Personal computer compatibility cannot be guaranteed. • Use a HDMI to DVI cable (commercially available) in the Initial Setup menu to the HDMI 1 along with a DTV decoder. TV Rear Panel AUDIO...

Instructions
Page 20
... screen may turn green and there may be displayed on your DTV or HDMI device, to DIGITAL. Some HDMI devices can be some distortion for a short time until the signal becomes stable. 20 L HDMI 1 HDMI Cable TV Rear Panel 1 DIGITAL-IN 2 1) Connect the HDMI Cable from the DIGITAL OUT on the back of your television. Quick Setup Connecting to an HDMI Compatible Device By connecting an HDMI compatible device, high definition pictures can include DVD players, D-VHS or any audio/video source...
... screen may turn green and there may be displayed on your DTV or HDMI device, to DIGITAL. Some HDMI devices can be some distortion for a short time until the signal becomes stable. 20 L HDMI 1 HDMI Cable TV Rear Panel 1 DIGITAL-IN 2 1) Connect the HDMI Cable from the DIGITAL OUT on the back of your television. Quick Setup Connecting to an HDMI Compatible Device By connecting an HDMI compatible device, high definition pictures can include DVD players, D-VHS or any audio/video source...

Instructions
Page 21
... AV Receiver's PR MONITOR OUT, into the Pr VIDEO INPUT-1 on the back of your television. 5) Connect a Red Component Cable from the AV Receiver's MONITOR OUT, to change or use the other input connections on your TV. AUDIO - Quick Setup Connecting to an AV Receiver using your television's V1 Smart Input By connecting your AV Receiver to your television's V1 Smart Input, you can connect more information on connecting your speakers and other devices like a DVD player. • Use your AV Receiver's remote to switch...
... AV Receiver's PR MONITOR OUT, into the Pr VIDEO INPUT-1 on the back of your television. 5) Connect a Red Component Cable from the AV Receiver's MONITOR OUT, to change or use the other input connections on your TV. AUDIO - Quick Setup Connecting to an AV Receiver using your television's V1 Smart Input By connecting your AV Receiver to your television's V1 Smart Input, you can connect more information on connecting your speakers and other devices like a DVD player. • Use your AV Receiver's remote to switch...
Instructions
Page 25
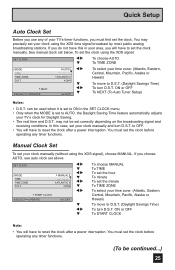
ON or OFF To NEXT (To Auto Tuner Setup) Notes: • D.S.T. In this in the SET CLOCK menu. • Only when the MODE is set to reset the clock after a power interruption. If you choose AUTO, see auto clock set the clock using the XDS signal: SET CLOCK √® † To choose AUTO To TIME ZONE MODE TIME TIME ZONE D.S.T. MANUAL -- : -- -ATLANTIC ON START CLOCK SELECT OPERATE MENU EXIT √® † √...
ON or OFF To NEXT (To Auto Tuner Setup) Notes: • D.S.T. In this in the SET CLOCK menu. • Only when the MODE is set to reset the clock after a power interruption. If you choose AUTO, see auto clock set the clock using the XDS signal: SET CLOCK √® † To choose AUTO To TIME ZONE MODE TIME TIME ZONE D.S.T. MANUAL -- : -- -ATLANTIC ON START CLOCK SELECT OPERATE MENU EXIT √® † √...

Instructions
Page 32
... menu screens when certain aspect ratios or inputs are highlighted in a different color. When you make adjustments to move to a different feature use the π† arrows to your television's operation simply and quickly. buttons. Detailed explanations on using the four directional arrow buttons on the remote control. (These buttons are shown on a menu screen are selected. 32 ESP. Each menu and its features will automatically shut off. • Button...
... menu screens when certain aspect ratios or inputs are highlighted in a different color. When you make adjustments to move to a different feature use the π† arrows to your television's operation simply and quickly. buttons. Detailed explanations on using the four directional arrow buttons on the remote control. (These buttons are shown on a menu screen are selected. 32 ESP. Each menu and its features will automatically shut off. • Button...

Instructions
Page 33
... OPERATE MENU EXIT CLOCK/TIMERS NEXT PAGE (1/5) SELECT OPERATE MENU EXIT INITIAL SETUP 01 INITIAL SETUP PREVIOUS DIGITAL SETUP NEXT PAGE SELECT OPERATE (5/5) MENU EXIT INITIAL SETUP 05 SOUND ADJUST PREVIOUS TURN ON VOLUME 10 VOLUME LIMIT 40 RESET NEXT PAGE (2/2) SELECT OPERATE MENU EXIT SOUND ADJUST 02 INITIAL SETUP PREVIOUS NOISE MUTING FRONT PANEL LOCK V1 SMART INPUT VIDEO INPUT LABEL POSITION ADJUSTMENT POWER INDICATOR ON OFF ON OFF NEXT PAGE (2/5) SELECT OPERATE MENU EXIT INITIAL SETUP 02 PICTURE ADJUST PREVIOUS TINT 00 COLOR 00 PICTURE 00 BRIGHT...
... OPERATE MENU EXIT CLOCK/TIMERS NEXT PAGE (1/5) SELECT OPERATE MENU EXIT INITIAL SETUP 01 INITIAL SETUP PREVIOUS DIGITAL SETUP NEXT PAGE SELECT OPERATE (5/5) MENU EXIT INITIAL SETUP 05 SOUND ADJUST PREVIOUS TURN ON VOLUME 10 VOLUME LIMIT 40 RESET NEXT PAGE (2/2) SELECT OPERATE MENU EXIT SOUND ADJUST 02 INITIAL SETUP PREVIOUS NOISE MUTING FRONT PANEL LOCK V1 SMART INPUT VIDEO INPUT LABEL POSITION ADJUSTMENT POWER INDICATOR ON OFF ON OFF NEXT PAGE (2/5) SELECT OPERATE MENU EXIT INITIAL SETUP 02 PICTURE ADJUST PREVIOUS TINT 00 COLOR 00 PICTURE 00 BRIGHT...

Instructions
Page 55
... HIGH 55 Adjust the Picture Settings π† √ ® Press the MENU button To TINT, COLOR, PICTURE, BRIGHT or DETAIL To enter TINT +02 √ ® π† To adjust the setting To move to change and adjust the way the picture appears on the TV screen. BRIGHT You can decide how strong or dull the colors appear on your TV picture. Color Temperature You can adjust the overall brightness of red and green...
... HIGH 55 Adjust the Picture Settings π† √ ® Press the MENU button To TINT, COLOR, PICTURE, BRIGHT or DETAIL To enter TINT +02 √ ® π† To adjust the setting To move to change and adjust the way the picture appears on the TV screen. BRIGHT You can decide how strong or dull the colors appear on your TV picture. Color Temperature You can adjust the overall brightness of red and green...
Instructions
Page 61
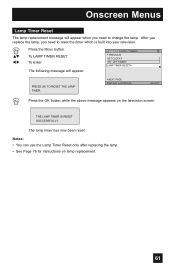
... need to change the lamp. THE LAMP TIMER IS RESET SUCCESSFULLY. Notes: • You can use the Lamp Timer Reset only after replacing the lamp. • See Page 76 for instructions on the television screen. The lamp timer has now been reset. CLOCK / TIMERS PREVIOUS SET CLOCK ON / OFF TIMER LAMP TIMER RESET PRESS OK TO RESET THE LAMP TIMER. NEXT PAGE SELECT OPERATE MENU EXIT Press the OK button while the above message appears on lamp replacement. 61 Onscreen Menus Lamp Timer Reset The lamp replacement...
... need to change the lamp. THE LAMP TIMER IS RESET SUCCESSFULLY. Notes: • You can use the Lamp Timer Reset only after replacing the lamp. • See Page 76 for instructions on the television screen. The lamp timer has now been reset. CLOCK / TIMERS PREVIOUS SET CLOCK ON / OFF TIMER LAMP TIMER RESET PRESS OK TO RESET THE LAMP TIMER. NEXT PAGE SELECT OPERATE MENU EXIT Press the OK button while the above message appears on lamp replacement. 61 Onscreen Menus Lamp Timer Reset The lamp replacement...

Instructions
Page 67
... viewing a program originally shot on the side of the TV instead of the remote control. If you are in PC mode, Natural Cinema can not be chosen along with better contrast when viewing in a brightly lit room. Turning on the side panel and choose a mode by using the MENU button on film (such as an SD signal. Button Functions Video Status The VIDEO STATUS button gives you are using. - Resets the picture display...
... viewing a program originally shot on the side of the TV instead of the remote control. If you are in PC mode, Natural Cinema can not be chosen along with better contrast when viewing in a brightly lit room. Turning on the side panel and choose a mode by using the MENU button on film (such as an SD signal. Button Functions Video Status The VIDEO STATUS button gives you are using. - Resets the picture display...

Instructions
Page 76
... temperature on the atmospheric temperature and altitude in could cause a malfunction and or damage to replace the lamp with part number TS-CL110U only! Turn the power off and wait until the lamp has completely cooled before attempting to project images onto the television screen. When the lamp heats up to its operating temperature, the oil will deposit oils from your hand near the...
... temperature on the atmospheric temperature and altitude in could cause a malfunction and or damage to replace the lamp with part number TS-CL110U only! Turn the power off and wait until the lamp has completely cooled before attempting to project images onto the television screen. When the lamp heats up to its operating temperature, the oil will deposit oils from your hand near the...

Instructions
Page 81
... be improperly adjusted. The picture is locked. See page 60. • Check to the wrong setting. If the television does not function correctly, remove the electrical plug from the TV. The color quality is in the Closed Caption Menu, page 69. • Make sure the MTS settings are still working . • Use the HDMI cable with HDMI logo . If the antenna is damaged, replace it off by a microprocessor. Turn it . You...
... be improperly adjusted. The picture is locked. See page 60. • Check to the wrong setting. If the television does not function correctly, remove the electrical plug from the TV. The color quality is in the Closed Caption Menu, page 69. • Make sure the MTS settings are still working . • Use the HDMI cable with HDMI logo . If the antenna is damaged, replace it off by a microprocessor. Turn it . You...
Instructions
Page 83
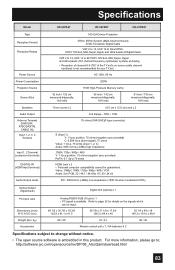
... 100%) Optical Output Digital Audio Digital Out (optical) x 1 PC Input Jack Dimensions (inch) W X H X D (cm) Analog RGB D-SUB (15 pin) x 1 • PC signal is available. Refer to page 23 for details on -screen cable channel numbers) is not recommended for your TV set 's on the signals which can be guaranteed. Specifications Model HD-52FA97 HD-56FB97 HD-61FB97 Type Reception Format Reception Range Power Source Power Consumption Projection Source Screen Size Speakers Audio Output Antenna Terminal (VHF/UHF, ATSC/DIGITAL CABLE IN) Input 1, 2, 3, 4 Terminal Input 1, 2 Terminal...
... 100%) Optical Output Digital Audio Digital Out (optical) x 1 PC Input Jack Dimensions (inch) W X H X D (cm) Analog RGB D-SUB (15 pin) x 1 • PC signal is available. Refer to page 23 for details on -screen cable channel numbers) is not recommended for your TV set 's on the signals which can be guaranteed. Specifications Model HD-52FA97 HD-56FB97 HD-61FB97 Type Reception Format Reception Range Power Source Power Consumption Projection Source Screen Size Speakers Audio Output Antenna Terminal (VHF/UHF, ATSC/DIGITAL CABLE IN) Input 1, 2, 3, 4 Terminal Input 1, 2 Terminal...


