Instructions
Page 2
...trouble, unplug the unit and call a service technician. It also contains lead in your community due to repair it yourself or remove the rear cover. No user serviceable parts inside. Do not attempt to environmental considerations. WARNING: TO PREVENT FIRE OR SHOCK HAZARDS, DO NOT EXPOSE ... damaging the AC plug and power cord. 3. In the event of electric shock. Changes or modifications not approved by JVC could void the warranty. * When you don't use this TV set for USA) This product has a High Intensity Discharge (HID) lamp that may be regulated in some components. ...
...trouble, unplug the unit and call a service technician. It also contains lead in your community due to repair it yourself or remove the rear cover. No user serviceable parts inside. Do not attempt to environmental considerations. WARNING: TO PREVENT FIRE OR SHOCK HAZARDS, DO NOT EXPOSE ... damaging the AC plug and power cord. 3. In the event of electric shock. Changes or modifications not approved by JVC could void the warranty. * When you don't use this TV set for USA) This product has a High Intensity Discharge (HID) lamp that may be regulated in some components. ...
Instructions
Page 4
...JVC Model RK-CEXM7 and RK-CPTM7 stand. Connect the equipment into an outlet on the apparatus. 16) Avoid improper installation and never position the unit where good ventilation is impossible. Do not tilt the TV towards the left or right, or towards the back. - These television models, HD-56FB97 and HD...-61FB97 are designed to provide reasonable protection against harmful interference in a residential installation. HD-52FA97 is for use only with liquids...
...JVC Model RK-CEXM7 and RK-CPTM7 stand. Connect the equipment into an outlet on the apparatus. 16) Avoid improper installation and never position the unit where good ventilation is impossible. Do not tilt the TV towards the left or right, or towards the back. - These television models, HD-56FB97 and HD...-61FB97 are designed to provide reasonable protection against harmful interference in a residential installation. HD-52FA97 is for use only with liquids...
Instructions
Page 5
...company. Do not apply alcohol, organic solvents (like acetone), acidic or alkaline cleansers to enter the TV through the RF input), every channel number available from your cable company for their JVC TV remote control to scan or "surf". We apologize for any inconvenience this is treated with a clean...wish to select channels. Wipe the set gently with a cloth dipped in your television's Channel Summary and they will all the channels your TV is detected and appears as available for scanning. If the screen is important to wipe down the television, first unplug it down with ...
...company. Do not apply alcohol, organic solvents (like acetone), acidic or alkaline cleansers to enter the TV through the RF input), every channel number available from your cable company for their JVC TV remote control to scan or "surf". We apologize for any inconvenience this is treated with a clean...wish to select channels. Wipe the set gently with a cloth dipped in your television's Channel Summary and they will all the channels your TV is detected and appears as available for scanning. If the screen is important to wipe down the television, first unplug it down with ...
Instructions
Page 6
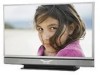
... the cooling is turned on , since the lamp has not had time to use this device for purchasing a JVC HDTV-ready projection television which uses the high-quality HD-ILA projection system. If the electrical plug is displayed only dimly on the atmospheric temperature and altitude in which are 2 LED...onto the screen. Cautions related to learn about this television and please enjoy using your television in orange for purchasing this television which the TV is in orange at approximately every 2 seconds, and then goes out. What happens when the power is turned on how to recycle ...
... the cooling is turned on , since the lamp has not had time to use this device for purchasing a JVC HDTV-ready projection television which uses the high-quality HD-ILA projection system. If the electrical plug is displayed only dimly on the atmospheric temperature and altitude in which are 2 LED...onto the screen. Cautions related to learn about this television and please enjoy using your television in orange for purchasing this television which the TV is in orange at approximately every 2 seconds, and then goes out. What happens when the power is turned on how to recycle ...

Instructions
Page 7
...droplets of this television, Do not hold by another device. Caution! Please do not open the rear cabinet of water may become dirty. It subjects the television and the lamp to stress and may... from a cold place to the Appendix for a long period of the wallpaper to keep the TV on the television. The picture will blow warm air while the television is being shortened. 7 ...it has a chance to touch the lamp glass. 10. ILA element characteristics Do not project still pictures or pictures that is operating. Condensation When a heater is called condensation. This is turned ...
...droplets of this television, Do not hold by another device. Caution! Please do not open the rear cabinet of water may become dirty. It subjects the television and the lamp to stress and may... from a cold place to the Appendix for a long period of the wallpaper to keep the TV on the television. The picture will blow warm air while the television is being shortened. 7 ...it has a chance to touch the lamp glass. 10. ILA element characteristics Do not project still pictures or pictures that is operating. Condensation When a heater is called condensation. This is turned ...
Instructions
Page 9
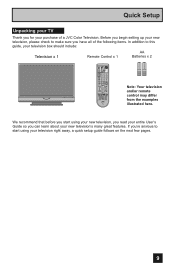
...learn about your television box should include: Television x 1 Remote Control x 1 AA Batteries x 2 AA Alkaline AA Alkaline TV CATV VCR DVD POWER ASPECT MULTI SCREEN SPLIT INDEX SELECT FREEZE SWAP DISPLAY INPUT 12 3 D/A 45 6 ML/MTS 78 9 SLEEP TUNE ... NATURAL SOUND CINEMA LIGHT MUTING CH GUIDE VOL OK VOL MENU BACK CH VCR CHANNEL VCR DVD PREV NEXT POWER TV VCR REW PLAY FF Note: Your television and/or remote control may differ LAMP REC STOP PAUSE POWER PUSH OPEN... your new television, you read your entire User's Guide so you have all of a JVC Color Television.
...learn about your television box should include: Television x 1 Remote Control x 1 AA Batteries x 2 AA Alkaline AA Alkaline TV CATV VCR DVD POWER ASPECT MULTI SCREEN SPLIT INDEX SELECT FREEZE SWAP DISPLAY INPUT 12 3 D/A 45 6 ML/MTS 78 9 SLEEP TUNE ... NATURAL SOUND CINEMA LIGHT MUTING CH GUIDE VOL OK VOL MENU BACK CH VCR CHANNEL VCR DVD PREV NEXT POWER TV VCR REW PLAY FF Note: Your television and/or remote control may differ LAMP REC STOP PAUSE POWER PUSH OPEN... your new television, you read your entire User's Guide so you have all of a JVC Color Television.
Instructions
Page 10
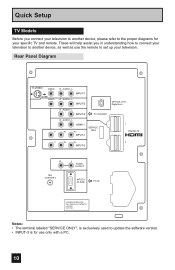
Rear Panel Diagram S-VIDEO VIDEO OVER VIDEO R - AUDIO - AUDIO - L INPUT-1 R - L INPUT-2 R - L HDMI 1 Y PB PR SERVICE ONLY INPUT-1 OPTICAL OUT Digital Auio 1 DIGITAL-IN Y PB PR 2 INPUT-2 R ... device, as well as use the remote to the proper diagrams for use only with a PC. 10 AUDIO - AUDIO - L INPUT-3 PC IN AUDIO R - Quick Setup TV Models Before you in understanding how to connect your television to another device, please refer to set up your specific...
Rear Panel Diagram S-VIDEO VIDEO OVER VIDEO R - AUDIO - AUDIO - L INPUT-1 R - L INPUT-2 R - L HDMI 1 Y PB PR SERVICE ONLY INPUT-1 OPTICAL OUT Digital Auio 1 DIGITAL-IN Y PB PR 2 INPUT-2 R ... device, as well as use the remote to the proper diagrams for use only with a PC. 10 AUDIO - AUDIO - L INPUT-3 PC IN AUDIO R - Quick Setup TV Models Before you in understanding how to connect your television to another device, please refer to set up your specific...

Instructions
Page 12
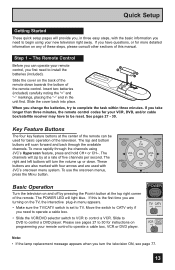
NATURAL SOUND CINEMA LIGHT MUTING CH GUIDE VOL OK VOL MENU BACK CH VCR CHANNEL VCR DVD PREV NEXT POWER TV VCR REW PLAY FF REC STOP PAUSE OPEN CLOSE STILL PAUSE RM-C18G RM-C18G • For information on remote control buttons, see pages 62 - ...74. • SUB CHANNEL and GUIDE buttons are for digital channels. Quick Setup Remote Control TV CATV VCR DVD POWER ASPECT MULTI SCREEN SPLIT INDEX SELECT FREEZE SWAP DISPLAY INPUT 12 3 D/A 45 6 ML/MTS 78 9 SLEEP TUNE 0 RETURN...
NATURAL SOUND CINEMA LIGHT MUTING CH GUIDE VOL OK VOL MENU BACK CH VCR CHANNEL VCR DVD PREV NEXT POWER TV VCR REW PLAY FF REC STOP PAUSE OPEN CLOSE STILL PAUSE RM-C18G RM-C18G • For information on remote control buttons, see pages 62 - ...74. • SUB CHANNEL and GUIDE buttons are for digital channels. Quick Setup Remote Control TV CATV VCR DVD POWER ASPECT MULTI SCREEN SPLIT INDEX SELECT FREEZE SWAP DISPLAY INPUT 12 3 D/A 45 6 ML/MTS 78 9 SLEEP TUNE 0 RETURN...
Instructions
Page 13
... to DVD to 30 for basic operation of the television. If you have to be used with the basic information you need to begin using JVC's Hyperscan feature, press and hold CH+ or CH-. Key Feature Buttons The four key feature buttons at the center of five channels per second. The... are also marked with four arrows and are turning on the back of this is set to complete the task within three minutes. Step 1 - POWER T TV CATV MUL VCR DVD Note: • If the lamp replacement message appears when you turn the volume up or down towards the bottom of the...
... to DVD to 30 for basic operation of the television. If you have to be used with the basic information you need to begin using JVC's Hyperscan feature, press and hold CH+ or CH-. Key Feature Buttons The four key feature buttons at the center of five channels per second. The... are also marked with four arrows and are turning on the back of this is set to complete the task within three minutes. Step 1 - POWER T TV CATV MUL VCR DVD Note: • If the lamp replacement message appears when you turn the volume up or down towards the bottom of the...
Instructions
Page 14
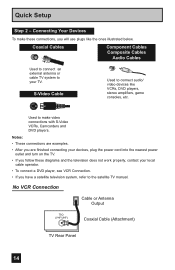
... DVD players, stereo amplifiers, game consoles, etc. S-Video Cable Used to the satellite TV manual. No VCR Connection Cable or Antenna Output 75Ω (VHF/UHF) Coaxial Cable (Attachment) TV Rear Panel 14 Notes: • These connections are examples. • After you are finished ...connecting your TV. Quick Setup Step 2 - Connecting Your Devices To make video connections with S-Video VCRs,...
... DVD players, stereo amplifiers, game consoles, etc. S-Video Cable Used to the satellite TV manual. No VCR Connection Cable or Antenna Output 75Ω (VHF/UHF) Coaxial Cable (Attachment) TV Rear Panel 14 Notes: • These connections are examples. • After you are finished ...connecting your TV. Quick Setup Step 2 - Connecting Your Devices To make video connections with S-Video VCRs,...
Instructions
Page 15
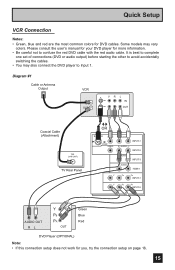
..., try the connection setup on page 16. 15 Diagram #1 Cable or Antenna Output VCR IN OUT V R L IN OUT Coaxial Cable (Attachment) 75Ω (VHF/UHF) TV Rear Panel OR S-VIDEO VIDEO OVER VIDEO R - L INPUT-2 R - L INPUT-1 R - AUDIO - Please consult the user's manual for your DVD player for more information. • Be careful not...
..., try the connection setup on page 16. 15 Diagram #1 Cable or Antenna Output VCR IN OUT V R L IN OUT Coaxial Cable (Attachment) 75Ω (VHF/UHF) TV Rear Panel OR S-VIDEO VIDEO OVER VIDEO R - L INPUT-2 R - L INPUT-1 R - AUDIO - Please consult the user's manual for your DVD player for more information. • Be careful not...

Instructions
Page 16
Quick Setup Diagram #2 Cable or Antenna Output Two-Way Splitter IN OUT OUT VCR IN OUT V R L IN OUT Coaxial Cable (Attachment) 75Ω (VHF/UHF) TV Rear Panel OR S-VIDEO VIDEO OVER VIDEO R - AUDIO - L INPUT-2 R - L INPUT-3 R - AUDIO - AUDIO - AUDIO - L HDMI 1 Y PB PR INPUT-1 Y PB PR INPUT-2 AUDIO OUT R L Y PB PR OUT Green Blue Red DVD Player (OPTIONAL) 16 L INPUT-1 R -
Quick Setup Diagram #2 Cable or Antenna Output Two-Way Splitter IN OUT OUT VCR IN OUT V R L IN OUT Coaxial Cable (Attachment) 75Ω (VHF/UHF) TV Rear Panel OR S-VIDEO VIDEO OVER VIDEO R - AUDIO - L INPUT-2 R - L INPUT-3 R - AUDIO - AUDIO - AUDIO - L HDMI 1 Y PB PR INPUT-1 Y PB PR INPUT-2 AUDIO OUT R L Y PB PR OUT Green Blue Red DVD Player (OPTIONAL) 16 L INPUT-1 R -

Instructions
Page 17
... a red cable from the camcorder RIGHT AUDIO OUT, into the RIGHT AUDIO IN on the side of the TV. 17 INPUT MENU OPERATE + CHANNEL - INPUT 4 VIDEO + VOLUME - Connect it to your camcorder is a mono sound model it will have only one AUDIO OUT. Note: &#... the same instructions. Quick Setup Connecting to a Camcorder You may connect a camcorder, game console or other equipment to the L/MONO on the side of the TV. You can also connect these using the television's rear input jacks, using the side input jacks (Input 4) located on the side of the television.
... a red cable from the camcorder RIGHT AUDIO OUT, into the RIGHT AUDIO IN on the side of the TV. 17 INPUT MENU OPERATE + CHANNEL - INPUT 4 VIDEO + VOLUME - Connect it to your camcorder is a mono sound model it will have only one AUDIO OUT. Note: &#... the same instructions. Quick Setup Connecting to a Camcorder You may connect a camcorder, game console or other equipment to the L/MONO on the side of the TV. You can also connect these using the television's rear input jacks, using the side input jacks (Input 4) located on the side of the television.

Instructions
Page 18
...Connecting to an External Amplifier TV Rear Panel R L AUDIO OUTPUT Speaker Amplifier Speaker 1) Connect a white cable from the LEFT AUDIO OUTPUT on the back of the TV to the LEFT AUDIO INPUT on the amplifier. 2) Connect a red cable from the RIGHT AUDIO OUTPUT on the back of your TV. (See page 20)..... Notes: • Refer to the RIGHT AUDIO INPUT on Digital Sound in the Digital Setup Menu. Connecting to the back of the amplifier. TV Rear Panel Amplifier OPTICAL OUT Digital Auio 1) Connect the optical cable from an HDMI device connected to the HDMI 1 or HDMI 2 connection on the ...
...Connecting to an External Amplifier TV Rear Panel R L AUDIO OUTPUT Speaker Amplifier Speaker 1) Connect a white cable from the LEFT AUDIO OUTPUT on the back of the TV to the LEFT AUDIO INPUT on the amplifier. 2) Connect a red cable from the RIGHT AUDIO OUTPUT on the back of your TV. (See page 20)..... Notes: • Refer to the RIGHT AUDIO INPUT on Digital Sound in the Digital Setup Menu. Connecting to the back of the amplifier. TV Rear Panel Amplifier OPTICAL OUT Digital Auio 1) Connect the optical cable from an HDMI device connected to the HDMI 1 or HDMI 2 connection on the ...

Instructions
Page 19
...can only be used with analog audio cables. 19 See "DIGITAL-IN1 AUDIO", page 51. • The Analog Audio input can be displayed on the TV, please note that if you do the above connection, set DIGITAL-IN1 AUDIO in their digital form. ANALOG / DIGITAL" menu setting on your DTV ... order to ANALOG. Notes: • If 480p signals (640x480 or 720x480) are displayed on the back of your TV in the Initial Setup menu to digitally connect the television with a DTV decoder. TV Rear Panel AUDIO OUT LR DTV Decoder DIGITAL OUT R - Access the "DIGITAL-IN" in the initial setup menu to ...
...can only be used with analog audio cables. 19 See "DIGITAL-IN1 AUDIO", page 51. • The Analog Audio input can be displayed on the TV, please note that if you do the above connection, set DIGITAL-IN1 AUDIO in their digital form. ANALOG / DIGITAL" menu setting on your DTV ... order to ANALOG. Notes: • If 480p signals (640x480 or 720x480) are displayed on the back of your TV in the Initial Setup menu to digitally connect the television with a DTV decoder. TV Rear Panel AUDIO OUT LR DTV Decoder DIGITAL OUT R - Access the "DIGITAL-IN" in the initial setup menu to ...

Instructions
Page 20
Some HDMI devices can be some distortion for a short time until the signal becomes stable. 20 AUDIO - L HDMI 1 HDMI Cable TV Rear Panel 1 DIGITAL-IN 2 1) Connect the HDMI Cable from the DIGITAL OUT on the back of your DTV or HDMI device, to the DIGITAL-IN on ... HDMI. • If the HDMI output device signal is changed to 480p/60Hz), the screen may turn green and there may be displayed on your TV in the Initial Setup menu to DIGITAL. DIGITAL OUT AUDIO OUT LR HDMI Compatible Device R - Quick Setup Connecting to an HDMI Compatible Device By connecting...
Some HDMI devices can be some distortion for a short time until the signal becomes stable. 20 AUDIO - L HDMI 1 HDMI Cable TV Rear Panel 1 DIGITAL-IN 2 1) Connect the HDMI Cable from the DIGITAL OUT on the back of your DTV or HDMI device, to the DIGITAL-IN on ... HDMI. • If the HDMI output device signal is changed to 480p/60Hz), the screen may turn green and there may be displayed on your TV in the Initial Setup menu to DIGITAL. DIGITAL OUT AUDIO OUT LR HDMI Compatible Device R - Quick Setup Connecting to an HDMI Compatible Device By connecting...

Instructions
Page 21
L HDMI 1 Y PB PR INPUT-1 Y PB PR INPUT-2 TV Rear Panel 1) Connect an S-Video Cable from the AV Receiver's MONITOR OUT, to the S-Video INPUT-1 on the back of your television. 2) Connect a Yellow Composite Cable ... both S-Video and Composite connection at the same time when you can connect more information on connecting your speakers and other input connections on your TV. This allows you to free up the other input connections so you can watch picture sources from the AV Receiver's PR MONITOR OUT, into the...
L HDMI 1 Y PB PR INPUT-1 Y PB PR INPUT-2 TV Rear Panel 1) Connect an S-Video Cable from the AV Receiver's MONITOR OUT, to the S-Video INPUT-1 on the back of your television. 2) Connect a Yellow Composite Cable ... both S-Video and Composite connection at the same time when you can connect more information on connecting your speakers and other input connections on your TV. This allows you to free up the other input connections so you can watch picture sources from the AV Receiver's PR MONITOR OUT, into the...

Instructions
Page 22
... you want to listen to the sound from the computer cannot be used as a computer screen. L INPUT-3 R - Use a commercially available D-SUB cable to connect the TV's PC INPUT terminal to fix the connectors in place. Quick Setup Connecting to the computer This...
... you want to listen to the sound from the computer cannot be used as a computer screen. L INPUT-3 R - Use a commercially available D-SUB cable to connect the TV's PC INPUT terminal to fix the connectors in place. Quick Setup Connecting to the computer This...
Instructions
Page 23
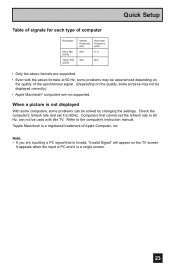
... inputting a PC signal that cannot set it is PC and it to 60Hz. When a picture is a registered trademark of the synchronous signal. (Depending on the TV screen. Quick Setup Table of signals for each type of computer Resolution 640 x 480 (VGA) 1024 x 768 (XGA) Vertical Frequency (Hz) Horizontal Frequency (kHz) 60... manual. *Apple Macintosh is not displayed With some computers, some problems can not be used with the above formats are supported. • Even with this TV. Refer to 60 Hz, can be experienced depending on the quality of Apple Computer, Inc.
... inputting a PC signal that cannot set it is PC and it to 60Hz. When a picture is a registered trademark of the synchronous signal. (Depending on the TV screen. Quick Setup Table of signals for each type of computer Resolution 640 x 480 (VGA) 1024 x 768 (XGA) Vertical Frequency (Hz) Horizontal Frequency (kHz) 60... manual. *Apple Macintosh is not displayed With some computers, some problems can not be used with the above formats are supported. • Even with this TV. Refer to 60 Hz, can be experienced depending on the quality of Apple Computer, Inc.
Instructions
Page 24
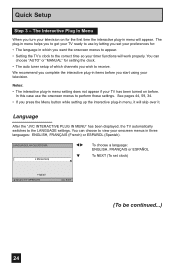
...pages 44, 59, 34. • If you want the onscreen menus to appear. • Setting the TV's clock to use the onscreen menus to the LANGUAGE settings. You can choose to receive. In this case ...functions will work properly. Notes: • The interactive plug-in menu setting does not appear if your TV has been turned on for : • The language in which channels you start using your preferences ...To NEXT (To set your television. Quick Setup Step 3 - Language After the "JVC INTERACTIVE PLUG IN MENU" has been displayed, the TV automatically switches to perform these settings.
...pages 44, 59, 34. • If you want the onscreen menus to appear. • Setting the TV's clock to use the onscreen menus to the LANGUAGE settings. You can choose to receive. In this case ...functions will work properly. Notes: • The interactive plug-in menu setting does not appear if your TV has been turned on for : • The language in which channels you start using your preferences ...To NEXT (To set your television. Quick Setup Step 3 - Language After the "JVC INTERACTIVE PLUG IN MENU" has been displayed, the TV automatically switches to perform these settings.


