

Instruction Manual
Page 2
... 2 Camera Setting Requirements Network 4 Images 7 Operating protocol 7 Setting Pages 8 Pages Available to Each User .......... 10 Internet Explorer Setting Settings 12 How to Open the Setting Page ...... 12 Basic Setting1 Page 13 Basic Setting2 Page 15 Camera Page 18 Back Light Compensation Area Edit window 26 Encoding Page 27 Audio Page 39 Alarm Page 41 Alarm Environment Page 46 FTP Recording Page 48 PTZ Page 52 Auto Patrol Page 53 Privacy Mask Page 55 Motion Detection...
... 2 Camera Setting Requirements Network 4 Images 7 Operating protocol 7 Setting Pages 8 Pages Available to Each User .......... 10 Internet Explorer Setting Settings 12 How to Open the Setting Page ...... 12 Basic Setting1 Page 13 Basic Setting2 Page 15 Camera Page 18 Back Light Compensation Area Edit window 26 Encoding Page 27 Audio Page 39 Alarm Page 41 Alarm Environment Page 46 FTP Recording Page 48 PTZ Page 52 Auto Patrol Page 53 Privacy Mask Page 55 Motion Detection...

Instruction Manual
Page 3
... change without suffixes like B or C. ● This manual explains the system setup using Internet Explorer, and the Built-in Viewer operations. ● Our company holds the copyright of recorded materials without prior consent from the actual ones. ● For the standard camera installation, refer to "Instructions (Installation)" and the separate "Safety Precautions" manual. ● The features and settings unique to each model are identified by the camera model...
... change without suffixes like B or C. ● This manual explains the system setup using Internet Explorer, and the Built-in Viewer operations. ● Our company holds the copyright of recorded materials without prior consent from the actual ones. ● For the standard camera installation, refer to "Instructions (Installation)" and the separate "Safety Precautions" manual. ● The features and settings unique to each model are identified by the camera model...

Instruction Manual
Page 7
... No.2 rtsp://192.168.0.2/PSIA/Streaming/channels/1 Encoder No.3 rtsp://192.168.0.2/PSIA/Streaming/channels/2 ONVIF This camera supports ONVIF (Open Network Video Interface Forum). You can maintain high image quality with a low bit rate, but the processing load on the decoder becomes heavier. PTZ (Pan, Tilt, Zoom) This camera has a digital PTZ function. Operating protocol Protocols for each encoder is to promote the interoperability of surveillance device settings, and audio/video data...
... No.2 rtsp://192.168.0.2/PSIA/Streaming/channels/1 Encoder No.3 rtsp://192.168.0.2/PSIA/Streaming/channels/2 ONVIF This camera supports ONVIF (Open Network Video Interface Forum). You can maintain high image quality with a low bit rate, but the processing load on the decoder becomes heavier. PTZ (Pan, Tilt, Zoom) This camera has a digital PTZ function. Operating protocol Protocols for each encoder is to promote the interoperability of surveillance device settings, and audio/video data...

Instruction Manual
Page 10
... Default password Authorization levels admin jvc All operations and setting changes are set as follows. The camera has three access authorization level, which are allowed. operator jvc The following items cannot be required at the beginning. Memo: ● When accessing to the camera from Internet Explorer, refer to Each User Enter User Name and Password User name and password entry will be operated, and setting changes are not permitted. [Basic Setting1] [Network] [Protocol] [Access Restrictions] [Time] [Password] [Maintenance] [Multicast ] user jvc Viewing...
... Default password Authorization levels admin jvc All operations and setting changes are set as follows. The camera has three access authorization level, which are allowed. operator jvc The following items cannot be required at the beginning. Memo: ● When accessing to the camera from Internet Explorer, refer to Each User Enter User Name and Password User name and password entry will be operated, and setting changes are not permitted. [Basic Setting1] [Network] [Protocol] [Access Restrictions] [Time] [Password] [Maintenance] [Multicast ] user jvc Viewing...

Instruction Manual
Page 11
...users have access to the access privileges of the user. ⅷ admin Basic Setting1 Basic Setting2 Details [Network] [Time] [Camera] [Encoding] [Camera] [Encoding] [Audio] (VN-H57U/H257U/ H257VPU/H157WPU only) [Alarm] [Alarm Environment] [FTP Recording] [SD Card Record] [PTZ] [Auto Patrol] [Privacy Mask] [Motion Detection] [Audio Detection] (VN-H57U/H257U/ H257VPU/H157WPU only) [Tampering Detection] [Network] [Protocol] [Multicast] [Access Restriction] [Time] [Password] [Focus] (VN-H57U/H257U/ H257VPU/H157WPU only) [Maintenance] [LED State] [Miscellaneous] [Operation] [Settings] [Position...
...users have access to the access privileges of the user. ⅷ admin Basic Setting1 Basic Setting2 Details [Network] [Time] [Camera] [Encoding] [Camera] [Encoding] [Audio] (VN-H57U/H257U/ H257VPU/H157WPU only) [Alarm] [Alarm Environment] [FTP Recording] [SD Card Record] [PTZ] [Auto Patrol] [Privacy Mask] [Motion Detection] [Audio Detection] (VN-H57U/H257U/ H257VPU/H157WPU only) [Tampering Detection] [Network] [Protocol] [Multicast] [Access Restriction] [Time] [Password] [Focus] (VN-H57U/H257U/ H257VPU/H157WPU only) [Maintenance] [LED State] [Miscellaneous] [Operation] [Settings] [Position...

Instruction Manual
Page 12
... set [Display mixed content] to proceed. Enter IP address of the camera is "jvc") 3. Enter the user name and password. (The factory default user name is "admin" and the factory default password is displayed. Click [Details] of the Built-in the address bar of Internet Explorer. (for example, the factory default of the camera. 4. Note: ● Do not turn off the power supply or reset the camera when booting or directly after changing settings. Internet Explorer Setting Settings How to Open the Setting...
... set [Display mixed content] to proceed. Enter IP address of the camera is "jvc") 3. Enter the user name and password. (The factory default user name is "admin" and the factory default password is displayed. Click [Details] of the Built-in the address bar of Internet Explorer. (for example, the factory default of the camera. 4. Note: ● Do not turn off the power supply or reset the camera when booting or directly after changing settings. Internet Explorer Setting Settings How to Open the Setting...

Instruction Manual
Page 14
... be set the time of camera. If you do not want to set IP Setting to their factory defaults even if the [Initialize] button is recorded in the JPEG header. Only the time will start with this item. Internet Explorer Setting Settings (continued) Basic Setting1 Page (continued) Network A IP Setting B IP Address C Subnet Mask D Default Gateway Time E Time (read only) Sets the DHCP client function. Memo: ● You cannot change the time with...
... be set the time of camera. If you do not want to set IP Setting to their factory defaults even if the [Initialize] button is recorded in the JPEG header. Only the time will start with this item. Internet Explorer Setting Settings (continued) Basic Setting1 Page (continued) Network A IP Setting B IP Address C Subnet Mask D Default Gateway Time E Time (read only) Sets the DHCP client function. Memo: ● You cannot change the time with...

Instruction Manual
Page 25
... which occurs when zooming in on the shooting conditions, it may appear in the image, but this is not a camera malfunction. [Set values: ON, OFF] Memo: ● CLVI is released. ● When the distribution limits are surpassed, the video feed will not appear in the edit window and the following error messages are factory defaults. 25 M Back Light Compensation Selects...
... which occurs when zooming in on the shooting conditions, it may appear in the image, but this is not a camera malfunction. [Set values: ON, OFF] Memo: ● CLVI is released. ● When the distribution limits are surpassed, the video feed will not appear in the edit window and the following error messages are factory defaults. 25 M Back Light Compensation Selects...

Instruction Manual
Page 38
... Monitor Output image. * The [Set values] in Monitor Output (for Installation) mode, the [Encoding] page continues to show [Monitor Output] as when it is glowing green. Procedure Press and hold the [FOCUS ASSIST] button to output the video image from the monitor output terminal to the monitor and perform adjustment of 16:9 are compressed horizontally to 4:3 when output. Internet Explorer Setting Settings (continued) Encoding Page (continued) D Monitor Output Change monitor output settings. [Set values: ON, OFF] There are restrictions on the camera...
... Monitor Output image. * The [Set values] in Monitor Output (for Installation) mode, the [Encoding] page continues to show [Monitor Output] as when it is glowing green. Procedure Press and hold the [FOCUS ASSIST] button to output the video image from the monitor output terminal to the monitor and perform adjustment of 16:9 are compressed horizontally to 4:3 when output. Internet Explorer Setting Settings (continued) Encoding Page (continued) D Monitor Output Change monitor output settings. [Set values: ON, OFF] There are restrictions on the camera...

Instruction Manual
Page 62
... * The [Set values] in Viewer and other entries that occurs. Press the [Cancel] button to restore the invalid entry to be used during access using the [Tampering Detection] page, disable the Built-in bold letters are factory defaults. When using "admin" or "operator". Memo: ● If the [OK] button is not meant to 10] Sets the minimum time for longer than the specified time, tampering detection is placed...
... * The [Set values] in Viewer and other entries that occurs. Press the [Cancel] button to restore the invalid entry to be used during access using the [Tampering Detection] page, disable the Built-in bold letters are factory defaults. When using "admin" or "operator". Memo: ● If the [OK] button is not meant to 10] Sets the minimum time for longer than the specified time, tampering detection is placed...

Instruction Manual
Page 64
... contain visual data. [Set values: 1280 to use. Sets an address of DNS server. [Factory default: 0.0.0.0] The MAC address of camera is set to the network environment where the DHCP server is shown as a hexadecimal number. However, if the IPv6 is not supported by the connected network, the "global" address bar is running. If you have selected a value other than "Auto" is selected for the camera and "Auto" is shown as...
... contain visual data. [Set values: 1280 to use. Sets an address of DNS server. [Factory default: 0.0.0.0] The MAC address of camera is set to the network environment where the DHCP server is shown as a hexadecimal number. However, if the IPv6 is not supported by the connected network, the "global" address bar is running. If you have selected a value other than "Auto" is selected for the camera and "Auto" is shown as...

Instruction Manual
Page 65
... Function Update Procedure". (A Page 128) A Server Certificate Register Information Local Certification B Protocol Settings HTTP/HTTPS Specifies settings related to use. [Set values: HTTP, HTTPS] * The [Set values] in the address bar. ● The camera's default settings do not support using the HTTPS and SNMP functions. Displays valid server certificates. If you connect via Internet Explorer after changing protocol settings, enter the address using the new server port and port number in bold letters are factory defaults. 65 Select the protocol to server...
... Function Update Procedure". (A Page 128) A Server Certificate Register Information Local Certification B Protocol Settings HTTP/HTTPS Specifies settings related to use. [Set values: HTTP, HTTPS] * The [Set values] in the address bar. ● The camera's default settings do not support using the HTTPS and SNMP functions. Displays valid server certificates. If you connect via Internet Explorer after changing protocol settings, enter the address using the new server port and port number in bold letters are factory defaults. 65 Select the protocol to server...

Instruction Manual
Page 81
... error occurred. A Focus Status B Adjust Mode Focus adjustment operation status. Error : A moving . The adjustment progress for 3 minutes or more, the mode automatically returns to "Select". Stop : Not moving. The [STATUS] LED color also alternates between green and orange. Day Focus Adjust : Provides a finer level of adjustment than "Select" and you select "Select", and the camera exits Focus Assist mode. * The [Set values] in percentages (%). Ready : Preparing to its original position. (VN-H257U...
... error occurred. A Focus Status B Adjust Mode Focus adjustment operation status. Error : A moving . The adjustment progress for 3 minutes or more, the mode automatically returns to "Select". Stop : Not moving. The [STATUS] LED color also alternates between green and orange. Day Focus Adjust : Provides a finer level of adjustment than "Select" and you select "Select", and the camera exits Focus Assist mode. * The [Set values] in percentages (%). Ready : Preparing to its original position. (VN-H257U...

Instruction Manual
Page 84
... camera. For factory defaults, see the "List of Factory Defaults of the camera. This page can be saved. 1 (TAMRON) : Select this type to use a Tamron lens. 2 (FUJINON) : Select this type to restart. A B C D E Click [Advanced Settings] and [Maintenance]. Memo: ● Do not turn off the camera's power supply while the camera is not reset. If you press the [Apply] button after selecting a lens type, the setting will be used during access using "admin". Internet Explorer Setting Settings...
... camera. For factory defaults, see the "List of Factory Defaults of the camera. This page can be saved. 1 (TAMRON) : Select this type to use a Tamron lens. 2 (FUJINON) : Select this type to restart. A B C D E Click [Advanced Settings] and [Maintenance]. Memo: ● Do not turn off the camera's power supply while the camera is not reset. If you press the [Apply] button after selecting a lens type, the setting will be used during access using "admin". Internet Explorer Setting Settings...
Instruction Manual
Page 85
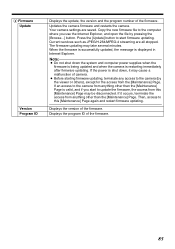
..., and if you use the Internet Explorer, and open the file by the viewer or others), except for the access from anything other than the [Maintenance] Page. If the power is shut down the system and computer power supplies when the firmware is being updated and when the camera is displayed in Internet Explorer. If it may take several minutes. Your camera settings are all stopped.
..., and if you use the Internet Explorer, and open the file by the viewer or others), except for the access from anything other than the [Maintenance] Page. If the power is shut down the system and computer power supplies when the firmware is being updated and when the camera is displayed in Internet Explorer. If it may take several minutes. Your camera settings are all stopped.
Instruction Manual
Page 104
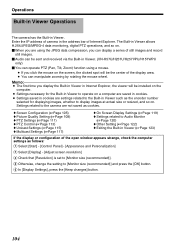
...] - [Control Panel] - [Appearance and Personalization] B Select [Display] - [Adjust screen resolution] C Check that [Resolution] is set to [Monitor size (recommended)]. D Otherwise, change the setting to the camera are using the JPEG data compression, you can display a series of still images and record still images. Ⅵ Audio can be the center of Internet Explorer. Settings related to [Monitor size (recommended)] and press the [OK] button. E In [Display Settings], press the [Keep changes] button. 104 Enter the IP address of camera in Viewer. Operations...
...] - [Control Panel] - [Appearance and Personalization] B Select [Display] - [Adjust screen resolution] C Check that [Resolution] is set to [Monitor size (recommended)]. D Otherwise, change the setting to the camera are using the JPEG data compression, you can display a series of still images and record still images. Ⅵ Audio can be the center of Internet Explorer. Settings related to [Monitor size (recommended)] and press the [OK] button. E In [Display Settings], press the [Keep changes] button. 104 Enter the IP address of camera in Viewer. Operations...

Instruction Manual
Page 105
...; The clock time of this , audio from the camera's audio signal input cable or connector and audio from the microphone connected to the SD Card Playback Screen. When transmitting audio, this when you specify [Unicast], [Multicast], [On Screen Display], [Audio Monitor] or [Other]. (A Page 115, 117, 119, 120, 122) Pauses or plays back images. For details, see the "Instructions (SD Card Function Settings)". 105 Switches the Operation Menu to the Viewer Setup Menu. Click this button turns orange...
...; The clock time of this , audio from the camera's audio signal input cable or connector and audio from the microphone connected to the SD Card Playback Screen. When transmitting audio, this when you specify [Unicast], [Multicast], [On Screen Display], [Audio Monitor] or [Other]. (A Page 115, 117, 119, 120, 122) Pauses or plays back images. For details, see the "Instructions (SD Card Function Settings)". 105 Switches the Operation Menu to the Viewer Setup Menu. Click this button turns orange...

Instruction Manual
Page 114
... digital zooming. Press the [H] button to return to stop automatic patrol. Camera: Select when using the electronic zoom to 640x480 or 640x360.) The zoom image is x1, Pan and Tilt cannot be set. A larger value increases the zooming speed. [Set values: 1 to 4 to start automatic patrol. Press the [Start] button to 8] Zoom : Controls the zooming speed. You can be operated from x1 to move the display area in Viewer Operations (continued) PTZ Control (continued) A Auto Function B Preset Position C Pan / Tilt / Zoom...
... digital zooming. Press the [H] button to return to stop automatic patrol. Camera: Select when using the electronic zoom to 640x480 or 640x360.) The zoom image is x1, Pan and Tilt cannot be set. A larger value increases the zooming speed. [Set values: 1 to 4 to start automatic patrol. Press the [Start] button to 8] Zoom : Controls the zooming speed. You can be operated from x1 to move the display area in Viewer Operations (continued) PTZ Control (continued) A Auto Function B Preset Position C Pan / Tilt / Zoom...

Instruction Manual
Page 124
... camera can transmit a maximum of 20 videos via TCP do not know the IP address of the Built-in the network environment, the digital certificate of the camera. If you are connected to monitor cameras in more places, use the Built-in Viewer in the folder before using a proxy server, set by the Anti-virus software settings. Read the readme.txt file in the first time, the ActiveX software...
... camera can transmit a maximum of 20 videos via TCP do not know the IP address of the Built-in the network environment, the digital certificate of the camera. If you are connected to monitor cameras in more places, use the Built-in Viewer in the folder before using a proxy server, set by the Anti-virus software settings. Read the readme.txt file in the first time, the ActiveX software...

Instruction Manual
Page 128
... Built-in Viewer URL via Internet Explorer while set to the factory default settings, and update the camera's firmware. ● Windows needs to be used for updating are as instructed by the displayed messages. ● Do not turn off the camera's power supply while the camera is not included; Others HTTPS and SNMP Function Update Procedure The camera's default settings do not support using the firmware with the camera at its factory default settings, install the Built-in Viewer's ActiveX to your computer by accessing the Built...
... Built-in Viewer URL via Internet Explorer while set to the factory default settings, and update the camera's firmware. ● Windows needs to be used for updating are as instructed by the displayed messages. ● Do not turn off the camera's power supply while the camera is not included; Others HTTPS and SNMP Function Update Procedure The camera's default settings do not support using the firmware with the camera at its factory default settings, install the Built-in Viewer's ActiveX to your computer by accessing the Built...


