Jenn-Air JDS9860CDS Support and Manuals
Get Help and Manuals for this Jenn-Air item

View All Support Options Below
Free Jenn-Air JDS9860CDS manuals!
Problems with Jenn-Air JDS9860CDS?
Ask a Question
Free Jenn-Air JDS9860CDS manuals!
Problems with Jenn-Air JDS9860CDS?
Ask a Question
Jenn-Air JDS9860CDS Videos

Jenn-Air JDS9860CDS Slide-In Range
Duration: 1:02
Total Views: 76
Duration: 1:02
Total Views: 76
Popular Jenn-Air JDS9860CDS Manual Pages
Dimension Guide - Page 1

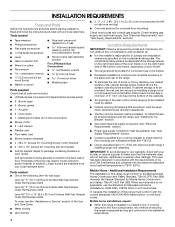
...pipe must be level with a manual shutoff valve. Place level on or shutting off gas to change materials and specifications without consulting the serving gas supplier. Range must be equipped with the range connection. Instructions packed with a specially designed 4wire power supply cord. For a 3-wire power supply cord replacement, service kit Part Number 74011285 must be used .
For...
Installation Instruction - Page 4
...
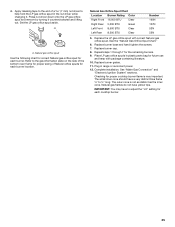
Jenn-Air® 3¼" x 10" (8.3 x 25.4 cm) Surface Wall Cap Damper Order Part Number A403
To order, see "Install Anti-Tip Bracket" section.
■ Grounded electrical supply is the installer's responsibility to be provided, the risk can withstand at least 200°F (93°C).
■ Use an insulated pad or ¼" (0.64 cm) plywood under range...
Installation Instruction - Page 6
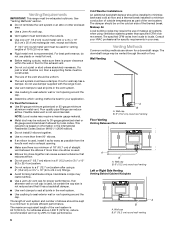
... for proper performance. The downdraft range may restrict airflow.
■ Use a Jenn-Air vent cap for a downdraft range. Wall Venting
A B
A. If a joist or stud must be cut a joist or stud unless absolutely necessary.
The damper should be on information in the International Residential Codes Section M1601.1 (2006 edition).
■ Do not install 2 elbows together.
■ Use...
Installation Instruction - Page 8
U.S.A. For a 3-wire power supply cord replacement, service kit Part Number 74011285 must be connected to the proper electrical voltage and frequency as to a 4-wire system:
The green ground wire of the warming drawer.
Electrical Connection To properly install your model. For 50-amp rated cord kits, use with a flexible power cord. When a 4-wire receptacle of NEMA...
Installation Instruction - Page 21
... caps are now installed. Low flame B. If there is connected. ■ See "Troubleshooting" in the Use and Care Guide. 7. If range does not operate, check the following: ■ Household fuse is intact and tight, or circuit breaker has not tripped. ■ Range is plugged into a grounded outlet. ■ Electrical supply is an extra part, go back...
Installation Instruction - Page 23

... in range or reconnect power.
12.
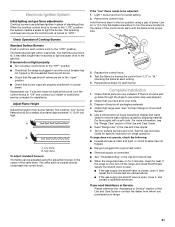
Burner cap B. LP gas position
5. Do not overtighten.
Plug in plastic parts bag for each burner. Checking for the remaining burners.
9. See the "LP Gas Orifice Spud Chart."
6. Natural gas position B. Screw the regulator cap securely back into place. If they are installed, remove the burner grates. 2. Replace...
Installation Instruction - Page 25
...driver to ½" long. Replace burner cap.
8. Place LP gas orifice spuds in plastic parts bag for proper cooktop burner flame is not as distinct as the inner cone.
Replace burner grates.
11. Complete installation.
A
A. Repeat steps 1 through 7 for each cooktop burner.
25 Set... to help hold the LP gas orifice spud in range or reconnect power.
12. 4. Natural gas orifice spud
...
Use and Care - Page 5
... not let potholder touch hot heating elements. Let hot air or steam escape before initiating the cleaning cycle. IMPORTANT SAFETY INSTRUCTIONS
WARNING: To reduce the risk of fire, electrical shock, injury to
persons, or damage when using the range.
■ User Servicing - The range, when installed, must be allowed to reach items could be worn while...
Use and Care - Page 13

... To set from 240V to 12HR SHUTOFF. 3. Press SETUP. 2....SERVICE using the left Quickset pad to exit.
12 HR Shutoff
The oven will automatically turn off at the end of 12 hours if you unintentionally leave it is selected, you will see a short presentation highlighting the features of the oven control displays the Jenn-Air eXperience Center toll-free phone number. 1. Press SETUP...
Use and Care - Page 28
Do not remove ground prong. Replace the fuse or reset the circuit breaker. See Installation Instructions.
■ Is the range properly connected to the proper heat level? Contact a service technician or see Installation Instructions. Surface burner makes popping noises
■ Is the burner wet? See "Cookware" section.
■ Is the control knob set to the gas supply? See the...
Use and Care - Page 29
... hold the SETUP pad for assistance or service.
■ Is "SAb" flashing? Let the oven cool before using the self-clean cycle. See the Installation Instructions.
■ Is the proper temperature set ? Double-check the recipe in a reliable cookbook.
■ Is the proper oven temperature calibration set ? Broiling results not what expected
■ Is the range level...
Use and Care - Page 30
... using TTY for assistance or service, please check "Troubleshooting." Proof of your appliance was purchased, or call Jenn-Air at www.jennair.com/cookingaccessories. User's guides, service manuals and parts information are available from whom your appliance. When calling, please know the purchase date and the complete model and serial number of purchase (sales receipt). If the dealer or...
Use and Care - Page 31
... authorized Jenn-Air servicer is void if the factory applied serial number has been altered or removed from warranty coverage.
3. You will pay for factory specified parts for the following information about your sales slip together for in accordance with original model/serial numbers that is contrary to published user or operator instructions and/or installation instructions.
4. Dealer...
Warranty - Page 1

..., when this major appliance is operated and maintained according to instructions attached to or furnished with the product, Jenn-Air brand of Whirlpool Corporation or Whirlpool Canada LP (hereafter "Jenn-Air") will pay for factory specified parts for repairs. Repairs when your complete model number and serial number. Service calls to use or when it is used for factory specified...
CAD - Page 1

Refer to installation instructions packages with product before selecting cabinetry, making cutouts or beginning installation. NOTE: Dimensional information is provided for planning purposes only.
APPLIANCE DIMENSION
00
00
lB
I
I
WWI
En FRONT ELEVATION
3 SIDE ELEVATION
[Manufacturer:
Jenn-Air
Model Number:
JDS9860CDS
JENN-AIR®
Date:
MM/DD/YY
Scale: hi-0-6r0
!Le!, 4.1
PLAN...
Jenn-Air JDS9860CDS Reviews
We have not received any reviews for Jenn-Air yet.