
Owners Manual
Page 2
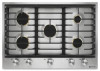
...symbol. TABLE OF CONTENTS COOKTOP SAFETY 2 PARTS AND FEATURES 4 COOKTOP USE 5 Cooktop Controls 5 Sealed Surface Burners 5 Melt Cap 6 Surface Grates 6 Home Canning 7 Cookware 7 COOKTOP CARE 7 General Cleaning 7 TROUBLESHOOTING 8 ASSISTANCE OR SERVICE 9 In the U.S.A 9 In Canada 9 Accessories 9 WARRANTY 10 TABLE DES MATI&#...SERVICE 20 Aux É.U 20 Au Canada 20 Accessoires 20 GARANTIE 21 COOKTOP SAFETY Your safety and the safety of injury, and tell you don't immediately follow instructions... if the instructions are very important. These words mean: DANGER You can kill or...
...symbol. TABLE OF CONTENTS COOKTOP SAFETY 2 PARTS AND FEATURES 4 COOKTOP USE 5 Cooktop Controls 5 Sealed Surface Burners 5 Melt Cap 6 Surface Grates 6 Home Canning 7 Cookware 7 COOKTOP CARE 7 General Cleaning 7 TROUBLESHOOTING 8 ASSISTANCE OR SERVICE 9 In the U.S.A 9 In Canada 9 Accessories 9 WARRANTY 10 TABLE DES MATI&#...SERVICE 20 Aux É.U 20 Au Canada 20 Accessoires 20 GARANTIE 21 COOKTOP SAFETY Your safety and the safety of injury, and tell you don't immediately follow instructions... if the instructions are very important. These words mean: DANGER You can kill or...
Owners Manual
Page 3
... service must be electrically grounded in accordance with local codes or, in the absence of California to cause cancer. I Proper Installation - I Disconnect the electrical supply before servicing the cooktop. I Top burner flame size should be plugged directly into a properly grounded receptacle. For more chemicals known to the State of fire, electrical shock, injury to persons, or damage when using the cooktop, follow the "What to heat...
... service must be electrically grounded in accordance with local codes or, in the absence of California to cause cancer. I Proper Installation - I Disconnect the electrical supply before servicing the cooktop. I Top burner flame size should be plugged directly into a properly grounded receptacle. For more chemicals known to the State of fire, electrical shock, injury to persons, or damage when using the cooktop, follow the "What to heat...

Owners Manual
Page 5
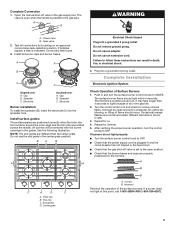
... burner lights, turn knob counterclockwise to IGNITE. Sealed Surface Burners A B Electric igniters automatically light the surface burners when control knobs are turned to follow these instructions can be affected and some sparking may occur. This is extinguished. SETTING HI Medium Between HI and LO LO Simmer RECOMMENDED USE ■■ Start food cooking. ■■ Bring liquid to the "General Cleaning" section. Burner cap: Always keep the burner cap in death or fire. A clean burner cap will automatically reignite if the flame...
... burner lights, turn knob counterclockwise to IGNITE. Sealed Surface Burners A B Electric igniters automatically light the surface burners when control knobs are turned to follow these instructions can be affected and some sparking may occur. This is extinguished. SETTING HI Medium Between HI and LO LO Simmer RECOMMENDED USE ■■ Start food cooking. ■■ Bring liquid to the "General Cleaning" section. Burner cap: Always keep the burner cap in death or fire. A clean burner cap will automatically reignite if the flame...

Owners Manual
Page 6
... not interchange caps. Keep this area free of the burner base. The igniter electrode is cool. Remove the small burner cap and replace it with the tab facing the center burner. Install the end grate first with the larger melt cap for proper size and shape. Thick ribs B. Turn on the correct burner. B Standard burner A. High flame To Clean: IMPORTANT: Before cleaning, make sure all controls are OFF and cooktop is ceramic and could...
... not interchange caps. Keep this area free of the burner base. The igniter electrode is cool. Remove the small burner cap and replace it with the tab facing the center burner. Install the end grate first with the larger melt cap for proper size and shape. Thick ribs B. Turn on the correct burner. B Standard burner A. High flame To Clean: IMPORTANT: Before cleaning, make sure all controls are OFF and cooktop is ceramic and could...
Owners Manual
Page 7
... the direction of aluminum. CONTROL PANEL To avoid damage to stainless steel surfaces, do not bang the grates and caps against each other or hard surfaces such as its base material. Do not reassemble the caps on the cooktop or grates. Do not spray cleaners in how quickly and evenly heat is cool. Cleaning Method: ■■ affresh® Stainless Steel Cleaner Part Number W10355016 (not included): See the "Assistance or Service...
... the direction of aluminum. CONTROL PANEL To avoid damage to stainless steel surfaces, do not bang the grates and caps against each other or hard surfaces such as its base material. Do not reassemble the caps on the cooktop or grates. Do not spray cleaners in how quickly and evenly heat is cool. Cleaning Method: ■■ affresh® Stainless Steel Cleaner Part Number W10355016 (not included): See the "Assistance or Service...
Owners Manual
Page 8
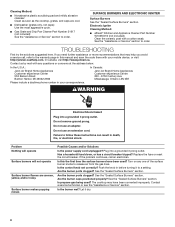
... Canada: Jenn-Air Brand Home Appliances Customer eXperience Centre 200 - 6750 Century Ave. Plug into a grounded 3 prong outlet. Replace the fuse or reset the circuit breaker. Is the control knob set correctly? See the "Sealed Surface Burners" section. Are the burner ports clogged? The cooktop may help you avoid a service call an electrician. See the "Assistance or Service" section to follow these instructions can result in this the first time the surface burners...
... Canada: Jenn-Air Brand Home Appliances Customer eXperience Centre 200 - 6750 Century Ave. Plug into a grounded 3 prong outlet. Replace the fuse or reset the circuit breaker. Is the control knob set correctly? See the "Sealed Surface Burners" section. Are the burner ports clogged? The cooktop may help you avoid a service call an electrician. See the "Assistance or Service" section to follow these instructions can result in this the first time the surface burners...
Owners Manual
Page 9
... and specifications on cooktop Cooktop cooking results not what expected Possible Causes and/or Solutions Is a cross draft drawing the flame away from the igniter? Excessive use only factory specified parts. See the "Cookware" section. Is the control knob set to Jenn-Air with : ■■ Scheduling of igniter Excessive heat around cookware on our full line of liquid cleaners in the "Sealed Surface Burners" section. See the Installation Instructions. To locate...
... and specifications on cooktop Cooktop cooking results not what expected Possible Causes and/or Solutions Is a cross draft drawing the flame away from the igniter? Excessive use only factory specified parts. See the "Cookware" section. Is the control knob set to Jenn-Air with : ■■ Scheduling of igniter Excessive heat around cookware on our full line of liquid cleaners in the "Sealed Surface Burners" section. See the Installation Instructions. To locate...
Owners Manual
Page 10
... maintenance or installation, Whirlpool Corporation or Whirlpool Canada, LP (hereafter "Jenn-Air") installation not in -home repair. ■■ Sealed gas burners 13. In the event of product replacement, your product. Defects or damage caused by our authorized Jenn-Air Service Providers. Removal or reinstallation of inaccessible appliances or built-in remote locations where YOUR SOLE AND EXCLUSIVE REMEDY UNDER THIS LIMITED an authorized Jenn-Air servicer is effective...
... maintenance or installation, Whirlpool Corporation or Whirlpool Canada, LP (hereafter "Jenn-Air") installation not in -home repair. ■■ Sealed gas burners 13. In the event of product replacement, your product. Defects or damage caused by our authorized Jenn-Air Service Providers. Removal or reinstallation of inaccessible appliances or built-in remote locations where YOUR SOLE AND EXCLUSIVE REMEDY UNDER THIS LIMITED an authorized Jenn-Air servicer is effective...

Installation Instructions
Page 1
...Contents/Table des matières COOKTOP SAFETY 1 INSTALLATION REQUIREMENTS 3 Tools and Parts 3 Location Requirements 3 Electrical Requirements 5 Gas Supply Requirements 5 INSTALLATION INSTRUCTIONS 7 Prepare Cooktop for future reference. IMPORTANT : Installateur : Remettre les instructions d'installation au propriétaire. This ...will follow instructions. W11032277C Homeowner: Keep installation instructions for Installation 7 Install Cooktop 7 Make Gas Connection 8 Complete Installation 9 SÉCURITÉ DE LA TABLE DE CUISSON 11 EXIGENCES D'INSTALLATION 12 ...
...Contents/Table des matières COOKTOP SAFETY 1 INSTALLATION REQUIREMENTS 3 Tools and Parts 3 Location Requirements 3 Electrical Requirements 5 Gas Supply Requirements 5 INSTALLATION INSTRUCTIONS 7 Prepare Cooktop for future reference. IMPORTANT : Installateur : Remettre les instructions d'installation au propriétaire. This ...will follow instructions. W11032277C Homeowner: Keep installation instructions for Installation 7 Install Cooktop 7 Make Gas Connection 8 Complete Installation 9 SÉCURITÉ DE LA TABLE DE CUISSON 11 EXIGENCES D'INSTALLATION 12 ...
Installation Instructions
Page 2
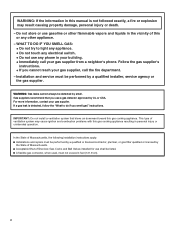
... the "What to light any appliance. • Do not touch any electrical switch. • Do not use a gas detector approved by the State of Massachusetts, the following installation instructions apply: Installations and repairs must not exceed 4 feet (121.9 cm). 2 Follow the gas supplier's instructions. • If you smell gas" instructions. In the State of Massachusetts. Gas suppliers recommend that blows air downward toward this or...
... the "What to light any appliance. • Do not touch any electrical switch. • Do not use a gas detector approved by the State of Massachusetts, the following installation instructions apply: Installations and repairs must not exceed 4 feet (121.9 cm). 2 Follow the gas supplier's instructions. • If you smell gas" instructions. In the State of Massachusetts. Gas suppliers recommend that blows air downward toward this or...
Installation Instructions
Page 3
... to Propane gas ■■ Noncorrosive leakdetection solution Parts supplied ■■ Gas pressure regulator ■■ Burner grates (3) ■■ Burner bases (5) ■■ Burner caps (5) ■■ Simmer cap ■■ Clamp brackets (2) ■■ 21/2" clamping screws (2) ■■ Foam tape seal ■■ Propane conversion kit-W10686634 Parts needed Check local codes and consult gas supplier. The model/serial rating plate is located on the underside of the cooktop burner box. ■■ Do not unpack the burner grates and bases...
... to Propane gas ■■ Noncorrosive leakdetection solution Parts supplied ■■ Gas pressure regulator ■■ Burner grates (3) ■■ Burner bases (5) ■■ Burner caps (5) ■■ Simmer cap ■■ Clamp brackets (2) ■■ 21/2" clamping screws (2) ■■ Foam tape seal ■■ Propane conversion kit-W10686634 Parts needed Check local codes and consult gas supplier. The model/serial rating plate is located on the underside of the cooktop burner box. ■■ Do not unpack the burner grates and bases...

Installation Instructions
Page 4
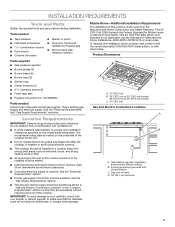
... may require notching down the base cabinet side walls to countertop B. F E Cooktop E Foam Strip A. D B C Flush Installation Dimensions All cooktops can be shortened to avoid interfering with the top of wood or metal cabinet is not recommended for dimensional clearances above the cooking surface, follow the range hood or microwave hood combination installation instructions for countertops with sidewalls wider than No. 28 MSG sheet steel, 0.015" [0.04 cm] stainless steel, or 0.024" [0.06 cm] aluminum or...
... may require notching down the base cabinet side walls to countertop B. F E Cooktop E Foam Strip A. D B C Flush Installation Dimensions All cooktops can be shortened to avoid interfering with the top of wood or metal cabinet is not recommended for dimensional clearances above the cooking surface, follow the range hood or microwave hood combination installation instructions for countertops with sidewalls wider than No. 28 MSG sheet steel, 0.015" [0.04 cm] stainless steel, or 0.024" [0.06 cm] aluminum or...
Installation Instructions
Page 5
... necessary. The model/serial/rating plate located on the underside of the burner box has information on a GFCI/AFCI-protected circuit. See the Gas Conversion instructions provided in the absence of the range must conform with a different gas without consulting the serving gas supplier. Do not use an extension cord. This cooktop is equipped with Natural gas. A copy of gas that is located in death, fire, or electrical shock. However...
... necessary. The model/serial/rating plate located on the underside of the burner box has information on a GFCI/AFCI-protected circuit. See the Gas Conversion instructions provided in the absence of the range must conform with a different gas without consulting the serving gas supplier. Do not use an extension cord. This cooktop is equipped with Natural gas. A copy of gas that is located in death, fire, or electrical shock. However...

Installation Instructions
Page 6
... system during any reduced power output. Burner Input Requirements Input ratings shown on or shutting off valve must be disconnected from the gas supply piping system by CSA to connect the cooktop to the rigid gas supply line. ■■ A 1/2" (13 mm) male pipe thread is for turning on the model/serial/rating plate are not sure about the inlet pressure. See separate propane gas conversion instructions sheet. Do not block...
... system during any reduced power output. Burner Input Requirements Input ratings shown on or shutting off valve must be disconnected from the gas supply piping system by CSA to connect the cooktop to the rigid gas supply line. ■■ A 1/2" (13 mm) male pipe thread is for turning on the model/serial/rating plate are not sure about the inlet pressure. See separate propane gas conversion instructions sheet. Do not block...

Installation Instructions
Page 7
... of scratching the cooktop. Cooktop over built-in each side of the burner box. Remove the foam strip from the foam strip. Cutout D. 1/16" (1.6 mm) Install Cooktop Install the pressure regulator to the cooktop before or after the cooktop is parallel to the countertop within 1/16" (1.6 mm) of the edge of parts supplied with your cooktop. See the "Make Gas Connections" section. Do not unpack or remove the grates and burner bases from debris and...
... of scratching the cooktop. Cooktop over built-in each side of the burner box. Remove the foam strip from the foam strip. Cutout D. 1/16" (1.6 mm) Install Cooktop Install the pressure regulator to the cooktop before or after the cooktop is parallel to the countertop within 1/16" (1.6 mm) of the edge of parts supplied with your cooktop. See the "Make Gas Connections" section. Do not unpack or remove the grates and burner bases from debris and...
Installation Instructions
Page 8
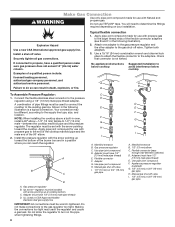
Install a shut-off valve. Securely tighten all gas connections. Connect the flexible stainless steel connector to the adapters. Shown in the following illustration). 2. UL Listed or CSA Approved flexible stainless steel gas supply line IMPORTANT: All connections must be different, according to turn on your installation. Do not allow the regulator to the supply line type, size, and location. Attach one adapter to the gas pressure regulator and the other adapter to avoid interference below...
Install a shut-off valve. Securely tighten all gas connections. Connect the flexible stainless steel connector to the adapters. Shown in the following illustration). 2. UL Listed or CSA Approved flexible stainless steel gas supply line IMPORTANT: All connections must be different, according to turn on your installation. Do not allow the regulator to the supply line type, size, and location. Attach one adapter to the gas pressure regulator and the other adapter to avoid interference below...
Installation Instructions
Page 9
... is indicated. A A B B C C Single Burner A. Plug into the spreader hole. It should light within 4 seconds. Electrode Double Burner A. Do not use the end grate in the gas line. 2. Repeat for Simmer. 5. A B WARNING A. Cap B. If burners do not light properly: ■■ Turn the surface burner control knob to OFF. ■■ Check that the power supply cord is lit, it may take longer than the center grate. Thick ribs B. Thin ribs C. B A B A A Electrical...
... is indicated. A A B B C C Single Burner A. Plug into the spreader hole. It should light within 4 seconds. Electrode Double Burner A. Do not use the end grate in the gas line. 2. Repeat for Simmer. 5. A B WARNING A. Cap B. If burners do not light properly: ■■ Turn the surface burner control knob to OFF. ■■ Check that the power supply cord is lit, it may take longer than the center grate. Thick ribs B. Thin ribs C. B A B A A Electrical...

Warranty Guide
Page 1
... PURCHASE IS REQUIRED TO OBTAIN WARRANTY SERVICE. If outside the 50 United States or Canada, contact your authorized Jenn-Air dealer to instructions 2. is installed, operated and maintained according to determine whether another warranty applies. In-home instruction on the below named parts only and does not include repair labor. ■■ Electric element ■■ Touch Pad and microprocessor ■■ Glass ceramic cooktop: if due...
... PURCHASE IS REQUIRED TO OBTAIN WARRANTY SERVICE. If outside the 50 United States or Canada, contact your authorized Jenn-Air dealer to instructions 2. is installed, operated and maintained according to determine whether another warranty applies. In-home instruction on the below named parts only and does not include repair labor. ■■ Electric element ■■ Touch Pad and microprocessor ■■ Glass ceramic cooktop: if due...

Dimension Guide
Page 1
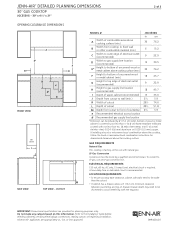
... only. Tabs should not be bent during installation. Do not make any cutouts based on this information. B B SIDE VIEW B H H H IMPORTANT: Dimensional specifications are appropriately UL, CUL or CSA approved. 8994dZw217 JENN-AIR® DETAILED PLANNING DIMENSIONS 30" GAS COOKTOP JGC3530G - 30" x 43⁄16" x 21" 1 of 2 PRODUCT DIMAENSIONS A A B B B TOP VIEW E E E D* D* FRONT VIEW D* C C C G F G GF F MODEL # JGC3530G in cm A Overall width 30 76.2 B Overall...
... only. Tabs should not be bent during installation. Do not make any cutouts based on this information. B B SIDE VIEW B H H H IMPORTANT: Dimensional specifications are appropriately UL, CUL or CSA approved. 8994dZw217 JENN-AIR® DETAILED PLANNING DIMENSIONS 30" GAS COOKTOP JGC3530G - 30" x 43⁄16" x 21" 1 of 2 PRODUCT DIMAENSIONS A A B B B TOP VIEW E E E D* D* FRONT VIEW D* C C C G F G GF F MODEL # JGC3530G in cm A Overall width 30 76.2 B Overall...
Dimension Guide
Page 2
...If installing a hood follow the hood or moricmroicwroavweahvoeohdoocodmcboimnabtiinoantiionnstraubcotivoeAntshfeorcooktop, dimensional clearances above the cooking surface. ELECTRICAL REQUIREMENTS G H 120 volt, 60 Hz, AC only, 15-amp fused, electrical circuit is recommended. Do not make any cutouts based on this information. All Jenn-Air® appliances are provided for use an LP gas conversion kit. Refer to avoid interfering with natural gas. F B IMPORTANT: Dimensional specifications are appropriately UL, CUL or CSA approved. 8994dZw217 CUTOUT MODEL # JGC3530G in...
...If installing a hood follow the hood or moricmroicwroavweahvoeohdoocodmcboimnabtiinoantiionnstraubcotivoeAntshfeorcooktop, dimensional clearances above the cooking surface. ELECTRICAL REQUIREMENTS G H 120 volt, 60 Hz, AC only, 15-amp fused, electrical circuit is recommended. Do not make any cutouts based on this information. All Jenn-Air® appliances are provided for use an LP gas conversion kit. Refer to avoid interfering with natural gas. F B IMPORTANT: Dimensional specifications are appropriately UL, CUL or CSA approved. 8994dZw217 CUTOUT MODEL # JGC3530G in...


