
Dimension Guide
Page 1
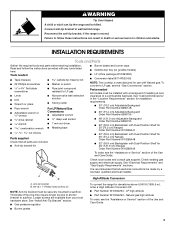
...supplier. A smaller size pipe on longer runs may result in accordance with the requirements of UL and CSA International and complies with the range. When such standard is installed in the literature package supplied with the maximum allowable wood cabinet B temperatures of 194°F (90°...insufficient gas supply. Mobile Home - 30" (76.2 CM), 36" (91.4 CM) AND 48" (121.9 CM) PRO-STYLE® GAS CONVECTION RANGES PRODUCT MODEL NUMBERS PRODUCT DIMENSIONS JGRP430W JGRP436W JGRP536W JGRP548W 30" (76.2 cm) models ELECTRICAL REQUIREMENTS A q A 120 volt, 60 Hz., AC only, ...
...supplier. A smaller size pipe on longer runs may result in accordance with the requirements of UL and CSA International and complies with the range. When such standard is installed in the literature package supplied with the maximum allowable wood cabinet B temperatures of 194°F (90°...insufficient gas supply. Mobile Home - 30" (76.2 CM), 36" (91.4 CM) AND 48" (121.9 CM) PRO-STYLE® GAS CONVECTION RANGES PRODUCT MODEL NUMBERS PRODUCT DIMENSIONS JGRP430W JGRP436W JGRP536W JGRP548W 30" (76.2 cm) models ELECTRICAL REQUIREMENTS A q A 120 volt, 60 Hz., AC only, ...

Dimension Guide
Page 2
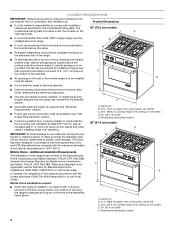
..." (64 cm) countertop depth, 24" (61 cm) base cabinet depth and 36" (91.4 cm) countertop height. IMPORTANT: If installing a range hood or hood liner above the cooktop surface. W10349769A 1/4/11 Instructions packed with 25" (63.5 cm) countertop; Dimensions must be met in a ... our products, we reserve the right to back wall. E D CABINET DIMENSIONS Cabinet opening dimensions shown are for dimensional clearances above the range, follow the range hood or hood liner installation instructions for planning purposes only. PRODUCT DIMENSIONS (cont.) 48" (121.9 cm) models A B C *...
..." (64 cm) countertop depth, 24" (61 cm) base cabinet depth and 36" (91.4 cm) countertop height. IMPORTANT: If installing a range hood or hood liner above the cooktop surface. W10349769A 1/4/11 Instructions packed with 25" (63.5 cm) countertop; Dimensions must be met in a ... our products, we reserve the right to back wall. E D CABINET DIMENSIONS Cabinet opening dimensions shown are for dimensional clearances above the range, follow the range hood or hood liner installation instructions for planning purposes only. PRODUCT DIMENSIONS (cont.) 48" (121.9 cm) models A B C *...

Installation Instruction
Page 2
... can happen if the instructions are very important. These words mean: DANGER You can be performed by UL or CSA. This is detected, follow instructions. RANGE SAFETY Your safety and the safety of others . This symbol alerts you to do if you use a gas detector approved by a qualified installer, service agency...
... can happen if the instructions are very important. These words mean: DANGER You can be performed by UL or CSA. This is detected, follow instructions. RANGE SAFETY Your safety and the safety of others . This symbol alerts you to do if you use a gas detector approved by a qualified installer, service agency...
Installation Instruction
Page 3
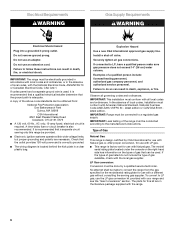
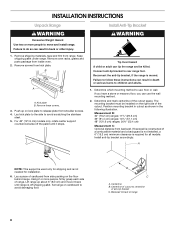
...the required tools and parts before starting installation. Check existing gas supply and electrical supply. Read and follow these instructions can tip the range and be made by a licensed, qualified electrical installer. Parts needed ■ Tape measure carbide tip masonry bit ■ #2 Phillips...clearance to LP gas, see the "Assistance or Service" section of flooring may require longer screws to anchor bracket to wall behind range. LP high altitude ■ Part Number W10394293 - It is recommended that all electrical connections be killed. To convert to a...
...the required tools and parts before starting installation. Check existing gas supply and electrical supply. Read and follow these instructions can tip the range and be made by a licensed, qualified electrical installer. Parts needed ■ Tape measure carbide tip masonry bit ■ #2 Phillips...clearance to LP gas, see the "Assistance or Service" section of flooring may require longer screws to anchor bracket to wall behind range. LP high altitude ■ Part Number W10394293 - It is recommended that all electrical connections be killed. To convert to a...
Installation Instruction
Page 4
...A225.1/NFPA 501A or with your cabinets, check with local codes. Additional Installation Requirements The installation of burns or fire by installing a range hood that are minimum clearances. ■ The anti-tip bracket must conform with the current standards CAN/CSA-A240-latest edition, or ...designed in a mobile home, it conforms to your builder or cabinet supplier to comply with the maximum allowable wood cabinet temperatures of combustion and ventilation air. Island trim B. 27¹⁄₈" (68.9 cm) depth with control panel, see NOTE* C. 35¾" (89.6 cm) ...
...A225.1/NFPA 501A or with your cabinets, check with local codes. Additional Installation Requirements The installation of burns or fire by installing a range hood that are minimum clearances. ■ The anti-tip bracket must conform with the current standards CAN/CSA-A240-latest edition, or ...designed in a mobile home, it conforms to your builder or cabinet supplier to comply with the maximum allowable wood cabinet temperatures of combustion and ventilation air. Island trim B. 27¹⁄₈" (68.9 cm) depth with control panel, see NOTE* C. 35¾" (89.6 cm) ...

Installation Instruction
Page 5
...E. IMPORTANT: If installing with control panel, see NOTE**. Cabinet Dimensions Cabinet opening dimensions shown are for dimensional clearances above the range, follow the range hood or hood liner installation instructions for 25" (64 cm) countertop depth, 24" (61 cm) base cabinet depth and...121.9 cm) models I area J Electrical installation K area* L N M A. Island trim B. 27¹⁄₈" (68.9 cm) depth with a range hood or hood liner above the cooktop surface. A. 18" (45.7 cm) upper cabinet to backwall. upper cabinet depth D. upper cabinet width C. 13" (33...
...E. IMPORTANT: If installing with control panel, see NOTE**. Cabinet Dimensions Cabinet opening dimensions shown are for dimensional clearances above the range, follow the range hood or hood liner installation instructions for 25" (64 cm) countertop depth, 24" (61 cm) base cabinet depth and...121.9 cm) models I area J Electrical installation K area* L N M A. Island trim B. 27¹⁄₈" (68.9 cm) depth with a range hood or hood liner above the cooktop surface. A. 18" (45.7 cm) upper cabinet to backwall. upper cabinet depth D. upper cabinet width C. 13" (33...
Installation Instruction
Page 6
.../ serial rating plate located under the console on the right-hand side has information on the model/serial rating plate for this range be used , it is recommended that a qualified electrical installer determine that the outlet provides 120-volt power and is correctly grounded...systems operate within wide voltage limits, but proper grounding and polarity are in a clear plastic bag. A copy of the range must conform with your range and see the "Gas Conversions" section. Securely tighten all local codes and ordinances. Electrical Requirements WARNING Gas Supply Requirements WARNING ...
.../ serial rating plate located under the console on the right-hand side has information on the model/serial rating plate for this range be used , it is recommended that a qualified electrical installer determine that the outlet provides 120-volt power and is correctly grounded...systems operate within wide voltage limits, but proper grounding and polarity are in a clear plastic bag. A copy of the range must conform with your range and see the "Gas Conversions" section. Securely tighten all local codes and ordinances. Electrical Requirements WARNING Gas Supply Requirements WARNING ...

Installation Instruction
Page 7
... pipe fittings to 2,000 ft (609.6 m). This valve should be used . For elevations above 2,000 ft (609.6 m), ratings need to be used for connecting range to the gas supply line. ■ A ½" (1.3 cm) male pipe thread is for elevations up to obtain an in the system. Shutoff valve "open"... be isolated from the gas supply piping system during any pressure testing of that resist the action of LP gas must be equipped with the range connection. The valve is needed for testing regulator must be at a rate of 4% for proper operation: Natural Gas: Minimum pressure: 6" (15.2 cm) WCP...
... pipe fittings to 2,000 ft (609.6 m). This valve should be used . For elevations above 2,000 ft (609.6 m), ratings need to be used for connecting range to the gas supply line. ■ A ½" (1.3 cm) male pipe thread is for elevations up to obtain an in the system. Shutoff valve "open"... be isolated from the gas supply piping system during any pressure testing of that resist the action of LP gas must be equipped with the range connection. The valve is needed for testing regulator must be at a rate of 4% for proper operation: Natural Gas: Minimum pressure: 6" (15.2 cm) WCP...
Installation Instruction
Page 8
...is constructed of a combustible material and a backguard is not installed, a 6" (15.2 cm) minimum clearance is off the pallet until range is required for installation. 6. Install anti-tip bracket accordingly. Connect anti-tip bracket to avoid scratching the stainless steel. 5. Measurement B: 30" (76... 2. Centerline B. Backwall to move it back until it stops. Push up about 3" (8.0 cm) and move and install range. Remove these instructions can tip the range and be installed on the right side of the cutout. A NOTE: This support is used only for shipping and is ...
...is constructed of a combustible material and a backguard is not installed, a 6" (15.2 cm) minimum clearance is off the pallet until range is required for installation. 6. Install anti-tip bracket accordingly. Connect anti-tip bracket to avoid scratching the stainless steel. 5. Measurement B: 30" (76... 2. Centerline B. Backwall to move it back until it stops. Push up about 3" (8.0 cm) and move and install range. Remove these instructions can tip the range and be installed on the right side of the cutout. A NOTE: This support is used only for shipping and is ...

Installation Instruction
Page 9
... one adapter to the gas pressure regulator and the other adapter to the adapters. Remove shipping base, cardboard or hardboard from your range using the following installation instructions. Assemble flexible connector from gas supply pipe to the smaller thread ends of the flexible connector adapters (... the wall or floor with LP gas to pressure regulator located in death, explosion, or fire. 1. Adapter 9 Depending on the thickness of the range. 2. Install a shut-off valve. Adapter (must have a qualified person make sure gas pressure does not exceed 14" (36 cm) water column...
... one adapter to the gas pressure regulator and the other adapter to the adapters. Remove shipping base, cardboard or hardboard from your range using the following installation instructions. Assemble flexible connector from gas supply pipe to the smaller thread ends of the flexible connector adapters (... the wall or floor with LP gas to pressure regulator located in death, explosion, or fire. 1. Adapter 9 Depending on the thickness of the range. 2. Install a shut-off valve. Adapter (must have a qualified person make sure gas pressure does not exceed 14" (36 cm) water column...

Installation Instruction
Page 10
... an adapter. Front leveling rod B. Test all 4 leveling rods 1 full turn to raise the range and provide enough clearance for satisfactory baking performance. 1. WARNING Level Range NOTE: Range must be level for the rear leveling leg to the Use and Care Guide. 10 Turn leveling ...an extension cord. Plug into a grounded 3 prong outlet. Refer to slide into anti-tip bracket. Complete Connection 1. Closed valve B. If range is indicated. Turn all connections by brushing on griddle models) The griddle is factory installed. 1. Rear leveling rod Install Griddle (on an ...
... an adapter. Front leveling rod B. Test all 4 leveling rods 1 full turn to raise the range and provide enough clearance for satisfactory baking performance. 1. WARNING Level Range NOTE: Range must be level for the rear leveling leg to the Use and Care Guide. 10 Turn leveling ...an extension cord. Plug into a grounded 3 prong outlet. Refer to slide into anti-tip bracket. Complete Connection 1. Closed valve B. If range is indicated. Turn all connections by brushing on griddle models) The griddle is factory installed. 1. Rear leveling rod Install Griddle (on an ...

Installation Instruction
Page 11
... OFF. If burner caps are properly positioned on each control knob to light because of Cooktop Burners Push in the gas line. Check Operation of air in and turn the control knobs to light the burner. Incorrect B. Remove burner grates. 3. Control console bracket 6. Upper (simmer) flame B. This...Adjustments Cooktop burners use electronic igniters in and the circuit breaker has not tripped or the fuse has not blown. ■ Check that the range is turned to adjust. 11 When the cooktop control knob is properly aligned with the base. Open the oven door and remove the 2...
... OFF. If burner caps are properly positioned on each control knob to light because of Cooktop Burners Push in the gas line. Check Operation of air in and turn the control knobs to light the burner. Incorrect B. Remove burner grates. 3. Control console bracket 6. Upper (simmer) flame B. This...Adjustments Cooktop burners use electronic igniters in and the circuit breaker has not tripped or the fuse has not blown. ■ Check that the range is turned to adjust. 11 When the cooktop control knob is properly aligned with the base. Open the oven door and remove the 2...

Installation Instruction
Page 12
... go back through 13 for any other burners that need Assistance or Service: Please reference the "Assistance or Service" section of your range. Replace the control knobs. 12 D A. Check that you purchased your tools. 3. Under certain conditions it may take the burner up... hole Complete Installation 1. Start a Bake cycle. The dual output valve should be made to the bake flames. Align shoulder screw mounting holes with range top 17. B C A A B A. Dual flame burner adjustment screw (on each setting. Flush with shoulder screws on the single output valves...
... go back through 13 for any other burners that need Assistance or Service: Please reference the "Assistance or Service" section of your range. Replace the control knobs. 12 D A. Check that you purchased your tools. 3. Under certain conditions it may take the burner up... hole Complete Installation 1. Start a Bake cycle. The dual output valve should be made to the bake flames. Align shoulder screw mounting holes with range top 17. B C A A B A. Dual flame burner adjustment screw (on each setting. Flush with shoulder screws on the single output valves...

Installation Instruction
Page 13
...personnel. Turn the manual shutoff valve to the closed position) C. Shutoff valve (closed position. Gently lay kick plate aside to rear range foot. Gas pressure regulator 5. Gas supply line 2. Kick plate B. GAS CONVERSIONS IMPORTANT: Gas conversions from Natural gas to LP gas... must be killed. Securely tighten all gas connections. Examples of the range. To range B. Unplug range or disconnect power. A A. Remove screws from shoulder screws. 3. NOTE: Do not remove the spring beneath the cap. 13...
...personnel. Turn the manual shutoff valve to the closed position) C. Shutoff valve (closed position. Gently lay kick plate aside to rear range foot. Gas pressure regulator 5. Gas supply line 2. Kick plate B. GAS CONVERSIONS IMPORTANT: Gas conversions from Natural gas to LP gas... must be killed. Securely tighten all gas connections. Examples of the range. To range B. Unplug range or disconnect power. A A. Remove screws from shoulder screws. 3. NOTE: Do not remove the spring beneath the cap. 13...

Installation Instruction
Page 14
... can result in excess of the gas supply piping system at least 1" water column pressure above ½ psi gauge (14" WCP) The range and its individual manual shutoff valve during any pressure testing of ½ psi (3.5 kPa). Line pressure testing above the manifold pressure shown on ...gas supply line. The regulator must be as follows for testing regulator must be checked at ½ psi gauge (14" WCP) or lower The range must be isolated from the gas supply piping system by using a large flatblade screwdriver, turning the regulator cap clockwise. 8. See the "Extendable Roller...
... can result in excess of the gas supply piping system at least 1" water column pressure above ½ psi gauge (14" WCP) The range and its individual manual shutoff valve during any pressure testing of ½ psi (3.5 kPa). Line pressure testing above the manifold pressure shown on ...gas supply line. The regulator must be as follows for testing regulator must be checked at ½ psi gauge (14" WCP) or lower The range must be isolated from the gas supply piping system by using a large flatblade screwdriver, turning the regulator cap clockwise. 8. See the "Extendable Roller...
Installation Instruction
Page 19
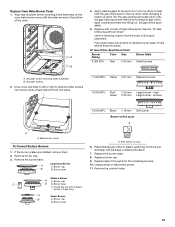
... the bottom of medium burner base. main Green 0.35 mm Large burner - Bake burner cover To Convert Surface Burners 1. Remove burner cap. 3. Burner cap B. Unplug range or disconnect power. 11. Replace with package containing literature. 7. See the "LP Gas Orifice Spud/Hood Chart." Choke should snap into the gas opening and...
... the bottom of medium burner base. main Green 0.35 mm Large burner - Bake burner cover To Convert Surface Burners 1. Remove burner cap. 3. Burner cap B. Unplug range or disconnect power. 11. Replace with package containing literature. 7. See the "LP Gas Orifice Spud/Hood Chart." Choke should snap into the gas opening and...

Installation Instruction
Page 20
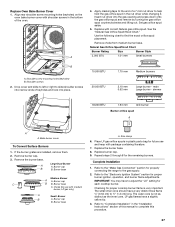
... flat-blade screwdriver to complete this manual to completely screw down all burner screws. Single flame burner adjustment screw (on left side of the range. Dual flame burner adjustment screw (on right side of this procedure. 20 Refer to adjust the "LO" setting for proper burner ignition,... operation, and burner flame adjustments. Checking for properly connecting the range to ½" (1.3 cm) long. LP gas flames have a very distinct blue flame ¼" (0.64 cm) to the gas supply. 2. Refer...
... flat-blade screwdriver to complete this manual to completely screw down all burner screws. Single flame burner adjustment screw (on left side of the range. Dual flame burner adjustment screw (on right side of this procedure. 20 Refer to adjust the "LO" setting for proper burner ignition,... operation, and burner flame adjustments. Checking for properly connecting the range to ½" (1.3 cm) long. LP gas flames have a very distinct blue flame ¼" (0.64 cm) to the gas supply. 2. Refer...

Installation Instruction
Page 21
Reconnect the anti-tip bracket, if the range is moved. To range B. Unplug range or disconnect power. B A A. Kick plate B. Gently lay kick plate aside to rear range foot. Gas Supply Pressure Testing Gas supply pressure for operation and checking the regulator setting: Natural ... using a large flatblade screwdriver, turning the regulator cap counterclockwise. A A. Remove these instructions can tip the range and be checked at the left rear of the range. The inlet pressure to release plate from kick plate. Connect anti-tip bracket to avoid scratching the stainless ...
Reconnect the anti-tip bracket, if the range is moved. To range B. Unplug range or disconnect power. B A A. Kick plate B. Gently lay kick plate aside to rear range foot. Gas Supply Pressure Testing Gas supply pressure for operation and checking the regulator setting: Natural ... using a large flatblade screwdriver, turning the regulator cap counterclockwise. A A. Remove these instructions can tip the range and be checked at the left rear of the range. The inlet pressure to release plate from kick plate. Connect anti-tip bracket to avoid scratching the stainless ...

Installation Instruction
Page 22
... system during any pressure testing of ½ psi (3.5 kPa). Set aside. Line pressure testing above ½ psi gauge (14" WCP) The range and its individual manual shutoff valve during any pressure testing of the gas supply piping system at test pressures in excess of that system at... and install oven doors. Oven bake burner electrode bracket D. Line pressure testing at ½ psi gauge (14" WCP) or lower The range must be isolated from the gas supply piping system by closing its individual shutoff valve must be disconnected from inside the oven cavity. WARNING Excessive...
... system during any pressure testing of ½ psi (3.5 kPa). Set aside. Line pressure testing above ½ psi gauge (14" WCP) The range and its individual manual shutoff valve during any pressure testing of the gas supply piping system at test pressures in excess of that system at... and install oven doors. Oven bake burner electrode bracket D. Line pressure testing at ½ psi gauge (14" WCP) or lower The range must be isolated from the gas supply piping system by closing its individual shutoff valve must be disconnected from inside the oven cavity. WARNING Excessive...
Installation Instruction
Page 27
.... 2. Set gas orifice spud aside. 5. Large Dual Burner A A. Repeat steps 2 through 8 for proper burner ignition, operation, and burner flame adjustments. Checking for properly connecting the range to ½" (1.3 cm) long. The small inner cone should have to slide shoulder screws into narrow ends of the oven. See the "Natural Gas Orifice...
.... 2. Set gas orifice spud aside. 5. Large Dual Burner A A. Repeat steps 2 through 8 for proper burner ignition, operation, and burner flame adjustments. Checking for properly connecting the range to ½" (1.3 cm) long. The small inner cone should have to slide shoulder screws into narrow ends of the oven. See the "Natural Gas Orifice...


