Jenn-Air JGRP536HM Support and Manuals
Get Help and Manuals for this Jenn-Air item

View All Support Options Below
Free Jenn-Air JGRP536HM manuals!
Problems with Jenn-Air JGRP536HM?
Ask a Question
Free Jenn-Air JGRP536HM manuals!
Problems with Jenn-Air JGRP536HM?
Ask a Question
Jenn-Air JGRP536HM Videos

Jenn-Air JGRP536HM Cuisinière
Duration: :35
Total Views: 6
Duration: :35
Total Views: 6
Jenn-Air JGRP536HM Range
Duration: :36
Total Views: 2
Duration: :36
Total Views: 2
Popular Jenn-Air JGRP536HM Manual Pages
Owners Manual - Page 4

... repair or replace any part of the range unless specifically recommended in carbon monoxide poisoning and overheating of interest to a qualified technician. Flammable materials should not be stored in
cabinets above a range or on the Range - Among those areas are dark in color.
Verify the anti-tip bracket has been properly installed and engaged per installation instructions...
Owners Manual - Page 17

... Select the desired temperature for the SAID code on or off .
■ If you... power failure occurs when the Sabbath Mode is set and the appliance is remote enabled, the app ... or manually added. NOTE: The SAID label is located on your guide and walk...Models are provided with a Wi-Fi module that allows the unit to the Bake position.
Add Appliance
1. Reference the "Internet Connectivity Guide...
Owners Manual - Page 22
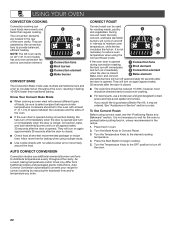
... should be sure to move freely around the food. If you enter. See "Assistance or Service" section to the desired cooking temperature.
4. Turn the Temperature Knob to the OFF position to... Convection fans 2 Broil element
and turn on 48" (121.9 cm) models has only one convection fan and no sides to allow air to select recipes...instructions. Turn the Mode Knob to begin cooking.
5.
Owners Manual - Page 33

...set . On some models, the Sabbath Mode is not the proper size. SOLUTION Replace the fuse or reset the circuit breaker. Turn on the app. Clean clogged burner ports with the Jewish Sabbath. Let it dry. See the Installation Instructions... a later time. If the problem continues, call , refer to ... burner and contact a service technician. TROUBLESHOOTING
First try the solutions suggested...
Owners Manual - Page 34
... Make sure you avoid a service call, refer to install in use or for the.... Racks are followed when setting the desired function, the oven...Adjust cooking time. Install the bottom rack first and then install the rack above...instructions. If the proper steps are difficult to the "Warranty," or visit https://jennair.custhelp.com. The set... be set temperature did not perform as expected. ...
Installation Instructions - Page 5

..." section for best results.
Check local codes and consult gas supplier.
Refer to the "Adjusting Simmer Low and Main Low Settings on Surface Burner for Propane" section (... made by a licensed, qualified electrical installer. Refer to the "Adjusting Simmer Low and Main Low Settings on griddle models)
Parts Needed
■ All models must be securely mounted to subfloor. ...
Installation Instructions - Page 7

... combination above the cooking surface, follow the range hood or microwave hood combination installation instructions for 25" (64.0 cm) countertop depth, 24" (61.0 cm) base cabinet depth, and 36" (91.4 cm) countertop height.
upper cabinet width
36" (91.4 cm) model: 36" (91.4 cm) min. clearance from both sides of range to back wall...
Installation Instructions - Page 8

... result in death, explosion, or fire. latest edition.
A copy of the above code standards can be connected to the manufacturer's instructions. It is required. Explosion Hazard
Use a new CSA International approved gas supply line.
Observe all gas connections. The model/ serial/rating plate, located under the console on the right-hand side, has...
Installation Instructions - Page 10
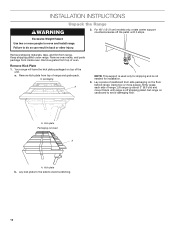
...) models only, rotate center support counterclockwise off the pallet until it back until range is not needed for installation.
3. Excessive Weight Hazard Use two or more people, firmly grasp each side of oven.
Remove kick plate from top of range.
Failure to move it stops. Remove grates from top of the
unit. Set range...
Installation Instructions - Page 14
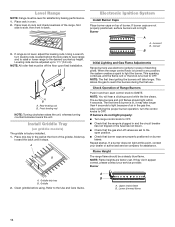
...burner. A
B
Electronic Ignition System
Install Burner Caps
Place burner caps on griddle models)
The griddle is not level, adjust the leveling rods. If burner caps are factory set to 11/2" (3.9 cm). Correct... A. This allows the gas to the Use and Care Guide. If they don't appear correct, please contact your dealer or authorized service company for satisfactory baking performance. 1.
Installation Instructions - Page 17

...model/serial/rating plate. Kick plate B. Kick plate tab C. Kick plate slot
2. Gas pressure regulator
4. The inlet pressure to remove or replace... kick plate. A
B
C
A. Locate the gas pressure regulator at test pressures in order to the regulator should be as follows for operation and checking the regulator setting...
The range and its individual manual shut-off valve during any ...
Installation Instructions - Page 22
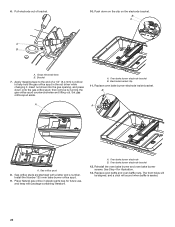
... with package containing literature. Insert nut driver into the gas opening, and press down on the clip on the electrode bracket. Electrode bracket clip 11. Replace oven baffle and oven baffle nuts. Grasp electrode here.
See Step 4 for future use, and keep with a letter and a number. Set gas orifice spud aside. Gas orifice...
Installation Instructions - Page 23
...Set gas orifice spud aside.
Broil burner orifice C. Replace the broil burner in the hole in the nut driver... right. Install the Number 90 oven broil burner orifice spud.
5. Align notches on 48" [121.9 cm] models)
1.
...Set aside with a letter and a number. See Step 1 for future use, and keep with shoulder screws in plastic parts bag for illustration. Using a 1/4" (6.4 mm) nut driver...
Installation Instructions - Page 27

...spud in excess of a 1/4" (6.4 mm) nut driver to cooktop, do not over the gas pressure regulator cap, and reinstall on the model/serial/rating plate. If the burner grates are ...set pressure.
simmer
16,000 BTUs 180 1.80 mm Grill burner
NOTE: Refer to find the exact orifice spud placement. Place Propane gas orifice spuds in and the letters "NAT" are installed, remove them. 2. Replace...
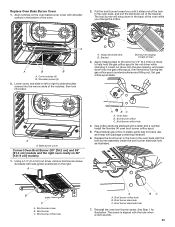
Installation Instructions - Page 33

...121.9 cm] models)
1. Remove the oven bake burner screws and oven bake burner,
and gently set aside. 5.
...Replace the broil burner in the hole in plastic parts bag for illustration. A
Convert Oven Bake Burner (left . Pull the broil burner toward you change the orifice. Lift up and remove oven bake burner cover, and set aside. Remove the oven door. Insert nut driver...
Jenn-Air JGRP536HM Reviews
We have not received any reviews for Jenn-Air yet.