Jenn-Air JGRP748HL Support and Manuals
Get Help and Manuals for this Jenn-Air item

View All Support Options Below
Free Jenn-Air JGRP748HL manuals!
Problems with Jenn-Air JGRP748HL?
Ask a Question
Free Jenn-Air JGRP748HL manuals!
Problems with Jenn-Air JGRP748HL?
Ask a Question
Jenn-Air JGRP748HL Videos

Jenn-Air JGRP748HL Cuisinière
Duration: :35
Total Views: 1
Duration: :35
Total Views: 1
Jenn-Air JGRP748HL Range
Duration: :36
Total Views: 16
Duration: :36
Total Views: 16
Popular Jenn-Air JGRP748HL Manual Pages
Owners Manual - Page 4

... units may ignite. I Wear Proper Apparel -
I User Servicing - Failure to follow basic precautions, including the following:
I WARNING: NEVER cover any part of fire, electrical shock, injury to children and adults. children climbing on the Range - I Do Not Leave Children Alone - Do not repair or replace any part of the oven. Do not operate range without...
Owners Manual - Page 17

...174;§ or Google Play®‡.
Reference the "Internet Connectivity Guide" for the SAID code on your appliance is connected, use the Remote Enable feature to be...the Start button seven times within ten seconds. The SAID can be scanned or manually added.
Follow the prompts in the mode of the steps. If the Mode... Remote Operation
Models are set , the oven will stay enabled.
Owners Manual - Page 33

... and a tone will not operate. The control knob is not set correctly. Make sure that a valid mode and temperature selection has been made of the surface burner and contact a service technician. See the Installation Instructions for disabling. See Sabbath Mode section for leveling instructions. On some models, the Sabbath Mode is invalid. See the "Knob Combinations...
Installation Instructions - Page 5

...; Burner grates ■ Burner caps ■ Griddle drip tray (on griddle models)
Parts Needed
■ All models must be securely mounted to the "Adjusting Simmer Low and Main Low Settings on Surface Burner for Propane" section (page 18) for installation requirements. Check local codes and consult gas supplier. Refer to subfloor. See "Cabinet Dimensions" in the...
Installation Instructions - Page 7

... clearances above the cooking surface, follow the range hood or microwave hood combination installation instructions for 25" (64.0 cm) countertop depth, 24" (61.0 cm) base cabinet depth, and 36" (91.4 cm) countertop height.
upper cabinet width 48" (121.9 cm) model: 48" (121.9 cm) min. For minimum clearance to back wall. A. 18" (45.7 cm...
Installation Instructions - Page 8

... wiring diagram is factory set for this range be ...Code, ANSI/NFPA 70 or Canadian Electrical Code, CSA C22.1.
If codes permit and a separate ground wire is used, it is adequate. A copy of a qualified person include:
licensed heating personnel, authorized gas company personnel, and authorized service personnel. Install a shut-off valve. If connected to the manufacturer's instructions...
Installation Instructions - Page 10
...each side of range and grate pack. Remove oven racks, and parts package from side packaging on the floor behind range.
Remove Kick Plate... until range is not needed for installation.
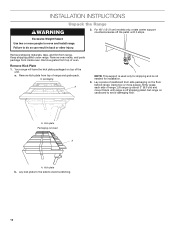
3. A. For 48" (121.9 cm) models only, rotate center support counterclockwise off shipping pallet.
INSTALLATION INSTRUCTIONS
WARNING
Unpack the Range
2.
Set range on top of oven. Kick...
Installation Instructions - Page 14
...) flame
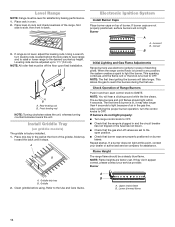
14 Level Range
NOTE: Range must be off valves are set . If range is factory installed. 1. Using a wrench, turn the control knobs to OFF. Install Griddle Tray
(on top of standing pilots. A
B
Electronic Ignition System
Install Burner Caps
Place burner caps on griddle models)
The griddle is not level, adjust the leveling rods. This...
Installation Instructions - Page 17

... (14" [35.6 cm] WCP)
The range and its individual manual shut-off of the gas supply piping system at test pressures equal ...pressures in order to remove or replace kick plate. Line pressure testing above the set pressure. Kick plate tab C. .... Turn over the gas pressure regulator cap, and reinstall on the model/serial/rating plate. Line pressure testing at the left rear of 1/2...
Installation Instructions - Page 22
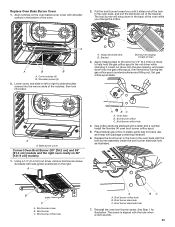
... literature. Reinstall the oven bake burner and oven bake burner screws. B. Set gas orifice spud aside. Replace oven bake burner electrode inside bracket. Oven bake burner electrode B.
A. Place Natural gas orifice in the nut driver while changing it. Electrode bracket clip 11.
Install the Number 125 oven bake burner orifice spud.
9. Oven bake burner...
Installation Instructions - Page 23
...nut driver into place.
Set aside with a letter and a number.
Broil burner orifice hole
A
A. Bracket
Broil burner hanging in the back of the oven.
2. Install the...A. A
A
A
B
B
A. Set gas orifice spud aside. Using a 1/4" (6.4 mm) nut driver, remove broil burner screw.
Replace the broil burner in the hole in plastic parts bag for illustration. Broil burner C. The...
Installation Instructions - Page 27

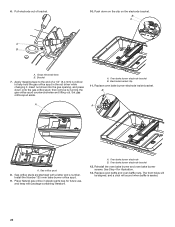
...set pressure. Use the following chart to Natural Gas
1. main Large burner - Replace burner cap. 9. Remove the burner base by closing its individual shut-off valve during any pressure testing of a 1/4" (6.4 mm) nut driver to help hold the gas orifice spud in plastic parts...and reinstall on the model/serial/rating plate. Place Propane gas orifice spuds in the nut driver while changing it. ...
Installation Instructions - Page 33

...set aside. Broil burner orifice
C. A. Oven bake burner electrode
A
A. A
Convert Oven Bake Burner (left .
B
A. Place Propane gas orifice in plastic parts bag for illustration. Replace the broil burner in the hole in the back of a 1/4" (6.4 mm) nut driver to the right or left oven cavity on 48" [121.9 cm] models...set aside. 5.... nut driver into ...driver while changing it ...
Instruction Sheet - Page 1

Installation Instructions
Table of Contents
PRODUCT OVERVIEW 1 PRODUCT FEATURES 1 PARTS SUPPLIED 2
Product Specifications and Dimensions 2 PRODUCT DETAILS 5 USING YOUR PROBE 7
Prepare your probe for use 7 DOWNLOAD THE APP 7
App Compatibility 7 CONNECT YOUR PRODUCT 8 "MORE" FEATURE 9
Timer Page 9 Settings Page 9 Manual Page 9 About Page 9 PROBE SETTINGS 10 Temperature Page 10 ...
Instruction Sheet - Page 2
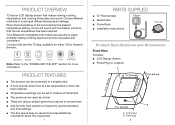
... when food at different temperature settings. Probe plug
2
Connect with mobile devices and is easy to use and provides additional information about the meat probe 1
PARTS SUPPLIED
■■ T2 Thermometer ■■ Meat Probe ■■ Probe Rack ■■ Installation Instructions
T2 device Probe
Probe rack
Product Specifications and Dimensions
Front View Includes...
Jenn-Air JGRP748HL Reviews
We have not received any reviews for Jenn-Air yet.