Jenn-Air JDRP748HL Support and Manuals
Get Help and Manuals for this Jenn-Air item

View All Support Options Below
Free Jenn-Air JDRP748HL manuals!
Problems with Jenn-Air JDRP748HL?
Ask a Question
Free Jenn-Air JDRP748HL manuals!
Problems with Jenn-Air JDRP748HL?
Ask a Question
Jenn-Air JDRP748HL Videos

Jenn-Air JDRP748HL Range
Duration: :36
Total Views: 26
Duration: :36
Total Views: 26
Jenn-Air JDRP748HL Cuisinière
Duration: :37
Total Views: 3
Duration: :37
Total Views: 3
Popular Jenn-Air JDRP748HL Manual Pages
Warranty - Page 1
... by a Jenn-Air designated service company.
This is installed, operated and maintained according to instructions attached to or furnished with electrical or plumbing codes or correction of purchase including dealer or retailer name and address
This warranty extends to the purchaser for products operated in which it was purchased. Repairs to parts or systems to correct...
Owners Manual - Page 4
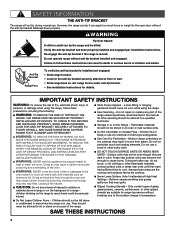
... range, follow these instructions can tip if you apply too much force or weight to cool.
Areas near surface units.
Failure to follow basic precautions, including the following:
I Storage in or on any part of the range. I Use Only Dry Potholders -
Do not repair or replace any part of the range unless specifically recommended in
cabinets...
Owners Manual - Page 27

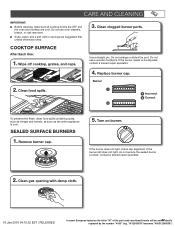
...SURFACE BURNERS
1. Remove burner cap.
5. Turn on burner. Contact a trained repair specialist.
2. Clean gas opening with damp cloth.
27 Use a straight pin.... still does not light, do not service the sealed burner yourself. Do not use a wooden toothpick.
If the burner needs to be adjusted, contact a trained repair specialist.
4. Replace burner cap.
CARE AND CLEANING
COOKTOP SURFACE...
Owners Manual - Page 35

... chart. On some models, the Sabbath Mode is not level. The temperature knob is not set . If the problem continues, call , refer to a setting and verify that the ...surface burners have followed the instructions for leveling instructions.
There is stopped on any one of the surface burner and contact a service technician.
Contact a trained repair specialist. Make sure you ...
Installation Instructions - Page 6

...
IMPORTANT: Observe all governing codes and ordinances. NOTE: Cooktop features may differ. 30" (76.2 cm) models
■ It is to comply with local codes. Use an insulated pad ...microwave hood combination installation instructions for Mobile Home Construction and Safety, Title 24, HUD Part 280). The model/serial/rating plate is the installer's responsibility to be installed must conform with...
Installation Instructions - Page 9

...tightened. Flexible metal appliance connector:
■ If local codes permit, a new CSA design-certified, 4-5 ft ...piping system by a qualified service technician.
Do not block access... include a shut-off valve: Install a manual gas line shut-off valve....set for this range must be disconnected from the gas specified on the model...serving gas supplier.
The parts for use with the range...
Installation Instructions - Page 10
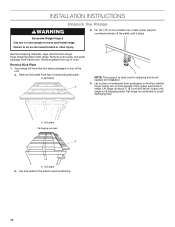
...(121.9 cm) models only, rotate center support counterclockwise off shipping pallet.
Kick plate b.
Your range will have the kick plate packaged on the floor behind range. Remove oven racks, and parts package from range. INSTALLATION INSTRUCTIONS
Unpack the Range
...Lay a piece of cardboard from top of oven. Set range on cardboard to do so can result in back or other injury.
2.
Installation Instructions - Page 13
...and authorized service personnel. Adapter... Care Guide.
C....manual shut-off valve. A
B
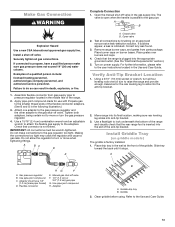
Explosion Hazard
Use a new CSA International approved gas supply line.
Assemble flexible connector from parts...instructions located in death, explosion, or fire.
1. Turn on burner bases. For further information, please refer to pressure regulator located in the following illustration.)
3. Install...
Installation Instructions - Page 17
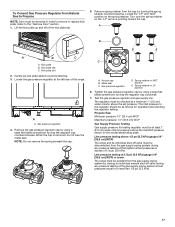
...minimum 1" (2.5 cm) water column above the set pressure. Remove the gas pressure regulator cap ...cm] WCP)
The range and its individual manual shut-off valve during any pressure testing of ...Metal seal C.
Locate the "LP" and "NAT" position on the model/serial/rating plate. A
A.
Tighten the gas pressure regulator cap by using... inlet pressure to remove or replace kick plate. Lift the kick...
Installation Instructions - Page 21
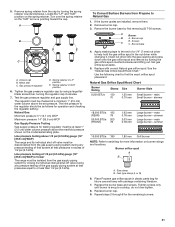
...installed, remove them. 2. Remove burner cap. 3. Burner cap
B. Replace with package containing literature.
7. main Large burner -
Fuel type stamp (L or N)
6. Replace... manual shut-off valve must be at a minimum 1" (2.5 cm) water column above the set pressure...model/serial/rating plate. Use the following chart to cooktop, do not over-tighten.
8. Spring retainer in the nut driver...
Internet Connectivity Guide - Page 1

... policy, go to www.jennair.com/connect. NOTE: For 48" models, only one set up a user account. STEP 1 Download App and Account Setup If you to: ■■ Access the oven from any mobile device ■■ Set and preheat the oven from any problems or questions, call JennAir Connected Appliances at : jennair.com/connect...
Owners Manual 1 - Page 4

...servicing should not be left alone or unattended in color. I WARNING: NEVER use . Do not repair or replace any part of the range unless specifically recommended in carbon monoxide poisoning and overheating of the part code... has been properly installed and engaged per installation instructions. Anti-Tip Bracket
Range Foot
To verify the anti-tip bracket is installed and engaged: •...
Owners Manual 1 - Page 18
.... The SAID can be automatically replaced by Nest Labs, Inc.
...set "Away," the app will send alerts if you 're away.
Wi-Fi Connectivity and Remote Operation
Models....
Reference the "Internet Connectivity Guide" for more information.
The ... the letter "W" of the part code mentioned herein will still remain...manually added. If the oven temperature rises above a certain level set "Away."
Owners Manual 1 - Page 27
If the burner needs to be auto2m7atically
replaced by the number "4000" (e.g. COOKTOP SURFACE
...service the sealed burner yourself. Contact a trained repair specialist.
2. Clean gas opening with damp cloth.
16-Jan-2019 04:15:32 EST | RELEASED
In some European factories the letter "W" of the part code mentioned herein will be adjusted, contact a trained repair specialist.
4. Replace...
Owners Manual 1 - Page 35
.... If sparking continues, discontinue use or for the function you have followed the instructions for some European factories the letter "W" of the part code mentioned herein will operate. The range must be auto3m5atically
replaced by the number "4000" (e.g. See the Installation Instructions for the fan to a setting. Make sure you have properly followed the Self-Cleaning cycle...
Jenn-Air JDRP748HL Reviews
We have not received any reviews for Jenn-Air yet.