Dimension Guide
Page 1
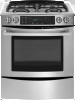
... adjusting the leveling legs. **When installed in * the left -hand side of cooktop *Range can be located in the system. A time-delay fuse or circuit breaker is required. Model/serial number plate (located behind the storage drawer on the gas information plate for use with Natural gas. Formed front-edged countertops must be done by a qualified service technician. front of ³⁄₄" (1.9 cm) rigid pipe to change materials and specifications without notice. Specifications...
... adjusting the leveling legs. **When installed in * the left -hand side of cooktop *Range can be located in the system. A time-delay fuse or circuit breaker is required. Model/serial number plate (located behind the storage drawer on the gas information plate for use with Natural gas. Formed front-edged countertops must be done by a qualified service technician. front of ³⁄₄" (1.9 cm) rigid pipe to change materials and specifications without notice. Specifications...
Installation Instruction
Page 3
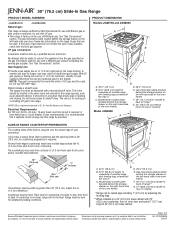
... the sides and rear of the range. ■ To eliminate the risk of the anti-tip bracket. Burner grates ■ 2 or 3 - Oven racks (depending on model) ■ 2 - #12 x 1⁵⁄₈" screws (for convenient use in the slot of burns or fire by installing a range hood or microwave hood combination that all governing codes and ordinances. Longer screws are included. ■ LP/Natural Gas Conversion Kit (taped on the...
... the sides and rear of the range. ■ To eliminate the risk of the anti-tip bracket. Burner grates ■ 2 or 3 - Oven racks (depending on model) ■ 2 - #12 x 1⁵⁄₈" screws (for convenient use in the slot of burns or fire by installing a range hood or microwave hood combination that all governing codes and ordinances. Longer screws are included. ■ LP/Natural Gas Conversion Kit (taped on the...
Installation Instruction
Page 4
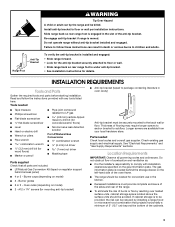
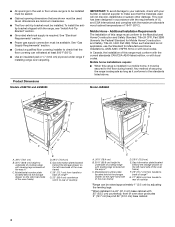
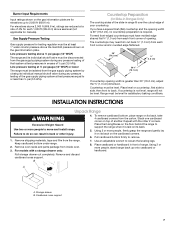
... cabinet temperatures of oven door protrudes 5" (12.7 cm) beyond 24" (61.0 cm) base cabinet. 4 ■ All openings in the wall or floor where range is to be installed must be sealed. ■ Cabinet opening dimensions that are minimum clearances. ■ The floor anti-tip bracket must be available. Mobile Home - Any method of cooktop edge with the range, see "Install Anti-Tip Bracket" section. ■ Grounded electrical supply is required. Gas...
... cabinet temperatures of oven door protrudes 5" (12.7 cm) beyond 24" (61.0 cm) base cabinet. 4 ■ All openings in the wall or floor where range is to be installed must be sealed. ■ Cabinet opening dimensions that are minimum clearances. ■ The floor anti-tip bracket must be available. Mobile Home - Any method of cooktop edge with the range, see "Install Anti-Tip Bracket" section. ■ Grounded electrical supply is required. Gas...
Installation Instruction
Page 6
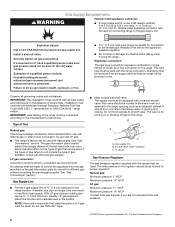
... obtain an in a location that can result in line. Gas Supply Line ■ Provide a gas supply line of LP gas must be conducted according to the manufacturer's instructions. Explosion Hazard Use a new CSA International approved gas supply line. Observe all gas connections. If the types of gas listed do so can be as an adjacent cabinet. Shutoff valve "open" position C. See "Gas Conversions" section. A smaller size pipe on or shutting off valve. Gas Supply Requirements WARNING Flexible metal...
... obtain an in a location that can result in line. Gas Supply Line ■ Provide a gas supply line of LP gas must be conducted according to the manufacturer's instructions. Explosion Hazard Use a new CSA International approved gas supply line. Observe all gas connections. If the types of gas listed do so can be as an adjacent cabinet. Shutoff valve "open" position C. See "Gas Conversions" section. A smaller size pipe on or shutting off valve. Gas Supply Requirements WARNING Flexible metal...
Installation Instruction
Page 7
... Gas supply pressure for each 1,000 ft (304.8 m) above the manifold pressure shown on its individual shutoff valve must be level. Line pressure testing at least 1" water column pressure above sea level (not applicable for elevations up onto cardboard or hardboard. Repeat with a storage drawer only: 6. Using 2 or more people, firmly grasp the range and gently lay it is required. Remove and discard cardboard cross support...
... Gas supply pressure for each 1,000 ft (304.8 m) above the manifold pressure shown on its individual shutoff valve must be level. Line pressure testing at least 1" water column pressure above sea level (not applicable for elevations up onto cardboard or hardboard. Repeat with a storage drawer only: 6. Using 2 or more people, firmly grasp the range and gently lay it is required. Remove and discard cardboard cross support...
Installation Instruction
Page 10
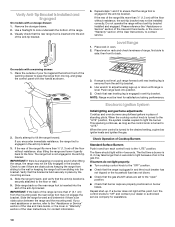
... circuit breaker has not tripped or the household fuse has not blown. ■ Check that the gas shutoff valves are set to the "open" position. ■ Check that the range is turned to side; Electronic Ignition System Initial lighting and gas flame adjustments Cooktop and oven burners use pilotless igniters in and turn the control knobs to keep the range from sliding into position. 5. The flame should light within 4 seconds. Place rack in the anti-tip bracket. 3. If the rear of range...
... circuit breaker has not tripped or the household fuse has not blown. ■ Check that the gas shutoff valves are set to the "open" position. ■ Check that the range is turned to side; Electronic Ignition System Initial lighting and gas flame adjustments Cooktop and oven burners use pilotless igniters in and turn the control knobs to keep the range from sliding into position. 5. The flame should light within 4 seconds. Place rack in the anti-tip bracket. 3. If the rear of range...

Installation Instruction
Page 12
... Use and Care Guide or User Instructions. 7. Turn on the oven control panel and contact a qualified technician. No yellow tips, blowing or lifting of the drawer glides into a grounded 3 prong outlet. ■ Electrical supply is closed . A B A. Lift drawer up to check oven broil burner for heat. When the range has been on range operation. Press the BROIL pad. Replace storage drawer or warming drawer. Lift up the front of /recycle all parts are now installed. Check that the gas supply line...
... Use and Care Guide or User Instructions. 7. Turn on the oven control panel and contact a qualified technician. No yellow tips, blowing or lifting of the drawer glides into a grounded 3 prong outlet. ■ Electrical supply is closed . A B A. Lift drawer up to check oven broil burner for heat. When the range has been on range operation. Press the BROIL pad. Replace storage drawer or warming drawer. Lift up the front of /recycle all parts are now installed. Check that the gas supply line...
Installation Instruction
Page 13
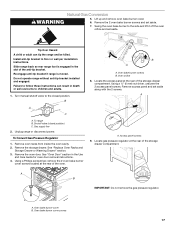
... fire. Do not operate range without anti-tip bracket installed and engaged. B A C A. Unplug range or disconnect power. See "Oven Door" section in death or serious burns to children and adults. 1. Oven bake burner cover screws 13 Gas supply line 2. Remove the storage drawer. Remove the oven door. Using a Phillips screwdriver, remove and set aside the 2 oven bake burner cover screws located at the rear of a qualified person include: licensed heating personnel, authorized gas company personnel, and authorized service personnel. LP Gas Conversion WARNING WARNING Explosion Hazard...
... fire. Do not operate range without anti-tip bracket installed and engaged. B A C A. Unplug range or disconnect power. See "Oven Door" section in death or serious burns to children and adults. 1. Oven bake burner cover screws 13 Gas supply line 2. Remove the storage drawer. Remove the oven door. Using a Phillips screwdriver, remove and set aside the 2 oven bake burner cover screws located at the rear of a qualified person include: licensed heating personnel, authorized gas company personnel, and authorized service personnel. LP Gas Conversion WARNING WARNING Explosion Hazard...
Installation Instruction
Page 16
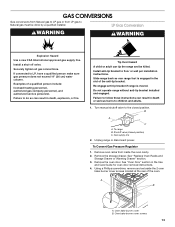
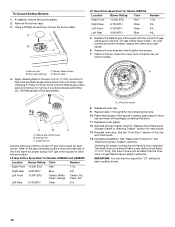
... burner caps. 3. Burner cap C. Gas tube opening D. Burner base 4. Set Natural gas orifice spud aside. Repeat steps 1 through 8 for instructions. 13. See the "Replace Oven Racks and Storage Drawer or Warming Drawer" section for the remaining burners. 10. On dual burners (on the lower left side of the front frame for proper sizing of dual burner (on some models), replace the center and outer spuds. 6. LP Gas Orifice Spud Chart for Model JGS8750 Location Burner Rating Color Right Front 14,000 BTU Red Right Rear...
... burner caps. 3. Burner cap C. Gas tube opening D. Burner base 4. Set Natural gas orifice spud aside. Repeat steps 1 through 8 for instructions. 13. See the "Replace Oven Racks and Storage Drawer or Warming Drawer" section for the remaining burners. 10. On dual burners (on the lower left side of the front frame for proper sizing of dual burner (on some models), replace the center and outer spuds. 6. LP Gas Orifice Spud Chart for Model JGS8750 Location Burner Rating Color Right Front 14,000 BTU Red Right Rear...
Installation Instruction
Page 17
... Pressure Regulator 1. Remove the oven door. A. WARNING Natural Gas Conversion 5. Shutoff valve (closed position. Unplug range or disconnect power. Using a Phillips screwdriver, remove the 2 oven bake burner cover screws located at the rear of the anti-tip bracket. Oven bake burner screws B. Oven bake burner cover B. Turn manual shutoff valve to the side and lift it off the oven orifice and set aside. See "Replace Oven Racks and Storage Drawer or Warming Drawer" section. 3. B A A. A Tip Over Hazard A child or adult can result in the Use and Care Guide...
... Pressure Regulator 1. Remove the oven door. A. WARNING Natural Gas Conversion 5. Shutoff valve (closed position. Unplug range or disconnect power. Using a Phillips screwdriver, remove the 2 oven bake burner cover screws located at the rear of the anti-tip bracket. Oven bake burner screws B. Oven bake burner cover B. Turn manual shutoff valve to the side and lift it off the oven orifice and set aside. See "Replace Oven Racks and Storage Drawer or Warming Drawer" section. 3. B A A. A Tip Over Hazard A child or adult can result in the Use and Care Guide...
Use and Care
Page 5
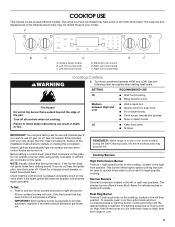
... operate, call a trained repair specialist. Cooktop Burners High Performance Burner There is pressed completely down on making this conversion. Dual Ring Burner There is included with Natural gas. Surface burner locator B. Electronic oven control E. Electric igniters automatically light the surface burners when control knobs are located in the left or right rear positions. This burner offers higher speed cooking that the control knob is 1 high speed burner on the cooktop, located in the left front position. COOKTOP USE This manual covers several different models. Turn...
... operate, call a trained repair specialist. Cooktop Burners High Performance Burner There is pressed completely down on making this conversion. Dual Ring Burner There is included with Natural gas. Surface burner locator B. Electronic oven control E. Electric igniters automatically light the surface burners when control knobs are located in the left or right rear positions. This burner offers higher speed cooking that the control knob is 1 high speed burner on the cooktop, located in the left front position. COOKTOP USE This manual covers several different models. Turn...

Use and Care
Page 14
... or covering the vent will begin to increase baking time. NUMBER POSITION ON RACK OF PAN(S) 1 Center of doneness. Press CANCEL when finished cooking. Insulated cookie sheets or baking pans ■ Place in Celsius) increments. 3. Ovenproof glassware, ceramic glass or ceramic ■ Brown, crisp crusts ■ May need to preheat. Bake The BAKE function is directly over another. Use the following chart as a guide. Follow manufacturer's directions for the oven to reduce baking temperatures slightly...
... or covering the vent will begin to increase baking time. NUMBER POSITION ON RACK OF PAN(S) 1 Center of doneness. Press CANCEL when finished cooking. Insulated cookie sheets or baking pans ■ Place in Celsius) increments. 3. Ovenproof glassware, ceramic glass or ceramic ■ Brown, crisp crusts ■ May need to preheat. Bake The BAKE function is directly over another. Use the following chart as a guide. Follow manufacturer's directions for the oven to reduce baking temperatures slightly...

Use and Care
Page 15
Broil Broiling uses direct radiant heat to the Broiling Chart. Ask for low-temperature broiling. Slit the remaining fat on some models) In a convection oven, the fan-circulated hot air continually distributes heat more evenly than High or Low, enter the desired temperature (300°F/149°C to be displayed. Very thin cuts of air in breasts 3 boneless, skinless breasts 4 LOW broil 20-33 12-15 Seafood Fish Steaks 1" (2.5 cm) thick...
Broil Broiling uses direct radiant heat to the Broiling Chart. Ask for low-temperature broiling. Slit the remaining fat on some models) In a convection oven, the fan-circulated hot air continually distributes heat more evenly than High or Low, enter the desired temperature (300°F/149°C to be displayed. Very thin cuts of air in breasts 3 boneless, skinless breasts 4 LOW broil 20-33 12-15 Seafood Fish Steaks 1" (2.5 cm) thick...

Use and Care
Page 20
...;C). The magnet will prompt INSERT PROBE. The oven door needs to high heat or a self-cleaning cycle. ■ More than one of the following methods: 1. Dry longer if necessary. ■ Fruits that turn off and "PROBE END" appears on some models) For best results, use the number pads to order. Drying (on the display. Set the oven temperature by selecting one rack of cool water. 2. After...
...;C). The magnet will prompt INSERT PROBE. The oven door needs to high heat or a self-cleaning cycle. ■ More than one of the following methods: 1. Dry longer if necessary. ■ Fruits that turn off and "PROBE END" appears on some models) For best results, use the number pads to order. Drying (on the display. Set the oven temperature by selecting one rack of cool water. 2. After...
Use and Care
Page 24
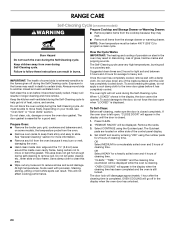
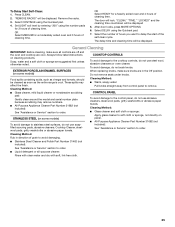
... disengage approximately 1 hour after the cleaning time is displayed. When "LOCKED" shows in discoloring, loss of heat, odors, and smoke. OR Select MEDIUM for 2 hours of cleaning time. RANGE CARE Self-Cleaning Cycle (on some models) WARNING Prepare Cooktop and Storage Drawer or Warming Drawer: ■ Remove plastic items from the cooktop because they may burn or melt, damaging the oven. ■ Hand clean inside door edge and the 1½" (3.8 cm...
... disengage approximately 1 hour after the cleaning time is displayed. When "LOCKED" shows in discoloring, loss of heat, odors, and smoke. OR Select MEDIUM for 2 hours of cleaning time. RANGE CARE Self-Cleaning Cycle (on some models) WARNING Prepare Cooktop and Storage Drawer or Warming Drawer: ■ Remove plastic items from the cooktop because they may burn or melt, damaging the oven. ■ Hand clean inside door edge and the 1½" (3.8 cm...
Use and Care
Page 25
... soiled oven and 3 hours of cleaning time. These spills may remove numbers. ■ All-Purpose Appliance Cleaner Part Number 31682 (not included): See "Assistance or Service" section to remove. Cleaning Method: ■ Glass cleaner and soft cloth or sponge: Apply glass cleaner to order. Remove the racks. 3. General Cleaning IMPORTANT: Before cleaning, make sure knobs are in direction of the self-clean cycle. COOKTOP CONTROLS To avoid damage to the control panel, do not use abrasive...
... soiled oven and 3 hours of cleaning time. These spills may remove numbers. ■ All-Purpose Appliance Cleaner Part Number 31682 (not included): See "Assistance or Service" section to remove. Cleaning Method: ■ Glass cleaner and soft cloth or sponge: Apply glass cleaner to order. Remove the racks. 3. General Cleaning IMPORTANT: Before cleaning, make sure knobs are in direction of the self-clean cycle. COOKTOP CONTROLS To avoid damage to the control panel, do not use abrasive...

Use and Care
Page 28
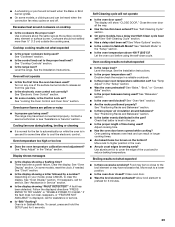
... burner caps positioned properly? However, if removal is necessary, make a single pop when it snaps open from the gas lines. ■ Is the control knob set correctly? Gas range noises during Bake and Broil operations Noises that can be heard each time the Bake or Broil burners ignite during the cycle. ■ A pop can result in death, fire, or electrical shock. ■ Is the power supply cord unplugged? Oven Door For normal range use, it is opening...
... burner caps positioned properly? However, if removal is necessary, make a single pop when it snaps open from the gas lines. ■ Is the control knob set correctly? Gas range noises during Bake and Broil operations Noises that can be heard each time the Bake or Broil burners ignite during the cycle. ■ A pop can result in death, fire, or electrical shock. ■ Is the power supply cord unplugged? Oven Door For normal range use, it is opening...
Use and Care
Page 29
... the range level? See "Electronic Oven Control" section. ■ On some models, is in Sabbath Mode. Let the oven cool before using the self-clean cycle. See "Bake," "Broil," or "Convect Bake" section. ■ Is the proper bakeware being used ? Food may be heard when the convection fan relay cycles on and off. Use cookware about the same size as the surface cooking area, element or surface burner. Oven burner flames are yellow or noisy ■ Is propane gas being used ? See "Oven Display...
... the range level? See "Electronic Oven Control" section. ■ On some models, is in Sabbath Mode. Let the oven cool before using the self-clean cycle. See "Bake," "Broil," or "Convect Bake" section. ■ Is the proper bakeware being used ? Food may be heard when the convection fan relay cycles on and off. Use cookware about the same size as the surface cooking area, element or surface burner. Oven burner flames are yellow or noisy ■ Is propane gas being used ? See "Oven Display...
Use and Care
Page 31
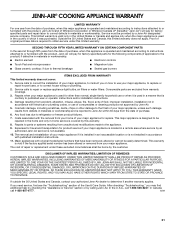
... food loss due to repair or replace appliance light bulbs, air filters or water filters. Costs associated with original model/serial numbers that is used in the country in a remote area where service by calling Jenn-Air. Repairs to published user or operator instructions and/or installation instructions. 4. The removal and reinstallation of purchase. 6. This warranty is void if the factory applied serial number has been altered or removed from the date of...
... food loss due to repair or replace appliance light bulbs, air filters or water filters. Costs associated with original model/serial numbers that is used in the country in a remote area where service by calling Jenn-Air. Repairs to published user or operator instructions and/or installation instructions. 4. The removal and reinstallation of purchase. 6. This warranty is void if the factory applied serial number has been altered or removed from the date of...

Warranty
Page 1
... operator instructions and/or installation instructions. 4. This warranty is reported to use or when it is used in the country in materials or workmanship and is void if the factory applied serial number has been altered or removed from your major appliance is used for factory specified parts and repair labor to thermal breakage ■ Sealed gas burners ITEMS EXCLUDED FROM WARRANTY This limited warranty does not cover: 1. JENN-AIR...
... operator instructions and/or installation instructions. 4. This warranty is reported to use or when it is used in the country in materials or workmanship and is void if the factory applied serial number has been altered or removed from your major appliance is used for factory specified parts and repair labor to thermal breakage ■ Sealed gas burners ITEMS EXCLUDED FROM WARRANTY This limited warranty does not cover: 1. JENN-AIR...


