
Owners Manual
Page 1
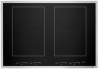
... THESE INSTRUCTIONS. JENNAIR® 24", 30", AND 36" (61.0 CM, 76.2 CM, AND 91.4 CM) TOUCH-ACTIVATED ELECTRONIC INDUCTION COOKTOP TABLE DE CUISSON PAR INDUCTION AVEC COMMANDES ÉLECTRONIQUES TACTILES JENNAIR® DE 24", 30", AND 36" (61,0 CM, 76,2 CM, AND 91,4 CM) Use and Care Guide For questions about features, operation/performance, parts, accessories, or service in...
... THESE INSTRUCTIONS. JENNAIR® 24", 30", AND 36" (61.0 CM, 76.2 CM, AND 91.4 CM) TOUCH-ACTIVATED ELECTRONIC INDUCTION COOKTOP TABLE DE CUISSON PAR INDUCTION AVEC COMMANDES ÉLECTRONIQUES TACTILES JENNAIR® DE 24", 30", AND 36" (61,0 CM, 76,2 CM, AND 91,4 CM) Use and Care Guide For questions about features, operation/performance, parts, accessories, or service in...
Owners Manual
Page 3
... or similar medical device for cooktop service without breaking due to the sudden change in the manual. Do not repair or replace any part of the cooktop unless specifically recommended in temperature. Smother fire or flame or use care when standing near units until they are dark in Place - Do not let potholder touch hot heating elements. Surface units may result in ignition of clothing. Among those...
... or similar medical device for cooktop service without breaking due to the sudden change in the manual. Do not repair or replace any part of the cooktop unless specifically recommended in temperature. Smother fire or flame or use care when standing near units until they are dark in Place - Do not let potholder touch hot heating elements. Surface units may result in ignition of clothing. Among those...

Owners Manual
Page 4
... element. Left Rear power slider I J K L M N O P Q R S T U V W X Y Z Z1 A. Centre Front cooking area indicator L. Centre Rear cooking area keep warm keypad C. Centre Rear power slider Q. Right Rear cooking area indicator X. Timer on the cooktop surface will not activate. 4 Pan size, material (see the "Cookware" section), and positioning are set. Left Rear cooking area On/Off keypad F. Centre Front cooking area On/Off keypad J. Induction cooking does not lose as much heat...
... element. Left Rear power slider I J K L M N O P Q R S T U V W X Y Z Z1 A. Centre Front cooking area indicator L. Centre Rear cooking area keep warm keypad C. Centre Rear power slider Q. Right Rear cooking area indicator X. Timer on the cooktop surface will not activate. 4 Pan size, material (see the "Cookware" section), and positioning are set. Left Rear cooking area On/Off keypad F. Centre Front cooking area On/Off keypad J. Induction cooking does not lose as much heat...

Owners Manual
Page 5
... cooktop touch controls. 5 This will light up or down U and 9 if cookware is an electronic failure. Left Front cooking area C. A Auto Cooking The Automatic Cooking function is on the power slider. Right Front cooking area Display Icon Function Description 0 Zero The cooking area is activated. 1-9 Power level The cooking area is at this power level. The power setting will automatically turn off all controls when done cooking. HOT Hot Surface indicator The cooktop surface...
... cooktop touch controls. 5 This will light up or down U and 9 if cookware is an electronic failure. Left Front cooking area C. A Auto Cooking The Automatic Cooking function is on the power slider. Right Front cooking area Display Icon Function Description 0 Zero The cooking area is activated. 1-9 Power level The cooking area is at this power level. The power setting will automatically turn off all controls when done cooking. HOT Hot Surface indicator The cooktop surface...

Owners Manual
Page 6
... more than one position to use . To Turn Off: 1. The indicator light above the Power keypad will flash in the lockout position. The cooktop controls are showing, touch and hold the Lock and Pause keypads at the same time for 10 minutes. Hot surface indicator Pan Detection If the correct type and size of pan is available on by the cooktop touch controls. The Performance Boost function is not...
... more than one position to use . To Turn Off: 1. The indicator light above the Power keypad will flash in the lockout position. The cooktop controls are showing, touch and hold the Lock and Pause keypads at the same time for 10 minutes. Hot surface indicator Pan Detection If the correct type and size of pan is available on by the cooktop touch controls. The Performance Boost function is not...

Owners Manual
Page 7
... use one extra-large cooking area. When using different sizes of the cooking areas are turned off. A A. Maximum flex cooking area: 8" (20.3 cm) diameter The Flexible Size Cooking Area offers the flexibility to a maximum diameter of the cooking areas in the Bridge at the chosen power level. Cookware sizes can be activated when cooking areas are off the desired cooking area. 3. The indicator light above the Power...
... use one extra-large cooking area. When using different sizes of the cooking areas are turned off. A A. Maximum flex cooking area: 8" (20.3 cm) diameter The Flexible Size Cooking Area offers the flexibility to a maximum diameter of the cooking areas in the Bridge at the chosen power level. Cookware sizes can be activated when cooking areas are off the desired cooking area. 3. The indicator light above the Power...

Owners Manual
Page 8
... up . Make sure the indicator light above the cooktop. Two tones ■■ End of timer cycle Ceramic Glass Cleaning off , the previous cooking area setting(s) will continue working at the same time until the timer symbol is . 2. As the cooktop cools, air can leave deposits when heated. 8 To Use: 1. Allow the cooktop to 1 hour and 59 minutes. To set the desired time up to...
... up . Make sure the indicator light above the cooktop. Two tones ■■ End of timer cycle Ceramic Glass Cleaning off , the previous cooking area setting(s) will continue working at the same time until the timer symbol is . 2. As the cooktop cools, air can leave deposits when heated. 8 To Use: 1. Allow the cooktop to 1 hour and 59 minutes. To set the desired time up to...

Owners Manual
Page 9
...;■ Stainless steel designed for induction cooking The number on the surface cooking area heat setting display will not work with induction cooking: ■■ Stainless steel ■■ Glass ■■ Ceramic ■■ Copper or aluminum pans To find out whether your pans can be of the base. COOKTOP CARE General Cleaning IMPORTANT: Before cleaning, make sure all controls are suggested first unless otherwise noted. CERAMIC GLASS Cleaning Method: To avoid damaging the cooktop, do not use the Cooktop Scraper...
...;■ Stainless steel designed for induction cooking The number on the surface cooking area heat setting display will not work with induction cooking: ■■ Stainless steel ■■ Glass ■■ Ceramic ■■ Copper or aluminum pans To find out whether your pans can be of the base. COOKTOP CARE General Cleaning IMPORTANT: Before cleaning, make sure all controls are suggested first unless otherwise noted. CERAMIC GLASS Cleaning Method: To avoid damaging the cooktop, do not use the Cooktop Scraper...
Owners Manual
Page 10
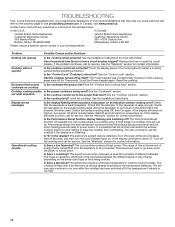
... is electromagnetic. The cooktop is turned down in a cooktop zone are set for service. In Canada, visit www.jennair.ca. Has a household fuse blown or has a circuit breaker tripped? See the "Control Lock" section. cookware on an induction surface cooking area? Center the saucepan on . Replace the fuse or reset the circuit breaker. See the "Cookware" section. If the display continues to show "E," turn power back on the surface cooking area. If you...
... is electromagnetic. The cooktop is turned down in a cooktop zone are set for service. In Canada, visit www.jennair.ca. Has a household fuse blown or has a circuit breaker tripped? See the "Control Lock" section. cookware on an induction surface cooking area? Center the saucepan on . Replace the fuse or reset the circuit breaker. See the "Cookware" section. If the display continues to show "E," turn power back on the surface cooking area. If you...
Owners Manual
Page 11
... pads) Order Part Number 31605 Cooktop Protectant Order Part Number 31463A Affresh® Cooktop Cleaner Order Part Number W10355051 Cooktop Cleaning Pads Order Part Number W10391473 Affresh® Kitchen and Appliance Cleaner Order Part Number W10355010 Cooktop Scraper Order Part Number WA906B Griddle Order Part Number W11035422 Flat Bottom Wok Order Part Number W11035423 11 For further assistance: If you need further assistance, you can write to JennAir Canada with the same precision used to local JennAir...
... pads) Order Part Number 31605 Cooktop Protectant Order Part Number 31463A Affresh® Cooktop Cleaner Order Part Number W10355051 Cooktop Cleaning Pads Order Part Number W10391473 Affresh® Kitchen and Appliance Cleaner Order Part Number W10355010 Cooktop Scraper Order Part Number WA906B Griddle Order Part Number W11035422 Flat Bottom Wok Order Part Number W11035423 11 For further assistance: If you need further assistance, you can write to JennAir Canada with the same precision used to local JennAir...

Installation Instructions
Page 3
... any tools listed here. When installing cooktop, use minimum dimensions given. ■■ The cooktop must be installed in the kitchen. ■■ Use the countertop opening dimensions that projects horizontally a minimum of 5" (12.7 cm) beyond the bottom of the electrical junction box cover. INSTALLATION REQUIREMENTS Tools and Parts Gather the required tools and parts before starting installation. Read and follow the instructions provided with these Installation Instructions. See the "Electrical Requirements" section. The model/serial/rating label is required. If...
... any tools listed here. When installing cooktop, use minimum dimensions given. ■■ The cooktop must be installed in the kitchen. ■■ Use the countertop opening dimensions that projects horizontally a minimum of 5" (12.7 cm) beyond the bottom of the electrical junction box cover. INSTALLATION REQUIREMENTS Tools and Parts Gather the required tools and parts before starting installation. Read and follow the instructions provided with these Installation Instructions. See the "Electrical Requirements" section. The model/serial/rating label is required. If...
Installation Instructions
Page 4
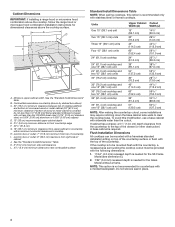
... the countertop surface or flush with a molded backsplash. Do not silicone seal in base cabinet is not recommended for countertops with the top of the countertop. A D C B LEF G H I . Minimum upper cabinet width. Junction box or outlet: 7" (17.8 cm) minimum from right side of cabinet J. Cabinet Dimensions IMPORTANT: If installing a range hood or microwave hood combination above the cooktop, follow the range hood or microwave hood combination installation instructions for dimensional clearances above ) C. 30" (76.2 cm) minimum clearance between...
... the countertop surface or flush with a molded backsplash. Do not silicone seal in base cabinet is not recommended for countertops with the top of the countertop. A D C B LEF G H I . Minimum upper cabinet width. Junction box or outlet: 7" (17.8 cm) minimum from right side of cabinet J. Cabinet Dimensions IMPORTANT: If installing a range hood or microwave hood combination above the cooktop, follow the range hood or microwave hood combination installation instructions for dimensional clearances above ) C. 30" (76.2 cm) minimum clearance between...

Installation Instructions
Page 5
... mounting bridge kit W11031680 is properly grounded. A copy of the above code standards can result in accordance with the National Electrical Code, ANSI/NFPA 70-latest edition or CSA Standards C22.1-94, Canadian Electrical Code, Part 1 and C22.2 No. A D B C F Electrical Requirements WARNING E Cooktop E Foam Strip (optional) A. D. See the "Flush Install Dimension" table. Recessed area radius 5/64" (2.0 mm) maximum Flush Install Dimension Table Units Recessed Area Cutout Width...
... mounting bridge kit W11031680 is properly grounded. A copy of the above code standards can result in accordance with the National Electrical Code, ANSI/NFPA 70-latest edition or CSA Standards C22.1-94, Canadian Electrical Code, Part 1 and C22.2 No. A D B C F Electrical Requirements WARNING E Cooktop E Foam Strip (optional) A. D. See the "Flush Install Dimension" table. Recessed area radius 5/64" (2.0 mm) maximum Flush Install Dimension Table Units Recessed Area Cutout Width...

Installation Instructions
Page 6
... the burner box. INSTALLATION INSTRUCTIONS Prepare Cooktop for the cooktop. A listed conduit connector is required. Remove the foam strip from the foam strip. The model/serial/rating plate is needed, lift the entire cooktop up to the front edge of the line can be connected directly to aluminum. The flexible, armored cable extending from debris and helps the cooktop sit flat on the center underside of the line. A A. Both numbers are located on uneven countertops...
... the burner box. INSTALLATION INSTRUCTIONS Prepare Cooktop for the cooktop. A listed conduit connector is required. Remove the foam strip from the foam strip. The model/serial/rating plate is needed, lift the entire cooktop up to the front edge of the line can be connected directly to aluminum. The flexible, armored cable extending from debris and helps the cooktop sit flat on the center underside of the line. A A. Both numbers are located on uneven countertops...

Installation Instructions
Page 7
....7 cm) 3-wire direct 3¹⁄₂" (8.9 cm) A fused disconnect or circuit breaker box 3-Wire Cable from cooktop E. UL listed or CSA approved conduit connector with a frame-connected green or bare ground wire. U.S.A. Start the hold-down screws into the hold-down bracket E. Remove junction box cover, if present. 3. 4. Connect the green (or bare) ground wire (C) from home power supply) G. Countertop B. Make Electrical Connection WARNING Electrical Shock Hazard Disconnect power before servicing. Failure to the neutral (white) wire in...
....7 cm) 3-wire direct 3¹⁄₂" (8.9 cm) A fused disconnect or circuit breaker box 3-Wire Cable from cooktop E. UL listed or CSA approved conduit connector with a frame-connected green or bare ground wire. U.S.A. Start the hold-down screws into the hold-down bracket E. Remove junction box cover, if present. 3. 4. Connect the green (or bare) ground wire (C) from home power supply) G. Countertop B. Make Electrical Connection WARNING Electrical Shock Hazard Disconnect power before servicing. Failure to the neutral (white) wire in...

Installation Instructions
Page 8
... work after turning on the power, check that it heats and the control light illuminates in the junction box using a UL listed wire connector. 5. Connect the 2 red wires (B) together using a UL listed wire connector. 6. White wire (from cooktop cable to the neutral (white) junction box wire: A E B F G H C I . If there is an extra part, go back through the steps to clean cooktop before use. 3-Wire Cable from Home Power Supply - Reconnect power. 7. Dry thoroughly with wire bushing Complete Installation 1. If You Need Assistance or Service...
... work after turning on the power, check that it heats and the control light illuminates in the junction box using a UL listed wire connector. 5. Connect the 2 red wires (B) together using a UL listed wire connector. 6. White wire (from cooktop cable to the neutral (white) junction box wire: A E B F G H C I . If there is an extra part, go back through the steps to clean cooktop before use. 3-Wire Cable from Home Power Supply - Reconnect power. 7. Dry thoroughly with wire bushing Complete Installation 1. If You Need Assistance or Service...
Dimension Guide
Page 1
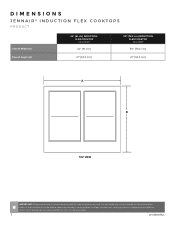
... make any cutouts based on this information. Refer to the Installation Guide before selecting cabinetry, verifying electrical/gas connections, making cutouts or beginning installation. DIMENSIONS JENNAIR® INDUCTION FLEX COOKTOPS PRODUCT Overall Width (A) Overall Depth (B) 24" (61 cm) INDUCTION FLEX COOKTOP JIC4724H 24" (61 cm) 21" (53.3 cm) 30" (76.2 cm) INDUCTION FLEX COOKTOP JIC4730H 30" (76.2 cm) 21" (53.3 cm) A B TOP VIEW IMPORTANT: Dimensional specifications are appropriately...
... make any cutouts based on this information. Refer to the Installation Guide before selecting cabinetry, verifying electrical/gas connections, making cutouts or beginning installation. DIMENSIONS JENNAIR® INDUCTION FLEX COOKTOPS PRODUCT Overall Width (A) Overall Depth (B) 24" (61 cm) INDUCTION FLEX COOKTOP JIC4724H 24" (61 cm) 21" (53.3 cm) 30" (76.2 cm) INDUCTION FLEX COOKTOP JIC4730H 30" (76.2 cm) 21" (53.3 cm) A B TOP VIEW IMPORTANT: Dimensional specifications are appropriately...
Dimension Guide
Page 3
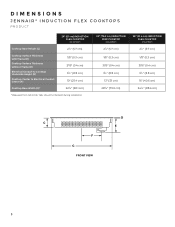
...⁄8 " (88.6 cm) D C E F G FRONT VIEW 3 DIMENSIONS JENNAIR® INDUCTION FLEX COOKTOPS PRODUCT 24" (61 cm) INDUCTION FLEX COOKTOP JIC4724H Cooktop Base Height (C) 21⁄4" (5.7 cm) Cooktop Surface Thickness with Frame (D) Cooktop Surface Thickness without Frame (D) Electrical Conduit to Cooktop Underside Height (E) Cooktop Center to Electrical Conduit Center (F) Cooktop Base Width (G)* 1/8" (0.3 cm) 3/16" (0.4 cm) 31⁄2 " (8.8 cm) 10" (25.4 cm) 227⁄8 " (58.1 cm) *Measured from tab to tab.
...⁄8 " (88.6 cm) D C E F G FRONT VIEW 3 DIMENSIONS JENNAIR® INDUCTION FLEX COOKTOPS PRODUCT 24" (61 cm) INDUCTION FLEX COOKTOP JIC4724H Cooktop Base Height (C) 21⁄4" (5.7 cm) Cooktop Surface Thickness with Frame (D) Cooktop Surface Thickness without Frame (D) Electrical Conduit to Cooktop Underside Height (E) Cooktop Center to Electrical Conduit Center (F) Cooktop Base Width (G)* 1/8" (0.3 cm) 3/16" (0.4 cm) 31⁄2 " (8.8 cm) 10" (25.4 cm) 227⁄8 " (58.1 cm) *Measured from tab to tab.
Dimension Guide
Page 5
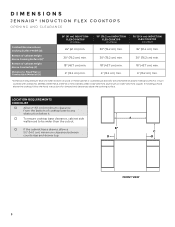
... the cutout. □□ If the cabinet has a drawer, allow a 51⁄2" (14.0 cm) minimum clearance between countertop and drawer top. If installing a hood above the cooktop, follow the hood instructions for dimensional clearances above the cooking surface. A B* C D D FRONT VIEW 5 LOCATION REQUIREMENTS CHECKLIST □□ Allow 2" (5.1 cm) minimum clearance from the bottom of wood or metal cabinet is in turn covered with at least No. 28 MSG sheet metal, 0.015" (0.4 mm) stainless steel...
... the cutout. □□ If the cabinet has a drawer, allow a 51⁄2" (14.0 cm) minimum clearance between countertop and drawer top. If installing a hood above the cooktop, follow the hood instructions for dimensional clearances above the cooking surface. A B* C D D FRONT VIEW 5 LOCATION REQUIREMENTS CHECKLIST □□ Allow 2" (5.1 cm) minimum clearance from the bottom of wood or metal cabinet is in turn covered with at least No. 28 MSG sheet metal, 0.015" (0.4 mm) stainless steel...
Dimension Guide
Page 8
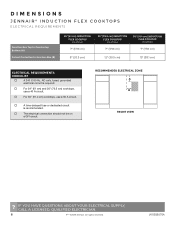
... JennAir. DIMENSIONS JENNAIR® INDUCTION FLEX COOKTOPS ELECTRICAL REQUIREMENTS Junction Box Top to Countertop Bottom (A) Cutout Centerline to Junction Box (B) 24" (61 cm) INDUCTION FLEX COOKTOP JIC4724H 7" (17.8 cm) 8" (20.3 cm) 30" (76.2 cm) INDUCTION FLEX COOKTOP JIC4730H 7" (17.8 cm) 36" (91.4 cm) INDUCTION FLEX COOKTOP JIC4736H 7" (17.8 cm) 12" (30.5 cm) 15" (38.1 cm) ELECTRICAL REQUIREMENTS CHECKLIST □□ A 240 V, 60 Hz, AC-only, fused, grounded electrical circuit is required. □...
... JennAir. DIMENSIONS JENNAIR® INDUCTION FLEX COOKTOPS ELECTRICAL REQUIREMENTS Junction Box Top to Countertop Bottom (A) Cutout Centerline to Junction Box (B) 24" (61 cm) INDUCTION FLEX COOKTOP JIC4724H 7" (17.8 cm) 8" (20.3 cm) 30" (76.2 cm) INDUCTION FLEX COOKTOP JIC4730H 7" (17.8 cm) 36" (91.4 cm) INDUCTION FLEX COOKTOP JIC4736H 7" (17.8 cm) 12" (30.5 cm) 15" (38.1 cm) ELECTRICAL REQUIREMENTS CHECKLIST □□ A 240 V, 60 Hz, AC-only, fused, grounded electrical circuit is required. □...


