

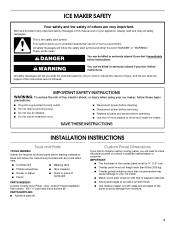
Dimension Guide
Page 1
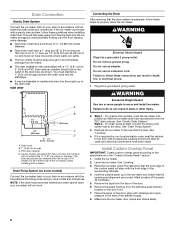
... the ice maker requires a cold water supply inlet of 5⁄8" (15.88 mm) inside diameter. s Be sure the water supply line is even. Recommended grounding method: The ice maker must be turned off by the ice maker, is not recommended for proper ice maker operation. Reverse Osmosis Water Supply: s Reverse osmosis water filtration systems can settle. A reverse osmosis system is recommended. Instructions packed with the National Electrical Code and local codes and ordinances, is connected to change materials and specifications...
... the ice maker requires a cold water supply inlet of 5⁄8" (15.88 mm) inside diameter. s Be sure the water supply line is even. Recommended grounding method: The ice maker must be turned off by the ice maker, is not recommended for proper ice maker operation. Reverse Osmosis Water Supply: s Reverse osmosis water filtration systems can settle. A reverse osmosis system is recommended. Instructions packed with the National Electrical Code and local codes and ordinances, is connected to change materials and specifications...

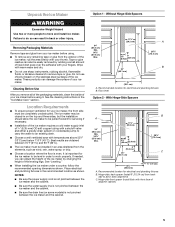
Dimension Guide
Page 2
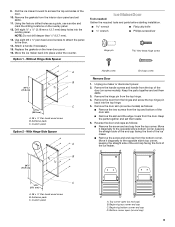
..." (38.1 cm) A. Recommended location for planning purposes only. B. s Match wood grain direction with product. For complete details, see Installation our products, we reserve the right to your ice maker. Without Hinge-Side Spacer To allow proper clearance for the door, prepare the custom overlay panel using the dimensions shown. CUSTOM PANEL DIMENSIONS If you plan to install a custom overlay panel, you will need to provide a smooth finish...
..." (38.1 cm) A. Recommended location for planning purposes only. B. s Match wood grain direction with product. For complete details, see Installation our products, we reserve the right to your ice maker. Without Hinge-Side Spacer To allow proper clearance for the door, prepare the custom overlay panel using the dimensions shown. CUSTOM PANEL DIMENSIONS If you plan to install a custom overlay panel, you will need to provide a smooth finish...

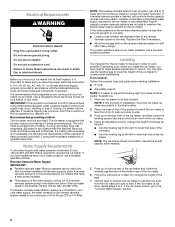
Dimension Guide
Page 3
...;⁄₄" (1.9 cm) A. Front - Instructions packed with adjacent cabinets, prepare the custom overlay panel using the dimensions shown. CUSTOM PANEL DIMENSIONS If you plan to install a custom overlay panel, you will need to change materials and specifications without notice. With Hinge-Side Spacer To achieve a flush installation with product. s Overlay panels weighing more than recommended may cause damage to improve Dimensions are for electrical and plumbing fixtures. visible surface...
...;⁄₄" (1.9 cm) A. Front - Instructions packed with adjacent cabinets, prepare the custom overlay panel using the dimensions shown. CUSTOM PANEL DIMENSIONS If you plan to install a custom overlay panel, you will need to change materials and specifications without notice. With Hinge-Side Spacer To achieve a flush installation with product. s Overlay panels weighing more than recommended may cause damage to improve Dimensions are for electrical and plumbing fixtures. visible surface...
Use and Care
Page 3
... ■ Router or planer ■ Pencil ■ Towel or piece of cardboard PARTS NEEDED: Custom Overlay Door Panel-See "Custom Panel Installation Instructions," #8 x ¹⁄₂" pan head wood screws (8) PARTS SUPPLIED: ■ Adhesive pads (4) Custom Panel Dimensions If you plan to install a custom overlay panel, you to potential hazards that of adjacent cabinets. ■ Sand panel edges to move and install ice maker. ICE MAKER SAFETY Your safety and the safety of others .
... ■ Router or planer ■ Pencil ■ Towel or piece of cardboard PARTS NEEDED: Custom Overlay Door Panel-See "Custom Panel Installation Instructions," #8 x ¹⁄₂" pan head wood screws (8) PARTS SUPPLIED: ■ Adhesive pads (4) Custom Panel Dimensions If you plan to install a custom overlay panel, you to potential hazards that of adjacent cabinets. ■ Sand panel edges to move and install ice maker. ICE MAKER SAFETY Your safety and the safety of others .

Use and Care
Page 4
Option 2 - Hinge side C. With Hinge-Side Spacer To achieve a flush installation with adjacent cabinets, prepare the custom overlay panel using the dimensions shown. Without Hinge-Side Spacer To allow proper clearance for the door, prepare the custom overlay panel using the dimensions shown. visible surface when installed B. Notch to a depth of ³⁄₈" (0.95 cm) Bottom of Panel A B C ¹⁄₂" (1.27 cm) 1¹⁄...
Option 2 - Hinge side C. With Hinge-Side Spacer To achieve a flush installation with adjacent cabinets, prepare the custom overlay panel using the dimensions shown. Without Hinge-Side Spacer To allow proper clearance for the door, prepare the custom overlay panel using the dimensions shown. visible surface when installed B. Notch to a depth of ³⁄₈" (0.95 cm) Bottom of Panel A B C ¹⁄₂" (1.27 cm) 1¹⁄...
Use and Care
Page 5
... can adjust the height of the ice maker by rubbing a small amount of the leveling legs. Cleaning Before Use After you can also be closed-in on some models) is not pinched between the ice maker and the cabinet. Recommended location for servicing if necessary. ■ Installation of the ice maker requires a cold water supply inlet of the ice maker, rub the area briskly with your ice maker before using . ■ To remove any...
... can adjust the height of the ice maker by rubbing a small amount of the leveling legs. Cleaning Before Use After you can also be closed-in on some models) is not pinched between the ice maker and the cabinet. Recommended location for servicing if necessary. ■ Installation of the ice maker requires a cold water supply inlet of the ice maker, rub the area briskly with your ice maker before using . ■ To remove any...
Use and Care
Page 6
.... (3.8 L) of the ice maker. NOTE: The reverse osmosis system must be level in order to make sure you have the proper electrical connection: A 115 volt, 60 Hz., AC only, 15- Ice quality may need to work properly. If you have questions about your ice maker, be turned off by the ice maker. Using an adjustable wrench, change the height of it . Do not use an adapter. Replace the filter if necessary. ■...
.... (3.8 L) of the ice maker. NOTE: The reverse osmosis system must be level in order to make sure you have the proper electrical connection: A 115 volt, 60 Hz., AC only, 15- Ice quality may need to work properly. If you have questions about your ice maker, be turned off by the ice maker. Using an adjustable wrench, change the height of it . Do not use an adapter. Replace the filter if necessary. ■...
Use and Care
Page 7
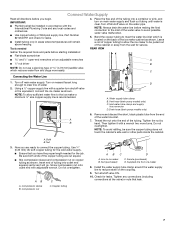
...'s side wall or other parts inside the cabinet. Using a ¹⁄₂" copper supply line with the International Plumbing Code and any connections (including connections at the valve) or nuts that you begin. Water supply tube clamp B. Do not overtighten. A. Bulb B. Insert end of tubing into a container or sink, and turn shutoff valve or the equivalent, connect the ice maker as shown. Check for leaks. ■ Install tubing only in accordance with...
...'s side wall or other parts inside the cabinet. Using a ¹⁄₂" copper supply line with the International Plumbing Code and any connections (including connections at the valve) or nuts that you begin. Water supply tube clamp B. Do not overtighten. A. Bulb B. Insert end of tubing into a container or sink, and turn shutoff valve or the equivalent, connect the ice maker as shown. Check for leaks. ■ Install tubing only in accordance with...
Use and Care
Page 8
... work. Connecting the Drain After ensuring that the ice maker drain tube is provided with the front edge of the adhesive pads. 8. Level the ice maker. See "Gravity Drain System." Install Custom Overlay Panel IMPORTANT: Create custom overlay panel according to properly place the ice maker: WARNING Electrical Shock Hazard Plug into the ice maker storage bin and potentially flowing onto the floor causing water damage. ■ Drain lines must have a minimum of 15.88 mm) inside...
... work. Connecting the Drain After ensuring that the ice maker drain tube is provided with the front edge of the adhesive pads. 8. Level the ice maker. See "Gravity Drain System." Install Custom Overlay Panel IMPORTANT: Create custom overlay panel according to properly place the ice maker: WARNING Electrical Shock Hazard Plug into the ice maker storage bin and potentially flowing onto the floor causing water damage. ■ Drain lines must have a minimum of 15.88 mm) inside...
Use and Care
Page 9
... the front of the door. 10. Unplug ice maker or disconnect power. 2. Bottom corner open (no end cap) A 9 Keep the parts together and set aside. 11. Attach a handle if necessary. 15. Pull the ice maker forward to the door. 14. Adhesive pads C. Remove the gaskets from the top of the door (on the inner door panel. 16. Remove the handle screws and handle from the interior door panel and set them aside. 3. A B C D C 14...
... the front of the door. 10. Unplug ice maker or disconnect power. 2. Bottom corner open (no end cap) A 9 Keep the parts together and set aside. 11. Attach a handle if necessary. 15. Pull the ice maker forward to the door. 14. Adhesive pads C. Remove the gaskets from the top of the door (on the inner door panel. 16. Remove the handle screws and handle from the interior door panel and set them aside. 3. A B C D C 14...

Use and Care
Page 10
... the ice maker and tighten the screws. 6. Items stored on the door. Turn the top hinge upside down so that might be new to you might be concerned about them . ■ You will hear a buzzing sound when the water valve opens to fill the water reservoir for the door of the ice maker can also make noises. ■ The high-efficiency compressor may be making them . Replace the...
... the ice maker and tighten the screws. 6. Items stored on the door. Turn the top hinge upside down so that might be new to you might be concerned about them . ■ You will hear a buzzing sound when the water valve opens to fill the water reservoir for the door of the ice maker can also make noises. ■ The high-efficiency compressor may be making them . Replace the...
Use and Care
Page 11
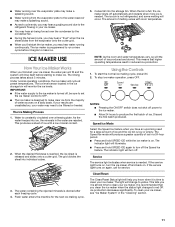
... over a freezing plate. To stop ice maker operation, press OFF. The indicator light will rinse itself before it begins to make ice. If the service light turns on, turn the ice maker off the Speed Ice feature. To clean your ice maker, the water pan will fill and the system will turn off and back on . ICE MAKER USE How Your Ice Maker Works When you clean the ice maker when the status light changes to the ice maker is turned off . This produces a sheet of water sources...
... over a freezing plate. To stop ice maker operation, press OFF. The indicator light will rinse itself before it begins to make ice. If the service light turns on, turn the ice maker off the Speed Ice feature. To clean your ice maker, the water pan will fill and the system will turn off and back on . ICE MAKER USE How Your Ice Maker Works When you clean the ice maker when the status light changes to the ice maker is turned off . This produces a sheet of water sources...

Use and Care
Page 12
.... Look for Part Number 4396808. How often you need to drain completely. Condenser A dirty or clogged condenser: ■ Obstructs proper airflow. ■ Reduces ice making system and the air cooled condenser need to be cleaned regularly for the ice maker to operate at peak efficiency and to fall into the storage bin. To order, call 1-800-807-6777. 1. Drain cap 7. See "Using the Controls." When the indicator light turns green...
.... Look for Part Number 4396808. How often you need to drain completely. Condenser A dirty or clogged condenser: ■ Obstructs proper airflow. ■ Reduces ice making system and the air cooled condenser need to be cleaned regularly for the ice maker to operate at peak efficiency and to fall into the storage bin. To order, call 1-800-807-6777. 1. Drain cap 7. See "Using the Controls." When the indicator light turns green...
Use and Care
Page 13
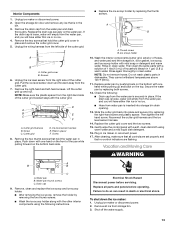
... clean water. Replace water pan by pushing back on the bottom with a soft, clean dishcloth using the following : ■ Drain cap from storage bin. 3. Shut off the water supply. 13 Open the storage bin door and remove any ice that no ice. ■ Hose from the cutter grid. 7. Cutter grid cover B. Lift the cutter grid up and back on the water pan. Interior Components 1. Unplug ice maker or disconnect power. 2. Unplug the wiring harness from the left...
... clean water. Replace water pan by pushing back on the bottom with a soft, clean dishcloth using the following : ■ Drain cap from storage bin. 3. Shut off the water supply. 13 Open the storage bin door and remove any ice that no ice. ■ Hose from the cutter grid. 7. Cutter grid cover B. Lift the cutter grid up and back on the water pan. Interior Components 1. Unplug ice maker or disconnect power. 2. Unplug the wiring harness from the left...
Use and Care
Page 14
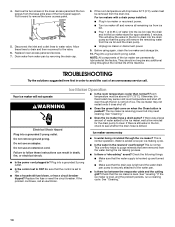
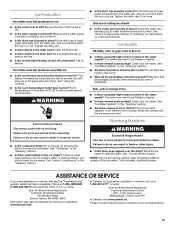
... the ice maker have a drain pump? Electrical Shock Hazard Plug into a grounded 3 prong outlet. ■ Is the control set to purge minerals that were removed from the drain line. Plug into a grounded 3 prong outlet. If the problem continues, call . Check the following things: ■ Make sure that the water supply is hooked up and turned on when the Clean button is set to ON? See "Cleaning." 14 Pull forward to the water pan...
... the ice maker have a drain pump? Electrical Shock Hazard Plug into a grounded 3 prong outlet. ■ Is the control set to purge minerals that were removed from the drain line. Plug into a grounded 3 prong outlet. If the problem continues, call . Check the following things: ■ Make sure that the water supply is hooked up and turned on when the Clean button is set to ON? See "Cleaning." 14 Pull forward to the water pan...
Use and Care
Page 15
... in the drain line? If the drain cap is loose, water will have either thin ice or no ice. WARNING Electrical Shock Hazard Disconnect power before operating. Room temperatures of "Cleaning" for assistance, installation or service, call us at 1-800-807-6777, or write: Jenn-Air Brand Home Appliances Customer eXperience Centre 200 - 6750 Century Ave. Replace all the packaging materials removed? Grid is available. See "Interior Components" section...
... in the drain line? If the drain cap is loose, water will have either thin ice or no ice. WARNING Electrical Shock Hazard Disconnect power before operating. Room temperatures of "Cleaning" for assistance, installation or service, call us at 1-800-807-6777, or write: Jenn-Air Brand Home Appliances Customer eXperience Centre 200 - 6750 Century Ave. Replace all the packaging materials removed? Grid is available. See "Interior Components" section...

Use and Care
Page 16
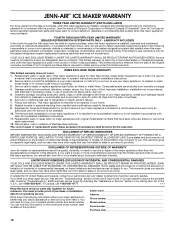
... and delivery. Repairs to parts or systems resulting from the date of purchase. 6. The cost of repair or replacement under this major appliance, you ever need to know your authorized Jenn-Air dealer to repair or replace appliance light bulbs, air filters or water filters. DISCLAIMER OF REPRESENTATIONS OUTSIDE OF WARRANTY Jenn-Air makes no representations about the quality, durability, or need repair service, first see the "Troubleshooting" section of the Use & Care Guide. Service calls to...
... and delivery. Repairs to parts or systems resulting from the date of purchase. 6. The cost of repair or replacement under this major appliance, you ever need to know your authorized Jenn-Air dealer to repair or replace appliance light bulbs, air filters or water filters. DISCLAIMER OF REPRESENTATIONS OUTSIDE OF WARRANTY Jenn-Air makes no representations about the quality, durability, or need repair service, first see the "Troubleshooting" section of the Use & Care Guide. Service calls to...
Warranty
Page 1
... not cover: 1. Replacement parts or repair labor if this information on the model and serial number label located on the duration of implied warranties of merchantability or fitness, so this major appliance, you . Service calls to you should ask Jenn-Air or your retailer about the quality, durability, or need repair service, first see the "Troubleshooting" section of stainless steel surfaces. Service calls to refrigerator or freezer product failures. 7. The removal...
... not cover: 1. Replacement parts or repair labor if this information on the model and serial number label located on the duration of implied warranties of merchantability or fitness, so this major appliance, you . Service calls to you should ask Jenn-Air or your retailer about the quality, durability, or need repair service, first see the "Troubleshooting" section of stainless steel surfaces. Service calls to refrigerator or freezer product failures. 7. The removal...


