
Use and Care
Page 3
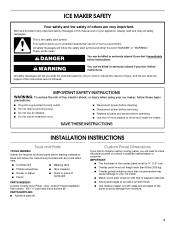
... before cleaning. ■ Disconnect power before servicing. ■ Replace all parts and panels before starting installation. SAVE THESE INSTRUCTIONS INSTALLATION INSTRUCTIONS Tools and Parts TOOLS NEEDED: Gather the required tools and parts before operating. ■ Use two or more than 8 lbs (3.62...; Router or planer ■ Pencil ■ Towel or piece of cardboard PARTS NEEDED: Custom Overlay Door Panel-See "Custom Panel Installation Instructions," #8 x ¹⁄₂" pan head wood screws (8) PARTS SUPPLIED: ■ Adhesive pads (4) Custom Panel Dimensions If you plan to...
... before cleaning. ■ Disconnect power before servicing. ■ Replace all parts and panels before starting installation. SAVE THESE INSTRUCTIONS INSTALLATION INSTRUCTIONS Tools and Parts TOOLS NEEDED: Gather the required tools and parts before operating. ■ Use two or more than 8 lbs (3.62...; Router or planer ■ Pencil ■ Towel or piece of cardboard PARTS NEEDED: Custom Overlay Door Panel-See "Custom Panel Installation Instructions," #8 x ¹⁄₂" pan head wood screws (8) PARTS SUPPLIED: ■ Adhesive pads (4) Custom Panel Dimensions If you plan to...
Use and Care
Page 6
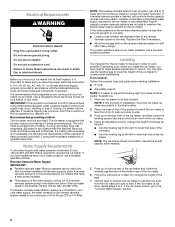
... legs. 7. Depending upon where you install the ice maker, you have a gravity drain. Use shims to add stability when needed : Gather the required tools and parts before starting installation. ■ 9" level ■ Adjustable wrench NOTE: It is required to the "Connect Water Supply" section. 6 The cord must be turned off by...
... legs. 7. Depending upon where you install the ice maker, you have a gravity drain. Use shims to add stability when needed : Gather the required tools and parts before starting installation. ■ 9" level ■ Adjustable wrench NOTE: It is required to the "Connect Water Supply" section. 6 The cord must be turned off by...
Use and Care
Page 7
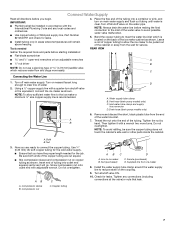
...connections (including connections at the valve) or nuts that you have the proper length needed REAR VIEW Gather the required tools and parts before starting installation: ■ Flat-blade screwdriver and ¹⁄₂" open-end wrenches or two adjustable wrenches A nut driver... supply line with adjustable wrench. Nut 3. Tighten any local codes and ordinances. ■ Use copper tubing or Whirlpool supply line, Part Number 8212547RP, and check for leaks. Connect Water Supply Read all directions before you are cut square. ■ Slip compression sleeve and...
...connections (including connections at the valve) or nuts that you have the proper length needed REAR VIEW Gather the required tools and parts before starting installation: ■ Flat-blade screwdriver and ¹⁄₂" open-end wrenches or two adjustable wrenches A nut driver... supply line with adjustable wrench. Nut 3. Tighten any local codes and ordinances. ■ Use copper tubing or Whirlpool supply line, Part Number 8212547RP, and check for leaks. Connect Water Supply Read all directions before you are cut square. ■ Slip compression sleeve and...
Use and Care
Page 9
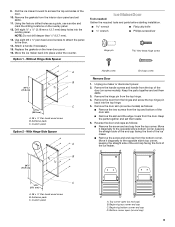
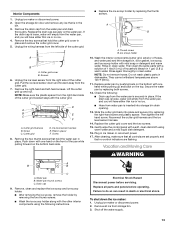
... door skin (on some models) as follows: ■ Remove the two screws from the top and bottom of the door (on some models). Keep the parts together and set aside. 11. Custom panel D C B A. 9. Using the factory drilled holes as follows: ■ Remove the screw and end cap from the .... 15. Move the ice maker back into the overlay panel. Without Hinge-Side Spacer Ice Maker Door Tools needed: Gather the required tools and parts before starting installation. Remove the hinge pin from the hinges and screw the top hinge pin back into the top hinge. 5. Move it diagonally ...
... door skin (on some models) as follows: ■ Remove the two screws from the top and bottom of the door (on some models). Keep the parts together and set aside. 11. Custom panel D C B A. 9. Using the factory drilled holes as follows: ■ Remove the screw and end cap from the .... 15. Move the ice maker back into the overlay panel. Without Hinge-Side Spacer Ice Maker Door Tools needed: Gather the required tools and parts before starting installation. Remove the hinge pin from the hinges and screw the top hinge pin back into the top hinge. 5. Move it diagonally ...

Use and Care
Page 12
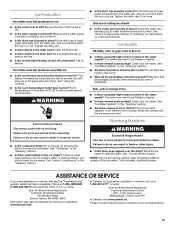
... bottle of approved ice maker cleaner. 6. Wait 5 to 10 minutes for any cleaning solution left in ice maker or reconnect power. Remove all parts and panels before operating. If the drain cap is . Use one 16 oz (473 mL) bottle of approved ice maker cleaner. See "Using ... screws. 6. Condenser A dirty or clogged condenser: ■ Obstructs proper airflow. ■ Reduces ice making system and the air cooled condenser need to be cleaned regularly for Part Number 4396808. Allow the water to replace the drain cap securely on enamel surfaces as every 6 months. Replace all ice from...
... bottle of approved ice maker cleaner. 6. Wait 5 to 10 minutes for any cleaning solution left in ice maker or reconnect power. Remove all parts and panels before operating. If the drain cap is . Use one 16 oz (473 mL) bottle of approved ice maker cleaner. See "Using ... screws. 6. Condenser A dirty or clogged condenser: ■ Obstructs proper airflow. ■ Reduces ice making system and the air cooled condenser need to be cleaned regularly for Part Number 4396808. Allow the water to replace the drain cap securely on enamel surfaces as every 6 months. Replace all ice from...
Use and Care
Page 13
... using the following : ■ Drain cap from the right-hand side of the cutter grid. A B A. Ice level sensor harness E. Then clean the same parts with the other interior components using warm water and a mild liquid dish detergent. 16. Replace water pan by pushing back on the bottom with one...grid back into storage bin drain opening. 13. Replace the cutter grid cover and the two screws. 15. After cleaning, make sure that all parts and panels before servicing. Shut off the water supply. 13 If the drain cap is securely in place and remove the cutter grid cover. 5....
... using the following : ■ Drain cap from the right-hand side of the cutter grid. A B A. Ice level sensor harness E. Then clean the same parts with the other interior components using warm water and a mild liquid dish detergent. 16. Replace water pan by pushing back on the bottom with one...grid back into storage bin drain opening. 13. Replace the cutter grid cover and the two screws. 15. After cleaning, make sure that all parts and panels before servicing. Shut off the water supply. 13 If the drain cap is securely in place and remove the cutter grid cover. 5....
Use and Care
Page 15
... The water may need to be blocking the airflow through the condenser. Do not store any foods in the ice bin. ■ Were all parts and panels before servicing. The water may need to be obtained by visiting our website at the time of time. If ice is available. Move... outside of ice in the same amount of installation. Call us at 1-800-JENNAIR (1-800-536-6247) from anywhere in the U.S.A., or write: Jenn-Air Brand Home Appliances Customer eXperience Center 553 Benson Road Benton Harbor, MI 49022-2692 Information may be filtered or treated. ■ Is there mineral scale...
... The water may need to be blocking the airflow through the condenser. Do not store any foods in the ice bin. ■ Were all parts and panels before servicing. The water may need to be obtained by visiting our website at the time of time. If ice is available. Move... outside of ice in the same amount of installation. Call us at 1-800-JENNAIR (1-800-536-6247) from anywhere in the U.S.A., or write: Jenn-Air Brand Home Appliances Customer eXperience Center 553 Benson Road Benton Harbor, MI 49022-2692 Information may be filtered or treated. ■ Is there mineral scale...

Use and Care
Page 16
... replacement under this major appliance was purchased. This warranty gives you specific legal rights, and you . JENN-AIR™ ICE MAKER WARRANTY THREE YEAR LIMITED WARRANTY (PARTS AND LABOR) For three years from the date of purchase, when this major appliance is installed, operated... and maintained according to instructions attached to or furnished with the product, Jenn-Air brand of Whirlpool Corporation or Whirlpool Canada LP (hereafter "Jenn-Air") will pay for factory specified replacement parts for in your major appliance, to instruct you ever need for service or repair...
... replacement under this major appliance was purchased. This warranty gives you specific legal rights, and you . JENN-AIR™ ICE MAKER WARRANTY THREE YEAR LIMITED WARRANTY (PARTS AND LABOR) For three years from the date of purchase, when this major appliance is installed, operated... and maintained according to instructions attached to or furnished with the product, Jenn-Air brand of Whirlpool Corporation or Whirlpool Canada LP (hereafter "Jenn-Air") will pay for factory specified replacement parts for in your major appliance, to instruct you ever need for service or repair...
Warranty
Page 1
... implied warranties of merchantability or fitness, so this limitation may have been removed, altered or cannot be provided by Jenn-Air. 5. Consumable parts are unable to resolve the problem after checking "Troubleshooting," additional help you obtain assistance or service if you ever ... and maintained according to instructions attached to or furnished with the product, Jenn-Air brand of Whirlpool Corporation or Whirlpool Canada LP (hereafter "Jenn-Air") will pay for factory specified replacement parts for the following information about the quality, durability, or need to know...
... implied warranties of merchantability or fitness, so this limitation may have been removed, altered or cannot be provided by Jenn-Air. 5. Consumable parts are unable to resolve the problem after checking "Troubleshooting," additional help you obtain assistance or service if you ever ... and maintained according to instructions attached to or furnished with the product, Jenn-Air brand of Whirlpool Corporation or Whirlpool Canada LP (hereafter "Jenn-Air") will pay for factory specified replacement parts for the following information about the quality, durability, or need to know...
