Jenn-Air JJW2827IM Support and Manuals
Get Help and Manuals for this Jenn-Air item
View All Support Options Below
Free Jenn-Air JJW2827IM manuals!
Problems with Jenn-Air JJW2827IM?
Ask a Question
Free Jenn-Air JJW2827IM manuals!
Problems with Jenn-Air JJW2827IM?
Ask a Question
Jenn-Air JJW2827IM Videos

Jenn-Air JJW2827IM Fours encastré double
Duration: :37
Total Views: 0
Duration: :37
Total Views: 0
Jenn-Air JJW2827IM Double Wall Oven
Duration: :37
Total Views: 6
Duration: :37
Total Views: 6
Popular Jenn-Air JJW2827IM Manual Pages
Warranty - Page 1
... or province to determine whether another warranty applies. Service or parts for in remote locations where an authorized Jenn-Air servicer is a limited 5-year warranty on the duration of implied warranties of repair or replacement under this major appliance is installed, operated and maintained according to instructions attached to correct defects in accordance with published...
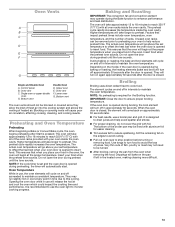
Owners Manual - Page 4
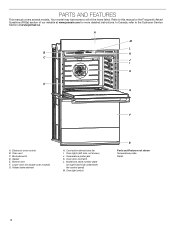
... AND FEATURES
This manual covers several models. Refer to the Customer Service Section at www.jennair.com for more detailed instructions. Oven vent C. Bottom vent F. A
M
L
B
K
C J
I . Electronic oven control B. Gasket E. Model and serial number plate
(on double oven models) G. Convection element and fan I
H
D G
F
A. Oven light switch
E
Parts and Features not shown Temperature...
Owners Manual - Page 5
... panel.
Oven use .
5
Power B.
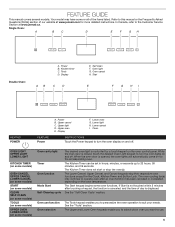
FEATURE GUIDE
This manual covers several models. Lower oven G. When the oven door is controlled by a touch keypad on for the Clock, Kitchen Timer, and Button Lock. Refer to the Customer Service Section at www.jennair.com for more detailed instructions. In Canada, refer to this manual or the Frequently Asked Questions...
Owners Manual - Page 6
...models, touch the corresponding oven keypad to activate. Modes column B.
The touch pads are very sensitive and require only a light touch to show the clock, mode, oven temperature, kitchen timer, and oven timer, if set it from this manual... allows you to set , options can be adjusted, and instructions, preparation, and tips ... and function controls. Welcome Guide This appears on . Select...
Owners Manual - Page 8
...set the clock, change the oven temperature between Fahrenheit and Celsius, turn the audible signals and prompts on and off, and adjust the oven calibration, change the language, and more.
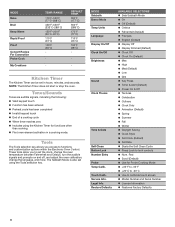
Tools
The Tools selection key allows you to calibrate touch screen ■■ Model...zero ■■ Includes using the Tools selection key. Service Info. DEFAULT TEMP. 350°F (177°C) ...
Owners Manual - Page 9
...can be displayed. Touch ON, and then touch SETUP. For single ovens, go to idle mode and ...guide. The other oven. Touch LOCK to a regular Bake mode.
9
Oven Temperature Control
IMPORTANT: Do not use of the elements and impact the temperature. For example, if set... immediately.
However, it was set temperature and will turn off Sabbath Mode for only part of shapes that lasts greater ...
Owners Manual - Page 10
... oven bottom with any changes to a higher speed. Touch SET.
10. NOTE: Once the timer ends; NOTE: On double oven models, the oven cavity temperature may be displayed. 4.
OR Touch... timer is set independently.
Touch ON, and then touch SETUP. Review the settings and touch START to certain birds. NOTE: If a bake time is not set temperature will be set in food poisoning...
Owners Manual - Page 13
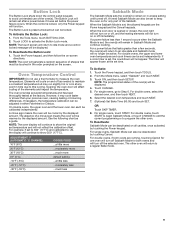
..., the bake and broil elements will go above the set temperature to maintain the oven temperature. Slit the remaining fat on the model, if the oven door is designed to maintain the oven... heated oven, making cleaning more difficult.
13 Unused oven racks can be lined with your set temperature to maintain a consistent temperature. Very thin cuts of juices. Lower oven G. Opening the...
Owners Manual - Page 16
...■■ Affresh® Kitchen and Appliance Cleaner Part Number W10355010 (not included): See the "Accessories" ...; Remove any loose soil to follow label instructions on -screen directions. At high temperatures,..., loss of porcelain on some models, the temperature probe from oven during... move birds to regular service. In Canada, reference the Customer Service section at www.jennair....
Owners Manual - Page 17
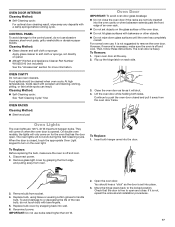
... pull it is not, repeat the removal and installation procedures.
17 Disconnect power. 2. Insert both sides...Part Number W10355010 (not included): See the "Accessories" section for the oven that the door is set... double oven models, the lights will not work during the Self-Cleaning cycle. Replace bulb, using...instructions. To Replace: Before replacing the bulb, make sure the oven is heavy.
Owners Manual - Page 18
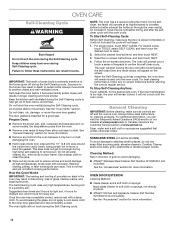
...-clean. You may help reduce preheat time. TROUBLESHOOTING
First try the solutions suggested here. Is the Sabbath mode set or turned on. See the "Oven Temperature ...Problem
Possible Causes and/or Solutions
Nothing will take more recommendations that batter is self-cleaning, the other oven cannot be set ? See cycle instructions for service. Are pie crust edges browning early?
Replace...
Owners Manual - Page 19
...; Features and specifications on our full line of appliances.
■■ Installation information.
■■ Use and maintenance procedures.
■■ Repair parts sales.
■■ Specialized customer assistance (Spanish speaking, hearing impaired, limited vision, etc.).
■■ Referrals to local dealers, repair parts distributors and service companies. Our consultants...
Installation Instructions - Page 3
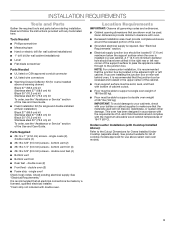
... Black 30" (76.2 cm) kit Stainless steel 30" (76.2 cm) kit To order, see the "Assistance or Service" section of the Use and Care Guide.
■■ Flush Installation Kit (for ovens installed above select wall-oven models.
3 double oven (2)
■■ Foam strip - See "Electrical Requirements." If you are shown must be solid, level...
Installation Instructions - Page 6
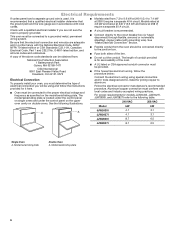
... is properly grounded.
For power requirements for joining copper to a grounded metal, permanent wiring system. Models rated at 4.8 kW and below at 240 V (3.6 kW and below :
Connect the aluminum wiring using and follow the instructions provided for serviceability of the line.
■■ Do not cut the conduit. See "Make Electrical Connection" section...
Installation Instructions - Page 16
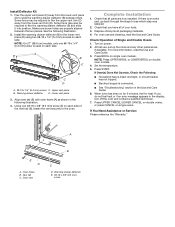
.... Install Deflector Kit 1. Lower vent piece
3. If there is used on double oven models. 4. Oven vent
B
C
D. Warming drawer deflector D. Set the temperature. 5.
Turn on each side. Press START. A
E D
A. Using one #8-18 x 1/4" (6.4 mm) screw is an extra part, go back through the steps to slide the warming drawer deflector (B) between the two pieces.
Warming...
Jenn-Air JJW2827IM Reviews
We have not received any reviews for Jenn-Air yet.